background image

Operation instruction MagicBox


Seite 

3

  von  21


Introduction 

Thank  you  for  choosing  the  "MagicBox"  electrochemical  high-current 
brush weld cleaner made by REUTER GmbH & Co. KG. 
The purpose of this manual is to provide you with information concerning 
the safe handling and operation of the " MagicBox 

“ as well as general 

information on cleaning and marking. 
The  user  is  given  information  concerning  basic  concepts  and 
applications,  as  well  as  practical  advice  and  help  in  the  selection  of 
settings, so that operating errors can be avoided. 
Your  specialist  dealer  will  be  happy  to  support  and  advise  you  with 
regard to commissioning, applications or problems. 
Our telephone hotline is always available with expert advice on +49 (0) 
171-5450200. 
Please  read  through  these  operating  instructions  carefully  before 
commissioning.   
We  hope  you  enjoy  working  with  our  appliances  and  wish  you  every 
success. 


Safety Notice 

These operating instructions do not replace the detailed instructions for 
the cleaning devices and only serve as a supplement.. 
 
Please refer to all safety instructions in the operating instructions of the 
devices, e.g .: 

  SuperCleanox 

  Cleanox 

  EasyCleanox 

  AkkuCleanox 


Summary of Contents for MagicBox EP-01-160

Page 1: ...n MagicBox Seite 1 von 21 Operation instruction MagicBox EP 01 160 Automatic electrolyte supply 2022 01 25 Rev 4 REUTER GmbH Co KG Schimmelbuschstr 9e 40699 Erkrath Tel 49 0 211 73080430 mail reuter works www reuter works ...

Page 2: ... 7 5 Connect machine accessories 7 5 1 Cleaning machine 7 5 2 AutoFeed 7 5 3 Electrolyte canister 8 5 4 Autofeed hose package 9 5 4 1 Change brush 10 5 4 2 Adjusting the Teflon sleeve 11 5 4 3 Connection of earth clamp workpiece 11 5 4 4 Tip for setting up 11 6 Working with the AutoFeed Brush 12 7 Service Work 13 7 1 Replace the electrolyte canister 13 7 2 Fill the electrolyte canistern 14 7 3 Mea...

Page 3: ...of settings so that operating errors can be avoided Your specialist dealer will be happy to support and advise you with regard to commissioning applications or problems Our telephone hotline is always available with expert advice on 49 0 171 5450200 Please read through these operating instructions carefully before commissioning We hope you enjoy working with our appliances and wish you every succe...

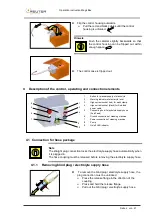
Page 4: ...e lead seal with metal shears Remove the lead seal carefully Remove the cable ties on the right and left of the lid latches Unlock the lid latches To do this slide the lid latches to the left or the right Open the transport box Check the delivery against the delivery note for completeness Report missing damaged or undelivered goods immediately Safety information Cut the lead seal with the metal sh...

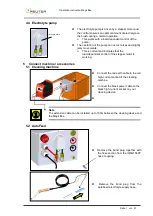
Page 5: ...oupling must be released before removing the electrolyte supply hose 4 1 1 Removing blind plug electrolyte supply hose To remove the blind plug electrolyte supply hose the plug connection must be unlocked Press the release flange in the direction of the coupling Press and hold the release flange Pull out the blind plug electrolyte supply hose 6 1 7 2 4 3 8 5 9 1 Button for manual supply of electro...

Page 6: ... is attached to the base plate When the level is low the level indicator turns on with a warning tone Note Replace the empty canister with a full one and pour the rest into the new one 4 3 Manuel supply of electrolyte Hold down the push button The pump runs and supplies electrolyte Release the push button The pump stops supplying electrolyte Note This function is only required to empty or fill the...

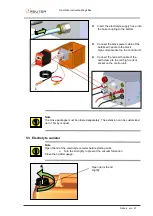
Page 7: ...es that the load dependent control of the stepper motor is working 5 Connect machine accessories 5 1 Cleaning machine Connect the red earth cable to the red high current socket of the cleaning machine Connect the black power cable to the black high current socket on your cleaning device Note The extension cable can be installed up to 100m between the cleaning device and the MagicBox 5 2 AutoFeed R...

Page 8: ... control unit Connect the red earth cable of the earth clamp to the red high current socket on the control unit Note The Hose packages must be ordered separately The extension can be customized up to 10m by request 5 3 Electrolyte canister Note Open the lid of the electrolyte canister before starting work Turn the lid slighty to prevent the vacuum formation Close the lid after usage Open turn the ...

Page 9: ...handle in orange 3 Performance AutoFeed carbon fiber brush XL or XXL EP 02 960 or EP 02 961 Teflon sleeve XL or XXL EP 02 928 or EP 02 948 Hose and cable package 4 5 6 7 2 5m 10mm2 highly flexible cable with Teflon supply hose and siliconized glass fiber hose 4 Hinweis In the delivery the adapter brush and Teflon sleeve are already firmly attached 4 7 8 6 5 3 1 Carbon fiber brush 2 Teflon sleeve 3...

Page 10: ...Teflon sleeve over the new brush again Tip moisten the brush with electrolyte Note Make sure that the Teflon sleeve is not screwed onto the thread at an angle Screw the Teflon sleeve onto the adapter until the working dimension a 10 15mm is reached Please refer to chapter 4 4 2 Note When replacing the brush check the O rings of the adapter and inner part for damage Only remove the adapter if the f...

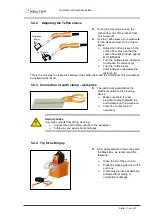
Page 11: ...on fiber and the workpiece This guarantees an optimal work result 5 4 3 Connection of earth clamp workpiece The earth clamp establishes the electrical contact to the cleaning device Make sure there is good electrical contact between the earth clamp and the workpiece Clean the contact point if necessary Security notice Very high currents flow during cleaning Connect the earth clamp directly to the ...

Page 12: ...ugh the electrolyte pump The electrolyte begins to flow automatically as soon as the carbon fiber tips touch the material surface As soon as you lift the brush off the workpiece the electrolyte supply stops automatically without any more electrolyte flowing out of the supply hose The control unit automatically regulates the correct amount of electrolyte The harder higher current you press the brus...

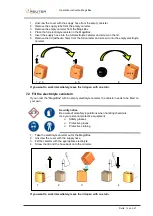
Page 13: ...through the orange string Safety Notice Since it is possible to work without interruption 100 ED there is a risk of overheating the material and burning the operator in case of skin contact Therefore rinse cool regularly with plenty of water If possible use distilled or deionized water 7 Service Work 7 1 Replace the electrolyte canister Security notice The MagicBox is normally delivered with an em...

Page 14: ... work immediately leave the lid open with one turn 7 2 Fill the electrolyte canistern If you order the MagicBox with an empty electrolyte canister the canister needs to be filled on your own Security notice Be aware of all safety regulations when handling chemicals Use your personal protective equipment Safety glasses Protective gloves Protective clothing 1 Take the electrolyte canister out of the...

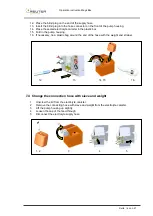
Page 15: ...te canister with the lid without a hole 4 Lift the electrolyte canister out of the MagicBox 5 Place a suitable container with water in the MagicBox 6 Place the hose with the weight and sieve in the water 7 Press the button on the control unit until at least 200 ml of water flushed through the hose package and brush 8 Remove the supply hose of the AutoFeed hose package from the pump housing 9 Clean...

Page 16: ...ox 15 Fold in the pump housing 16 If necessary tie a plastic bag around the end of the hose with the weight and strainer 7 4 Change the connection hose with sieve and weight 1 Unscrew the lid from the electrolyte canister 2 Remove the connecting hose with sieve and weight from the electrolyte canister 3 Lift the pump housing up slightly 4 Loosen the cap of the feed through 5 Disconnect the electro...

Page 17: ...art PTFE Sleeve O Ring 4 1 EP B 02 954 AutoFeed Handle Part A 5 1 EP B 02 954 AutoFeed Handle Part B 6 1 EP B 02 957 PG Nut M28x2 7 1 EP B 1091 anti kink sleeve AutoFeed Handle 8 1 EP B 1117 Protection Sleeve 17mm or EP B 1118 Protection Sleeve 19mm 9 1 EP 07 144 Cable Black 10mm 10 1 EP 07 106 High Current Plug Black 11 1 EP B 2010 PTFE Sleeve Di12mm Note The O Rings are available as Set EP B 004...

Page 18: ...s with the new 14 EP B 0046 O Ring 8 5x1 15 EP B 0044 O Ring 6x1 O Rings at AutoFeed Adapter Remove and replace the old O Rings with the new 14 EP B 0046 O Ring 8 5x1 16 EP B 0045 O Ring 2x1 Be careful not to cut into the O rings during assembly When assembling make sure that you tighten the AutoFeed adapter again with a SW10 open end wrench ...

Page 19: ...abel red 16mm2 7 1 EP 06 050 Elektrolyte pump AutoFeed housing 8 1 EP 06 050 Elektrolyte pump AutoFeed engine 9 1 EP B 1021 LED Green 10 2 EP B 0043 Angle bulkhead fitting 6x4mm PP 11 1 EP B 0042 Reduction 6mm barb x 4mm hose IQS PP 12 1 EP B 2011 PTFE Pipe 4mm 180mm 13 1 EP B 0048 push button AutoFeed 14 1 EP 07 216 Stainless steel high current socket black 15 1 EP 07 217 Stainless steel high cur...

Page 20: ...p housing lower part Pos Qty Name 1 1 EP B 4100 Pump housing bottom part SW bolt 2 1 EP B 1086 AutoFeed PCB 3 1 EP B 1086 AutoFeed Sensor 4 4 Standoff M3x10 F M 5 4 DIN 127 M3 spring washer 6 4 DIN 934 8 M3 nut 7 1 EP B 1090 Cable bushing ring shaped ø6mm ...

Page 21: ...lishing and Passivation of welds Due to its design and construction the object of the declaration described above meets the relevant basic health and safety requirements of the EC directives listed below in the version we put on the market If the products are changed without our agreement this declaration loses its validity Relevant EU 2014 35 EU Niederspannungsrichtlinie harmonized regulations 20...

Reviews: