background image

INSTALLATION INSTRUCTIONS:

 DOOR MOUNT KIT

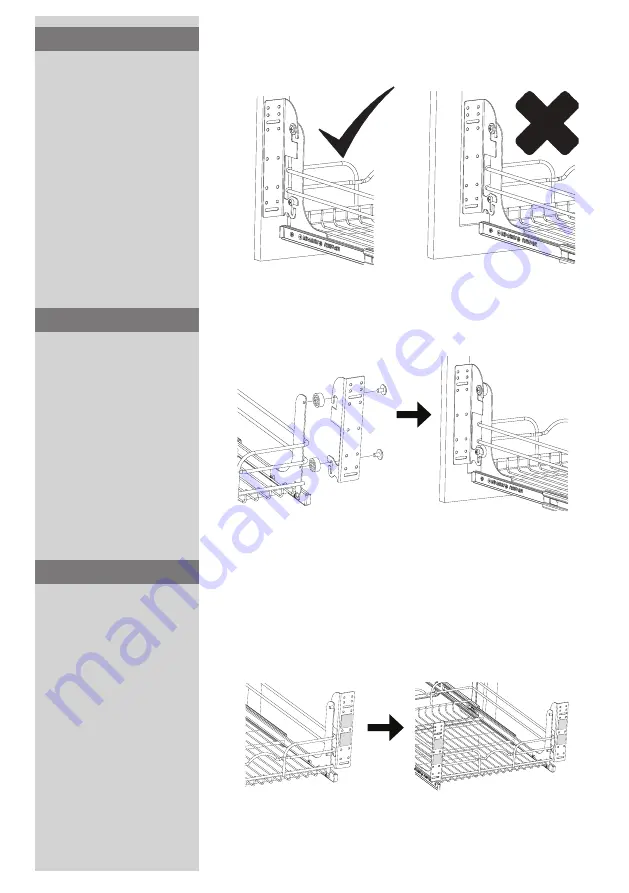
Since  each cabinet door is 

different make sure the door 

brackets line up with the thick 

portion of the cabinet door.  

This will ensure that the screws 

will not run thru and damage 

your door.

(See Figure D)

STEP 3B

FIG. D

FIG. E

Plastic spacers are provided if 

the door brackets need to be 

extended further to reach the 

thick portion of the door. 

(See Figure E)

STEP 3C

Apply double stick tape to the 

door brackets. 

(See Figure F)

STEP 4

FIG. F

Summary of Contents for RV-14PB S

Page 1: ...he door mount kit is de signed to work with almost any RV series waste con tainer Single and Two Tier pull out baskets Two Tier Cookware Organizers and certain Hampers This kit has a patented design to work with virtually all cabinet door designs US Patent No 6 390 576 2 2 No Description QTY A Door Brackets 2 B L Brackets 2 C Screws and Nuts 4 D Wood Screws 6 E Machine Screws 4 F Door Extenders 4 ...

Page 2: ...ee Figure A STEP 1 Using the 4 provided screws and nuts attach the L Brackets to the slide Note Depending on your particular basket design L Brackets will mount on either the inside or outside of wire See Figure B STEP 2 FIG B Attach the door brackets to the outside of the L brackets using the 4 provided screws See Figure C STEP 3A FIG A FIG C Inside wire shown ...

Page 3: ...on of the cabinet door This will ensure that the screws will not run thru and damage your door See Figure D STEP 3B FIG D FIG E Plastic spacers are provided if the door brackets need to be extended further to reach the thick portion of the door See Figure E STEP 3C Apply double stick tape to the door brackets See Figure F STEP 4 FIG F ...

Page 4: ...ted Double stick tape will hold the door in place while you use the provided wood screws to secure the brackets to cabinet door See Figure G STEP 5 Now that cabinet door is attached you will be able to fully adjust the door by loosening and positioning the bolts Once the door is in the correct alignment you can retighten all 4 bolts See Figure H STEP 6 FIG H ...

Page 5: ... tipo de cestas Este kit de puerta tiene una patente diseñada para trabajar con casi prácticamente todos los diseños de puertas de gabinete Le kit de montage pour porte est conçu pour fonctionner avec presque n importe quelle poubelle de la série RV paniers coulissants simples ou doubles range plats à deux niveaux et certains paniers Ce kit pour porte a une conception brevetée pour s adapter à pre...

Page 6: ... soporte tipo L puede ser montado ya sea adentro o afuera del cable Vea la Figura B En utilisant les 4 vis et écrous fournis montez les équerres de support sur votre coulisse Remarque Selon la conception particulière de votre panier l équerre de support va se monter à l intérieur ou à l extérieur du fil métallique Voir Figure B PASO 2 ÉTAPE 2 Sujete los soportes de la puerta a la parte exterior de...

Page 7: ... en plastique sont fournis si les supports de porte doivent être étendus plus loin pour atteindre la partie épaisse de la porte Voir Figure E PASO 3C ÉTAPE 3C Aplique cinta de doble lado a los soportes de la puerta Sujete la puerta del gabinete a los soportes mientras trata de mantener la puerta a nivel No se preocupe si la puerta se mueve un poco esto puede ser ajustado La cinta de doble lado suj...

Page 8: ...l gabinete está sujetada usted podrá ajustar la puerta completamente aflojando y posicionado los pernos Una vez que la puerta esté alineada correctamente usted puede volver a apretar los cuatro pernos Vea la Figura H Maintenant que la porte de l armoire est attachée vous pouvez ajuster la porte complètement en desserrant et en positionnant les boulons Une fois que la porte est bien alignée vous po...

Reviews: