FIRST Global Building Guide Created by REV Robotics 2019, Licensed Under CC BY-SA
33
Pitch
is the distance between the centers of two adjacent
pins
. The REV Robotics building system uses #25
chain.
3.12.3
Custom Length Chain
In almost all applications, chain links are connected to form a loop. While chain can sometimes be purchased in specific
length loops, it is more common to receive chain in bulk lengths and make custom loop lengths to fit the application. It is
recommended to use a specialized tool, called a chain breaker, to cut chain into desired lengths in order to prevent
accidental damage.
Chain breakers do not actually
“break” or
cut the chain, instead they are used to press out the pins holding a link together.
After the pins have been removed the chain can be separated leaving inner links on both ends of the break. Refer to
individual tool instructions for more specific and detailed chain break procedures.
3.12.4
Master Links
Roller chain is typically connected into a continuous loop. This can be done using a special tool to press the pins in and
out of the desired outer link, or if the chain is already the correct length, an accessory called a master link, or quick-release
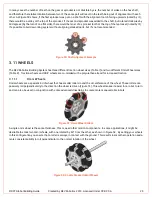
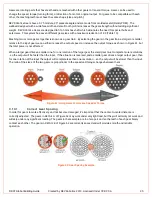
link, (Figure 57) can be used to connect two ends of the chain.
Figure 57: Master Link (Enlarged)
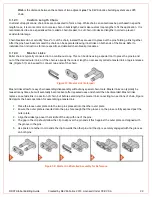
Master links allow for easy chain assembly/disassembly without any special chain tools. Master links can typically be
reused many times, but will eventually become bent after repeated uses and should then be discarded. Master links
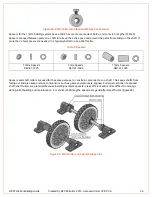
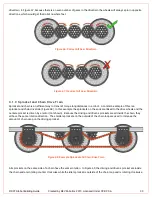
replace an outside link in a section of chain, but before examining the master link connecting two sections of chain, Figure
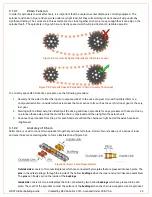
58 depicts the basic operation for assembling a master link.
1.
Place the loose outer plate onto the two pins pressed into the other outer plate.
2.
Ensure the outer plate is inserted onto the pins far enough that the grooves on the pins are fully exposed past the
outer plate.
3.
Align the widest gap near the middle of the clip with one of the pins.
4.
The gap in the clip should allow the clip to slip over the pin and sit flush against the outer plate and aligned with
the groove in the pins.
5.
Use pliers or another tool to slide the clip towards the other pin until the clip is securely engaged with the grooves
on both pins.
Figure 58: Master Link Detailed Assembly for Reference


