background image

25 

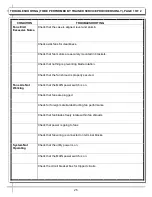
CONDITION 

TROUBLESHOOTING 

Fans Emit        

Excessive Noise 

Check that the case is aligned, level and plumb. 


Check axial fans for cleanliness.  


Check that fan motors are securely mounted in brackets. 


Check that nothing is preventing blade rotation. 


Check that the fan shroud is properly secured. 

Fans Are Not 

Working 

Check that the MAIN power switch is on. 


Check that fans are plugged.  


Check for foreign material obstructing fan performance. 


Check that fan blades freely rotate within fan shrouds 


Check that power is going to fans 


Check that fan wiring is connected on terminal blocks. 

System Not     

Operating 

Check that the utility power is on. 


Check that the MAIN power switch is on.


Check the circuit breaker box for tripped circuits.


TROUBLESHOOTING (TO BE PERFORMED BY TRAINED SERVICE PROVIDERS ONLY), PAGE 1 OF 2 

Summary of Contents for NR3633HSSV

Page 1: ...NELS TOE KICK ATTACHMENT INSTRUCTIONS Reveal READ AND SAVE THESE INSTRUCTIONS Model NR3640HSSV Free Standing Unit With Rear Sliding Doors Shown WITH Front Side Rear Cladding and Toe Kick Attached Model NR4840HSSV Free Standing Unit With Rear Sliding Doors Shown WITHOUT Front Side Rear Cladding And Toe Kick Attached Model NR4840HSSV Free Standing Unit With Solid Back Shown WITH Front Side Rear Clad...

Page 2: ...CONT D ELECTRICAL BOX COMPONENTS CASE DESIGN FIELD SERVICE PARTS LIST CONT D HEATER DECKS BAFFLE AIR DEFLECTOR CASE DESIGN FIELD SERVICE PARTS LIST CONT D SHELVING ASSEMBLY COMPONENTS CASE DESIGN FIELD SERVICE PARTS LIST CONT D LED LIGHT PLUG THERMOMETER CASE DESIGN FIELD SERVICE PARTS LIST CONT D REAR PIKE DOORS PERFORATED PLENUM DOORS CASE STARTUP HEATER SETTINGS LIGHTS SWITCH SHUTTING DOWN CASE...

Page 3: ...35 3 4 W NR3640HSSV 20 3 8 39 5 8 33 D x 35 3 4 W NR3647HSSV 27 7 8 47 1 8 33 D x 35 3 4 W NR3655HSSV 35 1 4 54 5 8 33 D x 35 3 4 W NR4833HSSV 13 5 8 32 7 8 33 D x 47 3 4 W NR4840HSSV 20 3 8 39 5 8 33 D x 47 3 4 W NR4847HSSV 27 7 8 47 1 8 33 D x 47 3 4 W NR4855HSSV 35 1 4 54 5 8 33 D x 47 3 4 W Taller units have a heater rod and additional fans in upper section of merchandiser ...

Page 4: ...or individual adjustment COMPLIANCE This equipment MUST be installed in compliance with all applicable NEC federal state and local electrical and plumbing codes THERMOMETER Thermometers in equipment reflect internal air temperature only not actual food temperature Use probe thermometers to determine actual product temperatures COMPLIANCE Performance issues when in violation of applicable NEC feder...

Page 5: ...HERMOSTATS FOR ACTUAL PRODUCT FOOD TEMPERATURES Thermometers and thermostats reflect air temperatures ONLY For PRECISE food temperatures use calibrated food thermometers ONLY CAUTION GFCI BREAKER USE REQUIREMENT If N E C National Electric Code or your local code requires GFCI Ground Fault Circuit Interrupter protection you MUST use a GFCI breaker in lieu of a GFCI receptacle CAUTION To prevent sag...

Page 6: ... screw removal is required Place front toe kick in secure location while removing case from Skid Front Toe Kick 2 Disconnect Case From Skid Remove screws from shipping brackets Remove and discard shipping brackets from Skid Place J bar pry under base frame Raise case up from Skid to take weight off casters With case raised lower casters all the way down against Skid see next step for detailed inst...

Page 7: ... 4 people may be required for this task Carefully lower to floor using ramp if available Slide Skid from under case as required Maintain support of case at all times or center of gravity may cause case to fall See illustration at right 6 Casters Locking After case is at desired position and height use level to check that case is level and plumb Readjust height as needed as instructed in step 4 Loc...

Page 8: ...ving retainer clips See illustration below Check that glass shelving is in proper position before placing product in case Shelves may be adjusted vertically or entirely removed from merchandiser Metal shelving brackets ARE NOT able to be angled From Factory Transparent 2 Sided Tape Holds Glass To Top Of Rear Shelf Support Rail Shelving Retainer Clip Typ Is To Be Removed After Case Is In Place and ...

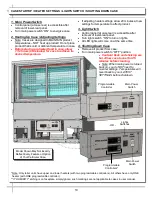
Page 9: ... See enlarged illustration below right 10 Main Power Switch LED Lights Switch Main power switch and LED lights switch is accessible at case rear electrical box Turn on main power switch and LED lights switch See partially disassembled illustration below OR Note Only taller units have upper and lower heaters with two programmable controllers All others have only ONE heater with ONE programmable con...

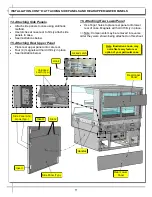
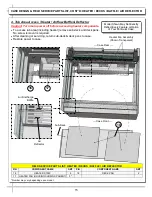
Page 10: ... toe kick to case via lower magnets Slide front panel horizontal support bracket into case s support slot line up arrows Then slide front panel into case until it attaches to case via lower magnets See illustration below 13 Handles On Sides of Case Handles may remain on case after it has been moved into position and cladding is attached However if handles interfere with the placement of cladding t...

Page 11: ...4 magnets will hold it firmly in place See illustration below 16 Attaching Rear Lower Panel Use finger holes to place rear panel onto lower rear of case Magnets will hold it firmly in place Note Components may be removed in reverse order they were shown being attached on this sheet Note Illustration shown may not reflect every feature or option of your particular case Rear Lower Panel Unlocked Lat...

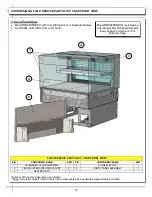
Page 12: ...May Not Exactly Reflect Every Feature or Option of Your Particular Case FIELD SERVICE PARTS LIST CASE FRONT VIEW P N COMPONENT NAME AMT P N COMPONENT NAME AMT 1 UV BONDED GLASS ASSEMBLY 1 4 AIR DEFLECTOR 1 2 FAN IN UPPER AIRFLOW SYSTEM 5 5 FRONT PANEL ASSEMBLY 1 3 HEATER ROD 1 3 2 1 4 5 Number of fans vary depending upon model Note Only taller models have a heater rod accompanied by a separate pro...

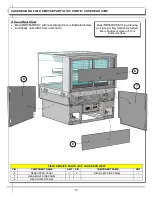
Page 13: ... Solid back units differ from unit shown FIELD SERVICE PARTS LIST CASE REAR VIEW P N COMPONENT NAME AMT P N COMPONENT NAME AMT 6 REAR UPPER PANEL 1 9 REAR LEFT SIDE PANEL 1 7 REAR RIGHT SIDE PANEL 1 8 REAR LOWER PANEL 1 Model NR3640HSSV Free Standing Unit Shown May Not Exactly Reflect Every Feature or Option of Your Particular Case 6 7 9 8 ...

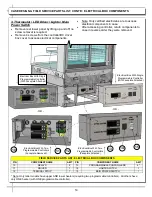
Page 14: ...x With Single Programmable Controller With Faceplate Attached FIELD SERVICE PARTS LIST ELECTRICAL BOX COMPONENTS P N COMPONENT NAME AMT P N COMPONENT NAME AMT 10 RELAYS 2 13 PROGRAMMABLE CONTROLLERS 2 11 DRIVER 1 14 LIGHTS SWITCH 1 12 TERMINAL STRIP 1 15 MAIN POWER SWITCH 1 Electrical Box With Single Programmable Controller With Faceplate Attached Electrical Box With Two Programmable Controllers F...

Page 15: ...case CASE DESIGN FIELD SERVICE PARTS LIST CONT D HEATER DECKS BAFFLE AIR DEFLECTOR Model Shown May Not Exactly Reflect Every Feature or Option of Your Particular Case Number may vary depending upon model Air Discharge Baffle FIELD SERVICE PARTS LIST HEATER DECKS BAFFLE AIR DEFLECTOR P N COMPONENT NAME AMT P N COMPONENT NAME AMT 16 HEATER STRIP 2 18 DECK PAN 2 17 HEATER FAN HOUSING SHOWN X PARENT 3...

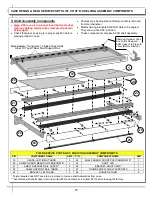
Page 16: ...LVING ASSEMBLY COMPONENTS P N COMPONENT NAME AMT P N COMPONENT NAME AMT 19 GLASS LEFT RIGHT HAND 2 24 SHELF GUARD FRONT POLYCARBONATE 1 20 SHELF GUARD REAR POLYCARBONATE 1 25 LIGHT LED 1 21 SHELF SUPPORT RAIL OUTER 2 26 BRACKET RIGHT HAND 1 22 SHELF SUPPORT RAIL INNER 2 27 THUMB SCREW SHELF SUPPORTS 4 23 BRACKET LEFT HAND 2 28 BUMPER STAND 8 Polycarbonate does NOT need to be removed to remove shel...

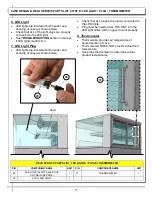
Page 17: ...that ALL of the light plugs are properly connected to the LED light See TROUBLESHOOTING section in manual if LED lights malfunction 7 LED Light Plug LED lights are located at both header and shelving of case as shown below Check that ALL plugs are properly connected to the LED lights Plug must be inserted ALL THE WAY into the LED light orifice with no gap to work properly 8 Thermometer Thermometer...

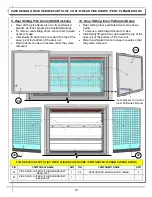
Page 18: ...emoved Inner Bracket To Control Inner Perforated Plenum FIELD SERVICE PARTS LIST REAR SLIDING PIKE DOORS PERFORATED PLENUM SLIDING DOORS P N COMPONENT NAME AMT P N COMPONENT NAME AMT 32 PIKE DOOR OUTER WITH INNER BRACKET REAR LEFT 1 34 PERFORATED SLIDING DOOR INNER 2 33 PIKE DOOR OUTER WITH INNER BRACKET REAR RIGHT 1 10 Rear Sliding Inner Perforated Doors Rear sliding inner perforated doors are sh...

Page 19: ...wer Switch Control panel at case rear is accessible after removal of lower rear panel Turn main power switch ON to energize case 2 Heating Up Case Adjusting Settings Note Cases are designed to MAINTAIN product temperatures NOT heat up product Do not place product that is cold or ambient temperature in case Before placing pre heated food in case allow 1 1 2 hours 90 minutes for case to achieve its ...

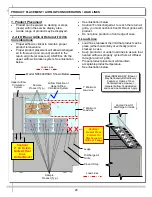
Page 20: ...ea A wide range of product may be displayed 2 Air Diffuser Grille Return Air Grille Considerations Proper airflow is critical to maintain proper product temperature Proper product placement will allow discharged air to flow over and around product to the return air grille at case rear AS WELL AS the upper airflow circulation system See illustration below Angled View Of Discharge Air Grille Load Li...

Page 21: ...h a solution of hand dishwashing liquid detergent and water or a solution of baking soda and water Rinse and polish dry with paper towel or soft cloth Never use scouring powders or steel wool as they will scratch stainless steel Brighten by polishing with a cloth dipped in vinegar or in ammonia sprinkle baking soda on sponge and rub gently rinse Polish dry with paper towel Remove streaks or heat s...

Page 22: ...se to cool for 45 minutes before proceeding Remove sub deck and deck pans Wipe down tub area Return subdeck and deck pans to case Restore power to case WARNING TURN OFF CASE BEFORE PERFORMING PREVENTIVE MAINTENANCE PREVENTIVE MAINTENANCE TO BE PERFORMED BY TRAINED SERVICE PROVIDER ...

Page 23: ...eck air return grilles area at front of decking for obstructions DO NOT set product on air grilles as this will prevent proper airflow See PRODUCT PLACEMENT AIRFLOW CONSIDERATION LOAD LINES section in manual for product placement guidelines Check that the case is not in the sun or directly under HVAC air conditioner ducts See OVERVIEW DISPLAY TYPE I vs II COMPLIANCE WARNINGS PRECAUTIONS section in...

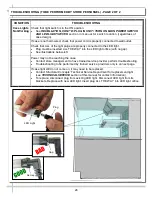
Page 24: ...serted ALL THE WAY into the LED light orifice with no gap See illustrations below left Power may not be reaching the case Contact store management to have trained service provider perform troubleshooting Troubleshooting to be performed by trained service providers only is on next page If case light still do not come on it may need to be replaced Contact Structural Concepts Technical Service Depart...

Page 25: ... Working Check that the MAIN power switch is on Check that fans are plugged Check for foreign material obstructing fan performance Check that fan blades freely rotate within fan shrouds Check that power is going to fans Check that fan wiring is connected on terminal blocks System Not Operating Check that the utility power is on Check that the MAIN power switch is on Check the circuit breaker box f...

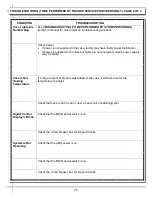
Page 26: ...aulty Case Is Not Holding Temperature If a large amount of product was added to the case it will take time for the temperature to adjust Check that case is not in sun or near a heat or air conditioning vent Digital Control Display Is Blank Check that the MAIN power switch is on Check the circuit breaker box for tripped circuits System Is Not Operating Check that the utility power is on Check that ...

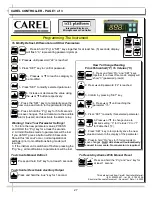
Page 27: ...nstrument is switched off before pressing the Prg key all modifications to parameters will be lost Set aux Prg mute def Prg mute Set Set Set aux Prg mute How To Change Reading From Fahrenheit F To Celsius C 1 Press and hold Prg and SET keys together for at least 5 seconds display will show 0 password prompt 2 Press until password 22 is reached 3 Confirm by pressing SET key 4 Press or until reachin...

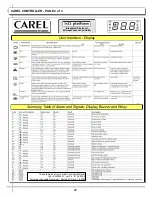
Page 28: ...of Alarm and Signals Display Buzzer and Relay User Interface Display 28 This data derived from Carel Controller Material ir33 030220441 rel 2 0 01 05 2006 Structural Concepts Document Revision C Date 1 4 2022 CAREL CONTROLLER PAGE 2 of 3 Integrated Electronic Microprocessor Controller ...

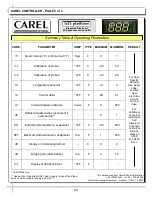
Page 29: ...efrost temperature evaporator C F F 50 200 dP1 Maximum defrost duration evaporator min F 1 250 d6 Display on hold during defrost C 0 2 dd Dripping time after defrost min F 0 15 d 1 Display of defrost probe 1 C F F For Case Specific Defaults See Serial Label Located Near Electrical Access On Your Case For Additional Technical Information Call Structural Concepts Technical Service Dept at 1 800 433 ...

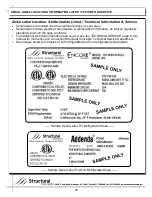
Page 30: ...r case Serial labels contain electrical temperature refrigeration information as well as regulatory standards to which the case conforms For additional technical information and service see the TECHNICAL SERVICE page in this manual for instructions on contacting Structural Concepts Technical Service Department See images below for samples of both refrigerated and non refrigerated serial labels Sam...

Page 31: ...sonable attorney fees and costs Remedies of SCC SCC s rights and remedies shall be cumulative and may be exercised from time to time In a proceeding or action relating to the breach of this Agreement by Purchaser Purchaser shall reimburse SCC for reasonable costs and attorney s fees incurred by SCC No waiver by SCC of any breach of Purchaser shall be effective unless in writing nor operate as a wa...

Reviews: