background image

English

English

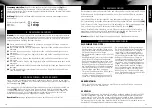
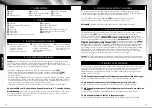
INSTrUCTIoNS For SaFe FlYINg

GENERAL FLyING TIPS:

• Always place the quadrocopter on a level 

surface. An inclined surface can, under 

certain circumstances, have a negative 

impact on the starting behaviour of the 

quadrocopter.

• Always operate the controls slowly and 

with a gentle touch.

• Always maintain visual contact with the 

quadrocopter and do not look at the 

remote control!

• Move the thrust control down again 

somewhat as soon as the quadrocopter lifts 

off from the ground. Maintain flying 

altitude by adjusting the thrust controller.

• If the quadrocopter lowers, move the thrust 

control slightly upward again.

• If the quadrocopter climbs, move the thrust 

controller down slightly.

• To fly along a curve, tapping the 

directional  controller very slightly in the 

respective direction often suffices. There 

is a general tendency during preliminary 

attempts at flight to operate the 

quadrocopter's controls too aggressively. 

Always operate the controls slowly and 

carefully. Never fast and fitfully.

• Beginners should first master trimming 

before attempting to master the thrust 

controller. The quadrocopter does not 

necessarily have to fly straight at the 

beginning - initially, it is more important 

to maintain a constant height of 

approximately  one metre above the 

ground by repeatedly tapping the thrust 

control. Only then should the pilot 

practice steering the quadrocopter left  

and right.

BATTERy STATuS:

• If the battery is empty, the LEDs on the model start to flash. Land immediately in 

order to avoid crashing.

Flying model aircraft and helicopters outdoors has required mandatory liability 

insurance  since 2005. Contact your private liability insurer and make sure that your 

new and earlier models are included in your insurance coverage. Request written 

confirmation  and keep this in a safe place. Alternatively, the DMFV offers a trial 

membership  free of charge online at www.dmfv.aero, which includes insurance.

ATTENTION!

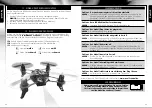
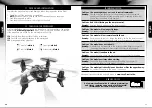
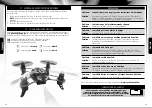
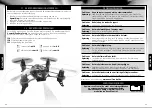
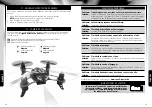
8   FlIghT CoNTrol (MoDe 2)

Note:

 Only minimal corrections of the controls are necessary for a smooth flying 

behaviour  of the quadrocopter! The direction information applies if the quadrocopter is 

viewed from behind. If the quadrocopter is flying towards the pilot, it must be moved  

in the opposite direction.

8A

 Take off or increase altitude by carefully moving the control for thrust and yaw 

forward.

8B

 Land or decrease altitude by moving the control for thrust and yaw backward.

8C

 Fly forward by moving the controller for pitching and rolling carefully forward.

8D

 Fly backward by moving the controller for pitching and rolling carefully backward.

8E

 Fly to the left by moving the controller for pitching and rolling carefully to the left.

8F

 Fly to the right by moving the controller for pitching and rolling carefully to the right.

8G

 Turn the quadrocopter around to the left by moving the controller for thrust and yaw to 

the left.

8H

 Turn the quadrocopter around to the right by moving the controller for thrust and 

yaw to the right.

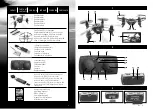
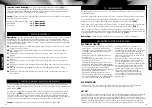
10   CaMera FUNCTIoN

The quadcopter has a camera for photos and videos and a slot for MicroSD cards. 
Disconnect the quadcopter from the battery before inserting or removing a MicroSD card. 
If the MicroSD card is inserted correctly, the quadcopter is connected correctly and a  

connection with the remote control is in place, a blue LED lights up over the card slot 

(10A)

.

Photos: Press the photo button to take a photo. The remote control sounds a short beep 

and the LED above the MicroSD card slot lights up red briefly 

(10B)

.

Videos: Press the video button to record a video. The remote control sounds a long beep 

and the LED above the MicroSD card slot flashes red. Press the video button again to end 

the recording 

(10C)

.

Note:

 No photos can be taken while a video is being recorded.

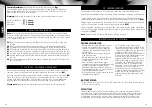
Control adjustment:

 By pressing the control for thrust and yaw 

(2g)

,

the sensitivity of the control can be adjusted in three steps (Minimum (standard),  

Medium and Maximum). The remote control beeps once for Minimum, twice for  

Medium and three times for Maximum.

Warning! 

Only switch to a higher level when you have mastered the lower

Minimum (default)  = 


1 x beep

Medium = 


2 x beeps

Maximum = 


3 x beeps

9   FlY loopS - aDVaNCeD USerS oNlY!

Once you have mastered your quadcopter, you can try your hand at the stunt flying 

function. To do so, briefly press on the right joystick on the remote control 

(9A)

.

Now the next control input forwards/backwards or sideways will turn into a loop 

(9B)

Make sure that you have sufficient room in each direction (at least 10 meters). Also 

comply with the safety height – fly at a height of at least 5 m, as your quadcopter 

loses height when rolling over and has to be caught and corrected afterwards.

Please note:

 Looping is more successful when the battery is still relatively full.

18

19

Summary of Contents for 23949

Page 1: ...opiado Deseche los aparatos eléctricos fuera de uso en el punto limpio destinado para ello en su municipio Deseche las demás piezas en la basura normal Gracias por su colaboración Wetgeving voor inzameling van afgedankte elektrische en elektronische apparatuur Verwijder alle verbruikte batterijen afzonderlijk Lever oude elektrische apparaten in bij uw gemeentelijke inzamelpunt voor afgedankte elek...

Page 2: ...zione Hélices de recambio Anillos de protección Reserve propeller Beschermring Hélice de rechange Anneaux de garde Replacement propeller Protective rings Ersatz Propeller Schutzringe Radiocomando Emisora Zender Télécommande Remote control Fernsteuerung Istruzioni per l uso Manual de instrucciones Gebruiksaanwijzing Mode d emploi Operating manual Bedienungsanleitung www revell control de www revell...

Page 3: ...5 6 10 11 9 12 9A Looping A A B B 7 7A 7B 10B 10C 12C 12B 12A 7C 7D 7E 8F 8G 8H 8C 8D 8 8A 8B 10A 9B 4 6A 6B 2 x 6D 1 x 6C 1 x 5A 8E ...

Page 4: ...r mit zugelassenen Originalteilen repariert oder verändert werden Andernfalls Sobald die Fernsteuerung nicht mehr zuverlässig funktioniert sollten neue Batterien eingelegt bzw die Batterien aufgeladen werden Sicherheitshinweise zum Ladegerät 1 Nicht wiederaufladbare Batterien dürfen nicht geladen werden 2 Dieses Ladegerät ist nicht geeignet für Personen einschliesslich Kindern mit körperlichen ode...

Page 5: ...1 und Mode 2 6 STARTVORBEREITUNG Der Schubregler der linke Regler der Fernsteuerung muss vor dem Einschalten nach unten zeigen 6A Anschließend den ON OFF Schalter der Fernsteuerung auf ON stellen dann blinkt die Power LED 6B Den Quadrocopter auf den Boden setzen so dass das Heck in Ihre Richtung zeigt OHNE den Akku anzuschliessen 6C Verbinden Sie den erst Akku mit dem Anschluss Kabel wenn der Quad...

Page 6: ...nach vorn bewegen 8B Zum Landen oder um tiefer zu fliegen den Regler für Schub und Gieren nach hinten bewegen 8C Um nach vorn zu fliegen den Regler für Nicken und Rollen vorsichtig nach vorn bewegen 8D Um rückwärts zu fliegen den Regler für Nicken und Rollen vorsichtig nach hinten ziehen 8E Um nach links zu fliegen den Regler für Nicken und Rollen vorsichtig nach links bewegen 8F Um nach rechts zu...

Page 7: ...Kabinenhaube die Motoren und die Propeller auf Beschädigungen Problem Das Modell überschlägt sich beim Starten Abhilfe Richtige Montage der Propeller prüfen siehe Kapitel 12 Kalibrieren Sie den Gyro im Modell neu Kapitel 6 Problem Das Modell zieht stark in eine Richtung bzw fliegt davon Abhilfe Kalibrieren Sie den Gyro im Modell neu Kapitel 6 Weitere Tipps und Tricks finden Sie im Internet unter w...

Page 8: ...tions and defects The product may only be repaired or modified with approved original parts Otherwise the model can be be damaged or pose a danger Maintenance and care Please only use a clean damp cloth to wipe off the model Protect the model and batteries from direct sunlight and or direct heat Never allow the model the remote control and charging unit to come into contact with water This may res...

Page 9: ... charging process 3 Inserting batteries remote control 3B Insert 2 x 1 5 V AAA batteries and pay attention to the polarity as shown in the battery compartment 3A To open the battery compartment unscrew the locking screw counter clockwise and open the flap 3C Replace the cover and screw in the securing screw clockwise 1A Rotors 1B Cap 1C Landing skid 1D Lens 1E Gears and outdrives 1F Protective rin...

Page 10: ...de by carefully moving the control for thrust and yaw forward 8B Land or decrease altitude by moving the control for thrust and yaw backward 8C Fly forward by moving the controller for pitching and rolling carefully forward 8D Fly backward by moving the controller for pitching and rolling carefully backward 8E Fly to the left by moving the controller for pitching and rolling carefully to the left ...

Page 11: ...d the model off and on again see 5 Preparing for take off Ensure that the battery is fully charged Problem Red LED is flashing on the remote control Remedy Replace the AAA batteries in the remote control Problem The model will no longer fly loops Remedy The battery charge level is too low Problem The model will not remain level in the air Remedy Battery power is too low charge the battery Switch t...

Page 12: ...e sécurité pour le chargeur 1 Ne pas recharger les piles jetables 2 Ce chargeur ne doit pas être utilisé par des personnes enfants y compris souffrant d un handicap physique ou mental ou n ayant pas assez de connaissances ou d expérience en ce qui concerne l utilisation de chargeurs sauf en cas de surveillance ou après explication compétente de la part d une personne investie de l autorité parenta...

Page 13: ...3B Insérer 2 piles de 1 5 V AAA en faisant attention aux indications de polarité à l intérieur du compartiment 3A Pour ouvrir le comparti ment à piles dévisser la vis de sécurité dans le sens antihoraire et ouvrir le capot 3C Replacer le couvercle et revisser la vis de sûreté dans le sens horaire 1A Rotors 1B Capot 1C Train d atterrissage 1D Objectif 1E Engrenage et arbre de transmission 1F Anneau...

Page 14: ...er vers l avant pousser avec précaution le régulateur de tangage et de roulis vers l avant 8D Pour voler vers l arrière diriger légèrement le régulateur de tangage et de roulis vers l arrière 8E Pour voler en translation latérale vers la gauche pousser avec précaution le régulateur de tangage et de roulis vers la gauche 8F Pour déplacer l hélicoptère en translation latérale vers la droite pousser ...

Page 15: ...ptère ne réagit pas aux instructions de commande Solution Recharger ou remplacer la batterie du quadricoptère Éteindre puis rallumer la radiocommande et le modèle voir le point 5 démarrage S assurer que la batterie est complètement rechargée Problème La diode rouge de la radiocommande clignote Solution Remplacer les piles AAA de la radiocommande Problème Le modèle n effectue plus de loopings Solut...

Page 16: ...d om kortsluiting te voorkomen Onderhoud en verzorging Neem het model alleen af met een schone vochtige doek Voorkom blootstelling van het model en de accu aan direct zonlicht en of inwerking van intense warmte Laat het model de zender en de lader niet in aanraking komen met water hierdoor kan de elektronica beschadigd raken Transformatoren adapters of laders die met het model worden gebruikt moet...

Page 17: ... 3 Batterijen plaatsen zender 3B Plaats 2 AAA batterijen van 1 5 V Let op de juiste richting van de polen zoals aangegeven in het batterijvak 3A Draai de borgschroef tegen de klok in los en trek de klep naar beneden om het batterijvak te openen 3C Plaats de afdekking weer terug en draai de schroef met de klok mee vast 1A Rotors 1B Kap 1C Landingspoot 1D Objectief 1E Aandrijving en aandrijfas 1F Be...

Page 18: ... voorzichtig naar voren om op te stijgen of hoger te gaan vliegen 8B Beweeg de regelaar voor liftkracht gieren naar achteren om te landen of lager te gaan vliegen 8C Beweeg de regelaar voor stampen rollen voorzichtig naar voren om vooruit te vliegen 8D Trek de regelaar voor stampen rollen voorzichtig naar achteren om achteruit te vliegen 8E Beweeg de regelaar voor stampen rollen voorzichtig naar l...

Page 19: ...opstijgen Probleem Het model stijgt niet op Oplossing De rotoren zijn niet op de juiste plekken gemonteerd Neem hoofdstuk 12 De rotoren vervangen in acht Zorg ervoor dat de accu goed is opgeladen Probleem Het model tuimelt in de lucht Oplossing Controleer de cabineafdekking de motoren en de rotoren op beschadigingen Probleem Het model slaat over de kop bij het opstijgen Oplossing Controleer of de ...

Page 20: ...o recargables pilas no se deben recargar 2 Este cargador no es adecuado para personas niños incluidos con limitaciones físicas o mentales o cuyos conocimientos o experiencia en el manejo de cargadores sea insuficiente salvo que estén super visados o hayan recibido las instruc ciones pertinentes por parte de un adulto responsable 3 Los niños no deben utilizar en ningún caso el cargador sin supervis...

Page 21: ...ido contrario 7C Si el quadrocóptero se mueve por sí mismo hacia delante o atrás de forma rápida o lenta pulse el trimado de cabeceo de forma gradual en sentido contrario 7D Si el quadrocótero se eleva demasiado lento o demasiado rápido pulse el trimado de gas de forma gradual en sentido contrario 7 TRIMADO DEL CONTROL 1A Rotores 1B Cúpula 1C Pata de aterrizaje 1D Objetivo 1E Engranaje y eje de tr...

Page 22: ...lante 8D Empuje la palanca de cabeceo y alabeo con cuidado hacia atrás para volar hacia atrás 8E Empuje la palanca de cabeceo y alabeo con cuidado hacia la izquierda para volar hacia la izquierda 8F Empuje la palanca de cabeceo y alabeo con cuidado hacia la derecha para volar hacia la derecha 8G Para rotar el quadrocóptero hacia la izquierda mueva la palanca de gas y guiñada hacia la izquierda 8H ...

Page 23: ...roblema El quadrocóptero no reacciona ante las órdenes de la emisora Solución Cargue o sustituya la batería del quadrocóptero Apague la emisora y el modelo y vuelva a encenderlos véase 5 Preparación para el despegue Asegúrese de que la batería se encuentra completamente cargada Problema En la emisora parpadea una luz LED roja Solución Cambie las pilas del tipo AAA de la emisora Problema El modelo ...

Page 24: ...tte di funzionare inserire nuove batterie e o ricaricarle Avvertenze di sicurezza sul caricabatterie 1 Non ricaricare batterie monouso 2 Questo caricabatterie non è adatto a persone incluso bambini con ridotte capacità motorie o mentali oppure con scarsa conoscenza ed esperienza con i caricabatterie salvo non sorvegliati o guidati da un adulto esperto 3 I bambini devono essere controllati il caric...

Page 25: ...e prestare attenzione alle indicazioni di polarità come indicato nel vano batterie 3A Per aprire il vano batterie svitare la vite di fissaggio in senso antiorario e aprire lo sportellino 3C Riposizionare il coperchio e riserrare la vite di fissaggio in senso orario 1A Rotori 1B Calotta 1C Piede di atterraggio 1D Obiettivo 1E Cambio e albero motore 1F Anelli di protezione 1G Slot microscheda SD 1H ...

Page 26: ...ollio con cautela a destra 8G Per virare il quadricottero a sinistra spostare verso sinistra il regolatore di accelerazione e imbardata 8H Per virare il quadricottero a destra spostare con attenzione verso destra il regolatore di accelerazione e imbardata Attenzione Per modelli di aerei ed elicotteri per volo in esterni dal 2005 è obbligatoria l assicurazione Informatevi presso il vostro assicurat...

Page 27: ... completamente carica Problema Il modellino barcolla in volo Soluzione Controllare se la calotta della cabina i motori e le eliche sono danneggiati Problema Il modellino si capovolge durante l avvio Soluzione Controllare il corretto montaggio delle eliche vedere il capitolo 12 Ricalibrare il giroscopio nel modellino capitolo 6 Problema Il modellino tende o vola fortemente in una direzione Soluzion...

Page 28: ...54 55 Notes Notes ...
Reviews: