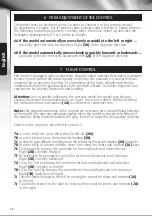
7 FLIGHT CONTROL
The model is equipped with an automatic altitude control assistant that makes it possible
to learn how to control the model quickly and easily. The assistant is a sensor that can
measure the air pressure to within 10 centimetres of the exact altitude and thereby
automatically keep the quadrocopter at the specified altitude. Therefore, beginners can
concentrate on forward/backwards and banking.
Attention:
Due to outside influences, the pressure inside the model may change,
causing the model to automatically rise or lower. This is not a defect. Briefly actuating
the control for thrust and rotation
(2A)
is sufficient to counteract this.
Note:
Only minimal corrections of the controls are necessary for a smooth flying behavior
of the model! The direction indication applies when the model is viewed from behind. If
the model is flying forwards towards the pilot, it must be moved in the opposite direction.
Switch on the model as described in section 5.
7A
In order to lift off, press the button for lift-off
(2M)
.
7B
In order to land, press the button for landing
(2N)
.
7C
In order to gain altitude, carefully move the control for thrust and rotation
(2A)
forwards.
7D
In order to fly at a lower altitude, move the control for thrust and rotation
(2A)
back.
7E
Fly forward by moving the controller for forward/backward and sideways
flight
(2B)
carefully forward.
7F
Fly backward by moving the controller for forward/backward and sideways
flight
(2B)
carefully backward.
7G
Fly to the left by moving the controller for forward/backward and sideways
flight
(2B)
carefully to the left.
7H
Fly to the right by moving the controller for forward/backward and sideways
flight
(2B)
carefully to the right.
7I
Turn the model around to the left by moving the control for thrust and rotation
(2A)
to the left.
7J
Turn model around to the right by moving the control for thrust and rotation
(2A)
to the right.
English
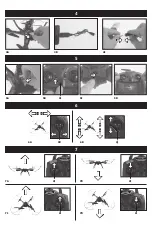
The model must be switched on first in order to connect it to the remote control.
Its adjustment is simple, but it requires some patience and a feel for it. Please observe
the following instructions precisely: Carefully move the thrust control up and raise the
helicopter approximately 0.5 to 1 metre in altitude.
6 TRIM ADJUSTMENT OF THE CONTROL
6A If the model automatically moves slowly or quickly to the left or right ...
gradually press the trim for sideways flight
(2K)
in the opposite direction.
6B If the model automatically moves slowly or quickly forwards or backwards ...
gradually press the forwards/backwards trim
(2J)
in the opposite direction.
18

