background image

Operation and Maintenance Manual – Steam sterilizers mod. Full Clave 

Rev. 01 of  01-12-2006 - C:\Documenti\Manuali di istruzione\FULL CLAVE GB-R01.doc 


Page 15 of 34


6.3  After work


After the operations have terminated, move the green main switch (17) to position 0 and open the door. 


Pay particular attention to the temperature of the various components 
when the machine is switched off. 
Wait a few minutes to allow them to cool.


7 . H O W


T O


A R R A N G E


T H E


I N S T R U M E N T S


F O R


T H E


S T E R I L I Z I N G


P R O C E S S  


Before being sterilized, the instruments must be cleaned to remove blood residues, incrustations, 
foreign bodies, etc. These impurities can damage the items being sterilized, the autoclave components 
and prevent the sterilizing process from being correctly carried out. 


These instruments must be made of NON-ferrous material since they could damage the other 
instruments or the autoclave itself. 


To achieve perfect sterilizing, it is therefore important to proceed in the following way: 


1.  Rinse and brush the instruments under running water immediately after use to remove all deposits. 
2.  Place the instruments in the ultrasound machine with distilled water and detergent solution if 

possible. 

3.  Thoroughly rinse the instruments in demineralised water to prevent scaling stains. 
4.  Dry the instruments to eliminate all water residues which could lead to oxidation. 
5.  Wash, rinse and dry the supplied trays and make sure that they are perfectly clean. 
6.  To ensure that packaged instruments are perfectly dried, we recommend use of support art. M9050 

supplied as an optional. 

7.  If loose instruments must be sterilized, it is advisable to cover the trays with a paper or fabric 

napkin to prevent direct contact with the tray surface: do not place the instruments straight on to the 
trays. 

8.  Scissors and forceps should be slightly opened. Mirrors and containers should be placed upside 

down for the sterilizing process. 

9.  It is advisable to keep the instruments separated from each other to achieve a better sterilizing 

action. Overloading will impair the sterilizing process. 

10. If packaged instruments must be sterilized on the trays, place the packets with their transparent side 

downwards and do not overlap. The packets should not be too large. Drying will be difficult if their 
edges overlap. 

11. The machine can operate with a maximum 3 Kg load. 
 

Sterilizing handpieces: 


Carefully read the handpiece operation manual with particular attention to the part about sterilizing. 


Wrap the handpiece in the special sterilizing cloth. 


Place the wrapped handpiece on a NON-perforated tray to prevent spilt lubricating oil from 
polluting the pipes of the autoclave. 


Proceed with a short cycle 121°C sterilizing program. 


Remember to immediately remove the handpiece from the autoclave at the end of the sterilizing 
process. 

 
For a valid sterilizing process, it is obligatory to add a chemical indicator for each cycle. 


Summary of Contents for Full Clave B 16

Page 1: ...MEDICAL APPLIANCE DIVISION COMPANY WITH CERTIFIED QUALITY SYSTEM UNI EN ISO 9001 EN 13485 Cod 3788 Operation and maintenance manual STEAM STERILIZERS MODELS GB...

Page 2: ...Keep the manual in a suitable place so that it remains in a perfect condition Following improvements or variations to the appliances the contents of this manual may be liable to modification without p...

Page 3: ...of work 15 7 How to arrange the instruments for the sterilizing process 15 7 1 Sterilizing chart 16 7 2 Notes and warnings 16 7 3 Monthly inspection proposal 17 7 4 Use of the printer 18 8 Messages d...

Page 4: ...e will automatically stop and the situation be indicated by an error message on the display if the operator fails to carry out the loading operations correctly or if a fault occurs WARNING IDENTIFIES...

Page 5: ...e i e FULL CLAVE activates an anti condensation function after each cycle if the door is not opened within 30 min Built in DRYING CYCLE by means of a vacuum pump AUTOMATIC AIR EXHAUST to eliminate the...

Page 6: ...delayed action type T 100 mA see enclosed wiring diagram Only have these fuses changed by a skilled electrician The noise level of the machine has been tested The continuous equivalent weighted acoust...

Page 7: ...the machine to prevent accidental contact with hot parts Never ever operate the appliance unless the power cable is in a perfect condition and the structure undamaged It is advisable to keep the door...

Page 8: ...are required to operate the machines Just fit the plug into a 230 V power socket The control panel is elegantly designed easy to read and consists of see page 9 1 INFO DISPLAY 2 VALUE DECREASE 3 VALUE...

Page 9: ...and 4 depressed for about 10 seconds at the same time in order to edit these data The first setting displayed is the language selection This can be changed by scrolling the various options with button...

Page 10: ...in a vertical direction using the 2 hooks supplied in the bag inside the pack These should be inserted into the two holes at the sides of the casing see drawing on page 11 Remove the pluriball wrappin...

Page 11: ...ET TO CONNECT TO THE WATERWORKS 2 CARTER SECURITY VALVE CHAMBER 3 THERMOSTAT MANUAL REARMAMENT CHAMBER RESISTANCE 4 THERMOSTAT MANUAL REARMAMENT GENERATOR RESISTANCE 5 THERMOSTAT AUTOMATIC REARMAMENT...

Page 12: ...perfectly parallel to the ground Comply with the following instructions to simply and efficiently check that the machine has been positioned correctly Open the door of the machine using the handle 12...

Page 13: ...from 1 to 8 and confirm with 10 Program number 10 is the Bowie Dick Test while program number 11 is the Vacuum Test If a customized special cycle is required select number 9 confirm by pressing 10 and...

Page 14: ...t the free end of the supplied drain pipe to the sewer main and insert the white connector on the other end of the pipe into the drain tank tap Make sure that the blue button on the tap SC2 trips Once...

Page 15: ...could lead to oxidation 5 Wash rinse and dry the supplied trays and make sure that they are perfectly clean 6 To ensure that packaged instruments are perfectly dried we recommend use of support art M9...

Page 16: ...red in special cabinets fitted with ultraviolet lamps and designed for this specific use 3 If the articles are to be stored for a longer period it is advisable to use our covered trays code 1474 2682...

Page 17: ...ilizer data Brand Model Year of purchase Observations Periodical internal inspection Date Cycle length on display Cycle temperature Cycle temperature 07 11 2000 20 134 VAPOR LINE The utilized indicato...

Page 18: ...er After this the real pressure and temperature values will be printed at intervals of 1 minute End end of the cycle Date Time Total length of the cycle The led marked with the word ERROR will come on...

Page 19: ...d Cod 09 STOP MANUAL FATALE Cycle stopped from the operator CODE 10 INSUFFICIENT VACUUM FATAL The preset vacuum value has not been reached in the chamber within the preset time CODE 11 INSUFFICIENT FR...

Page 20: ...oo many fabrics Reduce the load of fabrics OVERTEMPERATURE ALARM HEATING ALARM Defective transducer Open the door and check whether the atmospheric pressure appears on the display 1 bar Replace the tr...

Page 21: ...other Use sealer mod LUX SEAL code M9025 3 Trays with less than 400 holes have been used Use trays with at least 400 holes or the gauze type Chamber safety thermostat activated Reset the thermostat i...

Page 22: ...o that they all rest on the surface TOO MUCH NOISE WHEN MACHINE OPERATES The surface on which the machine stands is made of metal or is not too solid and gives rise to vibrations Choose a suitable sur...

Page 23: ...mperature of 8 C Use a damp cloth to clean the casing of the machine Never ever use inflammable liquids for any reason whatsoever The bacteriological filter must be changed at least once a year New on...

Page 24: ...carried out when the machine is cold Completely remove the drain tank 14 from the machine unscrew its plug and wash it thoroughly under running water Retighten the plug and carefully fit the tank back...

Page 25: ...ture and pressure parameters of the machine comply with the standards required for a correct sterilizing process These tests must be conducted by personnel authorized by the manufacturer using calibra...

Page 26: ...mpressed air 5 Check the condition of the door seal change it if it is cut or torn 6 Make sure that the micro and micro pressing system allows the door to close correctly Lubricate with a silicone spr...

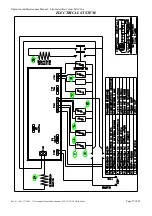
Page 27: ...Operation and Maintenance Manual Steam sterilizers mod Full Clave Rev 01 of 01 12 2006 C Documenti Manuali di istruzione FULL CLAVE GB R01 doc Page 27 of 34 ELECTRICAL SYSTEM...

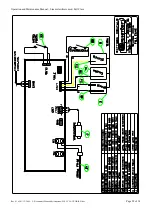
Page 28: ...Operation and Maintenance Manual Steam sterilizers mod Full Clave Rev 01 of 01 12 2006 C Documenti Manuali di istruzione FULL CLAVE GB R01 doc Page 28 of 34...

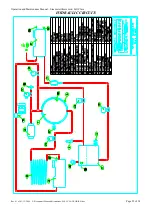
Page 29: ...Operation and Maintenance Manual Steam sterilizers mod Full Clave Rev 01 of 01 12 2006 C Documenti Manuali di istruzione FULL CLAVE GB R01 doc Page 29 of 34 HYDRAULIC CIRCUIT...

Page 30: ...039 0522 875579 and send us free of charges In case of non accepted repair estimate will be invoiced 50 00 2 The warranty will become void if the machine is sent back without prior authorization 3 If...

Page 31: ...that the appliance is correctly installed in compliance with sect 5 2 of the instruction manual The installer also declares that he has duly trained the user to operate the machine with the help of t...

Page 32: ...l and call costs excluded Replaced parts shall be returned free port The ordering party shall be charged for any part that is not returned All appliances returned for repairs shall only be sent to us...

Page 33: ...Via Don Luigi Sturzo 6 42021 BARCO Reggio Emilia ITALY THIS PART OF THE CERTIFICATE MUST BE SENT BACK BY REGISTERED LETTER WITHIN 8 DAYS FROM THE DATE OF PURCHASE WARRANTY CERTIFICATE TO BE RETURNED...

Page 34: ...FULL CLAVE S 16 D lgs 46 97 DDM 93 42 CEE La Reverberi s r l dichiara sotto la propria responsabilit che i prodotti elencati sono conformi alle norme La maison Reverberi s r l d clare sous sa respons...

Reviews: