Operation and Maintenance Manual – Steam sterilizers mod. Full Clave
Rev. 01 of 01-12-2006 - C:\Documenti\Manuali di istruzione\FULL CLAVE GB-R01.doc
Page 18 of 34
7.4 Use of the printer
The printer (15) is built into the control panel of the autoclave.
The printer is automatically powered when the main switch of the
autoclave (17) is turned on and the green led marked with the word
“POWER” lights up.
The printer is ready for printing and will activate whenever a sterilizing
cycle is carried out.
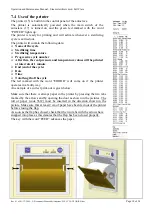
The printer will contain the following data:
Name of the cycle
Sterilizing time
Sterilizing temperature
Progressive cycle number
After this, the real pressure and temperature values will be printed
at intervals of 1 minute
End (end of the cycle)
Date
Time
Total length of the cycle
The led marked with the word “ERROR” will come on if the printer
operates in a faulty way.
An example of a correct print-out is given below.
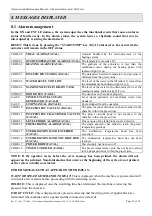
Make sure that there is always paper in the printer by pressing the two tabs
marked by the arrows and by opening the door as shown in the pictures. The
roll of paper (code 3667) must be inserted in the direction shown in the
picture. Make sure that at least 2 cm of paper have been fed out of the printer
before closing the flap.
As soon as the flap has closed, check that the two tabs with the arrows have
snapped into place as this denotes that the flap has been closed properly.
The key with the word “FEED” advances the paper.


