


English
11
Music Player Mode
Apple Mac Set-Up
Set-Up for OSX 10.2.1 --> 10.4.9
Setup Windows File Sharing on
the MAC:
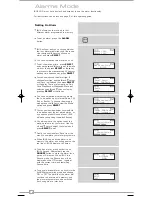
From the ‘Dock’, click ‘System Preferences’.
From the ‘System Preferences’ window
(under the ‘Internet & Network’ section)
click ‘Sharing’.
From the ‘Sharing’ window, do the following:
Under the ‘Services’ section, enable
‘Personal File Sharing’ and ‘Windows
Sharing’. Also, click ‘Start’ for each of these
services. Under Windows file sharing you
will also need to 'enable' the account you
wish to share from (This needs your
administrator password).
Under the ‘Firewall’ section, keep firewall off.
Under the ‘Internet’ section, keep ‘Internet
Sharing’ off.
Setup an Account:
From the ‘System Preferences’ window,
under the ‘System’ section, click ‘Accounts’.
Select an account and remember its ‘Short
Name’ and password. This information will
be used by iBLIK Wi-Fi when connecting to
your Mac.
Directory Setup:
From the ‘Dock’, click ‘Finder’. From the
‘Finder’ window, click ‘Applications >
Utilities’. Holding Ctrl click on ‘Directory
Access’ then select ‘Get Info’ and ensure
that read / write enabled. Next double click
on ‘Directory Access’ and enable the
following:
AppleTalk
LDAPv3
SLP
SMB/CIFS
Also, for the ‘SMB/CIFS’ item, click
‘Configure’ and select an appropriate
workgroup.
To allow your iBLIK Wi-Fi you need to add
your login details, by following the path Main
Menu -> System Setup -> Internet Setup ->
PC Settings. You should input your short
username and administrator password
here. Ensure that your Mac is successfully
connected to the wireless network. Note,
you may need to wait for few minutes for
the changes to take effect.
You should now be able to access the audio
files on your Mac by selecting Browse ->
Shared Folders on iBLIK, then selecting the
workgroup chosen in the step above. On
selecting your Mac scroll through the
available folders until you find the one which
contains your music files.
Apple Mac Set-Up
Set-Up for OSX Leopard 10.5.1-->
Setup Windows File Sharing on
the MAC:
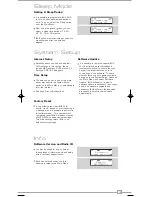
From the ‘Dock’, click ‘System Preferences’.
From the ‘System Preferences’ window
(under the ‘Internet & Network’ section)
click ‘Sharing’.
From the ‘Sharing’ window, do the following:
Under the ‘Services’ section, enable ‘File
Sharing’ click ‘Start’ for this service. Then
under the shared folders click the "+" and
select the folder which contains your music
files. Then Select the music folder from the
shared folders area, in the users area make
sure "Everyone" is set to read and write.
Finally click on "Options" and make sure
"Share files and folders using AFP" is
checked and "Share files and folders using
SMB" (This will require your admin
password to activate) lastly make sure your
account is also checked as active.
Ensure that your Mac is successfully
connected to the wireless network. Note,
you may need to wait for few minutes for
the changes to take effect.
You should now be able to access the audio
files on your Mac by selecting ‘Browse >
Shared Folders’ on iBLIK, then selecting
your Mac from the list of devices. On
selecting your Mac, you should see your
folder that you selected above.
✓
✓
✓
✓
✓
✓
iBLIK Wi-Fi Manual.qxd 21/6/08 19:38 Page 11