background image

GB-32


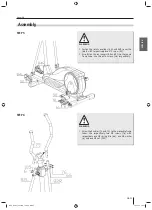
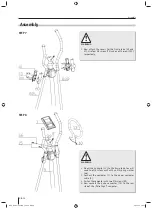
Assembly

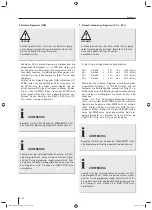
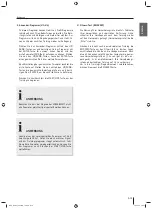
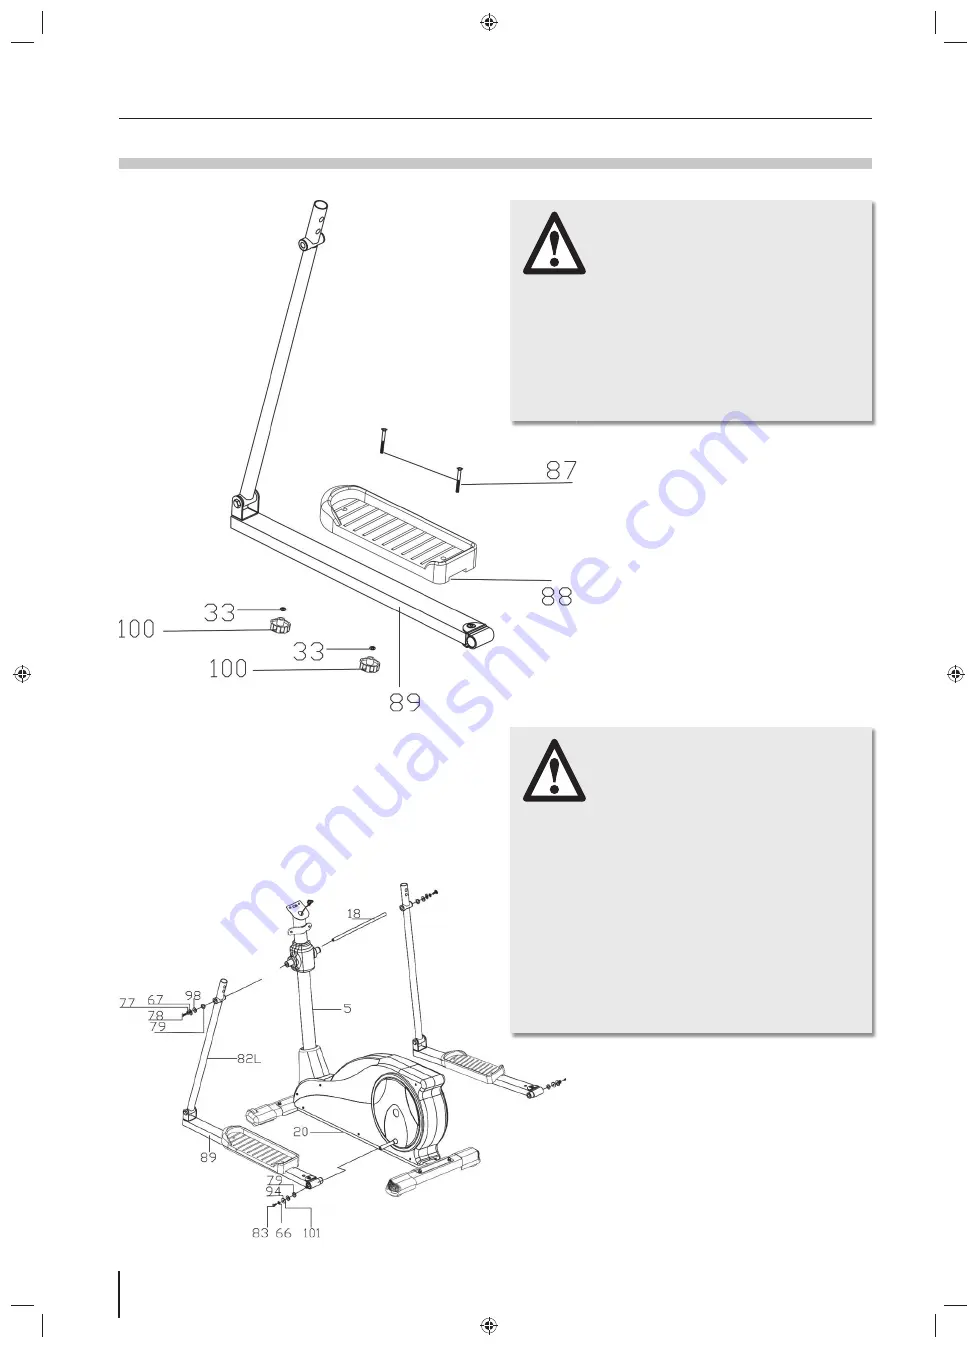
STEP 3

STEP 4

Assembly

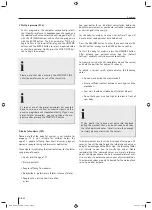
1.  Fasten the tread (88) on the left or right square fra-

me tube (89). Three specifi ed assembly positions let 
you make individual adjustments to your body 
height. Use the two M6 screws (87) each with a 
washer (33) and the locking grip (100).

WARNING

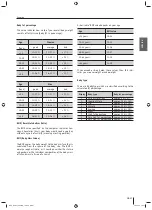
1.  Push the axle (18) through the guide into the frame 

tube (5). 

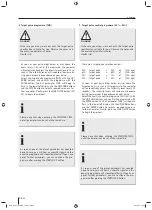
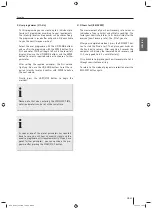
2.  Guide both moveable frame tubes (82L and 82R) over 

the axle and fasten each of them with a screw (78), 
a spring washer (77), a washer (67) and (98) and a 
spacer disc (79). 

3.  Mount the square frame tubes (89L and 89R) to the 

main frame at the rear (20). In each case, use a 
washer (94 and 101), a spacer disc (79), a spring clip 
(66) and an M8 screw (83).

WARNING

REX_Trainer_CX200E_12.indd   GB-32

REX_Trainer_CX200E_12.indd   GB-32

08.05.12   12:57

08.05.12   12:57

Summary of Contents for CX-200 E

Page 1: ...CX 200 E CROSSTRAINER ERGOMETER BEDIENUNGSANLEITUNG REX_Trainer_CX200E_12 indd D 1 REX_Trainer_CX200E_12 indd D 1 08 05 12 12 57 08 05 12 12 57 ...

Page 2: ...hase D 12 E Muskelaufbau D 12 F Gewichtsabnahme D 13 Bedienung D 13 Tastenfunktion D 13 Anzeige Informationen D 13 Trainings Parameter D 14 Trainings Programme D 15 A Manuell D 15 B Profil Programme D 15 C Watt Programm D 16 D Körperfett Analyse D 16 Körperfettanteil D 17 BMR D 17 BMI D 17 Körpertypen D 17 E Zielpulsprogramm D 18 F Zielpuls Steuerungs Programm D 18 G Anwender Programme D 19 H Fitne...

Page 3: ...reundlichen Grüßen Prophete GmbH u Co KG Vorwort Kennzeichnung wichtiger Hinweise Besonders wichtige Hinweise sind in der Bedienungsanlei tung wie folgt gekennzeichnet GEFAHR Dieser Warnhinweis macht Sie auf mögliche Ge fahren für Ihre Gesundheit oder Ihr Leben oder das anderer Personen aufmerksam die beim Um gang oder beim Betrieb des Gerätes entstehen können ACHTUNG Dieser Hinweis macht Sie auf ...

Page 4: ...chsene geeignet Das Gerät ist nicht dafür bestimmt durch Personen mit eingeschränkten physischen sensorischen oder geistigen Fähigkeiten oder mangels Erfahrung und oder mangels Wissen benutzt zu werden es sei denn sie werden durch eine für ihre Sicherheit zuständige Person beaufsichtigt oder erhielten von ihr Anweisungen wie das Gerät zu benutzen ist Das zulässige Maximalgewicht des Nutzers darf 1...

Page 5: ...D 5 DEUTSCH Explosionszeichnung Explosionszeichnung 2 REX_Trainer_CX200E_12 indd D 5 REX_Trainer_CX200E_12 indd D 5 08 05 12 12 57 08 05 12 12 57 ...

Page 6: ...9 Schraube M5x13 2 50 Feststellschraube 1 51 Oberes Zugseil 1 Nr Beschreibung Menge 52 Schraube M5x10L 8 53 Sensor 1 54 Unteres Zugseil 1 55 Halterung 2 56 C Ring 2 57 Magnet 1 58 Riemenrad 1 59 Kurbelachse 1 60 Bolzen M6x15 4 61 Riemen 1 62 Unterlegscheibe Ø18xØ5 2x1 0 8 63 Schraube M5x17 8 64 Kurbel L R 2 65 Abdeckung 2 66 Federscheibe M8 6 67 Unterlegscheibe Ø28xØ10 2x1 5T 2 68 Seitenverkleidun...

Page 7: ...mit vier M8 Schrauben 7 und vier Unterlegscheiben 6 ACHTUNG Montage SCHRITT 1 SCHRITT 2 1 Legen Sie den vorderen Standfuß 22 sowie den hin teren Standfuß 25 wie abgebildet auf den Boden 2 Montieren Sie beide Standfüße am Hauptrahmen 20 Verwenden Sie hierfür jeweils vier M8 Schrau ben 21 vier Muttern 26 mit jeweils einer Unter legscheibe 14 und einer Federscheibe 66 ACHTUNG REX_Trainer_CX200E_12 in...

Page 8: ...urch die Führung im Rahmenrohr 5 2 Führen Sie die beiden beweglichen Rahmenrohre 82L und 82R über die Achse und befestigen Sie diese mit jeweils einer Schraube 78 einer Feder scheibe 77 einer Unterlegscheibe 67 und 98 und einer Distanzscheibe 79 3 Montieren Sie nun die vierkant Rahmenrohre 89L und 89R hinten an den Hauptrahmen 20 Ver wenden Sie jeweils eine Unterlegscheibe 94 und 101 eine Distanzs...

Page 9: ... 6 und einer M8 Mutter 102 ACHTUNG SCHRITT 5 SCHRITT 6 Montage 1 Befestigen Sie die Gelenkabdeckungen 84L und 84 R über den Gelenken mit jeweils einer M5 Schraube 52 2 Befestigen Sie ebenfalls die hinteren Abdeckungen 90 und 91 auf dem Vierkant Rahmenrohr Ver wenden Sie hierzu jeweils drei M4 Schrauben 16 ACHTUNG REX_Trainer_CX200E_12 indd D 9 REX_Trainer_CX200E_12 indd D 9 08 05 12 12 57 08 05 12...

Page 10: ... Sie den Computer mit Hilfe von zwei M5 Schrauben 99 4 Schließen Sie nun den Puls Stecker 10 auf der Rückseite des Computers Puls Input an ACHTUNG Montage SCHRITT 7 SCHRITT 8 1 Befestigen Sie nun die Abdeckungen für das Rahmen rohr 80 und 81 Verwenden Sie hierzu jeweils vier M4 Schrauben 70 und eine M8 Schraube 102 ACHTUNG REX_Trainer_CX200E_12 indd D 10 REX_Trainer_CX200E_12 indd D 10 08 05 12 12...

Page 11: ...hen sollte sich der Puls bei ca 70 des Maximalpulses befinden und in den da rauf folgenden Wochen und Monaten langsam bis 85 des Maximalpulses steigen Die Trainingsanforderungen können z B durch Verlängerung der Trainingsdauer und oder eine Erhöhung der Schwierigkeitsstufen entspre chend der steigenden Kondition erhöht werden Sie ha ben mit folgenden Hilfsmitteln die Möglichkeit Ihre Puls frequenz ...

Page 12: ...rainingszeit von ca 15 20 Minuten üblich Wenn Sie nach einiger Zeit einen höheren Fitnessstand er reicht haben müssen Sie eventuell länger und höher dosiert trainieren Achten Sie während des Trainings auf Ihre Körperhaltung Oberkörper möglichst aufrecht halten Blick nach vorne richten Die Bewegung sollte möglichst aus den Beinen heraus kommen Nicht freihändig trainieren Die Arme sollen den Körper ...

Page 13: ...men MODE Sie können während des Trainings mittels der MODE Taste verschiedene Anzeige Informationen wie z B verbrauchte Kalorien Wattstärke usw abrufen ANZEIGE INFORMATIONEN 1 SPEED Tempo Der Computer gibt die aktuelle Geschwindigkeit an 0 0 99 9 km h Bei einigen Modellen werden abwechselnd auch die Pedalumdrehungen Min angezeigt RPM 2 TIME Zeit Der Computer zeigt Ihnen die aktuelle Trainingszeit ...

Page 14: ...HR Zielpuls Target Heart Rate Wählen Sie zuerst eines der gewünschten Trainings Pro gramme aus Manuell P1 Profil Programme P2 P13 Watt Programme P14 Zielpuls Programm THR Zielpuls Steuerungs Programme 55 85 Körperfett Analyse FAT Anwender Programme U1 U4 Sie können anschließend mehrere Trainings Parameter aus wählen oder auch kombinieren Einige Parameter sind in bestimmten Programmen nicht ein stel...

Page 15: ...vel 4 Wählen Sie das gewünschte Profil Programm P2 P13 mittels den UP DOWN Tasten aus und bestätigen Sie das Programm mit der ENTER Taste Im unteren linken Display wird der erste Parameter TIME Zeit anfangen zu blinken Wählen Sie mit den UP DOWN Tasten sowie der ENTER Taste einen ge wünschten Wert bzw weitere Parameter aus Drücken Sie zum Abschluss die START STOP Taste um das Training zu beginnen B...

Page 16: ...e um die Messung zu starten Legen Sie Ihre Hände zur Messung vollständig um die Sensoren und halten Sie die Position für ca 15 Sekunden Um ein möglichst korrektes Ergebnis zu erhalten beachten Sie die folgenden Hinweise Keine Bewegungen während der Messung Achten Sie auf genügend Kontakt zwischen Fingern und den Elektroden Die Arme sollten durchgestreckt sein gerade Ellbogen Halten Sie die Arme ni...

Page 17: ...eiten weist dies auf eine Über bzw Untergewichtigkeit hin Körper Typ Es gibt 9 Körper Typen die nach dem berechnetem Fettan teil eingeteilt sind Alter Männer Jahre gut mittel schlecht 20 12 17 17 22 22 20 29 13 18 18 23 23 30 39 14 19 19 24 24 40 50 15 20 20 25 25 50 16 21 21 26 26 Anzeige Körpertyp Körperfettanteil 1 ultrasportlich mager ca 5 bis 9 2 ideal sportlich ca 10 bis 14 3 schlank ca 15 b...

Page 18: ...ER Taste Im unteren linken Display wird der erste Parameter TIME Zeit an fangen zu blinken Wählen Sie mit den UP DOWN Tasten sowie der ENTER Taste einen gewünschten Wert bzw weitere Parameter aus Drücken Sie zum Abschluss die START STOP Taste um das Training zu beginnen ANMERKUNG Beachten Sie dass bei Eingabe der VORGABEZEIT nicht alle Parameter gleichzeitig eingestellt werden können ANMERKUNG Sob...

Page 19: ... Herzerholungsrate dient als Indikator Ihrer körperlichen und sportlichen Verfassung Umso schneller Ihre Herzfrequenz nach dem Training wieder auf den Normalpuls gelangt Herzerholungsrate desto fitter sind Sie Drücken Sie direkt nach dem absolvierten Training die RECOVERY Taste um den Fitness Test zu starten Legen anschließend die Hände an die Handpulssensoren Nach etwa 60 Sekunden zeigt Ihnen der ...

Page 20: ... völlig normal Technische Daten Maße ca 128 cm L x 61 cm B x159 cm H Gewicht ca 41 kg Klasseneinteilung HA max Gewichtsbelastung 130 kg Schwungmasse 8 kg Tretwiderstand 16 fach computergesteuert Entsorgung Fitness Gerät entsorgen Das Fitness Gerät darf am Ende der Lebens dauer nicht in den normalen Haushaltsabfall gelangen Es muss stattdessen an einem Sammelpunkt für das Recycling von elektri sche...

Page 21: ...D 21 DEUTSCH Konformitätserklärung REX_Trainer_CX200E_12 indd D 21 REX_Trainer_CX200E_12 indd D 21 08 05 12 12 57 08 05 12 12 57 ...

Page 22: ...s den Schaden selbst zu be heben die Nichtverwendung von Original Ersatzteilen Schäden die durch mangelnde Pflege ungeeignete Pflegemittel usw entstanden sind Bauteile die dem Verschleiß Abnutzung oder Verbrauch unterliegen ausgenommen eindeutiger Material bzw Herstellungsfehler wie z B Lager Leuchtmittel Aufkleber Riemen Batterien usw Kosten für Wartungs Überprüfungs und Säuberungs arbeiten 6 Der A...

Page 23: ...D 23 DEUTSCH Notizen REX_Trainer_CX200E_12 indd D 23 REX_Trainer_CX200E_12 indd D 23 08 05 12 12 57 08 05 12 12 57 ...

Page 24: ...echnische Änderungen vorbehalten Nachdruck verboten Stand 04 2012 88731 Prophete GmbH u Co KG Technische Änderungen vorbehalten Nachdruck verboten Stand 04 2012 88731 Prophete GmbH u Co KG nb t brück REX_Trainer_CX200E_12 indd D 24 REX_Trainer_CX200E_12 indd D 24 08 05 12 12 57 08 05 12 12 57 ...

Page 25: ...012 88731 Prophete GmbH u Co KG Technische Änderungen vorbehalten Nachdruck verboten Stand 04 2012 88731 Prophete GmbH u Co KG CX 200 E CROSSTRAINER OPERATING INSTRUCTIONS REX_Trainer_CX200E_12 indd D 25 REX_Trainer_CX200E_12 indd D 25 08 05 12 12 57 08 05 12 12 57 ...

Page 26: ...B 36 F Weight loss GB 37 Operation GB 37 Button functions GB 37 Display information GB 37 Exercise parameters GB 38 Workout programmes GB 39 A Manual GB 39 B Professional I programmes GB 39 C Watt programme GB 40 D Body fat analysis GB 40 Body fat percentage GB 41 BMR Basal Metabolism Ratio GB 41 BMI Body Mass Index GB 41 Body type GB 41 E Target pulse programme THR GB 42 F Target pulse control pr...

Page 27: ...ns in a safe place Kind regards Prophete GmbH u Co KG Preface Identification of important notes Particularly important notes are identified in the operating instructions as follows DANGER This warning alerts you to possible hazards to your health or life or that of other persons which may occur with the handling or operation of this machine WARNING This note alerts you to possible hazards for your m...

Page 28: ...als carry out repairs and use only original spare parts Keep the machine away from children and house pets It is only suitable for adults The machine is not designed for use by persons with re stricted physical sensory or mental abilities or lack of experience and or knowledge unless they are supervised by a person responsible for their safety or have received instructions on how to use the machin...

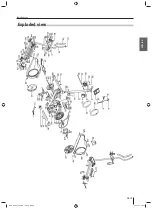
Page 29: ...GB 29 ENGLISH Exploded view Exploded view 2 REX_Trainer_CX200E_12 indd GB 29 REX_Trainer_CX200E_12 indd GB 29 08 05 12 12 57 08 05 12 12 57 ...

Page 30: ...x13 2 50 Locking screw 1 51 Upper traction cable 1 No Description Quantity 52 Screw M5x10L 8 53 Sensor 1 54 Lower traction cable 1 55 Holder 2 56 C ring 2 57 Magnet 1 58 Belt pulley 1 59 Crank axle 1 60 Pin M6x15 4 61 Belt 1 62 Washer Ø18xØ5 2x1 0 8 63 Screw M5x17 8 64 Crank L R 2 65 Cover 2 66 Spring washer M8 6 67 Washer Ø28xØ10 2x1 5T 2 68 Side covering 2 69 Upper covering L R 2 70 Screw M4x12 ...

Page 31: ...s 26 with respectively one washer 14 and one spring washer 66 WARNING 1 Connect the upper computer cable 2 to the com puter cable 19 2 Then push the frame tube 5 with covering 95 onto the frame Make sure not to pinch the computer cable 3 Now fasten the frame tube with four M8 screws 7 and four washers 6 WARNING REX_Trainer_CX200E_12 indd GB 31 REX_Trainer_CX200E_12 indd GB 31 08 05 12 12 57 08 05 ...

Page 32: ... the axle 18 through the guide into the frame tube 5 2 Guide both moveable frame tubes 82L and 82R over the axle and fasten each of them with a screw 78 a spring washer 77 a washer 67 and 98 and a spacer disc 79 3 Mount the square frame tubes 89L and 89R to the main frame at the rear 20 In each case use a washer 94 and 101 a spacer disc 79 a spring clip 66 and an M8 screw 83 WARNING REX_Trainer_CX...

Page 33: ...ne M8 spring disc 66 one M8 washer 6 and one M8 nut 102 WARNING 1 Fasten the joint coverings 84L and 84R over the joints with respectively one M5 screw 52 2 Also fasten the rear covers 90 and 91 to the square frame tube Use three M4 screws 16 respectively WARNING REX_Trainer_CX200E_12 indd GB 33 REX_Trainer_CX200E_12 indd GB 33 08 05 12 12 57 08 05 12 12 57 ...

Page 34: ...he upper computer cable 2 3 Fasten the computer with two M5 screws 99 4 Now connect the pulse connector 10 to the rear side of the Pulse Input computer WARNING 1 Now attach the covers for the frame tube 80 and 81 Use four M4 screws 70 and one M8 screw 102 respectively WARNING REX_Trainer_CX200E_12 indd GB 34 REX_Trainer_CX200E_12 indd GB 34 08 05 12 12 57 08 05 12 12 57 ...

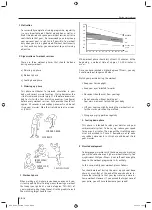
Page 35: ...resources can help you to check your pulse rate a You can feel your pulse rate yourself and count the beats per minute e g at your wrist Measurement of pulse rate by the usual methods b You can measure your pulse with the sensor surfaces attached to the handle c You can also determine your pulse rate using specific calibrated pulse measuring devices Pulse measurement by sensor is only an orientatio...

Page 36: ...nning a workout time of approx 15 20 minutes is usual Once you have reached a higher degree of fitness you may have to work out longer and harder Watch your posture during the workout Keep your torso upright Keep your eyes directed forwards Movement should occur from your legs Do not exercise without holding on Your arms are meant to stabilize your body Lift your heels up slightly during the workou...

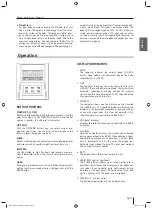
Page 37: ...u can call up different display infor mation such as consumed calories wattage etc with the MODE button DISPLAY INFORMATION 1 SPEED The computer indicates the current speed 0 0 99 9 km h Some models will alternately display the pedal revolutions min RPM 2 TIME The computer shows you the current exercise time max 5 99 00 If a specified time is entered the time will run backwards countdown and you wi...

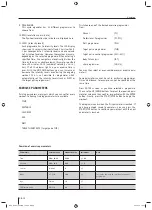
Page 38: ...RIES AGE WATT TARGET HEART RATE target pulse THR First choose one of the desired exercise programmes from Manual P1 Professional I programmes P2 P13 Watt programmes P14 Target pulse programmes THR Target pulse control programmes 55 85 Body fat analysis FAT User programmes U1 U4 You may then select or even combine several exercise para meters Some parameters cannot be set in particular programmes T...

Page 39: ...ogramme 12 Hills Level 6 Programme 13 Hurdle Level 4 Select the required professional I programme P2 P13 with the UP DOWN buttons and confirm the programme with the ENTER button The first parameter TIME will begin to flash in the lower left display Use the UP DOWN buttons and the ENTER button to select a required value or a further para meter Finally press the START STOP button to begin the workout I...

Page 40: ... entering your personal values see the Default Settings chapter analysis occurs automatically To measure curl your hands completely around the sensors and hold the position for approx 15 seconds To obtain a correct result please observe the following notes Do not move during the measurement Ensure sufficient contact between your fingers and the electrodes Your arms should be stretched out straight e...

Page 41: ...re overweight or underweight Body type There are 9 body types which are classified according to the calculated fat percentage Display Body type Body fat percentage 1 Ultra athletic lean approx 5 bis 9 2 Ideally athletic approx 10 bis 14 3 Slim approx 15 bis 19 4 Athletic approx 20 bis 24 5 Average approx 25 bis 29 6 Stout approx 30 bis 34 7 High fat percentage approx 35 bis 39 8 Very high fat perce...

Page 42: ... and confirm the programme with the ENTER button The first parameter TIME will begin to flash in the lower left display Use the UP DOWN buttons and the ENTER button to select a required value or a further parameter Finally press the START STOP button to begin the workout Please note that when entering the SPECIFIED TIME not all parameters can be set at the same time As soon as one of the preset param...

Page 43: ...our heart recovery rate serves as indication of your physical and athletic condition The faster your heart rate returns to its normal rate after the exercise heart recovery rate the fitter you are After your completed workout press the RECOVERY but ton to start the fitness test Then place your hands on the hand pulse sensors After roughly 60 seconds the computer will display the measured heart recov...

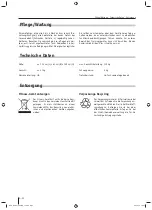
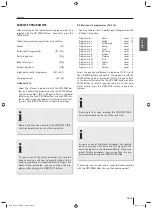
Page 44: ...lable disposal point Dimensions approx 128 cm L x61 cm W x159 cm H Weight approx 41 kg Classification HA Max Weight load 130kg Flywheels 8 kg Step resistance 16 fold computer controlled Care Maintenance We recommend checking all machine parts that could loosen screws nuts etc regularly every 2 to 4 weeks depending on the frequency of use Use a soft perhaps slightly moiste ned cloth to clean Do not ...

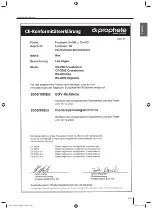
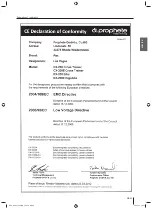
Page 45: ...GB 45 ENGLISH Declaration of conformity REX_Trainer_CX200E_12 indd GB 45 REX_Trainer_CX200E_12 indd GB 45 08 05 12 12 57 08 05 12 12 57 ...

Page 46: ...by third parties or the efforts of the user to remedy the damage himself not using original spare parts damage caused by lack of care unsuitable care pro ducts etc Components subject to wear or use except clear mate rial or manufacturer defects such as Bearings Lamps Stickers Belts Batteries etc Costs for maintenance inspection and cleaning work 6 Warranty claims only authorize the customer to dem...

Page 47: ...GB 47 ENGLISH Notes REX_Trainer_CX200E_12 indd GB 47 REX_Trainer_CX200E_12 indd GB 47 08 05 12 12 57 08 05 12 12 57 ...

Page 48: ...chnische Änderungen vorbehalten Nachdruck verboten Stand 04 2012 88731 Prophete GmbH u Co KG Technische Änderungen vorbehalten Nachdruck verboten Stand 04 2012 88731 Prophete GmbH u Co KG nb t brück REX_Trainer_CX200E_12 indd GB 48 REX_Trainer_CX200E_12 indd GB 48 08 05 12 12 57 08 05 12 12 57 ...

Page 49: ... 88731 Prophete GmbH u Co KG Technische Änderungen vorbehalten Nachdruck verboten Stand 04 2012 88731 Prophete GmbH u Co KG CX 200 E VÉLO ELLIPTIQUE MANUEL DE L UTILISATEUR REX_Trainer_CX200E_12 indd GB 49 REX_Trainer_CX200E_12 indd GB 49 08 05 12 12 57 08 05 12 12 57 ...

Page 50: ...n F 60 F Perte de poids F 61 Utilisation F 61 Fonctions des touches F 61 Affichage des informations F 61 PARAMÈTRES D ENTRAÎNEMENT F 62 PROGRAMMES D ENTRAÎNEMENT F 63 A Manuel F 63 B Programmes Profil F 63 C Programmes Watt F 64 D Analyse du taux de graisses corp orelles F 64 Taux de graisses corporelles F 65 BMR F 65 BMI F 65 Type corporel F 65 E Programme Pouls cible F 66 F Programme piloté par po...

Page 51: ...anuel de l utilisateur Cordialement Prophete GmbH u Co KG Avant propos Identification des remarques importantes Dans le manuel de l utilisateur les remarques particulière ment importantes sont identifiées comme suit DANGER Ce symbole attire votre attention sur des dan gers possibles qui pourraient menacer votre san té votre vie ou celle d autres personnes dans le cadre de l utilisation de l appareil...

Page 52: ...l n est pas conçu pour être utilisé par des perso nnes présentant une diminution de leurs capacités phy siques sensorielles ou mentales ni par des personnes manquant d expérience ou de connaissances sauf si elles sont placées sous la surveillance d une personne respon sable de leur sécurité ou qu elles ont reçu des instruc tions leur indiquant comment utiliser l appareil Le poids maximum admissibl...

Page 53: ...F 53 FRANÇAISE Vue éclatée Vue éclatée 2 REX_Trainer_CX200E_12 indd F 53 REX_Trainer_CX200E_12 indd F 53 08 05 12 12 58 08 05 12 12 58 ...

Page 54: ... Fixation 2 48 Écrou M10 1 49 Vis M5x13 2 50 Vis de serrage 1 51 Câble de traction supérieur 1 N Description Quantité 52 Vis M5x10L 8 53 Capteur 1 54 Câble de traction inférieur 1 55 Fixation 2 56 Joint C 2 57 Aimant 1 58 Poulie de courroie 1 59 Axe de pédale 1 60 Boulon M6x15 4 61 Courroie 1 62 Rondelle d appui Ø18xØ5 2x1 0 8 63 Vis M5x17 8 64 Manivelle G D 2 65 Couvercle 2 66 Rondelle ressort M8...

Page 55: ...nt le tube de cadre avec quatre vis M8 7 et quatre rondelles d appui 6 ATTENTION Montage ÉTAPE 1 ÉTAPE 2 1 Posez le stabilisateur avant 22 ainsi que le stabili sateur arrière 25 sur le sol comme indiqué 2 Montez les deux stabilisateurs sur le châssis 20 Utilisez pour cela à chaque fois quatre vis M8 21 quatre écrous 26 avec chacun une rondelle d appui 14 et une rondelle ressort 66 ATTENTION REX_Tr...

Page 56: ...uide placé dans le tube de cadre 5 2 Enfilez les deux bras de guidon mobile 82L et 82R sur l axe et fixez les chacun avec une vis 78 une rondelle ressort 77 une rondelle d appui 67 et 98 et une rondelle d entretoise 79 3 Montez maintenant les traverses carrées de pédale 89L et 89R à l arrière sur le châssis 20 Utilisez à chaque fois une rondelle d appui 94 et 101 une ron delle d entretoise 79 une ro...

Page 57: ...pui M8 6 et un écrou M8 102 ATTENTION ÉTAPE 5 ÉTAPE 6 Montage 1 Fixez les couvercles d articulation 84L et 84R sur les articulations avec une vis M5 52 chacun 2 Fixez également les habillages arrières 90 et 91 sur la traverse carrée de pédale Utilisez pour cela trois vis M4 16 pour chacun ATTENTION REX_Trainer_CX200E_12 indd F 57 REX_Trainer_CX200E_12 indd F 57 08 05 12 12 58 08 05 12 12 58 ...

Page 58: ...ement avec l aide de deux vis M5 99 4 Raccordez maintenant le connecteur du capteur de pouls 10 sur la face arrière de la console d entraînement dans la prise désignée par Puls In put ATTENTION Montage ÉTAPE 7 ÉTAPE 8 1 Fixez maintenant les habillages pour le tube de cadre 80 et 81 Utilisez pour cela quatre vis M4 70 pour chacun et une vis M8 102 ATTENTION REX_Trainer_CX200E_12 indd F 58 REX_Train...

Page 59: ...uls doit se situer à env 70 du pouls maximum il doit monter peu à peu jusqu à 85 du pouls maximum au cours des semaines et des mois qui suivent Les efforts d entraînement peuvent être augmentés p ex avec l allongement de la durée de l entraînement ou le passage àunniveaud effortsupérieur enfonctiondel amélioration de la condition physique Les moyens d aide suivants vous permettent de contrôler la ...

Page 60: ...t durer au moins 12 minutes Il est habituel de commencer avec une durée d entraînement d env 15 à 20 minutes Si vous avez atteint un niveau de forme physique supérieur au bout de quelque temps vous pouvez alors vous entraîner plus longtemps et à des doses plus importantes Veillez à votre posture pendant l entraînement Buste maintenu aussi droit que possible Regard dirigé vers l avant Les mouvement...

Page 61: ... cardiaque Pour de plus amples informations con sultez le chapitre Forme physique MODE La touche MODE vous permet de consulter différentes infor mations affichées p ex calories brûlées puissance en watts etc AFFICHAGE DES INFORMATIONS 1 SPEED Vitesse La console d entraînement affiche la vitesse actuelle de 0 0 à 99 9 km h Sur certains modèles le nombre de tours de pédale min est également affiché en ...

Page 62: ...bles TIME Durée DISTANCE Distance CALORIES Calories AGE Âge WATT Watt TARGET HEART RATE Pouls cible THR Sélectionnez tout d abord l un des programmes d entraînement souhaités à partir de Manuel P1 Programmes Profil P2 P13 Programmes Watt P14 Programmes Pouls cible THR Programmes pilotés par pouls cible 55 85 Analyse du taux de graisses corporelles FAT Programmes Utilisateur U1 U4 Ensuite vous pouve...

Page 63: ...ne Niveau 6 Programme 13 Haie Niveau 4 Sélectionnez le programme Profi I souhaité P2 P13 avec les touches UP DOWN et confirmez votre sélection avec la touche ENTER Le premier paramètre TIME Durée commencera à clignoter en bas à gauche de l écran Sélectionner la valeur souhaitée ou d autres paramètres supplémentaires à l aide des touches UP DOWN ainsi que de la touche ENTER Actionnez ensuite la touch...

Page 64: ...is avec la touche MODE Actionnez la touche MEASURE pour démarrer l analyse du taux de graisses corporelles L analyse démarre automatiquement après la saisie de vos données personnelles cf le chapitre Préréglages Pour la mesure entourez les capteurs entièrement avec les mains et maintenez cette position pendant env 15 se condes Pour que le résultat soit le plus correct possible observez les conseil...

Page 65: ... dessous cela indique une surcharge ou un déficit pondéral Type corporel Il existe 9 types corporels qui sont définis en fonction du taux de graisses corporelles calculé Âge Hommes années bon moyen mauvais 20 12 17 17 22 22 20 29 13 18 18 23 23 30 39 14 19 19 24 24 40 50 15 20 20 25 25 50 16 21 21 26 26 Âge Femmes années bon moyen mauvais 20 17 22 22 27 27 20 29 18 23 23 28 28 30 39 19 24 24 29 29 4...

Page 66: ... paramètre TIME Durée commencera à clignoter en bas à gauche de l écran Sélectionner la valeur souhaitée ou d autres paramètres supplémentaires avec l aide des touches UP DOWN ainsi que de la touche ENTER Action nez ensuite la touche START STOP pour démarrer l entraînement REMARQUE Notez que lors de l entrée de la DURÉE PRÉDÉFINIE tous les paramètres ne peuvent pas être réglés simultanément REMARQ...

Page 67: ...que est un indica teur de votre forme physique et sportive Plus votre fré quence cardiaque retrouve rapidement son niveau normal après l entraînement taux de récupération cardiaque plus vous êtes en forme Directement à l issue de votre entraînement actionnez la touche RECOVERY pour démarrer le test de forme phy sique Posez ensuite les deux mains sur les capteurs de pouls Au bout de 60 secondes env...

Page 68: ...à un point de collecte public Demandez à votre commune administration communale où se trouve le point de collecte compétent Entretien Maintenance Nous recommandons de contrôler régulièrement soit toutes les 2 à 4 semaines environ ou bien en fonction de la fré quence d utilisation tous les éléments de l appareil qui pré sentent un risque de desserrage vis écrous et simil Pour le nettoyage et l entr...

Page 69: ...F 69 FRANÇAISE Déclaration de conformité REX_Trainer_CX200E_12 indd F 69 REX_Trainer_CX200E_12 indd F 69 08 05 12 12 58 08 05 12 12 58 ...

Page 70: ...même les dégâts à la non utilisation de pièces détachées d origine aux dommages provoqués par le défaut d entretien l utilisation de produits d entretien inappropriés etc Les pièces soumises à l usure l abrasion ou à la con sommation sauf les vices de matériau ou de fabri cation indiscutables p ex Palier Moyen d éclairage Autocollant Courroie Piles etc Les coûts relevant des opérations de maintena...

Page 71: ...F 71 FRANÇAISE Notes REX_Trainer_CX200E_12 indd F 71 REX_Trainer_CX200E_12 indd F 71 08 05 12 12 58 08 05 12 12 58 ...

Page 72: ...echnische Änderungen vorbehalten Nachdruck verboten Stand 04 2012 88731 Prophete GmbH u Co KG Technische Änderungen vorbehalten Nachdruck verboten Stand 04 2012 88731 Prophete GmbH u Co KG nb t brück REX_Trainer_CX200E_12 indd F 72 REX_Trainer_CX200E_12 indd F 72 08 05 12 12 58 08 05 12 12 58 ...

Page 73: ...4 2012 88731 Prophete GmbH u Co KG Technische Änderungen vorbehalten Nachdruck verboten Stand 04 2012 88731 Prophete GmbH u Co KG CX 200 E CYCLETTE ISTRUZIONI PER L USO REX_Trainer_CX200E_12 indd F 73 REX_Trainer_CX200E_12 indd F 73 08 05 12 12 58 08 05 12 12 58 ...

Page 74: ...truttura muscolare I 84 F Perdita di peso I 85 Uso I 85 Funzioni dei tasti I 85 Informazioni visualizzate I 85 Parametri di allenamento I 86 Programmi di allenamento I 87 A Manuale I 87 B Programmi professionali I 87 C Programma Watt I 88 D Analisi del grasso corporeo I 88 Percentuale di grasso corporeo I 89 BMR I 89 BMI I 89 Tipo di corporatura I 89 E Programma delle pulsazioni target I 90 F Prog...

Page 75: ...phete GmbH u Co KG Premessa Identificazione di indicazioni importanti Le indicazioni particolarmente importanti all interno del ma nuale di istruzioni sono contrassegnate nel modo seguente PERICOLO Questa avvertenza richiama l attenzione su pos sibili pericoli per la salute e l incolumità dell utilizzatore o di altre persone che possono derivare dall utilizzo o dal funzionamento dell apparecchio AV...

Page 76: ...ci Si tratta di un prodotto adatto esclusivamente per gli adulti L apparecchio non è progettato per essere utilizzato da persone con capacità fisiche sensoriali o mentali limitate o privi della necessaria esperienza e o conoscenza a meno che non siano sorvegliati o ricevano istruzioni sull uso dell apparecchio da una persona che è responsa bile della loro sicurezza Il peso massimo dell utente non d...

Page 77: ...I 77 ITALIANO Disegno esploso Disegno esploso 2 REX_Trainer_CX200E_12 indd I 77 REX_Trainer_CX200E_12 indd I 77 08 05 12 12 58 08 05 12 12 58 ...

Page 78: ...2 48 Dado M10 1 49 Vite M5x13 2 50 Vite di fermo 1 51 Cavo di trazione superiore 1 N Descrizione Quantità 52 Vite M5x10L 8 53 Sensore 1 54 Cavo di trazione inferiore 1 55 Supporto 2 56 Anello a C 2 57 Magnete 1 58 Ruota per cinghia 1 59 Asse manovella 1 60 Perno M6x15 4 61 Cinghia 1 62 Rondella Ø18xØ5 2x1 0 8 63 Vite M5x17 8 64 Manovella S D 2 65 Copertura 2 66 Rondella elastica M8 6 67 Rondella Ø...

Page 79: ...uattro viti M8 7 e quattro rondelle 6 AVVERTENZA Montaggio FASE 1 FASE 2 1 Appoggiare sul pavimento la base d appoggio anteri ore 22 e quella posteriore 25 come indicato in figura 2 Montare le due basi d appoggio sul telaio principale 20 A tale scopo utilizzare quattro viti M8 21 quattro dadi 26 con una rondella 14 e una ron della elastica 66 AVVERTENZA REX_Trainer_CX200E_12 indd I 79 REX_Trainer_C...

Page 80: ...re l asse 18 attraverso la guida nel tubo del telaio 5 2 Far passare i due tubi telaio mobili 82L e 82R attra verso l asse e fissarli rispettivamente con una vite 78 una rondella elastica 77 una rondella 67 e 98 e un distanziale 79 3 Ora montare i tubi quadrati del telaio 89L e 89R nella parte posteriore del telaio principale 20 Uti lizzare rispettivamente una rondella 94 e 101 un distanziale 79 un...

Page 81: ... M8 6 e un dado M8 102 AVVERTENZA FASE 5 FASE 6 Montaggio 1 Fissare le coperture dei giunti 84L e 84 R sui giunti rispettivamente con una vite M5 52 2 Fissare anche le coperture posteriori 90 e 91 sul tubo quadrato A tale scopo utilizzare rispettivamente tre viti M4 16 AVVERTENZA REX_Trainer_CX200E_12 indd I 81 REX_Trainer_CX200E_12 indd I 81 08 05 12 12 58 08 05 12 12 58 ...

Page 82: ...ter con l ausilio di due viti M5 99 4 A questo punto collegare lo spinotto delle pulsazioni 10 sul lato posteriore del computer in Puls Input AVVERTENZA Montaggio FASE 7 FASE 8 1 Fissare ora le coperture per il tubo del telaio 80 e 81 A tale scopo utilizzare rispettivamente quattro viti M4 70 e una vite M8 102 AVVERTENZA REX_Trainer_CX200E_12 indd I 82 REX_Trainer_CX200E_12 indd I 82 08 05 12 12 5...

Page 83: ...rebbe ammontare al 70 circa della soglia massima e nelle settimane e nei mesi successivi dovrebbe lenta mente salire fino all 85 Tali requisiti si possono incre mentare ad esempio prolungando la durata dell allenamento e o aumentando i gradi di difficoltà in sintonia con il miglioramento della condizione Con i se guenti ausili è possibile controllare la propria frequenza cardiaca a Potete percepire ...

Page 84: ...zona target adatta a voi La fase di allenamento dovrebbe durare almeno 12 minuti Per un principiante l allenamento dura normalmente circa 15 20 minuti Se dopo un po di tempo riscontrate un miglioramento del vostro livello di forma fisica dovreste allenarvi più a lungo e con maggiore intensità Durante l allenamento prestate attenzione alla postura Tenere il busto il più possibile eretto Rivolgere lo...

Page 85: ...E Tramite il tasto MODE durante l allenamento è possibile ri chiamare varie informazioni sul display come ad es calorie consumate watt ecc INFORMAZIONI VISUALIZZATE 1 SPEED velocità Il computer indica la velocità corrente 0 0 99 9 km h In alcuni modelli vengono visualizzati in alternanza anche i giri di pedale al minuto RPM 2 TIME tempo Il computer indica il tempo corrente dell allenamento max 5 9...

Page 86: ...TE pulsazioni target THR Per prima cosa selezionare il programma di allenamento desiderato tra quelli disponibili off Manuale P1 Programmi Professionali P2 P13 Programmi Watt P14 Programma delle pulsazioni target THR Programmi di controllo delle pulsazioni target 55 85 Analisi del grasso corporeo FAT Programmi utente U1 U4 Quindi è possibile selezionare o anche combinare più para metri di allename...

Page 87: ...Programma 12 Collina Livello 6 Programma 13 Ostacolo Livello 4 Selezionare il programma professionale I desiderato P2 P13 mediante i tasti UP DOWN e confermare il programma con il tasto ENTER Nella parte inferiore sinistra del display il primo parametro TIME Tempo inizia a lampeggiare Selezionare con i tasti UP DOWN e con il tasto ENTER un valore deside rato o altri parametri Infine premere il tast...

Page 88: ...inseriti i valori individuali v capitolo Impostazioni preliminari l analisi avviene automatica mente Per la misurazione appoggiare completamente le mani sui sensori e mantenere questa posizione per circa 15 secondi Per ottenere un risultato il più possibile corretto seguire queste avvertenze Non muoversi durante la misurazione Assicurarsi che vi sia un contatto sufficiente tra le dita e gli elettro...

Page 89: ...oratura Esistono 9 tipi di corporatura che sono ripartiti in base alla percentuale di grasso calcolata Età Uomini Anni buono medio pessimo 20 12 17 17 22 22 20 29 13 18 18 23 23 30 39 14 19 19 24 24 40 50 15 20 20 25 25 50 16 21 21 26 26 Età Donne Anni buono medio pessimo 20 17 22 22 27 27 20 29 18 23 23 28 28 30 39 19 24 24 29 29 40 50 20 25 25 30 30 50 21 26 26 31 31 Età BMI 24 anni 19 24 25 34 ...

Page 90: ...UP DOWN e confermare il programma con il tasto ENTER Nella parte inferiore sinistra del display il primo parametro TIME Tempo inizia a lampeggiare Selezionare con i tasti UP DOWN e con il tasto ENTER un valore desiderato o altri parametri Infine premere il tasto START STOP per iniziare l allenamento NOTA All inserimento del TEMPO IMPOSTATO non è possibile impostare contemporaneamente tutti i parame...

Page 91: ...Test RECOVERY La misurazione del tasso di recupero cardiaco serve come indicatore della forma fisica e atletica Tanto più rapida mente la frequenza torna alla normalità dopo l allenamento recupero quanto più siete in forma Al termine dell allenamento premere subito il tasto RE COVERY per avviare il Fitness Test Quindi appoggiare le mani sui sensori delle pulsazioni Dopo circa 60 secondi il computer...

Page 92: ...ormale Dati tecnici Dimensioni ca 128 cm L x 61 cm B x159 cm H Peso ca 41 kg Classificazione HA Carico max 130 kg Massa oscillante 8 kg Resistenza dei pedali 16x controllata dal computer Entsorgung Smaltimento dell apparecchio per il fitness L apparecchio per il fitness al termine della sua vita utile non può essere smaltito con i normali rifiuti domestici Deve invece essere portato in un punto di rac...

Page 93: ...I 93 ITALIANO Dichiarazione di conformità REX_Trainer_CX200E_12 indd I 93 REX_Trainer_CX200E_12 indd I 93 08 05 12 12 58 08 05 12 12 58 ...

Page 94: ...parare da solo il danno Mancato utilizzo di ricambi originali Danni causati da una cura carente dall uso di prodotti detergenti non idonei ecc Componenti soggetti a normale usura o consumo ad eccezione dei difetti di materiali o fabbricazione evi denti come ad es cuscinetti lampadine adesivi cinghie batterie ecc I costi per i lavori di manutenzione controllo e puli zia 6 Il diritto alla garanzia a...

Page 95: ...I 95 ITALIANO Note REX_Trainer_CX200E_12 indd I 95 REX_Trainer_CX200E_12 indd I 95 08 05 12 12 58 08 05 12 12 58 ...

Page 96: ...echnische Änderungen vorbehalten Nachdruck verboten Stand 04 2012 88731 Prophete GmbH u Co KG Technische Änderungen vorbehalten Nachdruck verboten Stand 04 2012 88731 Prophete GmbH u Co KG nb t brück REX_Trainer_CX200E_12 indd I 96 REX_Trainer_CX200E_12 indd I 96 08 05 12 12 58 08 05 12 12 58 ...

Page 97: ...8731 Prophete GmbH u Co KG Technische Änderungen vorbehalten Nachdruck verboten Stand 04 2012 88731 Prophete GmbH u Co KG CX 200 E CROSSTRAINER ERGOMETER BEDIENINGSHANDLEIDING REX_Trainer_CX200E_12 indd I 97 REX_Trainer_CX200E_12 indd I 97 08 05 12 12 58 08 05 12 12 58 ...

Page 98: ...opbouw NL 108 F Gewichtsafname NL 109 Bediening NL 109 Functie van de knoppen NL 109 Weergegeven informatie NL 109 TRAININGSPARAMETERS NL 110 TRAININGSPROGRAMMA NL 111 A Handmatig NL 111 B Profielprogramma NL 111 C Watt programma NL 112 D Lichaamsvetanalyse NL 112 Aandeel lichaamsvet NL 113 BMR NL 113 BMI NL 113 Lichaamstype NL 113 E Doelpolsslagprogramma NL 114 F Doelpolsslag besturingsprogramma N...

Page 99: ...ed Met vriendelijke groet Prophete GmbH u Co KG Aanduiding van de belangrijke aanwijzingen Zeer belangrijke aanwijzingen zijn in de bedieningshand leiding als volgt aangeduid WAARSCHUWING Deze waarschuwing maakt u attent op mogelijke gevaren voor uw gezondheid of voor uw leven of dat van anderen die bij de omgang met of het gebruik van het apparaat kunnen ontstaan ATTENTIE Deze aanwijzing maakt u ...

Page 100: ...sluitend geschikt voor volwassenen Het apparaat is niet geschikt voor gebruik door personen met een fysieke zintuiglijke of geestelijke beperking of personen die niet voldoende ervaring en of kennis hebben tenzij zij terzijde worden gestaan door een per soon die verantwoordelijk is voor hun veiligheid of hen aanwijzingen geeft over het gebruik Het toelaatbare maximale gewicht van 130 kg van de geb...

Page 101: ...NL 101 NEDERLANDS Explosietekening Explosietekening 2 REX_Trainer_CX200E_12 indd NL 101 REX_Trainer_CX200E_12 indd NL 101 08 05 12 12 58 08 05 12 12 58 ...

Page 102: ... M10 1 49 schroef M5x13 2 50 stelschroef 1 51 bovenste trekkabel 1 Nr Beschrijving Aantal 52 schroef M5x10L 8 53 sensor 1 54 onderste trekkabel 1 55 houder 2 56 C ring 2 57 magneet 1 58 riemwiel 1 59 crankas 1 60 bout M6x15 4 61 riem 1 62 onderlegring Ø18xØ5 2x1 0 8 63 schroef M5x17 8 64 crank L R 2 65 afdekking 2 66 borgveer M8 6 67 onderlegring Ø28xØ10 2x1 5T 2 68 zijbekleding 2 69 bovenste bekl...

Page 103: ... nu de framebuis met vier M8 schroeven 7 en vier onderlegringen 6 ATTENTIE Montage STAP 1 STAP 2 1 Zet de voorste voet 22 evenals de achterste voet 25 zoals afgebeeld op de vloer 2 Monteer beide voeten aan het hoofdframe 20 Ge bruik hiervoor steeds vier M8 schroeven 21 vier moeren 26 met een onderlegring 14 en een borgveer 66 ATTENTIE REX_Trainer_CX200E_12 indd NL 103 REX_Trainer_CX200E_12 indd NL...

Page 104: ...chuif de as 18 door de geleiding in het framebuis 5 2 Breng beide beweegbare framebuizen 82L en 82R over de as en bevestig deze steeds met een schroef 78 een borgveer 77 een onderlegring 67 en 98 een afstandsring 79 3 Monteer nu de vierkante framebuizen 89L en 89R achter op het hoofdframe 20 Gebruik steeds een onderlegring 94 en 101 een afstandsring 79 een borgveer 66 en een M8 schroef 83 ATTENTIE...

Page 105: ... 6 en een M8 moer 102 ATTENTIE STAP 5 STAP 6 Montage 1 Bevestig de scharnierafdekkingen 84L en 84 R aan de scharnieren met steeds een M5 schroef 52 2 Bevestig ook de achterste afdekkingen 90 en 91 aan de vierkante framebuis Gebruik hiervoor steeds drie M4 schroeven 16 ATTENTIE REX_Trainer_CX200E_12 indd NL 105 REX_Trainer_CX200E_12 indd NL 105 08 05 12 12 58 08 05 12 12 58 ...

Page 106: ...de computer door middel van twee M5 schroeven 99 4 Sluit nu de polsslagstekker 10 aan op de achterkant van de computers Puls Input ATTENTIE Montage STAP 7 STAP 8 1 Bevestig nu de afdekkingen voor de framebuis 80 en 81 Gebruik hiervoor steeds vier M4 schroeven 70 en een M8 schroef 102 ATTENTIE REX_Trainer_CX200E_12 indd NL 106 REX_Trainer_CX200E_12 indd NL 106 08 05 12 12 58 08 05 12 12 58 ...

Page 107: ... van de maximale polsslag zijn en in de daarop volgende weken en maanden langzaam stijgen tot 85 van de maximale polsslag De trainingseisen kunnen bijv door verlenging van de trainingsduur en of een ver hoogde moeilijkheidsgraad afhankelijk van de verbete rende conditie worden verhoogd U hebt met volgende hulpmiddelen de mogelijkheid uw polsfrequentie te con troleren a U kunt uw polsslag zelf voel...

Page 108: ...e doelzone aflezen De trainingsfase moet minstens 12 minuten aanhouden Voor een eerste begin is een trainingstijd van ca 15 20 minuten gebruikelijk Als u na enige tijd een hoger fitnessniveau hebt bereikt moet u eventueel langer en hoger gedoseerd trainen Let bij de training op uw lichaamshouding Bovenlichaam zo recht mogelijk houden Blik naar voren richten De beweging moet zo mogelijk vanuit de ben...

Page 109: ...tie kunt u vinden in het hoofdstuk Fitnesstest MODE U kunt tijdens de training met behulp van de MODE knop allerlei weergave informatie zoals bijv verbruikte calo rieën Wattsterkte enz oproepen WEERGAVE INFORMATIE 1 SPEED tempo De computer geeft de huidige snelheid aan 0 0 99 9 km h Bij sommige modellen worden afwisselend ook de pedaalomwentelingen min weergegeven RPM 2 TIME tijd De computer laat ...

Page 110: ...eftijd WATT Watt THR polsslag Target Heart Rate Kies eerst een van de gewenste trainingsprogramma s uit Handmatig P1 Profielprogramma P2 P13 Watt programma P14 Doelpolsslagprogramma THR Doelpolsslag besturingsprogramma 55 85 Lichaamsvetanalyse FAT Toepassingsprogramma U1 U4 U kunt aansluitend meerdere trainingsparameters selecteren of deze ook combineren Sommige parameters zijn in bepaalde programm...

Page 111: ... Level 6 Programma 13 Horde Level 4 Selecteer het gewenste profielprogramma P2 P13 met behulp van de UP DOWN knoppen en bevestig het programma met ENTER In de onderste linker display begint de eerste parameter TIME tijd te knipperen Selecteer met de UP DOWN knoppen en met ENTER een gewenste waarde resp verdere parameters Druk ten slotte op de START STOP knop om de training te beginnen Zo nodig kunt...

Page 112: ...van uw persoonlijke waarde zie hoofdstuk Voorinstellingen vindt de analyse automatisch plaats Leg uw handen voor de meting helemaal rond de sensoren en houd deze positie ca 15 seconden vast Let op de volgende aanwijzingen om een zo correct mogelijk resultaat te verkrijgen Geen bewegingen tijdens de meting Let erop dat er voldoende contact is tussen vingers en elektroden De armen moeten doorgestrek...

Page 113: ... over of onderschrijdt wijst dit op een over of ondergewicht Lichaamstype Er zijn 9 lichaamstypes die volgens het berekende vetaan deel zijn ingedeeld Weergave Lichaamstype Aandeel lichaamsvet 1 ultrasportief mager ca 5 tot 9 2 ideaal sportief ca 10 tot 14 3 slank ca 15 tot 19 4 sportief ca 20 tot 24 5 gemiddeld ca 25 tot 29 6 gezet ca 30 tot 34 7 hoog vetaandeel ca 35 tot 39 8 zeer hoog vetaandee...

Page 114: ...en en bevestig het programma met ENTER In de onderste linker display begint de eerste parameter TIME tijd te knipperen Selecteer met de UP DOWN knoppen en met ENTER een gewenste waarde resp vervolgparameters Druk ten slotte op de START STOP knop om de training te beginnen OPMERKING Let erop dat bij invoer van de INSTELTIJD niet alle parameters gelijktijdig kunnen worden ingesteld OPMERKING Zodra e...

Page 115: ...ecuperatieniveau dient als indi cator van uw lichamelijke en sportieve conditie Hoe sneller uw hartfrequentie na de training weer naar de normale polsslag terugkeert hartrecuperatieniveau des te fitter bent u Druk direct na de voltooide training op de RECOVERY knop om de fitnesstest te starten Leg daarna de handen op de handpolsslagsensoren Na ca 60 seconden geeft de computer het gemeten hartrecuper...

Page 116: ...n afzetten Dit is heel normaal Technische gegevens Afmetingen ca 128 cm L x 61 cm B x159 cm H Gewicht ca 41 kg Klasse indeling HA max gewichtsbelasting 130 kg Vliegwie 8 kg Trapweerstand 16 voudig computergestuurd Afvalverwijdering Fitnessapparaat verwijderen Het fitnessapparaat mag aan het einde van de levensduur niet met het normale huis houdelijke afval worden verwijderd Het moet op een inzamelp...

Page 117: ...NL 117 NEDERLANDS Conformiteitsverklaring REX_Trainer_CX200E_12 indd NL 117 REX_Trainer_CX200E_12 indd NL 117 08 05 12 12 58 08 05 12 12 58 ...

Page 118: ... de gebruiker zelf om de schade te verhelpen het niet gebruiken van originele reserveonderdelen schade die door gebrekkig onderhoud ongeschikte schoonmaakmiddelen enz zijn ontstaan onderdelen die onderhevig zijn aan slijtage of verbruik met uitzondering van eenduidig materiaal resp fabrica gefouten zoals bijv lagers verlichting stickers riem batterijen enz Kosten voor onderhouds controle en reinig...

Page 119: ...NL 119 NEDERLANDS Notities REX_Trainer_CX200E_12 indd NL 119 REX_Trainer_CX200E_12 indd NL 119 08 05 12 12 58 08 05 12 12 58 ...

Page 120: ...9 Rheda Wiedenbrück eMail si service왁prophete net Technische Änderungen vorbehalten Nachdruck verboten Stand 04 2012 88731 Prophete GmbH u Co KG REX_Trainer_CX200E_12 indd NL 120 REX_Trainer_CX200E_12 indd NL 120 08 05 12 12 58 08 05 12 12 58 ...

Reviews: