background image

9

I-EEDU (02-21) 150492-A

INSTALLATION

Unpacking and Inspection


The unit was test-operated and inspected at the factory prior to crating and was in operating condition .


If, upon removing it from its crate, the unit has been found to have incurred any damage in shipment, document 

the damage with the transporting agency and contact an authorized Factory Distributor . If you are an authorized 

Distributor, follow the FOB freight policy procedures .

⚠ CAUTION ⚠

Ensure that EXCESSIVE shipping vibration has not caused the burner rack assembly to drop off 

the support rails into the bottom pan.


Remove the panel from the bottom rear of the furnace (refer to 

Burner Rack and Pilot Maintenance

 section) and 

check the burner rack assembly . The burner rack drawer should be setting level with each side on a support rail . 

If the burner rack assembly is positioned properly, close the back panel .


If the burner rack has fallen, remove the screws holding the burner rack assembly and pull out the burner rack 

drawer . Reassemble by sliding the burner rack drawer into the heater, ensuring that both sides are resting on 

the support rails . Reattach to the support brackets underneath the burners, reinsert the burner rack screws, and 

close the back panel .

Pre-Installation Checklist


‰

Check the rating plate for the gas specifications and electrical characteristics of the furnace to ensure that they 

are compatible with the gas and electric supplies at the installation site .


‰

Read this booklet and become familiar with the installation requirements of your particular furnace .


‰

If you do not have knowledge of local requirements, check with the local gas company or any other local agencies 

who might have requirements concerning this installation .


‰

Before beginning, make preparations for necessary supplies, tools, and manpower .


‰

Check to see if there are any field-installed options that need to be assembled/installed prior to unit installation .


‰

Shipped-separate options could include a gas shutoff valve, a vent cap, a condensate drain fitting, a 

thermostat, a hanger kit, a coupling kit, and/or a fan control .


‰

Some gas control options will either have parts shipped loose with the unit or shipped separately . If the unit is 
equipped with any of the options listed in 

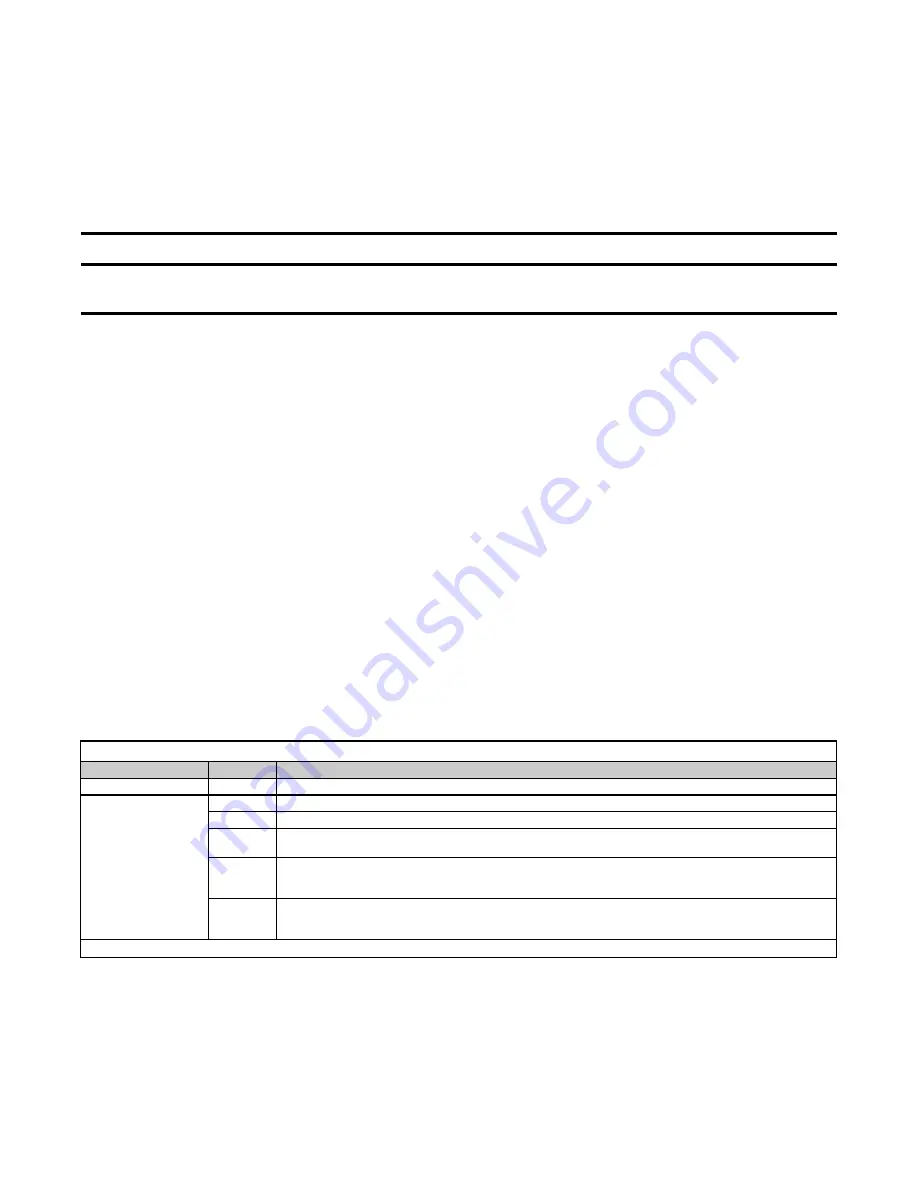
Table 6

, ensure that these parts are available at the installation site .

Table 6.  Gas Control and Makeup Air Control Options

Type

Option

Included Components (PN)

Gas control (heating)

AG7

Amplifier (260863), thermostat (48033)

Makeup air control

*

AG3

Control switch (29054), gasket (7726), gasket retainer plate (7727)

AG8

Temperature sensor and mixing tube (48041), amplifier (260864), control switch (29054)

AG9

Remote temperature selector (48042), temperature sensor and mixing tube (48041), amplifier (260863), 

control switch (29054)

AG15

Remote temperature selector (115848), stage adder module (115849), control switch (29054), 115-24V 

(103055), 208/230-24V transformer (103497), 1/2-inch transformer locknut (16222), discharge sensor 

holder (115850), discharge air sensor holder bracket (213612), temperature sensor (115815)

AG21

Signal conditioner (134170), conditioner relay (14747), 115-24V transformer (103055), 1/2-inch 

transformer locknut (16222), fuse box (12697), fuse box cover (12698), hole plugs—quantity three 

(16451)

*

All of the makeup air options also require a shipped-separate fan control (option CQ1, PN 57960), which should be at the job site .

Summary of Contents for EEDU

Page 1: ...service must be performed by a qualified installer service agency or the gas supplier Do not store or use gasoline or other flammable vapors and liquids in the vicinity of this or any other appliance...

Page 2: ...ure 18 Gas Supply Piping 18 Supply Piping Connections 19 High Elevation 2 000 Feet 609 Meters Installations 19 Conversion to LP Propane 21 Vent Connections 21 Specific Venting Requirements 21 Rotating...

Page 3: ...e and minimize equipment failure it is recommended that periodic maintenance be performed on this unit The ability to properly perform maintenance on this equipment requires certain tools and mechanic...

Page 4: ...n The instructions in this manual apply only to the model EEDU duct furnace Warranty Refer to the limited warranty form in the literature bag provided with the unit The warranty is void if Furnaces ar...

Page 5: ...ters into the combustion process is vented to the outdoors Sufficient air must enter the equipment location to replace the air exhausted through the vent system Modern construction methods involve a g...

Page 6: ...the combustion air of gas fired heating equipment presents a potential corrosion hazard Chlorine usually in the form of freon or degreaser vapors when exposed to flame will precipitate from the compo...

Page 7: ...7 I EEDU 02 21 150492 A Figure 2 Unit Dimensions...

Page 8: ...906 20 1 8 511 4 3 8 111 3 15 16 100 1 2 13 1 2 13 5 8 16 18 457 7 1 4 184 7 7 16 189 7 3 8 187 200 35 889 22 1 2 572 35 11 16 906 22 7 8 581 4 3 8 111 3 15 16 100 1 2 13 1 2 13 5 8 16 20 3 4 527 7 1...

Page 9: ...not have knowledge of local requirements check with the local gas company or any other local agencies who might have requirements concerning this installation Before beginning make preparations for ne...

Page 10: ...use property damage personal injury or loss of life The qualified service agency performing this work assumes responsibility for the conversion of this appliance to provide for higher CFM Theseinstruc...

Page 11: ...ve two side finger baffle screws from each baffle b Remove both side finger baffles BAFFLES SUPPORT BRACKET SCREWS Figure 4 Side Finger Baffle Removal 3 Install field conversion label see Figure 5 a F...

Page 12: ...Remove all baffles from heat exchanger b Remove top baffle support screws and remove top baffle support Reposition and secure support on opposite end of heat exchanger using screws c Remove bracket s...

Page 13: ...rain flange 3 Seal all corners and four square holes in bottom pan edge using RTV sealant 4 Terminate drain outside of building NOTE Periodic cleaning of the condensate collector and disposal system i...

Page 14: ...sition filler plates 7 as shown in Figure 8 DETAIL B Using filler plate as template drill 1 8 inch diameter holes and secure filler plates using sheet metal screws 8 Offset of filler plate allows alig...

Page 15: ...ont View Dimensions Unit Size Dimension A Inches Millimeters 075 100 14 5 8 371 125 140 17 3 8 441 170 20 1 8 511 200 22 7 8 581 225 25 5 8 651 250 28 3 8 721 300 33 7 8 860 350 39 3 8 1000 400 44 7 8...

Page 16: ...g The furnace is provided with four 15 32 inch 12 mm diameter holes for mounting using four point suspension as shown in Figure 11 The hardware required is shown in Figure 11 DETAIL A and includes fou...

Page 17: ...wo hanger brackets from their standard positions and install them at their base mounting positions as shown in Figure 12 DETAIL A 2 Install four leg brackets see Figure 12 DETAIL B from base mounting...

Page 18: ...ne gas having a heating value of 2 500 100 BTU per cubic foot Sizing of gas supply lines depends on piping capacity and is based on cubic feet per hour based on a 0 3 IN WC pressure drop a 0 6 specifi...

Page 19: ...able 12 Table 12 Gas Connection Sizes Unit Size Natural Gas Propane Connection Inches 075 250 1 2 1 2 300 400 3 4 1 2 Connection size to single stage valve not gas supply line size High Elevation 2 00...

Page 20: ...1 3000 US 075 16590 46 39658 56 100 125 84437 42 11834 54 140 170 200 225 45871 39 9789 53 250 87391 40 9789 53 300 350 400 87391 40 11834 54 2001 4500 Canada 075 84853 47 63922 1 15 mm 100 125 84437...

Page 21: ...th the unit it is packaged attached to the venter housing Detach the vent cap from the housing Specific Venting Requirements Read all of the following before installing venting Type of vent pipe use e...

Page 22: ...te disposal Vent terminal pipe and vent cap terminate the vent system with a vent cap option CC1 In most cases the vent cap is the same size as the vent run Units installed in the United States that a...

Page 23: ...meter holes in outlet duct and secure venter housing in its rotated position to outlet duct using three screws removed in step 1 Vent Termination Vent Pipe and Vent Cap Requirements for both vertical...

Page 24: ...ent Connections Continued Vent Termination Vent Pipe and Vent Cap Continued Figure 16 Vertical Vent Termination Single Wall Vent Run and Double Wall Terminal End Figure 17 Horizontal Vent Termination...

Page 25: ...ent cap to double wall pipe by drilling hole and inserting 3 4 inch long sheet metal screw into vent cap collar see Figure 19 DETAIL C Do not overtighten screw Figure 19 Connecting Double Wall Type B...

Page 26: ...y under wind conditions and to protect the building NOTES HORIZONTAL VENT TERMINATIONS The location of the termination of the horizontal vent system must be in accordance with National Fuel Gas Code Z...

Page 27: ...cast concrete and ceiling hung flush etc Material rectangular duct should be constructed of not lighter than 26 US gauge galvanized iron or 24 B S gauge aluminum Size proper sizing of supply air duct...

Page 28: ...de U channels for the other side flanges to ensure tight joints Use sheet metal screws to fasten ducts and U channels to the furnace flange refer to Ductwork to Furnace Connections section Connection...

Page 29: ...f the duct Or baffles may be inserted between the blower and the heater to assure an even flow of air across the heat exchanger Proper arrangements of blower and duct furnace with respect to angle of...

Page 30: ...TINUED Duct Connections Continued Duct Furnace Blower Connections Continued Figure 22 Duct Furnace Blower Connections STRAIGHT THROUGH AIR BLOWER CONNECTION BLOWER CONNECTION WITH ELBOWS UP OR DOWN BL...

Page 31: ...etermine bypass duct size as follows a Go to column closest to pressure drop through heater b Move down to CFM closest round up to CFM determined in step 2 c Move to left column to determine required...

Page 32: ...with U channel on top and bottom and L channel on sides as shown 3 Slide U channel over heater flange to make connection as shown 4 Form U strips to seal ends as shown Drill fastener holes and secure...

Page 33: ...witch housing are clear of furnace panels and inspection plates Allow at least 4 feet 1 2 meters of service room between the switch and removable panels All external wiring must be within approved con...

Page 34: ...hole pattern shown in Figure 25 DETAIL B to drill holes in ductwork 5 Remove ductwork access panel see Figure 24 DETAIL A 6 Remove sensor bulb from bracket and push sensor through 1 2 inch hole While...

Page 35: ...mportant mixing tube shown in Figure 26 DETAIL A is 12 inches 305 mm long and holder shown in Figure 26 DETAIL B extends 9 3 16 inches 233 mm into ductwork a In horizontal ductwork position sensor ass...

Page 36: ...re air may be pocketed Do NOT install thermostat on cold air walls For specific connection details refer to instructions with the thermostat If more than one unit is cycled from one thermostat separat...

Page 37: ...1 00 Equilibrium 0 60 Setpoint OFF 0 48 Setpoint ON 0 65 Limit Switch A non adjustable high limit switch mounted at the outlet air side of the heat exchanger acts to shut off the gas supply in the ev...

Page 38: ...er motors or 3PH require use of contactor or starter Recommended dial setting for most conditions is 130 F ON and 100 F OFF Conduit is field supplied for wiring fan control to field supplied blower Fo...

Page 39: ...iations in gas supply pressure Refer to the instructions provided with the unit for specific gas valve specifications wiring and operating instructions Optional Two Stage Operation Makeup Air NOTE The...

Page 40: ...in the discharge duct refer to Option AG8 AG9 or AG15 Discharge Air Temperature Sensor Installation section Follow the wiring diagram provided with the unit and the manufacturer s instructions for wir...

Page 41: ...valve The conditioner accepts an input signal of either 4 20 milliamps or 0 10 volts from a customer supplied control device such as a computer With the dip switches on the conditioner in the ON posi...

Page 42: ...s control option AH2 or PN 257473 for option AH3 gas control with lockout Option codes are listed on the unit wiring diagram Ignition Controller As part of the intermittent safety pilot systems the ig...

Page 43: ...el Ensure that electrical supply matches voltage rating of furnace as listed on unit rating plate Ensure that all field wiring is in accordance with wiring diagram Ensure that wire gauges are as requi...

Page 44: ...sing temperature setting drives burner ON or to full fire Observe burner flame at full fire natural gas flame should be about 1 1 2 inches in height with blue coloring Propane gas flame at full fire s...

Page 45: ...opane units leave the factory with the combination valve set so that the outlet gas pressure of a single stage valve or high fire of a two stage valve is 10 IN WC Low fire on a two stage valve is set...

Page 46: ...e for propane gas Other fuels should not display any yellow tipping 3 Open air shutters until yellow disappears MAINTENANCE WARNING If you turn OFF the electrical power supply turn OFF the gas The uni...

Page 47: ...ose manual shutoff valve and observe gas pressure Manometer reading should indicate no loss of gas pressure If loss of pressure is indicated replace combination gas valve before placing heater in oper...

Page 48: ...d blow away any dirt using compressed air i Adjust pilot flame to approximately 1 1 4 inches by removing capscrew from combination valve adjustment screw and turning screw WARNING Do not touch pilot s...

Page 49: ...tion the baffles will have already been removed b Remove baffles between heat exchanger tubes in accordance with Reverse Airflow Conversion section c Remove accumulated dust and grease deposits from h...

Page 50: ...ermostat Check control transformer output Check and tighten all wiring connections as necessary 3 Venter relay defective Replace relay 4 Defective motor or capacitor Replace motor or capacitor Pilot w...

Page 51: ...Duct Furnace Airflow section 4 Improper thermostat location or adjustment Refer to thermostat manufacturer s instructions 5 Belt slipping on blower Adjust belt tension Cold air delivered 1 Fan control...

Page 52: ...________________________________________ ________________________________________________________ Phone ________________________________________________________ Model ________________ Serial No ______...

Reviews: