
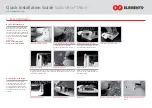

Connect the pigtails to antenna.
A
B
Line up the Ports in the openings.
Insert the board. First line up the ports,
then snap the board in the position.
Connect the pigtails to the board/radio.
Connect the opposite side of the
pigtail(s) to the radio/board connectors.
Snap the Board to the position.
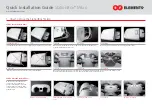
In case the board locks (close to the each of positioning pins) are too though, no need
for bigger hammer. Gently release the side locks with your fingers so board sits to the
pre molded position smoothly.
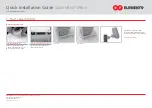
Remove all transport protecting tapes
and similar items from the board. First
check the setup of ports on your board.
If you need to open some of premolded
positions on the Base Panel, please do so
prior to inserting the board. Connect the
pigtail(s). Antenna side are both MMCX.
Setup of ports:
5GHz version
Port A – Vertical Polarization
Port B – Horizontal Polarization
First release rear side locks which
are holding board on the pins using
your fingers and lift the board from
the postion. Release front side locks
and by lifting board release the board
from the Base Panel. Disconnect the
pigtail(s).
Release the side locks.
Board lock too though.
Board locked OK.
Also make sure you mind the pigtails
path is free in space between the Board
and the Base Panel.
How To Release the Board
Lift the board.
Release the front position.
Release the rear position.
Disconnect pigtails from the Board.
Disconnect Pigtails from the Antenna.
Done :)
How To Insert the Board
2 Board Installation
Quick Installation Guide
StationBox® Mikro
www.rfelements.com
®


