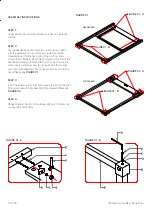
FIGURE 01
FIGURE 01 - B
HEADBOARD
FOOTBOARD
Stacked Canopy Bed -
Page 2 of 4
FIGURE 01 - A
FIGURE 01 - B
FIGURE 01 - A
FIGURE 01 - B
9
8
2
5
D
10/1/18
FIGURE 01 - A
ASSEMBLY INSTRUCTIONS
STEP 1:
Unpack each component and place on a flat, non-abrasive
surface.
STEP 2:
Lay the headboard (A) and post (D) on a working surface
with the hardware of the post facing inside. Secure the
threaded rods (1) to the fixed nuts of the post by simply
turning
them
manually. Bring the post against one end of the
headboard and align the threaded rod (1) to go through the
holes. Insert curved washers (6), lock washers (5) and hex
nuts (4) on threaded rods (1) and tighten the hex nuts (4) by
hand. Please see
FIGURE 01.
STEP 3:
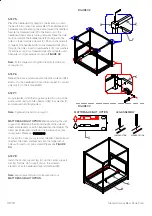
Insert the locator end of the short canopy rail (E) into the post
(D)
and secure with Allen head bolt (2) provided. Please see
FIGURE 02.
STEP 4:
Repeat steps 2, 3 and 4 for footboard (B), post (D) and short
canopy rail (E) assembly.


