50
The following pages will cover in detail how to select the
proper orifice, adjust the manifold pressures (at min and
max firing rates), verify the rate and set the proper temper-
ature rise. It is very important to ensure the unit is operat-
ing within the design parameters to deliver the proper
amount of heat when considering local gas heating val-
ues, altitudes of installation and manifold pressures.
The -97V Modulating products require a 2% reduction in
rate (input capacity in BTU’s) per each 1000 ft of elevation
above sea level when installed at elevations of 2,000 ft or
more. For example; a -97V furnace installed at 5,000 ft
above sea level would need to have the input rate reduced
to 10% less than the input BTU’s listed on the nameplate.
The process of properly adjusting the furnace requires five
steps:
1. Orifice Selection/Altitude Adjustment
2. Adjust The Gas Pressures (Inlet and Outlet, high and
low fire)
3. Verify the Input Rate
4. Adjust the Gas Heat Temperature Rise
5. Temperature Rise Verification
These steps may need to be repeated (in the same order)
to achieve the proper final adjustments required. Below is
the suggested procedure to select, adjust and verify fur-
nace operation.
STEP 1: ORIFICE SELECTION/
ALTITUDE ADJUSTMENT
The furnace is supplied with # 51 orifices from the factory
that will deliver nameplate input with natural gas with a
heating value of 1100 BTU’s/ft
3
at elevations from 0-2,000
ft. All other elevations and heating values will require
changing orifices and possibly input rate.
A. Gas requirements: LP or Natural?
The furnace is supplied configured for Natural Gas. If
installation will require LP gas, then an LP conversion
kit is required (See Section of this manual titled
LP
Conversion
for more details).
B. Obtain the average annual sea-level corrected heating
value (for orifice calculations) and average annual alti-
tude-adjusted heating value (for rate calculation) from
your local gas supplier.
High Altitude Input Correction and Conversions
C. If the elevation of your installation is below 2,000 ft,
skip this step. If the elevation of your installation is
2,000 ft or more above sea level, correct your input
rate based on the altitude. The formula for determining
the new input rate based on altitude is as follows:
New Input = Nameplate Input x (1-((Elevation in
Ft/1000Ft)x0.02))
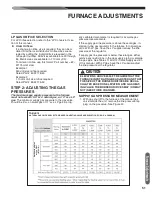
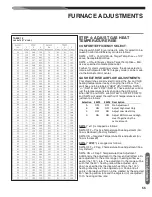
Select a High Altitude Kit
If the furnace is installed at an elevation of 5,000 ft. to
8000 ft. above sea-level, a high-altitude conversion
must be made to the furnace. Kits can be ordered
from the distributor. Use the table below to select your
kit. Instructions for the conversion are included with
the kit.
D. Select Orifice
Use Table 14 to select the proper natural gas orifice
based on the local heating rate and the elevation
(when above 2,000 ft). Note: LP conversion kit con-
tains 1.10mm orifices that are correct for all altitudes
up to 8000 ft.
FURNACE ADJUSTMENTS
Fu
rn
ac
e
Ad
ju
stm
en
ts
TABLE 13
HIGH ALTITUDE KITS

