background image

LIGHTING INSTRUCTIONS

This appliance is equipped with an
automatic electronic ignition device.
This device lights the oil burner each
time the room thermostat (closes) calls
for heat. See oil burner instructions
enclosed with furnace for further detail. 

MAKE SURE THAT COMBUSTION
CHAMBER IS FREE OF OIL BEFORE
USING RESET BUTTON ON
PRIMARY CONTROL. FAILURE TO
DO SO CAN CAUSE FLASH FIRE OR
EXPLOSION RESULTING IN
PROPERTY DAMAGE, PERSONAL
INJURY OR DEATH.

TO START FURNACE

1. Set room thermostat to highest

setting. 

2. Open shut-off valve in oil supply line. 

3. Close line switch. Burner should

start automatically. 

4. Bleed the fuel pump as soon as the

burner motor starts rotating. To
bleed the fuel unit, attach a clear
plastic hose over the bleed plug.
Loosen the plug and catch the oil in
an empty container. Tighten the plug
when all air is purged. 

5. Reset room thermostat to desired

temperature setting. 

11

WARNING

!

TO STOP FURNACE 

1. Set the room thermostat to lowest

temperature setting. 

2. Turn “Off” line switch to the furnace.

IF BURNER DOES NOT START

1. Check fuse or breaker in the furnace

circuit. 

2. Assure room thermostat is set above

room temperature. 

3. Check oil level in the tank. 

4. Make sure that oil line shut-off

valves are open. 

5. Wait five minutes to allow the control

to cool, so that it will recycle. Reset
the button on the primary control. 

6. Depress manual reset button on the

motor. 

NOTE: Do not expose cad cell to
direct electric bulb light or sunlight.
Light may enter through the air control
band slot and upset the electric circuit
of this device.

OPERATING INSTRUCTIONS

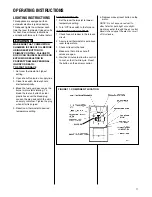
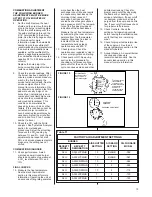
FIGURE 11. COMPONENT LOCATION

I421

OIL PROP

Summary of Contents for LX2000 Series

Page 1: ...cal switch do not use any phone in your building Immediately call your fuel oil supplier from a neighbor s phone Follow the fuel oil supplier s instructions If you cannot reach your fuel oil supplier...

Page 2: ...und to electrical panel DC microamp A flame signal hot surface ignition units Correct control voltage Measure and set heat anticipator amperage Air conditioning low voltage wires connected to terminal...

Page 3: ...rical Wiring 9 Thermostat 9 Heat Anticipator Settings 9 Typical Installation Diagrams 10 Operating Instructions 11 Lighting Instructions 11 Burner Adjustment 12 Furnace Adjustment 12 Air Volume Adjust...

Page 4: ...N OR AGAINST THE FURNACE JACKET THE AREA AROUND THE FURNACE MUST BE KEPT CLEAR AND FREE OF ALL COMBUSTIBLE MATERIAL INCLUDING GASOLINE AND OTHER FLAMMABLE VAPOR OR LIQUIDS THE HOMEOWNER SHOULD BE CAUT...

Page 5: ...hen they condense When appliances are installed within a confined space and combustion air is taken from within the heated space the air supply must be through two permanent openings of equal area one...

Page 6: ...f Oil Burning Equipment defines confined space and unconfined space as follows Confined Space Any space whose volume is less than 50 cu ft per 1 000 BTU HR 4 8 M3 per KW of the aggregate input rating...

Page 7: ...ct connection should be made to the bottom of the furnace For installations where return air ducts cannot be run under the floor return air may be taken from the sides and or back by cutting the furna...

Page 8: ...elay is mounted to the unit s main junction box and the flame sensor cadmium sulfide cell is enclosed in the burner housing above the blower wheel The standard oil burner is equipped with a single sta...

Page 9: ...ve should be installed in the suction line to keep the line primed and the internal by pass in the fuel unit must be plugged as per instructions furnished with the burner All oil lines must be tight a...

Page 10: ...10 TYPICAL INSTALLATION DIAGRAMS FIGURE 9 TWO PIPE INSTALLATION FIGURE 10 ONE PIPE INSTALLATION...

Page 11: ...r plastic hose over the bleed plug Loosen the plug and catch the oil in an empty container Tighten the plug when all air is purged 5 Reset room thermostat to desired temperature setting 11 WARNING TO...

Page 12: ...ter from the barometric damper Another 1 4 inch hole is provided by the manufacturer for testing over the fire Drill another 1 4 hole between the barometric damper and the chimney as shown in Figure 1...

Page 13: ...tion in this manual for more information Operating the unit at an excessive firing rate generates pollutant emissions Check for prompt pump cutoff by observing the flame or by checking for smoke at sh...

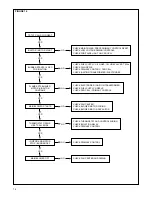
Page 14: ...R CHECK FUEL SUPPLY NOZZLE CHECK CAD CELL PRIMARY CONTROL CHECK FAN CENTER CHECK BLOWER MOTOR WIRING CHECK BLOWER MOTOR CAPACITOR CHECK THERMOSTAT AND CONTROL WIRING CHECK ISOLATION RELAY CHECK PRIMAR...

Page 15: ...rode tips see figure 17 2 Position the gauge so the center scribe mark is in line with the nozzle orifice Do not scratch the nozzle face 15 housing This locks the assembly into position The nozzle sho...

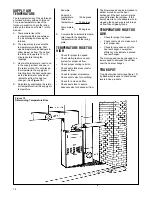
Page 16: ...degrees E Compare the calculated tempera ture rise with the specified temperature rise on the rating plate TEMPERATURE RISE TOO HIGH Check for proper fan speed Check static pressure on duct system for...

Page 17: ...duce the overfire draft dangerously TIPS FOR BETTER SMOKE READINGS 1 Before using tap the sampling tube to loosen any soot or rust tighten the clamp screw without any filter paper in the slot and purg...

Page 18: ...r motor must be cleaned periodically by a qualified installer service agency or the oil supplier to prevent the possibility of overheating due to an accumulation of dust and dirt on the windings or on...

Page 19: ...1375 649 1715 809 2070 977 620 293 835 394 940 444 1190 562 620 293 835 394 940 444 1190 562 620 293 835 394 940 444 1190 562 620 293 835 394 940 444 1190 562 620 293 865 408 1030 486 1290 609 1065 50...

Page 20: ...ove Enlarge to match chimney interior Replace loose bricks and mortar If all other causes have been eliminated a new chimney may have to be built Replace loose bricks or mortar Remove Have chimney cle...

Page 21: ...LY DATA 056 067 084 095 112 130 150 NOTE This appliance should only be used with specified Delavan or Monarch nozzles Use of other nozzles may result in unsatisfactory performance DELAVAN 50 60 70 B D...

Page 22: ...to oil pump supply line 16 Burner blower air inlet restricted or burner blower wheel dirty 17 Restricted flue 1 Cracked dirty or loose electrodes 2 Electrodes not properly adjusted 3 Incorrect nozzle...

Page 23: ...ion kit 3 Undersized return air 4 Overfired furnace 5 Dirty heat exchanger 6 High draft barometric damper not properly set 7 Excessive temperature rise 8 Air shutter adjustment open too much 1 Lack of...

Page 24: ...in operating position 7 Dirty strainers 8 Dirty line filter 9 Motor does not come up to speed 10 Bad air leak at seal 11 Improper pump setting 1 Pump gears worn 2 Vertical oil lift too great over 10...

Page 25: ...rfire Draft inches negative H2O Breech Draft inches negative H2O Chimney Draft inches negative H2O Smoke Reading CO2 CO2 Stack Temperature degrees F Room Temperature degrees F Net Stack Temperature de...

Page 26: ...HEATING AND COOLING CONTINUOUS LOW SPEED BLOWER SCHEMATICFIGURE 38 FOR MODELS WITH UTEC 1012 925 INTEGRATED FURNACE CONTROL 26...

Page 27: ...27 PARALLEL WIRING UPFLOW OIL FURNACES SCHEMATIC...

Page 28: ...28 HEATING AND COOLING CONTINUOUS LOW SPEED BLOWER SCHEMATICFIGURE 38...

Page 29: ...29 FIGURE 38 FOR MODELS WITH UTEC 1012 925 INTEGRATED FURNACE CONTROL...

Page 30: ...30...

Page 31: ...31...

Page 32: ...32 CM 898...

Reviews: