background image

31

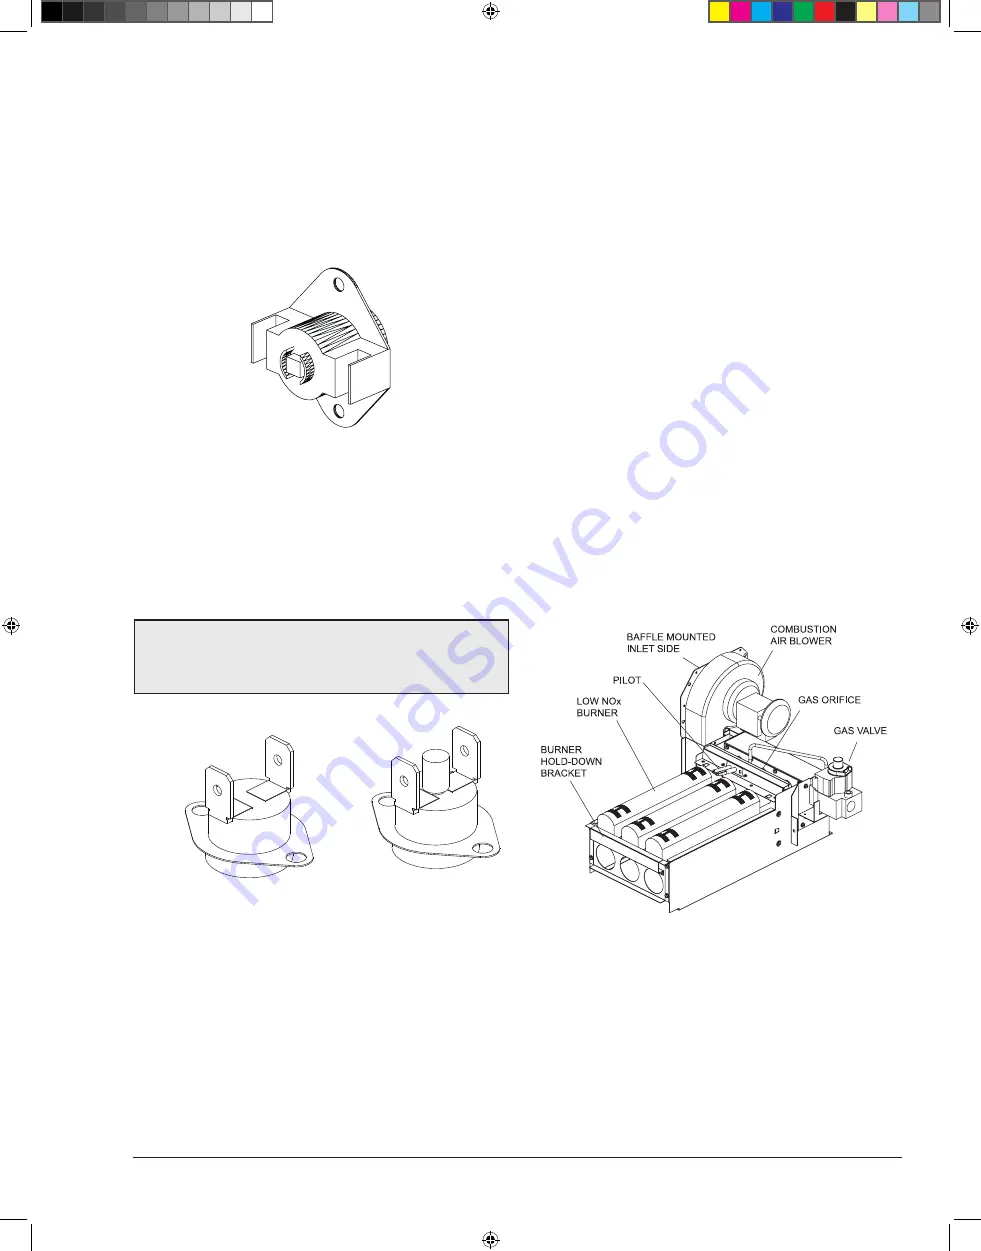
Flame Roll-Out Safety Switch

Heaters  are  equipped  with  a  thermal  cutoff  device  to 

prevent  flame  roll-out  in  the  event  the  heat  exchanger 

becomes  blocked.  It  is  a  “manual  reset”  type  roll-out 

switch that must be reset by a service technician after any 

over-temperature conditions have been fixed. Excessive 

restriction in the heat exchanger flue passage may cause 
the switch to disable the heater.

Figure 53.  Flame Roll-out Switch – Manual Reset

High Limits

The heater is equipped with two high limits.
On polymer headers both are automatic and are located in 

the inlet/outlet header. Both are set at 135°F (57°C). 
On ASME brass header both are located on the inlet/outlet 

headers. HL1 is manual reset and set to open at 160°F 

(71°C). HL2 is automatic and set to open at 135°F (57°C).

NOTE:

  An  erratic  high  limit  is  often  characteristic  of 

an internal heat exchanger problem, e.g. scale build-up, 

defective  bypass.  Refer  to  "TROUBLESHOOTING"  on 

page 37.

F10669-1

MANUAL RESET 

(ASME ONLY)

AUTO RESET 

Figure 54.  High Limit Switches

High Limit Removal

1.  Shut off main electrical power switch to heater.

2. 

Remove inlet/outlet sheet metal access panel.

3.  Remove  defective  high  limit  and  replace  with  the 

correct, new high limit.

4. 

Replace access panel.

Pilot Safety

The heater employs a pilot safety which closes the main 

gas valve within 8/10ths of a second whenever the pilot 

flame  is  interrupted.  The  pilot  flame  is  automatically  lit 

when the device is powered. The heater performs its own 

safety check and opens the main valve only after the pilot 

is proven to be lit. 

Burner Tray Removal

1.  Shut off main electrical power switch to heater.

2. 

Shut off gas upstream of heater.

3.  Remove front door.

4. 

Disconnect gas line from gas valve.

5. 

Remove  (2)  screws  that  mount  burner  tray  to  the 

base of the unit, (2) screws that mount the blower 

box to the burner tray, and (1) screw that secures the 

anti-rotation bracket to the heater.

6. 

Disconnect wires that terminate at gas valve.

7.  Unscrew (4) screws that secure the control box.
8.  Disconnect pilot wire from the pilot assembly.

9. 

Disconnect  wire  connector  from  the  combustion 

blower.

10. Carefully slide out the burner tray assembly.
11.  Reverse above procedure to reinstall.

Figure 55.  Burner Tray Assembly

Gas Valve Removal

1.  Shut off gas supply to the heater. Remove gas piping 

to gas valve inlet.

2. 

Remove burner tray, following above procedure.

3.  Disconnect, pilot tubing from gas valve.

4. 

Remove (2) screws that mount anti-rotation bracket 

to the burner tray.

6000.592_PoolSpa_LoNOx.indd   31

10/21/2019   2:23:58 PM

Summary of Contents for Raypak R207A

Page 1: ...cinity of this or any other appliance To do so may result in an explosion or fire WHAT TO DO IF YOU SMELL GAS Do not try to light any appliance Do not touch any electrical switch do not use any phone in your building Immediately call your gas supplier from a neighbor s phone Follow the gas supplier s instructions If you cannot reach your gas supplier call the fire department Installation and servi...

Page 2: ...ngths and gas inlet sizes See page 15 Required pressure for Natural Gas Min 5 WC Max 10 5 WC Sediment trap is required for all installations See page 14 WATER CHEMISTRY Water chemistry requirements See page 5 POWER Supply voltage See page 21 for acceptable input voltages VENTING Materials See pages 9 11 and 13 D 2 Power Vent Kit See page 13 Indoor Stack kit See page 11 CONTROLS INTERFACE Wiring di...

Page 3: ...nal Auxiliary Bypass Valve 18 Auxiliary Bypass Valve Adjustment 18 Pressure Relief Valve Installation 18 Plumbing Diagram 19 Heat Exchanger Reversal 20 5 ELECTRICAL WIRING 21 Electrical Power Draw 21 Transformer Wiring 21 6 WIRING DIAGRAM 23 7 CONTROLS 24 Control Panel Removal 24 Control Adjustments Digital Models 24 Operation 25 Status and Diagnostics 27 Remote Control Installation and Operation ...

Page 4: ...l injury death or substantial property damage if ignored A ACAUTION Indicates the presence of hazards or unsafe practices which could cause minor personal injury or product or property damage if ignored CAUTION CAUTION used without the warning alert symbol indicates a potentially hazardous condition which could cause minor personal injury or product or property damage if ignored NOTE Indicates spe...

Page 5: ...cause severe damage to your heater and associated equipment Maintain your water chemistry according to Table A If the mineral content and dissolved solids in the water become too high scale forms inside the heat exchanger tubes reducing heater efficiency and damaging the heater If the pH drops below 7 2 this will cause corrosion of the heat exchanger and severely damage the heater Heat exchanger d...

Page 6: ...del Identification Number The model number of a pool heater can be found on the Sales Order and the pool heater rating plate The example below identifies what the characters of the model number represent B _ 207A E N C 26 Burner Orifice Size C Copper tubes X Cupronickel tubes N Natural gas E Electronic ignition 207A input 199 500 BTUH 58 4 kw 267A input 266 000 BTUH 77 9 kw 337A input 332 500 BTUH...

Page 7: ... the equipment nor attempt repairs according to these instructions A AWARNING Improper installation adjustment alteration service or maintenance may damage the equipment create a hazard resulting in asphyxiation explosion or fire and will void the warranty NOTE The heater should not be located in an area where possible water leakage will result in damage to the area adjacent to the heater or to th...

Page 8: ...take ducts located within 10 3 m horizontally For Canadian installations pool heaters shall not be installed with the top of the vent assembly within 10 3 m below or to either side of any opening into the building Refer to the latest revisions of CAN CSA B149 A minimum of 6 1 8 m is required from the heater to an inside corner wall for proper outdoor venting Description Location Distance in mm a 3...

Page 9: ... to a chimney or gas vent Heater must always be vented to the outside See section Vent Piping on page 13 for details Minimum allowable space is shown on the nameplate A AWARNING Indoor heaters require a drafthood that must be connected to a vent pipe and properly vented to the outside Failure to follow this procedure can cause fire or fatal carbon monoxide poisoning Outdoor and Indoor Stacks The o...

Page 10: ... closest to unit 4 total 2 x 6 x 1 8 Pallet Anchor Bracket 4 Total Kit 011636 1 4 x 1 3 4 S S Tapcon Bolt and Washer Field Supplied NOTE Use hole closest to unit with washer overlapping edge of unit Min Edge Distance 6 152 mm Min Edge Distance 6 152 mm F10649 Model B in mm 207A 20 508 267A 23 584 337A 26 660 407A 29 737 Florida and Texas Building Code Wind Speed 150 mph 3 sec gust Exposure C Figur...

Page 11: ...from Inside the Building Each opening shall have a minimum net free area as noted Model Sq in m2 207A 200 0 13 267A 266 0 17 337A 333 0 21 407A 399 0 26 Table E Opening Minimum Net Free Requirements Indoor Air All Air from Outdoors When air is supplied directly from outside the building each opening shall have a minimum net free area as noted Model Unrestricted Opening sq in m2 Typical Screened or...

Page 12: ...219 99 238 108 19 8 6 R407A 399 116 9 29 737 9 58 1 2 1486 14 5 368 12 1 2 318 3 4 2 237 108 256 116 21 9 5 Table G Heater Specifications and Dimensions Specifications and Dimensions 20 1 2 521 mm 31 13 16 792 mm DRAFTHOOD B A J D C 7 3 4 197 mm GAS CONNECTION F10647 INDOOR Figure 9 Front View 26 1 2 673 mm ELECTRICAL CONNECTION 28 711 mm 34 867 mm STACKLESS OUTDOOR TOP 4 3 8 111 mm 8 7 8 225 mm 6...

Page 13: ...k shall be at least 5 1 5 m in vertical height above the drafthood outlet The vent cap location shall have a minimum clearance of 4 1 2 m horizontally from and in no case below unless a 4 1 2 m horizontal distance is maintained from electric meters gas meters regulators and relief equipment Theweightoftheventstackorchimneymustnotrestonthe heater drafthood Support must be provided in compliance wit...

Page 14: ...C upstream pressure under load and no load conditions must be provided for natural gas Gas Pressure Regulator The gas pressure regulator is preset at 3 1 in WC for natural gas The pressure at the gas valve taken with a manometer should be about 3 1 in WC natural gas If an adjustment is needed remove seal and turn adjustment screw clockwise to increase pressure or counter clockwise to decrease pres...

Page 15: ... 2 210 64 0 445 135 6 337A 10 3 0 30 9 1 140 42 7 290 88 4 407A 20 6 1 95 29 0 215 65 5 A 3 4 gas line can be used for up to 5 1 5 m maximum length from the gas valve in addition to the sediment trap Table I Gas Pipe Sizing Flow Rates Model Pipe Size Min GPM lpm Max GPM lpm 207A 1 1 4 1 1 2 2 20 75 125 473 267A 1 1 4 1 1 2 2 25 95 125 473 337A 1 1 4 1 1 2 2 35 132 125 473 407A 1 1 4 1 1 2 2 40 151...

Page 16: ...ded If there is any possibility of back siphoning when the pump stops it is suggested that a check valve or valves also be installed in the system Brass Headers ASME Models Heater must be located so that any water leaks will not damage the structure of adjacent area Before attaching the ProTek Shield Adapter to the inlet connection and the 2 inch unions make sure the O rings are properly seated in...

Page 17: ... constant heater internal temperature between 105 F 41 C and 115 F 46 C despite continually changing flow rates from the filter and changing pool temperatures This narrow range is needed to prevent damaging condensation on the burners which will occur if the heater runs for any length of time below 100 F 38 C It is also needed to inhibit scale formation in the tubes by maintaining temperatures wel...

Page 18: ...the BTU output of the model to be installed is recommended for this heater The maximum acceptable pressure relief valve setting is 125 psi 862 kPa A 3 4 NPT connection is provided in the Polymer header for installation of a pressure relief valve The valve shall be installed in a vertical position Do not over tighten Install pressure relief valve hand tight plus 1 2 turn F10662 IN OUT HEADER PRV DI...

Page 19: ...er Connection Figure 27 Single Pool Heater Installation Figure 28 Multiple Pool Heater Installation ISOLATION VALVE PRESSURE RELIEF VALVE PUMP UNION CHECK VALVE BALL VALVE 6000 592_PoolSpa_LoNOx indd 19 10 21 2019 2 23 51 PM ...

Page 20: ...pe may be glued directly into the headers unions Heat Exchanger Reversal Procedure for Residential Models 1 Remove right and left side access panels See Figure 29 F10652 Figure 29 Access Panels 2 Disconnect wires at high limit AGS automatic gas shut off water pressure switch on the in out header and ProTek Shield bonding wire See Figure 30 F10653 Figure 30 Component Wiring Locations In Out Header ...

Page 21: ...r power vent D 2 wiring Electrical Power Draw A ACAUTION Heater must be electrically grounded and bonded Bonding lug is provided loose with the heater Install bonding lug on lower right or left side of jacket as necessary for bonding the heater Mounting hole is provided on the jacket NOTE Failure to ground the heater electrically could affect the heater s electronics NOTE See Time Clock Fireman s ...

Page 22: ... latest edition of the National Electrical Code ANSI NFPA 70 Canada Canadian Electrical Code CSA C22 1 Part 1 and Part 2 CAUTION If the transformer s primary side is wired for 120 VAC and 240 VAC is applied damage to the transformer and PC board may result Such damages are not covered under manufacturer s limited warranty NOTE Input power to the heater 120 or 240 VAC can be supplied from the load ...

Page 23: ...23 For Reference Only For Reference Only 6 WIRING DIAGRAM 6000 592_PoolSpa_LoNOx indd 23 10 21 2019 2 23 53 PM ...

Page 24: ... panel stops Do not force NOTE Caution must be used to not damage controls or wiring F10647 3 KNURLED SCREW Figure 37 Knurled Screw Location Control Adjustments Digital Models The pool heater touchpad located on the upper front panel of the heater allows the user to select either POOL or SPA operation and to adjust the setpoint temperature The LCD display window indicates the mode OFF SPA POOL and...

Page 25: ...ly for 3 to 5 seconds The heater will continue to operate while in the Service Menu The first screen displayed is the Flame Strength indicator which indicates the pilot flame current using a bar graph and numerical display A signal of less than 4 bars indicates a weak flame signal and may require service Refer to the Troubleshooting section for possible causes and corrections Figure 41 Flame Stren...

Page 26: ...ep one above to access the program screen Press the MODE button until SPA MAX TEMP appears on the digital display Using the UP and DOWN buttons will change the Maximum Temperature Setting to your desired value The control can be set for a maximum of 107 F 42 C Pool Max Temp Pool Setpoint Maximum Adjustment Refer to step one above access into the program screen Press the MODE button until POOL MAX ...

Page 27: ... Time clock fireman switch circuit is open Low Temp Lockout Water temperature below 36 F 2 C Table N Heater Status Messages Active Faults The following conditions are displayed only while there is a demand for heat present Display Condition Water Sw Open Water pressure switch open Vent Field Sw 1 Vent spill switch field switch 1 open Hi Limit 1 Fault High limit 1 open Hi Limit 2 Fault High limit 2...

Page 28: ... Heating in the SPA Mode Remote Mode Figure 46 Remote Control Menu Remote Operation Activating the Remote To activate or deactivate the remote function 1 Press and hold the UP and DOWN arrow buttons for 3 to 5 seconds The second line of the display will alternate even when the unit is off No Demand NOTE When in remote operation the keypad mode and temp buttons are disabled Figure 47 Remote Control...

Page 29: ...e Remote Interface Harness 7 Install the 7 Pin Remote Interface Harness to the P8 connector and turn power ON to the heater See Figure 49 For activation of the remote control see section on page 28 3 Wire Remote Control Using Three Position Switch Pool Off Spa or Low Off High This application assumes that both heating functions pool and spa are required 1 Turn on power to the heater 2 Push the MOD...

Page 30: ...a multimeter to check If the pressure switch fails to close either the switch setting is too high or not enough pressure is being supplied by the filter pump 4 Turn the heater ON 5 Manually turn the pressure adjustment knob clockwise until the heater shuts off A flat screwdriver may be necessary if knob is too tight 6 Slowly turn the adjustment knob counter clockwise until the heater calls for hea...

Page 31: ... and replace with the correct new high limit 4 Replace access panel Pilot Safety The heater employs a pilot safety which closes the main gas valve within 8 10ths of a second whenever the pilot flame is interrupted The pilot flame is automatically lit when the device is powered The heater performs its own safety check and opens the main valve only after the pilot is proven to be lit Burner Tray Rem...

Page 32: ...then remove relief valve Remove side access panels 2 Remove top jacket holding screws 3 Remove rear top panel 4 Remove screws mounting the rain shield to the rear panel Also remove the screws that mount the rain shield to the sway brace Remove rain shield 5 Remove the four 4 screws holding down the flue collector Remove the flue collector 6 Disconnect flange nuts on Inlet Outlet header remove ProT...

Page 33: ...m to minimize airborne dust Use feasible engineering controls such as local exhaust ventilation or dust collecting systems to minimize airborne dust Wear appropriate personal protective equipment including gloves safety glasses with side shields and appropriate NIOSH certified respiratory protection to avoid inhalation of airborne dust and airborne fiber particles Unitherm Governor U G Replacement...

Page 34: ... gas supply fail to shut off turn off the manual gas control to the appliance Visual Inspection Flames can be observed through the opening below the plenum Flame color is blue and evenly spread on the top surface of the burner At least every three months a visual inspection should be made of the burners Water Pressure Switch A water pressure switch is provided in the heater to shut off the burners...

Page 35: ...any part of the control system and any gas control which has been under water 1 STOP Read the safety information above 2 Set the thermostat to the lowest setting 3 Turn off all electrical power to the appliance 4 This appliance is equipped with an ignition device which automatically lights the pilot Do not try to light the pilot by hand 5 Remove heater door panel 6 Turn gas control knob clockwise ...

Page 36: ...s higher than usual 4 The pump may have lost its prime and be running dry Check the pressure on the filter If there is no pressure then you are not moving water or your gauge is broken Try to get the pump to run at its normal flow rate Cold Weather Operation Important Freeze Information MODERATE CLIMATE Heater operation can continue during short term cold spells When temperatures are between 0 F 1...

Page 37: ...re Adjust gas pressure Insects or debris clogging burner intake ports Clean burners Outer jacket very hot paint blistered Broken refractory caused by shipping damage or improper combustion Replace refractory panels Excessive sooting of heat exchanger Determine cause of sooting and correct Takes too long to heat pool or spa Under sized heater Calculate heating capacity of heater Htr output BTUH Poo...

Page 38: ...tor on gas control Check for 24 VAC across PV MV PV terminals on PC board If voltage is okay replace gas control if not replace PC board NOTE If PC board goes into lockout reset system Lockout is used on L P G models Check for 24 VAC across MV MV PV terminals If no voltage replace module Check electrical connections between PC board and gas control If okay replace gas valve or gas control operator...

Page 39: ...nce k 261 1 199 0 153 1 118 8 93 0 73 3 58 3 51 0 If okay replace Circuit Board Sensor Failure Inspect thermister wires and connector at Terminal P1 Check resistance value of the thermister Reference to chart below Replace thermister if not within 10 of values shown below If okay replace Circuit Board Sensor resistance at various temperatures Water Sw Open Pressure switch Verify water flow and pre...

Page 40: ... warranties must be properly tagged with a return parts tag completely filled in with the heater serial number model number etc and shipped to the Company freight prepaid If determined defective by the Company and within warranty a like part or equal substitution will be returned freight collect Credit will not be issued MANUFACTURER 2151 Eastman Avenue Oxnard Ca 93030 6000 592_PoolSpa_LoNOx indd ...

Page 41: ...P 3 V 1 V 2 V 9 M I S I3 S 2 S 5 HP 4 HP 7 HP 6 HP I2 S 6 HP I5 HP 3 HP 7 S 4 S 17 HM 11 S 4 C 6 M 8 S 8 M 7 M 3 S 3 B 4 B 1 G 10 S 1 B 2 B 2 M 3 J 10 M 6 B 5 B 7 C 1 J 4 S 5 S 6 S 9 M 1 R 2 R 2 J 13 M 4 V 12 M 8 B 6000 592_PoolSpa_LoNOx indd 41 10 21 2019 2 24 04 PM ...

Page 42: ...L 17 M FOR UNITS WITH ASME BRASS HEADERS FROM 12 2019 FOR UNITS WITH ASME CAST IRON HEADERS PRIOR TO 12 2019 16 HM 15 HM 12 HM 9 HM 10 HM 2 C 6 M 11 HM 8 HM OPTIONAL 1 M 3 C 6 C 5 HM 17 HM 14 HM 13 HM 2 HM 4 HM 7 HM 3 HM 6 HM 2 S 9 S 4 S 18 HM 19 HM 21 HM 20 HM 19 HM 6000 592_PoolSpa_LoNOx indd 42 10 21 2019 2 24 07 PM ...

Page 43: ...21 M 22 M TEXAS CODE OPTION PRIOR TO 12 2019 1 M 19 HP 3 M OPTIONAL 18 HP 17 HP 20 HP 13 HP 2 HP 16 HP 11 HP 12 HP 14 HP 8 HP 6 C 1 C 10 HP 16 HP 12 HP 2 HP 13 HP 14 HP 17 HP 18 HP 8 HP 6 C 19 HP 19 HP 11 HP 1 M 1 C 15 HP 6 M OPTIONAL 1 P 2 P 4 P 6 P IID LOW NOx PILOT 6000 592_PoolSpa_LoNOx indd 43 10 21 2019 2 24 09 PM ...

Page 44: ...827F 006827F 006827F Inlet Outlet Header Includes 6 HP Units manufactured from 10 2019 017965F 017965F 017965F 017965F Units manufactured from 7 2013 thru 9 2019 014648F 014648F 014648F 014648F 3 HP Return Header Includes 6 HP 015095F 015095F 015095F 015095F 4 HP Tube Bundle Copper 010059F 010060F 010061F 010062F Tube Bundle Cupronickel Units manufactured from 7 2013 014930F 014931F 014932F 014933...

Page 45: ...19 010055F 006733F 010057F 010058F Tube Bundle Cupronickel ASME Units manufactured from 12 2019 017978F 017979F 017980F 017981F Units manufactured prior to 12 2019 010368F 010369F 010370F 010371F 5 HM Baffle 010038F 005261F 010040F 010041F 6 HM Stud Bolt Kit Units manufactured from 12 2019 017982F 017982F 017982F 017982F Units manufactured prior to 12 2019 007870F 007870F 007870F 007870F 7 HM Head...

Page 46: ...11 M Touch up Paint Green 750125 750125 750125 750125 Dark Gray 750126 750126 750126 750126 Cool Dark Gray 750256 750256 750256 750256 Warm Dark Gray 750258 750258 750258 750258 12 M Tie Down Bracket Optional 011636 011636 011636 011636 13 M Roll Out Switch 250ºF Optional 011745F 011745F 011745F 011745F Roll Out Switch 250ºF Upgrade 011733F 011733F 011733F 011733F 14 M Texas Code Option ASME Only ...

Page 47: ... 3 Pcs Units with Polymer Header 010311F 010311F 010311F 010311F Access Panel Set ASME Access Panel Set 3 Pcs for BR Header 017967F 017967F 017967F 017967F Access Panel Set 3 Pcs for CI Header prior to 12 2019 010312F 010312F 010312F 010312F 5 S Jacket Side Panel Right 010313F 010313F 010313F 010313F 6 S Jacket Side Panel Left 010314F 010314F 010314F 010314F 7 S Jacket Rear Panel 2 Pcs 010315F 010...

Page 48: ...O 9001 REGISTERED QUALITY MANAGEMENT SYSTEM www raypak com Raypak Inc 2151 Eastman Avenue Oxnard CA 93030 805 278 5300 Fax 805 278 5468 Litho in U S A 6000 592_PoolSpa_LoNOx indd 48 10 21 2019 2 24 10 PM ...

Reviews: