background image


TM012 Rheem Electric Water Heaters Service Instructions REV: B 
Date of Issue: 03/06 
 

This document is stored and maintained electronically by 

 Service. All printed copies not bearing this statement in RED are deemed “uncontrolled”


19

Fault Finding Chart 2.2 


2.2

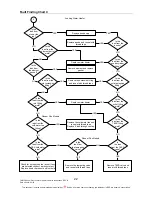
No hot water - Twin element models

Is

 the water in

 the tank at least 6 

degrees lower than 

the thermostat 

setting? 

Are

the bottom 

thermostat ECO 

contacts

closed ? 

Replace the lower 

element 

Water heater 
electrically ok

3

Does

the element

have the correct 

resistance? 

Test 7

NO

Break in wiring loom. 

Locate and repair  

Replace lower 

thermostat

Is

 the bottom

 element installed

 in the correct 

orientation? 

NO

Install the element 

correctly and reset the 

ECO

NO

YES

Test 5 

Are

the bottom 

thermostat contacts

closed ? 

YES

Test 6

NO

Replace lower 

thermostat

YES

Slide the thermostat out from under the 

retaining clamp and allow base to cool

NO

Is 

the overall

resistance of the 

water heater

correct? 

YES

NO

YES

Test 8

YES

Did 

the thermostat

contacts

close? 

Replace lower 

thermostat

NO

YES

Test 6


Summary of Contents for TM012

Page 1: ... Pt ty y L Lt td d A AB BN N 2 21 1 0 09 98 8 8 82 23 3 5 51 11 1 SERVICE INSTRUCTIONS Rheem Electric Water Heaters TM012 R R Re e ev v vi iis s si iio o on n n B B B P P Pu u ub b bl lli iis s sh h he e ed d d M M Ma a ar r rc c ch h h 0 0 06 6 6 111 Series Rheemglas 162 Series Rheemglas 171 Series Rheemglas 191 Series Rheemglas 121 Series Rheem Plus 411 Series Optima 462 Series Optima ...

Page 2: ...inding Chart 1 1 13 Fault Finding Chart 2 16 Fault Finding Chart 2 1 17 Fault Finding Chart 2 2 19 Fault Finding Chart 3 20 Fault Finding Chart 3 1 3 2 21 Fault Finding Chart 4 22 Fault Finding Chart 5 23 Fault Finding Chart 6 24 Fault Finding Chart 7 25 Electrical Insulation Testing 25 Component Replacement Procedures 26 Rheem Plus Tempering Valve Annual Service Procedure 32 Exploded View Single ...

Page 3: ...supply cord is damaged it must be replaced by the manufacturer or its service agent or a similarly qualified person in order to avoid a hazard Introduction The information provided in these instructions is based on the water heater being installed in accordance with the Installation Instructions provided with each water heater Should you require further technical advice on a Rheem Electric Water H...

Page 4: ... 1400 OPTIMA 411 462 425 400 1000 680 800 60 RP 20 RP 15 Consumer Adjustable 1636 Notes 121 series available in 125 160 250 and 315 litre capacities only 171 series available in 50 80 and 125 litre capacities only 191 series available in 50 litre capacity only Top thermostat on twin element models set at 60ºC 540mm anode fitted to 111050F and 171050F models only Preventative Maintenance It is sugg...

Page 5: ...ent to each element is utilized to maintain water temperature The top thermostat switches the neutral from the top element to the bottom element this ensures only one element can be energised at a time The top thermostat is factory set at 60ºC The bottom thermostat switches the active to the bottom element only Both thermostats incorporate a double pole manual reset ECO to provide additional prote...

Page 6: ...ng Liner A plastic tube installed in the cold water inlet of the water heater to provide protection against corrosion through the life of the water heater Anode Sacrificial A metal alloy electrode installed in the water heater cylinder that by galvanic action protects the cylinder from corrosion Over Temperature Energy Cut Out E C O A temperature sensing device in combination with the thermostat t...

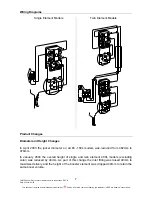
Page 7: ...ngle Element Models Twin Element Models Product Changes Diameter and Height Changes In April 2003 the jacket diameter on all 80 160L models was reduced from 492mm to 478mm In January 2004 the overall height of single and twin element 400L models excluding solar was reduced by 40mm As part of this change the inlet fitting was raised 40mm to maximise delivery and the height of the booster element wa...

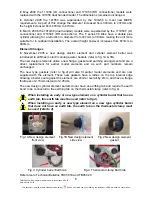
Page 8: ...o all Rheem electric storage water heaters refer to fig 1A 1B The new design elements utilise a new flange gasket and earthing arrangement and are a direct replacement for earlier model elements and as such part numbers remain unchanged The new type gaskets refer to fig 2 will also fit earlier model elements and are now supplied with the element These new gaskets have a radius on the top internal ...

Page 9: ... Showers exceeding 12 litres minute for mixed water and 5 minutes in duration 3 Two or more showers operating at the same time 4 Change of occupancy or number of persons increased 5 High water pressure area Excessive pressure relief valve discharge 6 Plumbing leaks 7 Thermostat temperature setting 8 Crossed connection Mixing or crossed connections If an automatic dishwasher washing machine flick m...

Page 10: ...opcock to make up the water pressure in the water heater and then turn the stopcock off again 5 Wait approximately 5 minutes then do either of the following a With your ear close to the stopcock turn it on slightly and listen for any water passing If there are no leaks water should not pass b Open a hot tap while listening for any pressure release If there is a pressure release there will be no le...

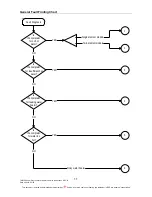
Page 11: ...ies not bearing this statement in RED are deemed uncontrolled 11 General Fault Finding Chart Is the complaint for no hot water Fault Diagnosis YES 1 2 Single element models Twin element models Is the complaint for insufficient hot water NO 3 YES Is the complaint for leaking water heater NO 4 YES Is the complaint for water too hot NO 5 YES 6 NO Noisy water heater ...

Page 12: ...power and advise customer Using the procedure on page 25 conduct an electrical insulation test Is the water heater connected to an off peak tariff Possible failure of the off peak relay or missed signal from energy supplier Continue with diagnosis to confirm water heater is operational YES Is the isolating switch turned off NO NO Is the fuse blown at the switchboard Is the reading below 1 mega ohm...

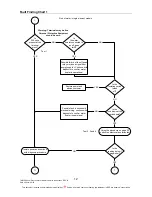
Page 13: ... the thermostat setting NO Slide the thermostat out from under the retaining clamp and allow base to cool NO YES Replace thermostat YES Did the thermostat contacts close Test 6 Replace thermostat NO Does the element have the correct resistance YES Are the thermostat ECO contacts closed Test 5 Install the element correctly and reset the ECO YES Test 7 Replace element NO Is the overall resistance of...

Page 14: ...ting this test Using a multimeter on the AC voltage scale measure between active and neutral on the terminal block Normal voltage is 240 volts Test 5 Ensure power is isolated before conducting test Using a multimeter on the x1 resistance scale measure between terminals 3L and 4L on the thermostat The reading should be less than 1 ohm Test 6 Ensure power is isolated before conducting test Using a m...

Page 15: ...8kW 29 35 ohms 2 4kW 22 26 ohms 3 0kW 17 21 ohms 3 6kW 15 17 ohms 4 8kW 11 13 ohms 6 0kW 9 11 ohms Test 8 Ensure power is isolated before conducting test Using a multimeter on the x1 resistance scale measure between active and neutral on the terminal block Normal resistance when the thermostat contacts are closed is 1 2kW 43 53 ohms 1 5kW 35 42 ohms 1 8kW 29 35 ohms 2 4kW 22 26 ohms 3 0kW 17 21 oh...

Page 16: ...edure on page 25 conduct an electrical insulation test Is either element circuit connected to an off peak tariff Possible failure of the off peak relay or missed signal from energy supplier Continue with diagnosis to confirm water heater is operational YES Is the isolating switch turned off NO NO Is the fuse s blown at the switch board Is the reading below 1 mega ohm 7 YES NO YES YES Possible faul...

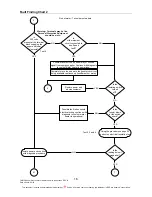
Page 17: ...ement closed Replace upper thermostat Test 12 Are the top thermostat ECO contacts closed Test 10 Replace the upper element Test 11 NO Is the neutral contact to the upper element closed Does the upper element have the correct resistance Test 7 NO Break in upper circuit wiring loom Locate and repair Is the top element installed in the correct orientation NO Install the element correctly and reset th...

Page 18: ...ween terminals 3L and 4L of the upper thermostat The reading should be less than 1 ohm Test 11 Ensure power is isolated before conducting test Using a multimeter on the x1 resistance scale measure between terminals 1L and 2T of the upper thermostat If the reading is less than 1 ohm the neutral to the top element is closed Test 12 Ensure power is isolated before conducting test Using a multimeter o...

Page 19: ...eplace the lower element Water heater electrically ok 3 Does the element have the correct resistance Test 7 NO Break in wiring loom Locate and repair Replace lower thermostat Is the bottom element installed in the correct orientation NO Install the element correctly and reset the ECO NO YES Test 5 Are the bottom thermostat contacts closed YES Test 6 NO Replace lower thermostat YES Slide the thermo...
Page 20: ... the water supply pressure more than 80 of the T PR valve rating YES Fit pressure limiting valve if not already installed Existing pressure limiting valve faulty Replace Faulty T PR valve Replace YES Is the correct T PR valve fitted NO Replace T PR valve with one of the correct pressure rating Do not use reconditioned T PR valves NO Are there any plumbing leaks crossed connections or dripping taps...

Page 21: ...ximum temperature of 48 degrees Depending on the length of pipe work and insulation to the fixture s water temperature can be lower due to heat loss Normal Operation Is the outlet water temp approx 48 degrees YES Clean or replace YES Are the filters blocked YES Tempering Valve Refer to manufacturers instructions Rheem Plus Refer to the Annual Servicing Procedure Replace Tempering Valve NO Has ther...

Page 22: ...if pressure will not hold Is the leak from the inlet extension fitting YES Is the leak from the inlet fitting weld NO YES NO Is the leak from the element barrel weld Remove element and replace gasket YES Is the leak from the outlet extension fitting YES Is the leak from the outlet fitting weld YES NO Is the leak from the T PR valve NO Is the leak from the T PR fitting weld NO Remove T PR valve and...

Page 23: ...ing through the water heater Is the noise water hammer Is the noise a metallic popping sound Is the noise only evident during the heating cycle Check for restrictions in pipe work faulty valves loose plumbing or other appliances i e washing machine or dishwasher Fit 600kPa PLV if pressure excessive NO YES Check for faulty stop cock non return valve or T PR valve NO YES NO Cylinder contracting due ...

Page 24: ... delivery is possible 2 Prohibit bacteria growth Tempering devices should be suggested as a solution YES Is the thermostat in good contact with the cylinder Remove the thermostat and clean any scale from the cylinder wall Re tension bracket and refit thermostat NO Are the ECO contacts closed Is the element installed in the correct orientation YES Replace thermostat NO Refit element correctly NO Re...

Page 25: ...o the water heater by removing fuse Confirm with multi meter across Active and Neutral at the terminal block that voltage is not present 2 Once satisfied disconnect the active and neutral wires from the terminal block 3 Connect megger leads to the neutral of the water heater wiring and earth 4 Operate megger A reading above 1 mega ohm should be obtained 5 If a reading below 1 mega ohm is indicated...

Page 26: ...isconnect the cold water supply pipe 5 Fit a drain hose to the cold water connection and run the other end to a drain or safe location 6 Open the temperature and pressure relief valve to allow air into the system Temperature and Pressure Relief Valve Procedure 2 Never fit a T PR valve with a rating higher than that indicated on the water heater rating plate Do not use reconditioned T PR valves 1 I...

Page 27: ... up with the fitting dip tube facing up and gently drive the dip tube into the fitting a short distance 7 Apply thread tape to the extension fitting and refit this will push the dip tube into the correct location 8 Reconnect the plumbing and restore the water supply 9 Purge air from the system through hot taps 10 Restore the power supply Anode Procedure 4 Elevated temperatures may be present durin...

Page 28: ...racking 8 Refit the thermostat protective cover and upper access cover securely 9 Conduct an electrical insulation test Refer to page 25 10 Replace lower access cover and restore electrical supply Bottom Thermostat Trade Adjustable Procedure 6 Personal Protective Equipment should be worn when conducting step 2 of this procedure to reduce the risk of electric shock Refer to Rheem Safety Procedure o...

Page 29: ...rical supply Cold Water Connector Rheem Plus Models Procedure 8 Elevated temperatures may be present during the draining process Personal Protective Equipment should be worn to prevent the risk of scalding 1 Isolate power and water supplies to the water heater 2 Relieve pressure from water heater through the T PR valve or a hot tap 3 Drain the water heater Refer to procedure 1 on page 26 4 Remove ...

Page 30: ...g valve and unscrew tempering valve from heater Note Removal of the cold pipe requires the use of a special tool part number 890330 To remove the cold pipe from the tempering valve slide the tool over the pipe and push up against the quick connect fitting whilst pulling down on the cold pipe 6 Screw new tempering valve into heater using thread tape on threaded section 7 Insert cold pipe into tempe...

Page 31: ... Drain the water heater Refer to procedure 1 on page 26 5 When the water heater is drained undo the four element screws removing thermostat clamp first 6 Withdraw heating unit Care must be taken to ensure the loop of the heating unit does not catch in the cylinder opening and open out inside the cylinder NOTE Do not cut off the heating unit and leave a portion inside the cylinder 7 Clean around cy...

Page 32: ...se order ensuring that the O ring for the quick connect fitting is in place No thread tape is required on the snap lock fitting thread 4 Screw tempering valve back into heater using thread tape on threaded section 5 Insert cold pipe into tempering valve quick connect fitting and push up to click pipe into place no tool required 6 Reconnect warm water pipe using thread tape on threaded section 7 Cl...

Page 33: ...ters Service Instructions REV B Date of Issue 03 06 This document is stored and maintained electronically by Service All printed copies not bearing this statement in RED are deemed uncontrolled 33 Exploded View Single Element Models ...

Page 34: ...aters Service Instructions REV B Date of Issue 03 06 This document is stored and maintained electronically by Service All printed copies not bearing this statement in RED are deemed uncontrolled 34 Exploded View Twin Element Models ...

Page 35: ...050211 050211 Element Incoloy 3 0kW 050253 050253 050253 050253 Element Copper 3 6kW N A 050210 050210 050210 Element Incoloy 3 6kW 050254 050254 050254 050254 Element Copper 4 8kW N A 050209 050209 050209 11 Element Incoloy 4 8kW 050255 050255 050255 050255 12 Thermostat Clamp 102501 102501 102501 102501 13 Element Gasket 050704 050704 050704 050704 14 Thermostat 051336 051313 051313 051313 15 Te...

Page 36: ...209 050209 11 Element Copper 6 0kW 050208 050208 050208 12 Thermostat Clamp 102501 102501 102501 13 Element Gasket 050704 050704 050704 14 Bottom Thermostat 051350 051350 051350 Terminal Block Single Element 051521 051521 051521 15 Terminal Block Twin Element N A 051507 051507 Jacket Bottom Pre April 03 100643 1 100643 1 100643 1 16 Jacket Bottom After April 03 100600 100600 100600 17 Access Cover...

Page 37: ...nt Copper 3 0kW 050211 050211 050211 Element Copper 3 6kW 050210 050210 050210 Element Copper 4 8kW 050209 050209 050209 11 Element Copper 6 0kW 050208 050208 050208 12 Thermostat Clamp 102501 102501 102501 13 Element Gasket 050704 050704 050704 Thermostat Bottom 111 162 series 051350 051350 051350 14 Thermostat Bottom 411 462 series 051354 051354 051354 Terminal Block Single Element 051521 051521...

Page 38: ...0554 220556 4 Duct Lower Cover Insulation 103680 103680 103680 103680 5 Duct Insulation 103672 103673 103674 103675 6 Duct Top Cover Insulation 103682 103682 103678 103678 7 Quick Connect Fitting Comes with item 2 N A N A N A N A 8 Quick Connect O ring 890357 890357 890357 890357 9 Cold Water Filter 890354 890354 890354 890354 10 Non return Valve 890356 890356 890356 890356 11 Hot Water Filter 890...

Page 39: ...isuse incorrect installation attempts to repair the water heater other than by a Rheem Accredited Service Agent or the Rheem Water Heaters Australia Service Department b Where it is found there is nothing wrong with the water heater where the complaint is related to excessive discharge from the temperature and pressure relief valve due to high water pressure where there is no flow of hot water due...

Page 40: ...ice All printed copies not bearing this statement in RED are deemed uncontrolled 40 Document Revision History Title Service Instructions Rheem Electric Water Heaters Document Number TM012 Revision Details of change D O I A Service Instructions issued for Rheem Electric Models 11 02 B Format revised Dual handed and Rheem Plus models added 03 06 ...

Reviews: