background image

Operative Instructions

5

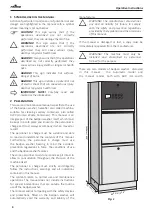
This  model  of  bedpan  washer  can  be  installed 

(according to the choice made during configuration): 

 - Stand alone

 - Wall-hung

 - Built-in model

 - Undercounter


a

WARNING!  Failure  to  comply  with  the 

instructions 

in 

manual, 

operational 

negligence,  incorrect  use  of  the  bedpan 

washer  and  execution  of  unauthorised 

changes,  both  on  the  machine  and  on  the 

programs,  are  the  cause  of  cancellation  by 

the manufacturer of the warranty granted.

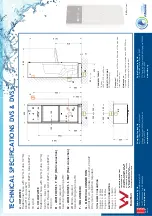
For  the  installation  schemes  see  the  Technical 

Specifications (see pg. 2).


Ö

IMPORTANT 

NOTE! 

The 

Technical 

Specifications (see pg. 2) must be considered 

as an integral part of this user Manual.

2.1  Field of application

This  machine,  intended  for  washing  and  disinfecting, 

is considered a class IIa medical device (as defined by 

Directive  93/42/EEC  class  IIa).  Follow  the  instructions 

of  the  instrument  manufacturers  (according  to  EN 

ISO 17664), as well as the national laws and directives 

for  the  automatic  treatment  of  medical  devices.  The 

personnel  in  charge  using  the  machine  daily  must 

be  aware  of  its  main  features,  and  must  also  receive 

adequate and continuous training.

2.1.1  Intended use

The  bedpan  washer  is  designed  for  the  needs  of 

washing  and  disinfecting  badpans,  urine  bottles, 

commodes, urology containers, kidney-shaped basins, 

drainage  bottles  and  other  clinical  containers  used  in 

hospital wards.

2.1.2  Intended users

Specialized  personnel  capable  of  working  in  a  CSSD, 

Hospital’s disinfection area and nursine homes.

2.1.3  Intended use of environment

The machine is intended to be used only for internal 

uses.  The  machine  is  designed  to  be  operational  up 

to a maximum altitude of 2000 metres (6562 ft), at a 

temperature between 5 and 40°C (41 and 104°F) and 

used in an environment with a maximum humidity of 

80%  for  temperatures  up  to  31°C  (88°F),  decreasing 

linearly to 50% at 40°C (104°F).

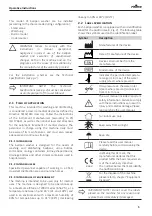
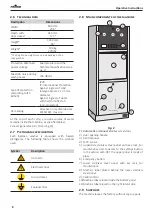
2.2  Label specification

Each bedpan washer is equipped with an identification 

label (for the position see 8, Fig. 2). The following table 

shows the symbols used on the identification label:

Symbol

Description

Manufacturer of the device.

Date of manufacture of the device.

Device serial number from the 

manufacturer.
Model name of the device.
Indicates the permitted temperatu-

re range (min./max.) of the water 

supply (steam where present).
Flow pressure on the water inlet 

(steam where present) connected 

from min. to max.
The user manual includes important 

safety information. Failure to comply 

with these instructions can result in 

injury and material damage. Please 

read carefully the user manual.

For indoor use only.

Keep away from sunlight.

Keep dry.

Please read this user manual 

carefully before commissioning the 

device.
In affixing this CE mark, the

manufacturer declares that this

product fulfils the basic requiremen-

ts of the machinery directive.

The number below the mark identify 

the notification body. 
For the disposal of the machine 

please refer to chapter "Equipment 

Disposal".


Ö

IMPORTANT  NOTE!  Do  not  cover  the  labels 

placed  on  the  machine  for  any  reason  and 

replace them immediately if damaged. 

xxxx

Summary of Contents for DVS

Page 1: ...Operator s Manual DVS DVS Washer Australia Tel 61 1300 347 944 New Zealand Tel 64 9 414 5575 Singapore Tel 65 9107 8943 ...

Page 2: ...AS NZS 3500 2 A HOT WATER Flexible inlet hose with 3 4 G Tube 1 2 G Min 45 C Max 60 C Water Pressure Min 100kPa Max 600kPa 18 L min B COLD WATER Flexible inlet hose with 3 4 G Tube 1 2 G Min 5 C Max 15 C Water Pressure Min 100kPa Max 600kPa 18L min E1 WASTE OUTLET P TRAP Wall connection Ø100mm required Max discharge temp 65 C E2 WASTE OUTLET S TRAP Floor connection Ø100mm required Max discharge te...

Page 3: ... this manual The manufacturer declines all and any liability for damage due to negligence and failure to comply with this manual and is also not liable for any damage caused by incorrect interpretations of the instructions contained Check for any updates to this manual on the manufacturer s website Before starting to operate with the bedpan washer read these instructions for use Original instructi...

Page 4: ...e personnel in charge must be suitable and able to read and understand the contents of this manual Furthermore the personnel in charge must use the bedpan washer bearing in mind the accident prevention regulations in force the conditions of use and the bedpan washer features The same personnel must store it and keep it intact to allow its consultation throughout the life span of the machine itself...

Page 5: ... CSSD Hospital s disinfection area and nursine homes 2 1 3 Intended use of environment The machine is intended to be used only for internal uses The machine is designed to be operational up to a maximum altitude of 2000 metres 6562 ft at a temperature between 5 and 40 C 41 and 104 F and used in an environment with a maximum humidity of 80 for temperatures up to 31 C 88 F decreasing linearly to 50 ...

Page 6: ...ine which has been repaired within the warranty period develops the same fault within 3 months after the repair the fault will be repaired free of charge 5 All warranty call outs must be approved by Rhima and have a Rhima Job number Ö IMPORTANT NOTE The purchaser will only be able to enforce its warranty rights if it has complied with any additional conditions concerning the warranty service also ...

Page 7: ...equal to the power supply voltage on the line neutral 1200V and a duration up to 5s of long duration which may occur between the line conductor and the system earthing which may have a voltage equal to the power supply voltage on the line neutral 250V and a duration greater than 5s overvoltage category II pollution degree 2 The validation of the product was made by the manufacturer in compliance w...

Page 8: ...s specified below steam generator 0 4 l 0 11 US gal 2 7 Pictograms specification Each bedpan washer is equipped with hazard pictograms The following table shows the symbols used Symbol Description Hot parts Electrical shock Ground mass Equipotential 2 8 Main components of the machine 3 1 5 4 7 8 10 11 2 9 6 Fig 2 1 Automatic or manual stainless steel door 2 Door opening handle 3 Control panel 4 N ...

Page 9: ...der for washing 1 pan and 1 urinal or 4 urinals 3d multi washer basket for washing several large objects e g jugs 3e holder for washing 2 bedpans or 2 urinal or 3 bowls 3f holder for washing 1 pan or commode and 1 urinal rotating holder 3g holder for washing 3 2 3 litre jugs 3 Safety and prevention The operator in charge must be instructed on the risks deriving from accidents on the devices prepar...

Page 10: ...the installation drawing The electrical and water connections can only be made by specialised service personnel paying particular attention not to crush the power supply cable and the water flexible hoses Do not install the machine in the same room where patients are housed The machine can heat the environment thus increasing humidity 3 1 3 Operator obligations Before starting to operate for the f...

Page 11: ...uards reassembled It is strictly forbidden to remove or tamper with the safety devices The machine maintenance must only be performed with the power supply off by qualified personnel and following the instructions in this manual 4 Handling Usually the packaged and palletised machine is transported to the retailer dealer who by means of its personnel and suitable means in compliance with current re...

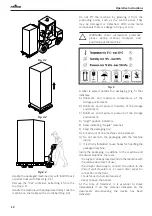
Page 12: ...e storage environment B Minimum and maximum humidity of the storage environment C Minimum and maximum pressure of the storage environment D High position indicators E Glass indicating Fragile material F Keep the packaging dry G A maximum of one machine can be stacked H Do not overturn the packaging with the machine inside I It is strictly forbidden to use hooks for handling the packaged machine In...

Page 13: ...hine surface and height can be adjusted with the adjustable feet placed under the machine itself when available b HAZARD All electrical and water connections loading unloading can only be carried out by specialised and authorised personnel and by consulting the relative diagrams Before machine positioning make sure that All the components needed for installation and proper use of the machine were ...

Page 14: ...e made by qualified skilled personnel a WARNING Power supply cable it is compulsory for the retailer installer to adapt the insulation class of the power supply cable to suit the working environment in compliance with current technical regulations Check that the electric specifications match those shown in the label The electrical connection must be carried out in compliance with current technical...

Page 15: ...35 0 5 60 17 36 19 60 310 350 36 40 6 16 8 40 20 16 22 40 360 400 41 45 8 96 11 20 22 96 25 20 410 450 French degrees fH CaCO3 mmol l German degrees DH CaCO3 PPM 46 50 11 76 14 00 25 76 28 00 460 500 51 55 14 56 17 80 28 56 30 80 510 550 56 60 5 66 6 06 31 36 33 60 560 600 The special washing and disinfecting machine is standard prepared for connection to cold and hot water Connect the flow pipes ...

Page 16: ...he bottom of the machine The correct positioning and sizing of the drain trap are shown on the installation drawing see the Technical Specifications see pg 2 a WARNING The bedpan washer drain pipe must be maintained if backflow and other drainage issues are to be avoided Be careful not to crush the pipe If the pipe has been crushed kinked or otherwise damaged consider replacing it to prevent futur...

Page 17: ...ldren and outsiders Possibly locked away Optimal storage temperature check the chemicals datasheet The shelf life in the original containers is indicated on the chemicals labels The manufacturer recommends a method for inventory management first in first out The washer disinfector can use up to 2 products for dosing liquids The manufacturer recommends using cleaning agents and chemical additives T...

Page 18: ...re takes care of setting the disinfection temperature and its duration All 15883 machines when not used for 24 hours automatically start a disinfection cycle composed by some wash phases a disinfection phase and a final rinse with sanitized water hotter than 65 C 149 F The door should always be closed when not working for long periods of time or even better after every wash cycle both for automati...

Page 19: ...n order and that all parts subject to wear and deterioration are fully efficient 7 1 Commissioning instructions These control operations reported below are performed to check if the machine works properly and should be performed when the machine installation is completed 1 Open the tap that supplies water to the machine a WARNING The water should NOT flow into the chamber otherwise the water loadi...

Page 20: ...ceed 5 kg 11 lbs Higher loads could damage the door closing mechanism 7 3 Programs The machine leaves the factory with presetting washing programs already entered in the settings menu For programs details see the Washing Programs booklet To operate the machine just select the program on the control panel touching the key related to the desired cycle normal short intensive or the special ones The d...

Page 21: ...ove most of the dirt Wash The washing phases are performed using the hot water to improve the washing results During the hot washing phases it is possible to add the detergent liquid optional to help the washing Disinfection At the beginning of disinfection the water tank is filled at low level with hot water and softener liquid standard The machine is preparing the final rinse in the mean time th...

Page 22: ... be completely clean The machine is equipped with an Empty Total System E T S at the end of each cycle water is automatically drained from the water pump water storage tank and pipes in order to ensure freedom from microbial contamination inside the machine 7 4 4 Extracting the load At the end of the program and when extracting the load do not force the door open to avoid damaging the device or cr...

Page 23: ...c emulsion residuals letting it react for a certain amount of time 30 seconds before start the selected program 8 1 Display The LCD display makes it easier to use the appliance giving a great deal of information regarding the state of the components inside the machine and showing the status of the running program The temperatures are set in degrees Celsius or Fahrenheit The images are animated to ...

Page 24: ...osed until you hear the classic closing click otherwise the program will not start Fig 12 1 8 1 2 Program 1 Urinals Phase 1 2 The machine starts the automatic working cycles It discharges the residues present in the items and starts the first rinse with cold water Fig 12 2 3 The display shows the solenoid valves that are operated in the different phases EV5 is used for rinsing with cold water The ...

Page 25: ... to 100 C 212 F and produces steam Steam flows out of the steam generator and passes through the same pipes used for washing until it reaches the chamber A temperature of 85 C 185 F is reached and maintained for 1 minute inside the chamber Fig 12 8 Phase 5 9 The hot water with softener liquid at around 45 C 113 F enters in the steam generator and mixes with hot water remained after the disinfectio...

Page 26: ... of the wash cycle until the temperature inside the wash basin and inside the steam generator have dropped below their preset safety temperature The display shows the message Cooling Wait until door opening is enabled For the alarms description and possible solutions see Annex 10 5 8 1 4 User settings menu a WARNING Any change to the menu must be done according with a technician Accessing the menu...

Page 27: ...u and change date and time Fig 15 Date and time are changed on the display and on the printer 8 1 6 Language setup To change the display language enter the menu with the technician password following the steps described in the paragraph user settings menu Select VARIOUS PARAMETERS menu and scroll until the Language setting Select the desired language from those available 8 1 7 Procedure for passwo...

Page 28: ...or stainless steel glass and plastic materials b HAZARD Products unsuitable for cleaning stainless steel glass and plastic materials may irreparably damage non interchangeable parts of the appliance and render the machine unusable If a suitable cleaning liquid is not available a mixture of water 75 and alcohol 25 may be used Cleaning should be carried out with a smooth non scratchy cloth moistened...

Page 29: ...is the user s obligation to fill in the Maintenance Logbook correctly and regularly The incorrect or incomplete compilation of the Maintenance Logbook will void the warranty 9 4 1 Cleaning the human waste containers hook support and machine s surfaces Sometimes it may be necessary to remove the human waste containers hook support to replace it or to perform routine extraordinary maintenance or cle...

Page 30: ...enance 9 5 4 Cleaning of level probe in storage tank 1 Power off the machine 2 Remove the upper panel of the device using the provided key 3 Disconnect the connector from the probes 4 Extract the probes from the water tank 5 Clean the steel rods possibly using softener liquid and being careful not to scratch them 6 Reinsert the probes in their housing 7 Restore the power to the device a WARNING It...

Page 31: ...tre The electrical and electronic devices to be disposed of contain reusable materials They also contain components harmful for the environment but necessary for the correct operation and safety of the equipment If they are not disposed of correctly or are disposed of as household waste these components can damage human health and the environment Never dispose of the old bedpan washer among conven...

Page 32: ...efault Only with techni cian PROGRAM 1 Time phase 0 99 Set the duration time for each phase of the selected program and the duration time of the disinfection once the set temperature is reached NA YES 2 Softener erogation 0 4 1 18 45 Set the dosage of antiscale dispensed 4 8 sec 12 ml YES 3 Disinfection temperature 80 90 Define the temperature required for items to be considered disinfected 85 C Y...

Page 33: ...tput trips 75 C YES 12 Minimum hysteresis 1 5 Minimum temperature value that must be maintained during disinfection 2 C YES 13 Maximum hysteresis 2 6 Maximum temperature value that must not be exceeded during disinfection 3 C YES 14 Time solvent 0 1 0 5 20 0 100 0 This set the time dosing that the solvent pump operates 5 0 sec 25 0 ml YES 15 Action solvent 0 200 This set the time the solvent is le...

Page 34: ...NO 22 Time C_system 0 12000 This sets the time value during which the cooling system works 50 YES 23 Font table EUR JAP EUR CYR Sets the font map to European Japanese or European Cyrillic EUR JAP NO DEFAULT DATA 1 Default data OFF ON Restores factory data OFF YES The minimum and maximum values of these parameters may be different from those shown here because they depend on the values set in the m...

Page 35: ...um hysteresis Time solvent Ac on solvent Solvent repe on Time open door Time A_system A_system delay Autodisinfec on Autodisinfect me Time C_system Font table Default data On Off Insert new password Set User PIN Password Op onal programs Language Buzzer Open temperature Ev steam temp Minimum hysteresis Parameters that the user can change on his own without the assistance of a technician or the manu...

Page 36: ...ter new password The password has been changed correctly S P By pressing bu on 3 scroll un l SET PASSWORD menu P R Press the bu on 3 to increase or bu on 4 to decrease several mes to select a number from 0 to 9 and confirm with the bu on 1 Repeat the opera on for all 4 digits P R P R At the first access enter by pressing button 1 four times ...

Page 37: ...r new password The password has been changed correctly By pressing bu on 3 scroll un l UNLOCK CODE menu Press the bu on 3 to increase and bu on 4 for decrease several mes to select a number from 0 to 9 and confirm with the bu on 1 Repeat the opera on for all 8 digits P R P R P R At the first access enter by pressing button 1 four times ...

Page 38: ...E18 DETERGENT SUPPLY The liquid tank is empty the filter is dirty or there is a flow meter failure in relation to the liquid detergent E19 SOLVENT SUPPLY The liquid tank is empty the filter is dirty or there is a flow meter failure in relation to the liquid solvent E20 NO DISINFECTION Heating element failure steam leaks E21 STEAMGEN TIMEOUT Mains tap is closed or the filter is dirty E22 SOL VALVES...

Page 39: ...r being open prevents the machine from starting Close the door Call Service A technician must be called to solve a fre quent problem or machine malfunction Contact the customer service Maintenance It is time to perform scheduled periodic maintenance Contact the customer service or the dedicated technical assistance for periodic validation 10 7 Troubleshooting PROBLEM CAUSE SOLUTION 1 The machine d...

Page 40: ...Operative Instructions 40 Notes ...

Page 41: ...Operative Instructions 41 Notes ...

Page 42: ...Operative Instructions 42 Notes ...

Page 43: ...4 1 Before starting the program 21 7 4 2 Starting the program 21 7 4 3 Program End 22 7 4 4 Extracting the load 22 8 Control Panel 22 8 1 Display 23 8 1 1 Display screens 23 8 1 2 Program 1 Urinals 24 8 1 3 Alarm messages 26 8 1 4 User settings menu 26 8 1 5 Date and time setup 27 8 1 6 Language setup 27 8 1 7 Procedure for password change Authorised Technicians Only 27 8 1 8 Settings 27 8 2 Alarm...

Page 44: ...TS AFTER SALES SUPPORT To request detergents or after sales support contact your local Rhima Service centre Australia 61 1300 347 944 New Zealand 64 9 414 5575 Singapore 65 9107 8943 Australia Tel 61 1300 347 944 New Zealand Tel 64 9 414 5575 Singapore Tel 65 9107 8943 ...

Reviews:

Related manuals for DVS