background image


STRONG 


SIMPLE 


HONEST 


CAPABLE


TUFF AND BUILT TO LAST 

EASY TO USE & MAINTAIN 

TRUSTWORTHY & SOUND 

NEVER LETS YOU DOWN


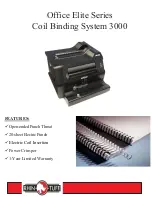
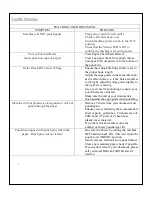
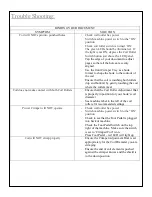
Summary of Contents for 3000

Page 1: ...COIL BINDING SYSTEM 3000 SETUP OPERATORMANUAL Performance Design LLC 2350 East Braniff St Boise Idaho 83716 www Rhin O Tuff com ...

Page 2: ...Office Elite Series Coil Binding System 3000 FEATURES Open ended Punch Throat 20 sheet Electric Punch Electric Coil Insertion Power Crimper 1 Year Limited Warranty ...

Page 3: ...Rollers Punch Button Coil Roller ON OFF Switch Open ended Punch Throat Foot Pedal Control Switch can use foot pedal to Punch or Crimp Coil Roller Adjustment Dial Power Crimper Shield Power Crimper Adjustment Dial Power Crimper Tray with book former Adjustable Edge Guide Snap into front of machine before 1st Use Foot Pedal for Punching or Coil Crimping Plug into Back of Machine before 1st Use Power...

Page 4: ...ly be opened by qualified repair personnel Punch Capacity 20lb 75 gsm Copy Paper 20 Sheets 10 Mil 235 gsm Acetate PVC Cover 2 Sheets Binding Capacity Coil Size Range 6mm 50mm Max Sheet Capacity Range Up to 440 Sheets Technical Data Punch Die Pattern 4 1 Oval 4mm x 5mm 2475 spacing Paper Size Up to A4 11 7 in 1 Pass Max up to 23 4 Voltage 115V AC 60Hz Current 4A Punch Duty Cycle 2 Min Run 1 Min Res...

Page 5: ...ce 7 Turn Power switch ON Amber LED should light up on front LED panel 3 Plug power cord into machine and wall outlet 4 Plug in foot pedal 5 Dial Coil Roller Adjustment to TOP POSITION turn dial to right all the way 6 Attach Power Crimper Tray to front of machine see Page 2 ...

Page 6: ...UMENT THICKNESS 4 1 COIL SIZE MARGIN CONTROL 20lb 75gsm Inches MM MM DIAL SETTING 5 35 1 4 6 6MM 36 47 9 32 7 7MM 48 60 5 16 7 9 8MM 61 70 11 32 8 7 9MM 71 80 3 8 9 5 10MM 81 90 7 16 11 11MM 91 100 1 2 12 7 12MM 101 110 17 32 13 5 13MM 111 120 9 16 14 2 14MM 121 130 19 32 15 15MM 131 140 5 8 15 8 16MM 141 150 43 64 17 17MM 151 160 23 32 18 2 18MM 161 180 3 4 19 20MM 181 200 7 8 22 2 22MM 201 210 2...

Page 7: ...6 ...

Page 8: ...e die set pins are pulled or disengaged Once a test punch is complete you are ready to punch your document 4 Insert paper slide left press Punch button or Foot pedal The Red LED will light up when punching with the Foot pedal Recommend punching no more than 20 sheets of 20lb 75gsm bond at one time Recommend punching no more than 2 sheets of Plastic Vinyl Heavier Paper covers at one time Common Doc...

Page 9: ... Begin feeding the Color Coil into the 1st few holes on the end of the document 4 Turn the Coil Rollers ON by pressing the COIL ICON Button on the front panel of the machine 5 Place the coil element and the book s binding edge parallel to the coil rollers Press the coil element lightly against the rollers until the coil begins threading through all the punched holes 6 Once the coil is inserted int...

Page 10: ...ping c Ensure that the Power Crimper Edge Guide is set so that the end of document last punched hole lines up with the crimping knives 2 Power Crimping a Push end of Coil in between the 2 Crimper Knives b Push down on the Crimper Shield clear plastic to hold the coil book into place c Press the Foot Pedal to crimp The red LED will illuminate on the front panel when the foot pedal is activated d Fl...

Page 11: ...to the right for centering Use a test sheet for punching to ensure your punch holes are centered Make sure the end of your document is flush against the edge guide when punching Machine will not produce a clean punch or will not punch through the paper Remove 5 sheets from your document and punch again Ensure you are following the recommended sheet capacity guidelines 20 sheets max of 20lb bond 75...

Page 12: ...where the rollers meet Coil does not make contact with both Coil Rollers Ensure that the Coil Roller Adjustment Dial is properly in position for your book s coil diameter See machine label to the left of the coil rollers for recommended settings Power Crimper will NOT operate Check wall outlet has power Switch machine power switch to the ON position Check to see that the Foot Pedal is plugged into...

Page 13: ...lacement or information for the Coil Binding System 3000 1 Obtain the serial number of machine from decal on back of machine as shown below 2 Call 1 800 390 5782 to arrange for a Return Merchandise Authorization number Please have thesymptom s of the machine failure the machine serial number as well as shipping and contact information at the time of the call Performance Design LLC Boise ID Web www...

Page 14: ...STRONG SIMPLE HONEST CAPABLE TUFF AND BUILTTO LAST EASYTOUSE MAINTAIN TRUSTWORTHY SOUND NEVERLETSYOUDOWN ...

Reviews: