background image


7


 4.2) 

Coiling. 

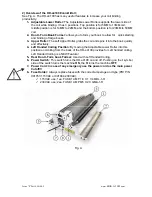
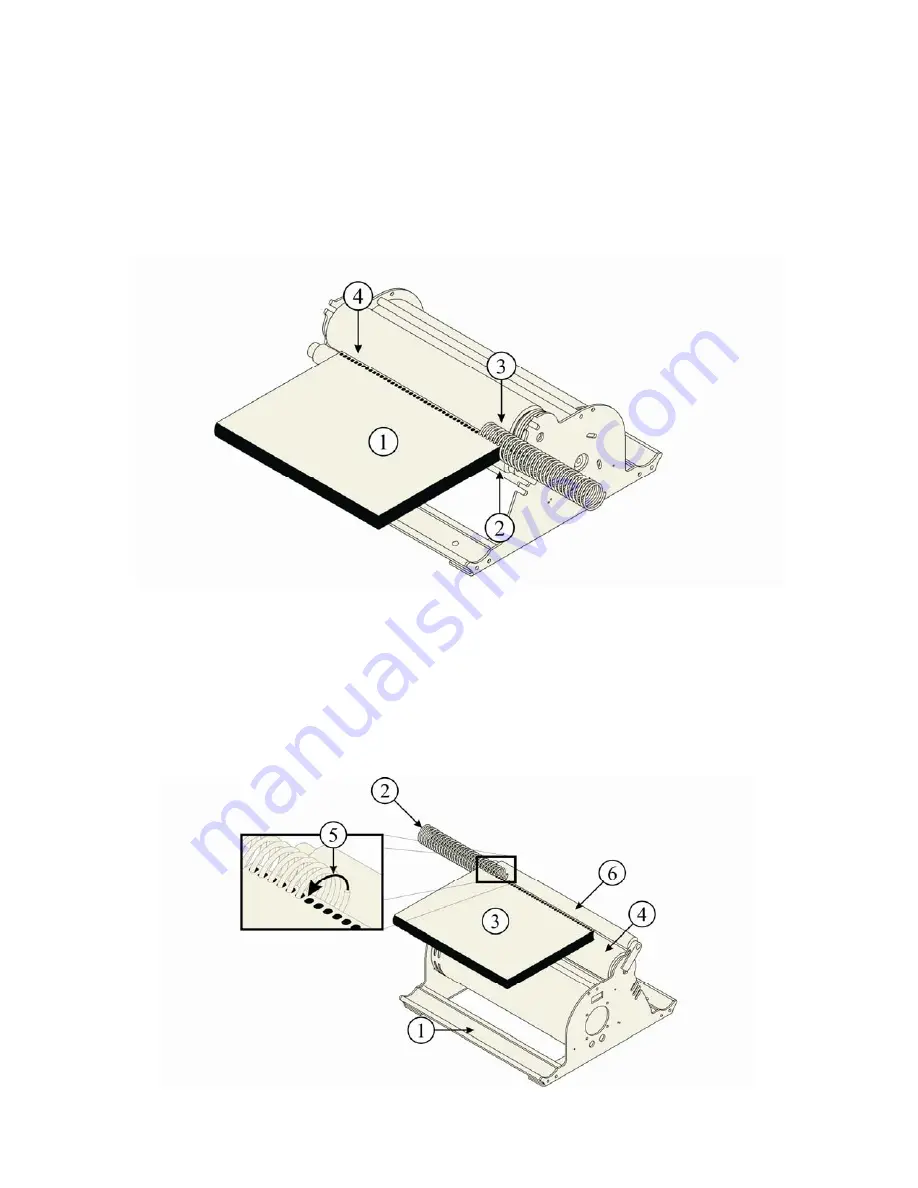
See Fig. C. Once the coil has been started, using both hands, rotate the 

book (1) so that it is level to the table surface. While holding the book close to the 
binding edge so that the pages and holes stay aligned, set the coil on top of the Lower 
Roller (2) and lightly “bump” the coil against the Upper Roller (3) so that the HD-e4100 
will spin the coil into the book. It may be preferred to pull the left end of the book away 
from the Upper Roller (4) allowing the right end of the Upper Roller (3) to do all the 
spinning of the coil, but you may fined other techniques work well also. In the next 
section a new technique/feature is described. This new technique/feature is Left handed 
coiling.  


Fig. C 


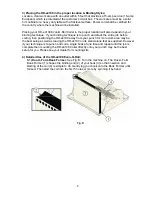
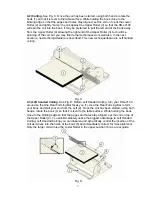
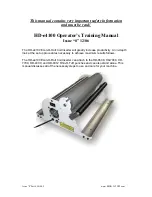
4.3) Left handed Coiling. See Fig. D. Before Left Handed Coiling, turn your HD-e4100 
around so that the Rear Forming Bar faces you (1). Use the Rear Forming Bar to form 
your book and start your coil from the Left (2). Once the coil has been started, using both 
hands, rotate the book (3) so that it is level to the table surface. While holding the book 
close to the binding edge so that the pages and holes stay aligned, set the coil on top of 
the Upper Roller (4). You will immediately notice the biggest advantage to Left Handed 
Coiling; Left Handed Coiling you can observe and dynamically control the insertion of the 
coil as it dives into the holes of the book (5) and immediately correct for miss alignment. 
Only the larger coil will use the Lower Roller in the upper position (6) as a rear guide. 


Fig. D 

Summary of Contents for Econ-O-Roll HD-e4100

Page 1: ...Issue 0 Part 941005 www RHIN O TUFF com HD e4100 Econ O Roll Coil Inserter Operator s Training Manual Issue 0 12 06 PDI Part 941005 Performance Design Inc 2350 East Braniff St Boise Idaho 83716 ...

Page 2: ... Econ O Roll Coil Inserter will greatly increase productivity An in depth look at the set up procedures necessary to achieve maximum results follows The HD e4100 Econ O Roll Coil Inserter can attach to the HD 6500 HD 7000 HD 7700 OD 4000 and OD 4012 Rhin O Tuff punches and can also stand alone This manual discusses all of the necessary steps to use and care for your machine ...

Page 3: ...portant safety notice 4 2 Overview of your HD e4100 Econ O Roll Coiler 5 3 Placing the HD e4100 in the proper location Binding Styles 6 4 Detailed Use of the HD e4100 Econ O Roll 6 5 Cleaning the HD e4100 Econ O Roll 8 6 Product Registration 8 7 Optional Binding Station Accessories 8 ...

Page 4: ...115VAC use 1ea FUSE 1 AMP 1 4 X 1 1 4 MDL 1 R 9 230VAC use 2ea FUSE 1 AMP M5 X 20 GMA 1 R Refer to the serial number label on the rear of the machine to determine the voltage of your machine Serial Number Label Example If the machine runs erratically or if the wheel stops turning while the machine is on unplug the HD e4100 and call your dealer immediately for service Never attempt to service your ...

Page 5: ...grabs the coil and spins it into the book quickly and effectively 4 Left Handed Coiling Position By moving the Adjustable Lower Roller into this position and coiling from the back of the HD e4100 provides for Left handed coiling Left Handed Coiling is a NEW Feature 5 Rear Doc U Form book Former Used with Left Handed Coiling 6 Power Switch This switch turns the HD e4100 on and off Pushing on the I ...

Page 6: ...ing then positioning the HD e4100 away from your punch for more work area may be the best setup as well as leaving the HD e4100 on its stand alone feet as supplied However if your technique is to punch and coil a single book at one time and repeat until the job is complete then mounting the HD e4100 Coiler directly onto your punch may be the best setup for you Please see your dealer for mounting k...

Page 7: ...d This new technique feature is Left handed coiling Fig C 4 3 Left handed Coiling See Fig D Before Left Handed Coiling turn your HD e4100 around so that the Rear Forming Bar faces you 1 Use the Rear Forming Bar to form your book and start your coil from the Left 2 Once the coil has been started using both hands rotate the book 3 so that it is level to the table surface While holding the book close...

Page 8: ...lete the book Or you can keep the book stationary and flip the pliers over move to the opposite end of the book and crimp the last coil that exits the book to complete the book Contact your dealer for Crimping Pliers 5 Cleaning the HD e4100 Econ O Tuff Coiler Caring for your HD E4100 Econ O Roll is important for the proper function of the machine The finished tan and gray body should be cleaned wi...

Page 9: ...able to NEW EZ Coil 4101 Book Former The HD 4102 Docking Station Links the HD e4100 Coil Inserter with the HD 4101 Book Former Providing Controlled EZ Coil Insertion with larger coil sizes up to 50MM The HD 4104 Coil Chute Keeps the coil tangle free ...

Page 10: ...10 Part 941005 12 06 ...
Reviews: