OPERATION
TW120 01/11
Operation Section 4-18
© 2011 Alamo Group Inc.
OPERA
T
ION
7.2 Constant Velocity (CV) Driveline
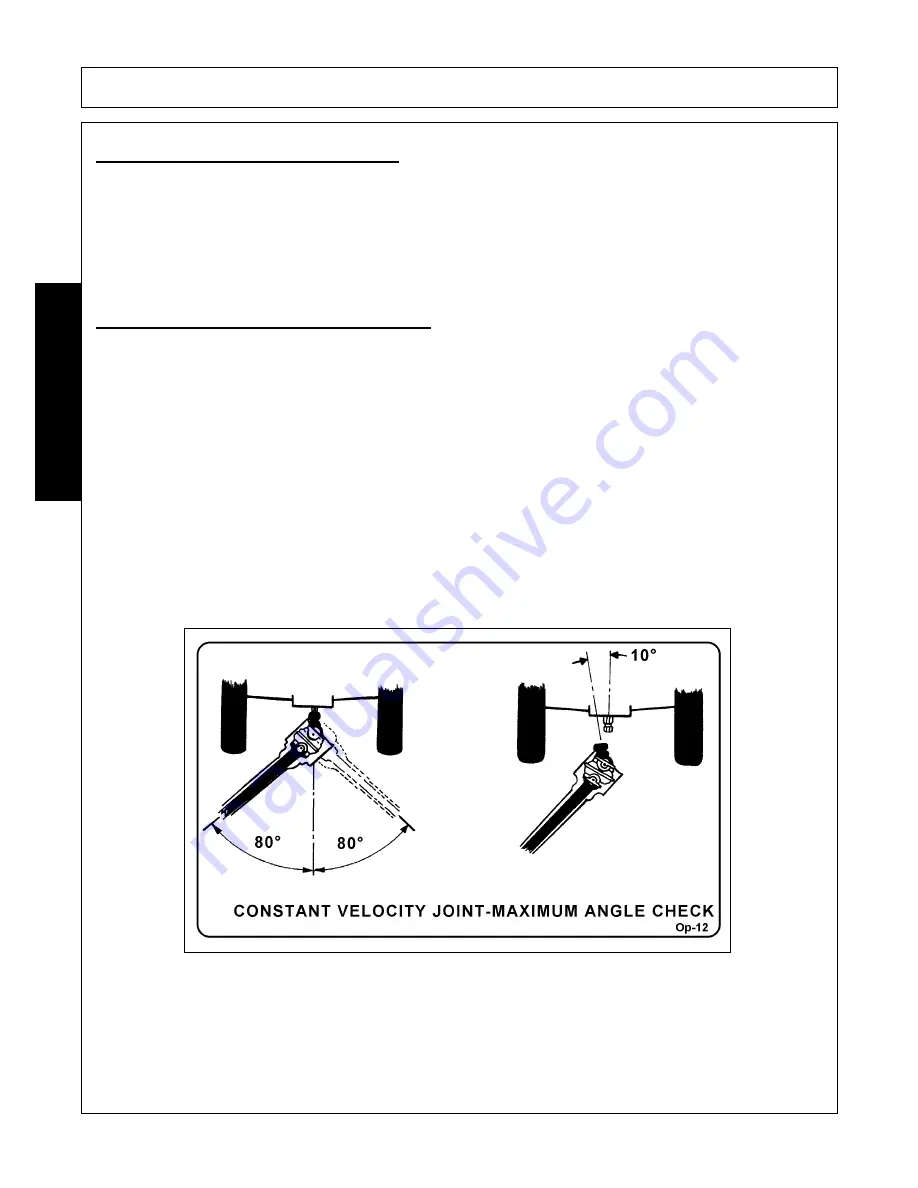
Mowers are equipped with a Constant Velocity (CV) driveline, the maximum turning angle between the tractor
and mower must be determined to ensure the joint angle does not over-extend which can cause CV joint
damage. Constant Velocity joints enable the driveline to operate smoothly with no vibrations and clattering at
angles up to 80°. Angles greater than 80° will result in mechanical damage to the CV joint and mower
driveline.
The Constant Velocity joint must be lubricated every 20-40 hours of operation as specified in the Maintenance
Section. Failure to properly lubricate the joint will result in accelerated wear and joint component failure.
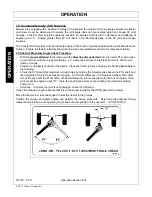
CV Driveline Maximum Angle Check Procedure
•
With the
mower attached
to the tractor and the
driveline disconnected
from the tractor PTO stub make
a hard left turn until there is approximately a 1" clearance between the left rear tractor tire and mower
frame or tongue.
•
Stop and completely shut down the tractor. Place the tractor in Park and apply the Parking Brake before
dismounting.
•
Check the CV joint at this maximum turning radius by holding the driveline yoke above the PTO shaft and
then angle the CV joint to its maximum angle. A minimum difference of 10 degrees between the center
line of the yoke and the PTO shaft must be maintained to ensure the joint will not be over angled. If the
joint cannot be angled at least 10°, there is a potential problem of over-angling the joint while making
sharp turns.
•
Solutions: To ensure the joint is not damaged, check the following:
Check the drawbar length to ensure that it is at the proper length for the RPM speed of the mower.
Move the tractor rear tires wider apart to limit the tractor turning radius.
Position the mower at multiple angles and perform the above procedure. Determine the sharpest turning
radius that maintains a safe operating angle and note this position to the operator.
OPS-R-0006_A
Summary of Contents for TW120
Page 9: ...Safety Section 1 1 2011 Alamo Group Inc SAFETY SECTION...
Page 28: ...SAFETY TW120 01 11 Safety Section 1 20 2011 Alamo Group Inc SAFETY Decal Description...
Page 29: ...SAFETY TW120 01 11 Safety Section 1 21 2011 Alamo Group Inc SAFETY...
Page 30: ...SAFETY TW120 01 11 Safety Section 1 22 2011 Alamo Group Inc SAFETY...
Page 31: ...SAFETY TW120 01 11 Safety Section 1 23 2011 Alamo Group Inc SAFETY...
Page 32: ...SAFETY TW120 01 11 Safety Section 1 24 2011 Alamo Group Inc SAFETY...
Page 33: ...SAFETY TW120 01 11 Safety Section 1 25 2011 Alamo Group Inc SAFETY...
Page 34: ...SAFETY TW120 01 11 Safety Section 1 26 2011 Alamo Group Inc SAFETY...
Page 35: ...SAFETY TW120 01 11 Safety Section 1 27 2011 Alamo Group Inc SAFETY...
Page 36: ...SAFETY TW120 01 11 Safety Section 1 28 2011 Alamo Group Inc SAFETY...
Page 38: ......
Page 39: ......
Page 65: ......
Page 91: ...Introduction Section 2 1 2011 Alamo Group Inc INTRODUCTION SECTION...
Page 96: ......
Page 97: ...Assembly Section 3 1 2011 Alamo Group Inc ASSEMBLY SECTION...
Page 109: ...Operation Section 4 1 2011 Alamo Group Inc OPERATION SECTION...
Page 156: ......
Page 157: ...Maintenance Section 5 1 2011 Alamo Group MAINTENANCE SECTION...
Page 160: ...MAINTENANCE TW120 01 11 Maintenance Section 5 4 2011 Alamo Group MAINTENANCE...
Page 161: ...MAINTENANCE TW120 01 11 Maintenance Section 5 5 2011 Alamo Group MAINTENANCE...
Page 174: ...MAINTENANCE TW120 01 11 Maintenance Section 5 18 2011 Alamo Group MAINTENANCE...
Page 188: ...Secci n de Seguridad 1 1 2011 Alamo Group Inc SECCI N DE SEGURIDAD...
Page 189: ......

