12
Prepare For Safe Operation
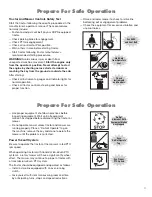
Hitching Mower To Tractor
Three-point hitch-mounted mowers:
— Refer to mower and tractor manufacturers’ manuals.
— Place tractor’s hydraulic power lift (rockshaft)
selector lever in down position to avoid unexpected
movement.
— Explain the hitching procedures to those operators
who cannot read.
— Front-end weights may be needed to maintain
steering control and front-end stability. Refer to the
manufacturers' operator's manual(s).
— When backing the tractor up to the mower, NEVER
allow anyone between the tractor and the mower.
— Attach the mower to the tractor three-point links and
securely pin in position.
— Securely attach the driveline to the tractor PTO.
Lower the master shield into place if it is movable.
Push and pull on the driveline to ensure it is locked
onto the PTO shaft.
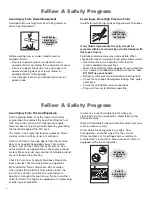
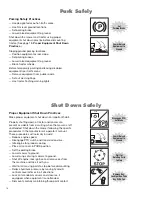
Read and
Understand
Manuals Before
Operating
Maintain
Proper Weight
Distribution
No One
Allowed Between
Tractor and
Mower
Avoid
Entanglement,
Use Guards and
Shields
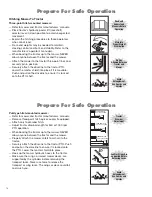
Pull-type hitch-mounted mowers:
— Refer to mower and tractor manufacturers’ manuals.
— Remove three-point hitch quick coupler if equipped.
— Attach only to drawbar hitch.
— Adjust tractor drawbar length for 540 or 1000 rpm
PTO operation.
— When backing the tractor up to the mower, NEVER
allow anyone between the tractor and the mower.
— Properly attach the mower safety tow chain to the
tractor.
— Securely attach the driveline to the tractor PTO. Push
and pull on the driveline to ensure it is locked onto
the PTO. Lower the master shield into place.
— Hook up the mower hydraulic hoses to the tractor.
— Make sure the wings, or raised mower decks, are
supported by the cylinders before removing the
transport locks. Never use force to release the
transport or wing locks. The wings or deck could fall
and crush you.
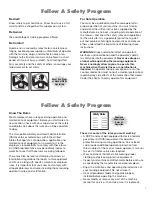
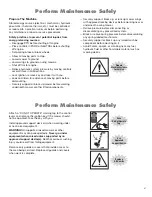
Confi rm Wings Are
Supported Before
Releasing Locks
Avoid
Entanglement,
Use Guards and
Shields
Prepare For Safe Operation
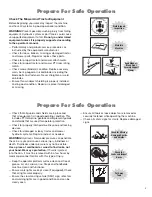
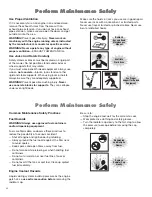
Tractor
Drawbar
Adjustment
14IN
540 RPO PTO
1-3/8" 6 SPLINE
1000 RPO PTO
1-3/8" 21 SPLINE
16IN
1000 RPO PTO
1-3/4" 20 SPLINE
20IN
540 RPM PTO
1-3/8" 6 SPLINE
1000 RPM PTO
1-3/8" 21 SPLINE
1000 RPM PTO
1-3/4" 20 SPLINE
Summary of Contents for TW120
Page 9: ...Safety Section 1 1 2011 Alamo Group Inc SAFETY SECTION...
Page 28: ...SAFETY TW120 01 11 Safety Section 1 20 2011 Alamo Group Inc SAFETY Decal Description...
Page 29: ...SAFETY TW120 01 11 Safety Section 1 21 2011 Alamo Group Inc SAFETY...
Page 30: ...SAFETY TW120 01 11 Safety Section 1 22 2011 Alamo Group Inc SAFETY...
Page 31: ...SAFETY TW120 01 11 Safety Section 1 23 2011 Alamo Group Inc SAFETY...
Page 32: ...SAFETY TW120 01 11 Safety Section 1 24 2011 Alamo Group Inc SAFETY...
Page 33: ...SAFETY TW120 01 11 Safety Section 1 25 2011 Alamo Group Inc SAFETY...
Page 34: ...SAFETY TW120 01 11 Safety Section 1 26 2011 Alamo Group Inc SAFETY...
Page 35: ...SAFETY TW120 01 11 Safety Section 1 27 2011 Alamo Group Inc SAFETY...
Page 36: ...SAFETY TW120 01 11 Safety Section 1 28 2011 Alamo Group Inc SAFETY...
Page 38: ......
Page 39: ......
Page 65: ......
Page 91: ...Introduction Section 2 1 2011 Alamo Group Inc INTRODUCTION SECTION...
Page 96: ......
Page 97: ...Assembly Section 3 1 2011 Alamo Group Inc ASSEMBLY SECTION...
Page 109: ...Operation Section 4 1 2011 Alamo Group Inc OPERATION SECTION...
Page 156: ......
Page 157: ...Maintenance Section 5 1 2011 Alamo Group MAINTENANCE SECTION...
Page 160: ...MAINTENANCE TW120 01 11 Maintenance Section 5 4 2011 Alamo Group MAINTENANCE...
Page 161: ...MAINTENANCE TW120 01 11 Maintenance Section 5 5 2011 Alamo Group MAINTENANCE...
Page 174: ...MAINTENANCE TW120 01 11 Maintenance Section 5 18 2011 Alamo Group MAINTENANCE...
Page 188: ...Secci n de Seguridad 1 1 2011 Alamo Group Inc SECCI N DE SEGURIDAD...
Page 189: ......

