background image

33

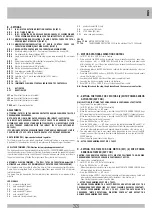
B - SETTINGS

DIP 1 

(ON) - MOTOR ROTATION DIRECTION CONTROL (POINT C)

DIP 2 

(ON) - TIMER (POINT D)

DIP 3 


(ON) - ACTIVATES DOOR RELEASE DURING PHASES OF SLOWDOWN AND 
TOTAL OPENING AND CLOSING (AS PER THE IMPACT TESTS OF EN12453) 

DIP 1-2 


MEMORIZATION/CANCELLATION OF RADIO CONTROL CODES FOR TOTAL 
OPENING (ONLY MODEL CRX) (POINT E)

DIP 1-3 


MEMORIZATION/CANCELLATION OF RADIO CONTROL CODES FOR 
PEDESTRIAN OPENING (ONLY MODEL CRX) (POINT F)

DIP 2-1 


MICRO-SWITCH CONTROLLER FOR PEDESTRIAN OPENING TIMER

DIP 4


 Photocells always active (OFF) - Photocells active only during closing (ON)

DIP 5


Pre-blinking (ON) - Normal blinking (OFF)

DIP 6


 Single pulse command (K BUTT) and step-by-step radio receiver (OFF) - automatic 
(ON)

DIP 7


 Power sensor operation (ON-activated) time operation (OFF-activated).

DIP 8


Electric lock activation (ON-activated)

DIP 9


Electric lock pulse release (ON-activated)

DIP 10

  Electric lock pulse engagement (ON-activated)

DIP 11

  Easy release activation (ON-activated)

DIP 12

  Sensor TEST activation (ON-activated).

DIP 13

  Selection of 1 or 2 motor operation (default OFF 2 motors)

DIP 14

  KING 24 - ON

DIP 15

  KING 24 - OFF

DIP 16 


IMMEDIATE CLOSING AFTER PASSING IN FRONT OF PHOTOCELLS

ON ACTIVATED
OFF DEACTIVATED

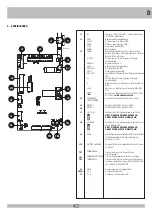
JP1 =>

 Check that the jumper is inserted!

JP2 =>

 Check that the jumper is inserted!

JP3 => 

Check that the jumper is inserted!

PROG =>

 S3 Programming button

ADJUSTMENTS

ATTENTION: PUT DIP 3 IN THE ON MODE ONLY AFTER HAVING CARRIED OUT ALL THE 
PROGRAMMING PROCEDURES.
NOTE: WITH DIP 3 (ON) BRIEF GATE REVERSAL AFTER IMPACT IS ACTIVATED.
THIS BRIEF GATE REVERSAL PERMITS STATIC FORCE TO BE REDUCED TO ZERO 
WITHIN 5 SECONDS AS PER STANDARD EN12453 POINT A.2.2 (ACCEPTABLE STATIC 
FORCE), THEREBY COMPLYING WITH THE IMPACT TESTS ALSO OUTLINED BY 
EN12453).
IF COMPLIANCE WITH THE AFOREMENTIONED STANDARD IS UNNECESSARY, SIMPLY 
POSITION DIP 3 TO OFF. IN THIS CASE THE GATES STOP WITHOUT REVERSING.

RUN TRIMMER (TR1) high-speed electronic regulator

This trimmer permits motor speed adjustment (the default setting is maximum speed). 
Adjustment of the automation is useful for compliance with European impact standards.

LOW-SPEED TRIMMER (TR2) Electronic slow speed approach control

The slow speed control is performed by adjusting the LOW- SPEED TRIMMER which changes 
the voltage output across the motor(s) (turning it clockwise increases the speed). Adjustment 
is performed to determine the correct speed at the end of opening and closing according to 
the gate or when there is friction that might cause the system to function poorly.

AUTOMATIC CLOSING TRIMMER - TCA (TR3) TOTAL OR PEDESTRIAN default NOT 
ACTIVATED and LED DL6 OFF (TRIMMER FULLY ROTATED COUNTERCLOCKWISE)

This trimmer makes it possible to adjust the time for total or pedestrian automatic closing. 
Only with gate completely (total) or partially (pedestrian) open and LED DL6 on (trimmer 
rotated clockwise). 
The pause time can be adjusted from a minimum of two seconds up to a maximum of two 
minutes.

LED SIGNALS

DL1  program activated (red)
DL2  gate opening M2 (green)
DL3  gate closing M2 (red)
DL4  gate opening M1 (green)
DL5  gate closing M1 (red)
DL6  automatic closing indicator (red)

DL7  photocell contact (NC) (red)
DL8  sensor contact (NC) (red)
DL9  STOP button (NC) (red)
DL10   radio code program (green)

FUSES
Fuse 1 T 8A

  MOTOR PROTECTION FUSE

F1 T 2A


 TRANSFORMER PROTECTION FUSE (on the outside of the T2 24V board)

C -  MOTOR ROTATIONAL DIRECTION CONTROL

1 -  Set DIP 1 to ON => LED DL1 starts flashing.
2 -  Press and hold the PROG button. (movement is now manually controlled - open-stop-

close-stop-open - etc.) => GREEN LEDS DL2 and DL4 are lit and the gate panels open 
with a fixed lag of 2 sec. If they close instead of open, release the button and reverse the 
two wires on the motor used.

3 -  After opening release the PROG button and calibrate the mechanical opening stops (on 

the operator).

4 -  Press and hold the PROG button => RED LEDs DL3 and DL5 turn on and the gate panels 

close with a time lag of 2 sec. 

5 -  Continue to hold the PROG button until the gate is completely closed.
6 -  Leave the two doors completely closed to set the timer.
7 -  Reset DIP1 to OFF => LED DL1 turns off, signaling exit from control.

N.B.: During this check the stop, the photocells and the sensors are not active.

D -  SETTING THE TIMER FOR 2 MOTORS (#) WITH POWER SENSOR 

ACTIVATED (DIP 7 ON)

WHILE SETTING THE TIMER THE POWER SENSOR IS CONTINUOUSLY ACTIVATED.

1 - The gate must be completely closed.
2 - Set DIP 2 to ON => LED DL1 will blink rapidly.
3 - Press the PROG button. => M1 opens.
4 -  When the mechanical opening stop is reached, the AUTOMATIC POWER SENSOR stops 

M1 (memorizing the time and the power) => At the same time M2 is triggered to open.

5 -  When the mechanical opening stop is reached, the AUTOMATIC POWER SENSOR stops 

M2 (memorizing the time and the power). 

6 -  Press the PROG button. => M2 closes.
7 -  Press the PROG button. => M1 closes and sets the lag time between M2 and M1. At 

the same time LED DL1 stops flashing indicating exit from the programming procedure.


 Safety and other gate commands now operate normally (inversions, stop, alarms, etc.).

8 -  The gate panels will close in high-speed mode (depending on how you set the RUN 

trimmer) and near total closure in the slow mode (depending on how you set the LOW-
SPEED trimmer).

9 -   Upon closing the power sensors stop the gate.

10 - AFTER PROGRAMMING RESET DIP 2 TO OFF.

D -  SETTING THE TIME FOR ONE MOTOR (M1) (#) WITH POWER 

SENSOR ACTIVATED (DIP 7 ON)

CAUTION: FOR ONE MOTOR CONTROL DIP 13 MUST BE POSITIONED TO ON; DURING 
PROGRAMMING THE POWER SENSOR IS CONTINUOUSLY ACTIVE.

The gate must be completely closed.
1 -  Set DIP 2 to ON => LED DL1 will blink rapidly.
2 -  Press the PROG button. => M1 opens.
 

 When the mechanical opening stop is reached, the AUTOMATIC POWER SENSOR stops 
M1 (memorizing the time and the power). 

3 -  Press the PROG button. => M1 closes.
 

 At the same time LED DL1 stops flashing indicating exit from programming. Safety and 
other gate commands now operate normally (inversions, stop, alarms, etc.).


 Upon closing the power sensor stops the gate.

4 - 

AFTER PROGRAMMING RESET DIP 2 TO OFF.

(#) DURING PROGRAMMING THE SAFETY DEVICES ARE ACTIVE AND STOP THE 
PROGRAMMING PROCEDURE (LED DL1 FROM FLASHING BECOMES CONSTANT). 
TO REPEAT PROGRAMMING SET DIP 2 TO OFF, CLOSE THE GATE USING THE 
PROCEDURE “MOTOR ROTATIONAL DIRECTION CONTROL” AND REPEAT THE 
DESIRED PROGRAMMING PROCEDURE.

G

B

Summary of Contents for AD00709

Page 1: ...erator Torantrieb Operador Alimentazione Alimentation Power Supply Stromspannung Alimentacion Peso max cancello Poids maxi portail Max gate weight Max Torgewicht Peso m x verja Forza max di spinta For...

Page 2: ...cati dalla mancata osservanza nell installazione delle norme di sicurezza e delle leggi attualmente in vigore ATTENTION POUR LA SECURITE DES PERSONNES IL EST IMPORTANT DE SUIVRE TOUTES LES INSTRUCTION...

Page 3: ...es caused by the non observance during the installation of the safety standards and of the laws in force at present ACHTUNG F R DIE SICHERHEIT DER PERSONEN IST ES WICHTIG DASS ALLE ANWEISUNGEN GENAU A...

Page 4: ...normas EN 12453 EN 12445 4 El instalador antes de instalar el motor de desplazamiento tiene que controlar que la cancela est en buenas condiciones mec nicas y que se abra y se cierre en forma adecuad...

Page 5: ...ntenna radio 3 Lampeggiatore 4 Selettore a chiave 5 Fotocellule esterne 1 NERO 1 Collegare a J5 o J6 morsetto NERO 2 Collegare a J5 o J6 morsetto CARATTERISTICHE TECNICHE KING 24V Lunghezza max anta m...

Page 6: ...orze entro i limiti della norma EN12453 Appendice A E Fotocellule es cod ACG8026 Da applicare ogni 60 70cm per tutta l altezza della colonna del cancello fino ad un massimo di 2 5m EN 12445 punto 7 3...

Page 7: ...ANT COL 1 1 80 90 45 100 100 815 90 14 A S3 Y 1 81 2 20 45 110 110 815 90 18 A S3 X 2 21 2 50 70 140 110 815 90 20 A S1 Z 2 51 3 00 90 170 140 815 115 25 B S2 Y 3 01 3 50 115 200 140 815 115 27 B S2...

Page 8: ...ermo A e bloccarlo serrando la vite da 8mA con una chiave fissa n 13 Per ottenere la chiusura desiderata si dovr spostare il fermo B OPZIONALE bloccandolo come descritto per il fermo A MANUTENZIONE Da...

Page 9: ...PASSO COMUNE COMUNE 24Vdc 0 8A 15 per ACCESSORI 24Vdc 0 8A 15 per AUTOTEST COSTE LAMPEGGIATORE 24Vdc 20W LED R 2 2K 1 4W SERRATURA ELETTRICA PEDONALE COSTE ALIMENTAZIONE 230Vac 50Hz TRASFORMATORE M1...

Page 10: ...a NON TOCCARE IL PONTICELLO SE VIENE RIMOSSO L OPERATORE NON FUNZIONA Connettore dedicato alla programmazione in fabbrica solo per modelli CRX NON TOCCARE IL PONTICELLO SE VIENE RIMOSSO L OPERATORE NO...

Page 11: ...so DL6 segnalazione tempo chiusura automatica rosso DL7 contatto fotocellule NC rosso DL8 contatto costa NC rosso DL9 comando pulsante STOP NC rosso DL10 programmazione codici radio verde FUSIBILI Fus...

Page 12: ...a cancello fermo 1 Posizionare il DIP 1 su ON e successivamente il DIP 2 su ON 2 Il led rosso DL1 di programmazione lampeggia con frequenza di 1 sec ON e 1 sec OFF per 10 secondi 3 Premere e mantenere...

Page 13: ...condo anche se le stesse restano impegnate GESTIONE CHIUSURA IMMEDIATA DOPO IL TRANSITO DA FOTOCELLULE DIP 16 ON e DIP 4 OFF Mentre il cancello apre transitando davanti alle fotocellule il cancello si...

Page 14: ...24VDC Potenza Trasformatore 130VA primario 230Vac secondario 18Vac Assorbimento massimo 50 mA Microinterruzioni di rete 100ms Potenza massima spia cancello aperto 24Vdc 3W equivalente a 1 lampadina d...

Page 15: ...CH cod ACG6058 TELECOMANDO SUN DISPOSITIVI Wi Fi NOVA Wi Fi FOTOCELLULE SENZA FILI cod ACG8037 COPPIA COLONNINE NOVA cod ACG8039 VERTIGO Wi Fi FOTOCELLULE SENZA FILI SOSTITUTIVE DELLA COSTA VERTIGO Wi...

Page 16: ...de 50 mm 1 Operateur KING 24V 2 Antenne radio 3 Signal electrique 4 Selecteur 5 Photocellules p protection externe 1 NOIR 1 Connecter J5 ou J6 borne NOIR 2 Connecter J5 ou J6 borne CARACTERISTIQUES TE...

Page 17: ...spositifs de limitation des forces dans les limites de la norme EN12453 appendice A E Cellules photo lectriques code ACG8026 Appliquer chaque 60 70 cm pour toute la taille de la colonne de la porte ju...

Page 18: ...sec ANT COL 1 1 80 90 45 100 100 815 90 14 A S3 Y 1 81 2 20 45 110 110 815 90 18 A S3 X 2 21 2 50 70 140 110 815 90 20 A S1 Z 2 51 3 00 90 170 140 815 115 25 B S2 Y 3 01 3 50 115 200 140 815 115 27 B...

Page 19: ...e il suffit de d placer le collier A et de le bloquer en vissant la vis M8 avec une cl n 13 Pour obtenir la fermeture desir e il est necessarie de deplacer le collier B OPTIONAL et de le bloquer comme...

Page 20: ...PAS COMMUN COMMUN 24Vdc 0 8A 15 pour ACCESSOIRES 24Vdc 0 8A 15 AUTOTEST pour BARRE PALPEUSE FEU CLIGNOTANT 24Vdc 20W LED R 2 2K 1 4W SERRURE LECTRIQUE PIETON BARRE PALPEUSE ALIMENTATION 230Vac 50Hz TR...

Page 21: ...en usine NE PAS TOUCHER AU CAVALIER SANS L OP RATEUR IL NE FONCTIONNE PAS Connecteur d di la programmation en usine seulement pour les mod les CRX NE PAS TOUCHER AU CAVALIER SI LE SYST ME RADIO EST E...

Page 22: ...ement ou partiellement ouverte pi tonne et avec la DEL DL6 allum e le trimmer doit tre r gl dans le sens des aiguilles d une montre Le temps de pause peut varier de 2 secondes 2 minutes selon le r gla...

Page 23: ...A PROGRAMMATION CHOISIE E PROGRAMMATION DES CODES RADIO POUR OUVERTURE TOTALE 62 CODES MAXIMUM UNIQUEMENT POUR LES MODELES CRX La programmation ne peut se faire que lorsque le portail est ferm 1 Posit...

Page 24: ...s ouvrir stopper fermer stopper ouvrir etc Si DIP 6 est sur ON Il effectue l ouverture quand le portail est ferm S il est actionn pendant le mouvement d ouverture cela ne produit aucun effet S il est...

Page 25: ...ommande et la fermeture automatique sont de travail Note 1 Au cours de cette op ration dans le cas de panne de les barres palpeuses ou cellules photo lectriques les cellules photo lectriques ou barres...

Page 26: ...PHOTOCELLULES SANS FIL POUR REMPLACER LA BARRE PALPEUSE VERTIGO Wi Fi 8 code ACG8042 VERTIGO Wi Fi 10 code ACG8043 BLOCK Wi Fi S LECTEUR CL SANS FILS code ACG6098 SPARK Wi Fi FEU CLIGNOTANT SANS FILS...

Page 27: ...stop is used during closing optional the maximum travel is reduced by 50 mm 1 KING 24V operator 2 Tuned aerial 3 Flashing lamp 4 Key selector 5 Photoelectric cells external 1 TECHNICAL DATA KING 24V...

Page 28: ...keep thrust force within the limits of EN12453 regulation Appendix A E Photocells like code ACG8026 To apply every 60 70cm for all the height of the column of the gate up to a maximum of 2 5m EN 12445...

Page 29: ...COL 1 1 80 90 45 100 100 815 90 14 A S3 Y 1 81 2 20 45 110 110 815 90 18 A S3 X 2 21 2 50 70 140 110 815 90 20 A S1 Z 2 51 3 00 90 170 140 815 115 25 B S2 Y 3 01 3 50 115 200 140 815 115 27 B S2 Y L M...

Page 30: ...per A in the needed position by tightening the 8mA screw with a n 13 key To obtain the desired closing limit you must adjust the stopper B OPTIONAL in the needed position and tighten it as for stopper...

Page 31: ...P COMMON COMMON 24Vdc 0 8A 15 for ACCESSORY SUPPLY 24Vdc 0 8A 15 for AUTOTEST SAFETY STRIPS BLINKER 24Vdc 20W LED R 2 2K 1 4W ELECTRIC LOCK PEDESTRIAN SAFETY STRIPS POWER SUPPLY 230Vac 50 Hz TRANSFORM...

Page 32: ...DO NOT REMOVE ANY JUMPER OTHERWISE THE OPERATOR WILL NOT WORK Connector dedicated to the factory programming only CRX control board DO NOT REMOVE ANY JUMPER OTHERWISE THE OPERATOR WILL NOT WORK Built...

Page 33: ...pening M1 green DL5 gate closing M1 red DL6 automatic closing indicator red DL7 photocell contact NC red DL8 sensor contact NC red DL9 STOP button NC red DL10 radio code program green FUSES Fuse 1 T 8...

Page 34: ...ellation is indicated by two flashes of green LED DL10 4 The red LED DL1 remains active and you can add new codes as shown above 5 Reset DIP 1 to OFF and DIP 2 to OFF 6 End of procedure INDICATOR MEMO...

Page 35: ...when closing If engaged when closing reverses the motion when opening If it remains engaged again it performs a further reversal after 2 seconds then performs an additional short reversal and then gi...

Page 36: ...power to the board and is set up to ensure compliance with double or reinforced insulation with regard to dangerous voltage Any external circuits connected to the outputs of the control panel must be...

Page 37: ...TRANSMITTER SUN Wi Fi DEVICES MASTER Wi Fi RECEIVER CARD TO MANAGE WIRELESS SYSTEM with connector 12 30V ac dc code ACG6094 with terminal block 12 30V ac dc code ACG6099 NOVA Wi Fi PHOTOCELLS WITHOUT...

Page 38: ...HE EIGENSCHAFTEN KING 24V Max Torfl gelweite m 4 Max Torgewicht kg 400 Max Hub mm 345 ffnungszeit ca s 14 27 Laufgeschwindigkeit m s 0 0125 Max Schubkraft N 1800 Stromspannung und Frequenz 24V 24V Mot...

Page 39: ...ungen muessen mit den Norm EN12453 uebereinstimmen Anhang A E Photozelle wie Kode ACG8026 Jede 60 70 cm f r die ganze H he der Spalte des Gatters bis zu einem Maximum von 2 5 m anwenden EN 12445 Punkt...

Page 40: ...Max a A max B C D E T sec ANT COL 1 1 80 90 45 100 100 815 90 14 A S3 Y 1 81 2 20 45 110 110 815 90 18 A S3 X 2 21 2 50 70 140 110 815 90 20 A S1 Z 2 51 3 00 90 170 140 815 115 25 B S2 Y 3 01 3 50 115...

Page 41: ...w nschte Offnungsweite einzustellen gen ngt es die Endschalter A zu verstellen und sie mit Hilfe eines Imbusschl els an der Mutterschraube festzuziehen Um die erw nschte Schliessweite einzustellen m s...

Page 42: ...EINSAME ERDUNGSKONTAKTE GEMEINSAME ERDUNGSKONTAKTE 24Vdc 0 8A 15 f r ZUBEH RE 24Vdc 0 8A 15 f r AUTOTEST KONTAKTLEISTE BLINKER 24Vdc 20W LED R 2 2K 1 4W ELEKTROSCHLOSS FUSSG NGER KONTAKLEISTE STROMVER...

Page 43: ...f r die Programmierung in der Fabrik NICHT DIE BERBR CKUNG BER HREN OHNE ANTRIEB NICHT BETRIEBSF HIG Verbinder f r die Programmierung in der Fabrik nur f r die Modelle CRX NICHT DIE BERBR CKUNG BER H...

Page 44: ...g ffnung und eingeschalteter LED Anzeige DL6 Trimmer im Uhrzeigersinn gedreht Die Pause kann von mindestens 2 Sekunden bis maximal 2 Minuten eingestellt werden LED ANZEIGEN DL1 Programmierung aktivier...

Page 45: ...eschlossenem Tor 1 DIP 1 auf ON und anschlie end DIP 2 auf ON stellen 2 Die rote LED AnzeigeDL1 f r die Programmierung blinkt mit einer Frequenz von 1 Sek ON und 1 Sek OFF f r 10 Sekunden 3 Die Fernst...

Page 46: ...enem Tor gedr ckt so wird das Tor geschlossen dr ckt man sie bei geschlossenem Tor f hrt das zur ffnung ELEKTRISCHE VERRIEGELUNG LOCK DIP 8 auf ON stellen um den Befehl f r die elektrische Verriegelun...

Page 47: ...rend dieses Vorgangs im fall eines ausfalls der Kontaktleisten oder Fotozellen der Fotozellen oder Kontaktleisten funktionieren noch Unterbrechung des Betriebs im Gange Anmerkung 2 Die Stoppen Taste i...

Page 48: ...G6058 FERNSENDER SUN Wi Fi VORRICHTUNGEN MASTER Wi Fi KARTE F R DEN BETRIEB DES SYSTEMS OHNE KABEL mit Verbinder 12 30V ac dc Kode ACG6094 mit Endblockierung 12 30V ac dc Kode ACG6099 NOVA Wi Fi FOTOZ...

Page 49: ...lo mec nicos Con el seguro mec nico incorporado que interviene durante la abertura Si se utiliza tambi n el seguro mec nico que interviene durante el cierre opcional la carrera m xima de remolque se r...

Page 50: ...Regulacion de la fuerza del motor D Nervaduras como c d ACG3010 y o otros dispositivos que limitan las fuerzas entre limites de las normas EN 12453 Appendix A E Fotoc lulas como c d ACG8026 Da applic...

Page 51: ...D E T sec ANT COL 1 1 80 90 45 100 100 815 90 14 A S3 Y 1 81 2 20 45 110 110 815 90 18 A S3 X 2 21 2 50 70 140 110 815 90 20 A S1 Z 2 51 3 00 90 170 140 815 115 25 B S2 Y 3 01 3 50 115 200 140 815 11...

Page 52: ...y bloquearlo con una llave fija n 13 Para poder obtener el cierre deseado se tendr que mover el seguro B OPCIONAL y bloquearlo con una llave fija n 13 MANTENIMIENTO Estas operaciones deben ser efectu...

Page 53: ...O PASSO COM N COM N 24Vdc 0 8A 15 para ACCESSORIOS 24Vdc 0 8A 15 para AUTOTEST COSTAS INTERMITENTE 24Vdc 20W LED R 2 2K 1 4W CERRADURA EL CTRICA PEATONAL COSTAS ALIMENTACION 230Vac 50Hz TRANSFORMADOR...

Page 54: ...O RESPETAR LAS PRUEBAS DE IMPACTO INDICADAS EN LA NORMATIVA EN12453 EN CASO DE QUE NO SEA NECESARIO OBEDECER LA NORMA ARRIBA DESCRITA BASTA COLOCAR EL DIP 3 EN POSICI N OFF EN ESTE CASO LAS PUERTAS SE...

Page 55: ...LOS TIEMPOS PARA 1 MOTOR M1 CON SENSOR DE CORRIENTE HABILITADO DIP 7 ON ATENCI N PARA GESTIONAR UN SOLO MOTOR EL DIP 13 DEBE ESTAR COLOCADO EN POSICI N ON DURANTE LA PROGRAMACI N EL SENSOR DE CORRIEN...

Page 56: ...os est n programados en el modo de IMPULSO de lo contrario pueden activar el movimiento de la puerta sin tener activos los elementos de seguridad PULSADOR DE MANDO PASO PASO COM K BUTTON Si DIP 6 en O...

Page 57: ...de seguridad se estropea o se queda empe ada por mas de 60 segundos los comandos ABRE CIERRE K BUTTON y el PEATONAL funcionar n solo a hombre presente El signal de activaci n de este funcionamiento se...

Page 58: ...CH c d ACG6058 TELEMANDO SUN DISPOSITIVOS Wi Fi MASTER Wi Fi FICHA DE GESTI N SISTEMA SIN CABLES con enchufe 12 30V ac dc c d ACG6094 con regleta 12 30V ac dc c d ACG6099 NOVA Wi Fi FOTOC LULAS SIN CA...

Page 59: ...2 de la Directive machines 2006 42 CEE et de ses modifications successives Sa mise en service est interdite avant que l installation ait t d clar e conforme aux dispositions pr vues par la Directive T...

Page 60: ...nsatore 35 F 450V x serie 120V 60 CME1166 Adattat motore KING 24V CME1299 Perno per ingranaggio serie KING CME2042 Corona elicoidale sblocco sx CME2041 Corona elicoidale dx serie KING CME8996 Vite s f...

Reviews: