G
B
17
17
E
LECTrIC sAfETY DEVICEs
for a sliding gate weighing more than 300 kg it is obligatory to fit 2 pairs of
photocells and mobile sensors in such a way as to protect any potentially
dangerous openings in the gate (fig. 6). The photocells must be located
at a height of between 40 cm and 60 cm. One pair of photocells must be
located inside the premises and adjusted so that they cover the entire
travel distance of the gate, while the other pair must be located externally
between the gateposts. in order to avoid the risk of personal injury the
gate and the railings must be covered with fine metal mesh for a distance
along the railings such as to cover the full travel distance of the gate) and
in any event there must be no openings of sufficient size to introduce a
hand. Any other shear points or entanglement/crushing points must be
protected or covered (see mechanical safety strip) (EN 12453 norm).
gate movement can be signalled by a flasher unit installed nearby.
Use S1/R2 electronic control board.
for connections and technical data of accessories refer to the appropriate
booklets.
E
MErGENCY rELEAsE
To be undertaken after disconnecting power supply.
The operator is irreversible and keeps the door closed even without a
lockset.
To open the gate manually, in open the motor cover and turn the knob
«A» anti-clockwise.
To restore electric working you have to turn the lever clockwise (fig. 7).
L
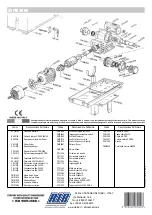
IMIT sWITCH ADJUsTMENT (fig. 8)
To adjust the assembly: release nuts g, after establishing the direction
of movement of cam H for opening and closing, position the two limit
switches, f, by turning knobs P and judging by sight.
After checking for correct operation of the two microswitches, precisely
adjust their positions so that the gate will stop in the desired position
during opening and closing.
Then fasten nuts g.
N.B.
The standard limit switch is used for gates of a max. iength of 13
meters.
if the gate is longer, «Special» limit switches for gates of up to 18 meters
can be supplied.
A
DJUsTMENT Of THE sAfETY CLUTCH (fig. 9)
N.B.: These operations must be executed only after the power
supply has been suspended.
To adjust, lock the motor shaft (A) with a n° 17 hex unrech, unscrew the
locking nut (b) with a n° 22 wrench.
To increase thrust force, tighten the grub screw, C, with a n° 6 hex
wrench.
let the gate move electrically a number of times, holding it with your
hands so that the thrust force is slightly higher than that actually required
to move the gate (UNi 8612 REgUlATiONS).
When adjustment has been completed, remember to fasten the nut at
the motor shaft.
M
AINTENANCE
To be undertaken only by specialized staff after disconnecting
power supply.
Clean the sliding guide of stones and dirt periodically only when the gate
does not move.
7
8
6
A) Sliding gate
b) External photo-electric cells
l) Safety strip fixed to column
i) Photo electric cells (internal)
9
ALWAYs UsE AN OPEN/CLOsE PUsH BUTTON WHICH
Is DEsIGNED TO PrEVENT THE POssIBILITY Of
sIMULTANEOUsLY sENDING THE OPPOsITE COMMAND
Of OPENING AND CLOsING AND AVOID sO A DAMAGE
TO THE MOTOr.


