background image

Page 28 / 66 


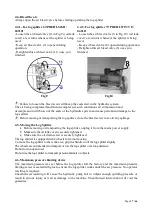
The ends of the logs must be cut square. Always make sure that both ends of the log 
you are splitting are cut as square as possible. This will prevent the log from sliding 
out of position while under pressure.  
Branches must be cut of flush with the trunk. 


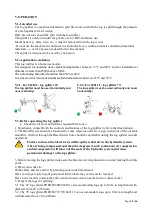
Wear protective equipment 
- Protect your eyes and face 
Any log splitter may throw foreign objects into the air.  
Flying debris can cause permanent eye damage or face & head injury. 
Always wear protective face shield or safety goggles.  
Everyday eyeglasses have only impact resistant lenses. They are not safety glasses. 
- Wear protective boots to protect your feet against potential falling logs.  
- Wear protective gloves to protect hands against wood debris and splits. 
Protective electrically non-conductive gloves and non-skid footwear / protective 
boots are recommended when working. 
Note for 6T log splitter Ref. PREHLS6SR/042101: Instal the log splitter on its 
support stand. Do not put the log splitter on the ground for operations. This is an 
awkward operating position in which the operator has to bring his face close to the 
machine, and thus risks being struck by wood chips or debris. 


Prevent fires 
Do not smoke or have open flames when operating or refilling the oil tank.  
Never operate the log splitter near a flame or spark. 
Oil is flammable and can explode. 


Keep visitors and children away 
The log splitter must always be operated by one person only.  
Other people should keep at a safe distance from the work area (at least 5m), 
especially when the log splitter is under operation.  
Never ask another person to help you with freeing jammed log.  
No one under the age of 16 should be allowed to operate the log splitter.  
Any individual under the age of 18 should have the necessary training, skills to 
perform the functions properly and safely and should always be under the 
supervision of an adult responsible for its safety. 
Keep persons (esp. children) and animals away from product and working area. 


Avoid injury from unexpected accident 
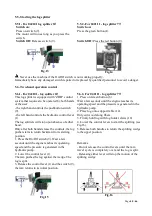
Danger! Keep clear of moving parts! 
Do not straddle or reach across the splitting area when operating the log splitter. 
Never pile logs to be split in a manner that will cause you to reach across the log 
splitter.  
Only use your hands to operate the control levers.  
Never use your foot, knee, a rope, or any other extension device.  
Always pay full attention to the movement of the wedge / log pusher ram.  
Never attempt to load your log splitter while the ram is in motion.  
Keep hands out of the way of all moving parts.  
Never try to split two logs on top of each other. One of them may fly up and hit you. 
Do not place any tool or any part of your body in the log splitter during operation. 


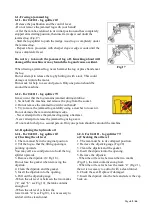
Protect your hands 
Keep hands out of moving parts. When the ram of the log splitter is in the return 
mode, keep your hands off the machine - the log splitter is designed to automatically 
stop when the cylinder is fully retracted.  

Summary of Contents for 042101

Page 1: ...ilisation EN LOG SPLITTER User and maintenance manual IT SPACCALEGNA Manuale di istruzioni e di manutenzione R f Art Nr PREHLS6SR 042101 PREHLS71T VE 042111 Imp par by Ribimex s a 56 Route de Paris FR...

Page 2: ...ouvoir le consulter ult rieurement WARNING Carefully read this instruction manual before operating this product Incorrect operation may cause injury and or damages Please keep this manual for future r...

Page 3: ...pieds 8 Moteur lectrique 9 Interrupteur de commande 10 Roue 11 Vis de purge d air voir Fig 9 12 Vis jauge d huile voir Fig 9 13 Support arri re 1 Tige de r glage de course de la poutre 2 Molette 3 Po...

Page 4: ...85 dB K 3dB Niveau de vibrations 2 5 m s2 2 5 m s2 Dimensions L x l x H 975 x 325 x 480mm 560 x 460 x 1100 mm Poids env 51kg 98kg TF temps de fonctionnement TR temps de repos III CONSIGNES DE S CURIT...

Page 5: ...grande herbe buisson ou autres obstacles Le lieu d installation doit tre suffisamment d gag pour permettre une bonne utilisation et permettre l utilisateur de rester vigilant Afin de pr venir tout ac...

Page 6: ...on support Ne pas poser le fendeur de b ches m me le sol Ce positionnement vous obligera vous baisser et approcher le visage proximit de la machine et risquer ainsi d tre bless par des d bris ou copea...

Page 7: ...produit en marche sans surveillance Ne pas laisser le produit tant qu il n est pas compl tement arr t D brancher le produit Attention D brancher le produit de sa source d alimentation avant toute op...

Page 8: ...e laissez jamais des enfants l utiliser Il convient de surveiller les enfants pour s assurer qu ils ne jouent pas avec le produit L utilisation de cet outil est interdite aux enfants et adolescents Se...

Page 9: ...pas faire fonctionner ce produit ou tout autre produit lectrique si vous tes fatigu malade sous l influence de l alcool de m dicaments ou de drogues ou de toute autre substance qui pourrait affecter...

Page 10: ...tenues dans ce manuel d crivent des composants disponibles au moment de son impression Nous nous r servons le droit d apporter toute modification sans information pr alable et sans obligation de modif...

Page 11: ...ccordements lectriques provisoires Ne pontez jamais les quipements de s curit et ne les mettez jamais hors service Tout raccordement lectrique voire des r parations sur des parties lectriques de la ma...

Page 12: ...d g ts Contenu du carton A Fendeur de b ches 1 set B Tubes du support 8 pcs C Roue essieu 2 sets D Visserie 1 sachet E Manuel d instructions 1 pce Contenu du carton A Fendeur de b ches 1 set B Levier...

Page 13: ...s vis sont fermement serr es l absence de fuites sur le syst me hydraulique le niveau d huile voir l huile recommand e au chapitre 6 faire le plein si n cessaire Veillez ce que la zone de travail remp...

Page 14: ...iliser le fendeur sur cette position 3 D branchez l appareil et retirez la fiche de la prise du secteur 4 Rel chez la deuxi me poign e de commande 5 a D visser la molette Fig 6 rep re A b Tirer sur la...

Page 15: ...tion lectrique doit tre quip e de dispositifs de protection de sous voltage de surtension et de surintensit ainsi que d un dispositif de courant r siduel RCD dont le courant assign r siduel maximum es...

Page 16: ...afin d viter tout coulement d huile 4 5 D placer le fendeur Avant de d placer ou transporter le fendeur d branchez le de sa source d alimentation lectrique Assurez vous que le bouchon du r servoir d...

Page 17: ...horizontalement et jamais verticalement 5 2 2 R f 042111 Fendeur 7T La fendeuse de b ches doit tre utilis e verticalement et jamais horizontalement 5 3 Avant d utiliser le fendeur V rifiez le niveau d...

Page 18: ...vaillez par basses temp ratures faites tourner le fendeur vide pendant 15 minutes pour pr chauffer l huile hydraulique 10 Rappel Le fendeur de b che doit tre uniquement actionn par une seule personne...

Page 19: ...position de d part 1 Appuyez sur l interrupteur 9 de commande du moteur lectrique Attendez quelques secondes jusqu ce que le moteur atteigne sa vitesse finale et que la pression soit g n r e dans la...

Page 20: ...et ne se coincent pas autant que le bois jeune Ne jamais fendre de troncs b ches contenant des clous fil ou autres objets Ne fendre que des morceaux de bois dont la longueur est inf rieure ou gale la...

Page 21: ...coinc avec une scie Ne demandez pas d aide une seconde personne 6 2 Contr le et Changement de l huile 6 2 1 R f 042101 Fendeur 6T 6 2 2 R f 042111 Fendeur 7T a Contr le du niveau d huile 1 Le pousse...

Page 22: ...nne pour positionner et tenir le coin refendre 5 Basculez ensuite la machine de mani re ce que l orifice de remplissage pointe vers le haut Fig 22 b 6 Versez l huile hydraulique de rechange 3 litres l...

Page 23: ...peut endommager la pompe 2 L huile doit tre compl tement vidange une fois par an 3 Avant de proc der la vidange assurez vous que toutes les pi ces mobiles soient arr t es et que le fendeur est d branc...

Page 24: ...s de purge avant de d placer le fendeur Serrez le boulon de vidange d huile Contactez votre revendeur Le moteur ne d marre pas Pas de courant dans la prise Prolongateur d fectueux Interrupteur ou capa...

Page 25: ...d 3 Log pusher 4 Work table 5 Wedge 6 Handle 7 Front stand 8 Motor 9 Switch 10 Wheel 11 Air Bleed screw see Fig 9 12 Oil screw see Fig 9 13 Back stand 1 Ram Travel Adjusting Rod 2 Knob 3 Transport han...

Page 26: ...ions level 2 5 m s2 2 5 m s2 Overall size LxWxH 975 x 325 x 480mm 560 x 460 x 1100 mm Weight kg 51kg 98kg TF working time TR resting time III SAFETY INSTRUCTIONS Before using this product carefully re...

Page 27: ...ls logs or other components laying around the work area Do not use it in areas where fumes from paint solvents or flammable liquids pose a potential hazard For 6T Log Splitter Ref PREHLS6SR 042101 Put...

Page 28: ...ay The log splitter must always be operated by one person only Other people should keep at a safe distance from the work area at least 5m especially when the log splitter is under operation Never ask...

Page 29: ...his product in the nearest recycle centre Please contact your local authority or local recycle centre for further information for its safe disposal 3 2 General safety information 1 Keep work area clea...

Page 30: ...ifications table This could be dangerous and may damage the machine 7 Use the right product Do not force small products or attachments to do the job of heavy duty tools 8 Dress properly Do not wear lo...

Page 31: ...r and or operator are responsible for any damages or injury caused to properties and or persons 21 Have your product repaired by qualified personnel Unless otherwise indicated in this instruction manu...

Page 32: ...peration of the machine being restricted When installing the supply line ensure that it is neither trapped nor compressed or bent and that the connector is not subject to moisture or falls in any liqu...

Page 33: ...g E Owner s Manual 1pc Content of the packaging A Log Splitter 1 set B Control Lever and Guard Assembly 2sets C Removable Support Table 1 pc D Owner s Manual 1pc Example on how to upack the 7t log spl...

Page 34: ...screws are tight check the hydraulic system for any possible leaks refill oil if necessary Ensure that the working area meets the following conditions no danger of slipping Flat and levelled surface...

Page 35: ...ed length is set c Once the rod is pulled sufficiently up to obtain the desired ram stroke tight the knob back to the original torque The ram travel is now shorter than the original full stroke The ra...

Page 36: ...n devices of under voltage over voltage and over current as well as a residual current device RCD which maximum residual current rated at 0 03A Electrical connection rubber cables must comply with EN6...

Page 37: ...moving or transporting the log splitter close the bleed screw to avoid any spillage 4 5 Moving the Log Splitter Before moving or transporting the log splitter unplug it from the mains power supply Mak...

Page 38: ...e operating the log splitter Check the oil level and refill as required before use 1 Familiarize yourself with the controls and features of the log splitter refer to the illustrations 2 The Bleed Scre...

Page 39: ...og splitter is strictly designed for one man operation Never allow more than one person approach and work on the machine at the same time 5 4 Placing the log on the splitter Prepare the wood to be spl...

Page 40: ...ds release the controls the log pusher starts to return backward to its starting position 1 Press the On Off switch 9 Wait a few seconds until the engine reaches its operating speed and the pressure i...

Page 41: ...ot attempt to split green logs Dry seasoned logs split much more easily and will not jam as frequently as green wood Never attempt to split logs containing nails metals parts or any other hard piece O...

Page 42: ...m and splitting wedge Never attempt to free the jammed log using a hammer Never attempt to release the jammed log using a saw Do not ask for help to a second person Only one person should be around th...

Page 43: ...he log splitter 5 Then tilt the machine so that the filling opening is pointing upwards Fig 22 b 6 Pour hydraulic oil 3 liters using a clean funnel 7 Clean the dipstick and the seal Check the oil leve...

Page 44: ...gislation 6 2 3 Recommended oil Following hydraulic oils or equivalent are recommend for both log splitters hydraulic transmission system SHELL Tellus 22 Aral Vitam GF22 Mobil DTE 11 BP Energol HCP 22...

Page 45: ...sening Check and tighten the parts Control Levers or Connection parts bent Repair the bent parts Lower hydraulic oil level Check and refill hydraulic oil 6 5 Storage Keep the product the instructions...

Page 46: ...ttore 10 Ruote 11 Vite di sfiato 12 Vite e asta di livello dell olio 13 Supporto anteriore 1 Barra di regolazione del martinetto 2 Pomello 3 Impugnatura superiore per il trasporto 4 Martinetto 5 Impug...

Page 47: ...one 89 dB A k 3dB A 85 dB K 3dB Livello di vibrazione 2 5 m s2 2 5 m s2 Dimensione LxWxH 975 x 325 x 480mm 560 x 460 x 1100 mm Peso ca 51kg 98kg TF tempo di lavoro TR tempo di riposo III ISTRUZIONI DI...

Page 48: ...e per la sicurezza dell operatore Per evitare di perdere l equilibrio non lasciare attrezzi ceppi oggetti o frammenti di materiale nella zona di lavoro Non utilizzare il prodotto nelle zone in cui so...

Page 49: ...gna o durante il cambio dell olio Non avviare mai lo spaccalegna in prossimit di fiamme o scintille L olio infiammabile e pu esplodere Tenere a distanza le persone estranee e i bambini Lo spaccalegna...

Page 50: ...tenzione Seguire e rispettare le istruzioni per l uso e la manutenzione Allentare la vite di sfiato vedere 4 4 Proteggere l ambiente Portare l olio in un luogo preposto allo smaltimento e rispettare l...

Page 51: ...ato migliore e pi sicuro se si utilizza l apparecchio per le finalit per cui stato concepito Non alterare in alcuna circostanza il vostro spaccalegna Questo prodotto stato progettato e costruito per e...

Page 52: ...corrente sufficiente al motore Evitare l uso di cavi senza protezione e insufficientemente isolati I cavi devono essere fatti con materiale protettivo adatto all uso esterno Verificare periodicamente...

Page 53: ...egamento elettrico La linea di alimentazione deve essere in conformit con la norma IEC 60245 cavo H07 RN F con una sezione dei conduttori minimo di 1 5 mm e una lunghezza massima di 10 m Non usare mai...

Page 54: ...el cartone fig 3 A Spaccalegna 1 set B Leva di commando e supporti laterale 2sets C Tavolo 1 pezzo D Manual d uso 1 pezzo Seguire le istruzioni sotto riportate da 1 a 5 Mettere lo spaccalegna sul suol...

Page 55: ...senza di perdite nel sistema idraulico il livello dell olio vedi olio consigliato nel Capitolo 6 effettuare il rifornimento se necessario Assicurarsi che l area di lavoro soddisfi le seguenti condizio...

Page 56: ...questa posizione 3 Spegnere l unit e staccare la spina dalla presa di corrente 4 Rilasciare la seconda leva di comando 5 a Allentare la manopola Fig 6 A b Sollevare l asta di regolazione Fig 6 B fino...

Page 57: ...sitivi di protezione di sotto voltaggio sovratensione sovracorrente come pure un dispositivo di corrente residua RCD con una corrente residua stimata a 0 03A I cavi di gomma del collegamento elettrico...

Page 58: ...perdite di olio 4 5 Spostare lo spaccalegna Prima di spostare o trasportare lo spaccalegna scollegare la presa dalla rete Accertarsi che la chiusura del tappo del contenitore dell olio sia ben sigill...

Page 59: ...ima del funzionamento dello spaccalegna Controllare il livello dell olio e se necessario assicurarsi di riempire il serbatoio dell olio prima dell uso 1 Imparare a conoscere tutti i comandi e caratter...

Page 60: ...spaccare tagliandole alla dimensione massima e assicurarsi che il legno sia tagliato dritto Mettere il legno sul spaccalegna in modo da non mettersi in pericolo 5 4 1 Spaccalegna 6T PREHLS6SR 042101 P...

Page 61: ...ulsante il cilindro ritorna nella posizione iniziale 1 Premere sul interruttore 9 per avviare il motore elettrico Aspettare alcuni secondi fino a quando il motore raggiunge la velocit finale e che la...

Page 62: ...evono essere asciutti in quanto si spaccano molto pi facilmente e non si incepperanno nello spaccalegna Non spaccare mai tronchi legna da ardere contenente chiodi fili o altri oggetti Spaccare solo i...

Page 63: ...e il cuneo Non tentare mai di liberare il tronco incastrato con un martello Non tentare mai di liberare il tronco bloccato con una sega Non chiedere l aiuto di una seconda persona 6 2 Controllo e cam...

Page 64: ...2 a per scaricare l olio nel serbatoio Se necessario chiamare una seconda persona per posizionare e mantenere lo spaccalegna 5 Quindi inclinare lo spaccalegna in modo che il foro di riempimento sia ri...

Page 65: ...o con l asta di livello Un livello dell olio troppo basso puo danneggiare la pompa dell olio 2 L olio dovrebbe essere completamente cambiato una volta all anno 3 Assicurarsi che tutte le parti mobili...

Page 66: ...i sono usurata e Rivolgersi al rivenditore Il motore non si avvia Nessuna corrente nella presa Controllare il fusibile Prolunga diffettosa Spingere e controllare la prolunga Sostituirla se necessario...

Reviews: