background image

Page 

8

 / 

18


EN – Original instructions


I. Parts List 
II. Characteristics


III. Safety instructions


IV. Getting Started


V. Operation


VI. Maintenance and Storage


I. PARTS LIST 

See Fig. 1 


II.


CHARACTERISTICS 

See Table 1 


III. SAFETY INSTRUCTIONS


WARNING! Read all safety warnings and all instructions. 


Failure to follow the warnings and instructions may result in electric shock, fire 
and/or serious injury.


WARNING! 


To reduce the risk of injury, read the instruction manual and understand the 
machine before use.


WARNING! 


When using electric tools basic safety precautions should always be followed to 
reduce the risk of fire, electric shock and personal injury.


Save all warnings and instructions for future reference.


Keep this manual handy so that you may refer to it later whenever any questions arise.  Always be 
sure to include this manual when selling, lending, or otherwise transferring the ownership of this 
product.


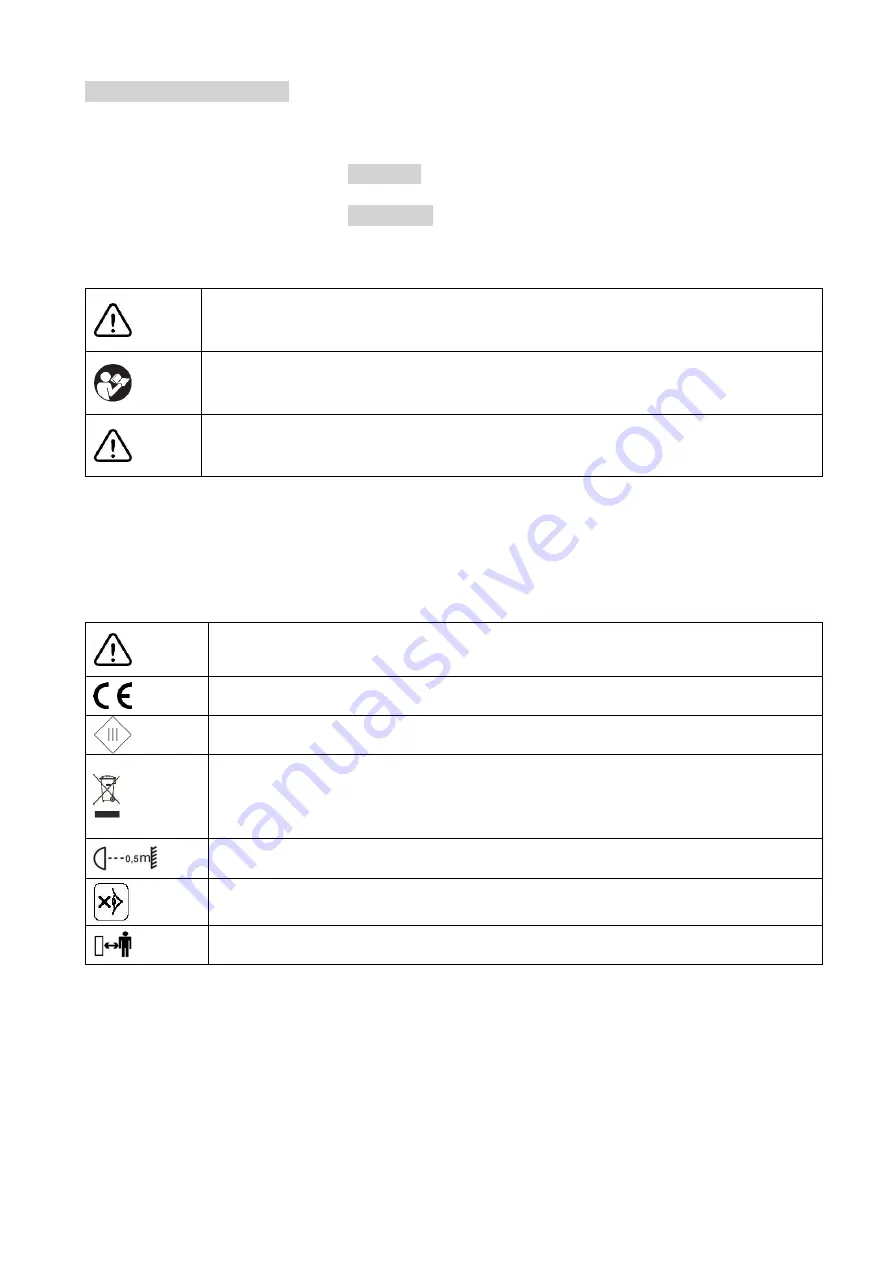
Symbols

 (

Explanation of symbols appearing on the tool, if applicable).


Caution! Risk of injury and/or damage and/or deterioration of product in case of 
non-compliance to safety requirements 


CE Conformity 


Class III electrical equipment 


Do not dispose of this product with household rubbish. 
Dispose of this product in the nearest recycle centre. 
Please contact your local authority or local recycle centre for further information 
for its safe disposal. 


Place the device more than 0.5m from a wall. 


Do not aim the eyes or face of people and animals. 
Do not direct the light beam to the eyes. 


Keep persons (esp. children) and animals away from product and working area. 


3.1- General safety warnings


Before using this product, read and understand all the following safety instructions. Become 
familiar with the controls and the proper use of the product. 


The safety precautions and instructions given in this manual are unable to cover all the 
conditions and situations that may arise. User should operate the product with common 
sense and caution, especially in the conditions that are not referred in this manual. 


The use of this product by children is prohibited. 


Only well-instructed adults should operate this product.  

Summary of Contents for 160306

Page 1: ...TLIGHT WITH MOTION SENSOR User and maintenance manual IT PROIETTORE SOLARE LED CON RILEVATORE DE MOVIMENTO Manuale di istruzione e di manutenzione Réf Art Nr PRLUMSOL SP9 160306 Imp par by Ribimex S A 56 Route de Paris FR 77340 Pontault Combault Imp da Ribimex Italia s r l Via Igna 18 IT 36010 Carrè Vi v1 2020 08 18 ...

Page 2: ... operating this appliance Incorrect operation may cause injury and or damages Please keep this manual for future reference Note Non contractual information and photos which may be changed without prior notice Actual product may differ from illustrative photos Subject to technical changes and improvements ATTENZIONE Leggere attentamente questo manuale di istruzioni prima di utilizzare l attrezzo Il...

Page 3: ...on lors de son prêt lors de la cession ou transfert de propriété du produit Symboles Explication des symboles présents sur l outil le cas échéant Signale un risque de blessures graves et ou dommages et ou de détérioration du produit en cas de non respect des consignes L outil est conforme aux exigences des directives européennes Matériel électrique de classe III Les produits électriques usagés ne ...

Page 4: ... Ne pas utiliser si des pièces sont desserrées ou endommagées Ne pas opérer lorsque vous êtes fatigué ou sous l influence de drogues ou de médicaments Conservez les étiquettes et la plaque signalétique pendant toute la durée de vie N utilisez pas l appareil avec les mains mouillées 3 3 Consignes sur l utilisation de ce produit Ce luminaire est équipé d une lampe LED intégrée qui ne peut pas être r...

Page 5: ...t supporter jusqu à 10 kg de poids Montez le projecteur sur le support de montage en utilisant les rondelles d origine Orientez le projecteur et le capteur dans la position souhaitée puis serrez les vis Installation du panneau solaire 1 Utilisez la base du panneau comme modèle pour marquer 4 trous de fixation Faites des trous avec une perceuse électrique puis fixez le panneau solaire en place avec...

Page 6: ...tation sur la position OFF Chargez le projecteur avec un panneau solaire sous la lumière directe du soleil Après 12 heures sous la lumière du soleil réglez l interrupteur d alimentation sur la position ON le produit est prêt à être utilisé Réglage du contrôle du projecteur Après l installation mettez l appareil sous tension et tournez la molette LUX sur le symbole du soleil Dirigez le détecteur de...

Page 7: ...tterie ou à un centre de collecte des déchets des équipements électriques et électroniques ou renseignez vous auprès de votre commune Effectuer la mise au rebut de l appareil des accessoires et de l emballage conformément aux réglementations locales relatives à la protection de l environnement Nos conditions de garantie sont disponibles auprès de notre STAV et sur notre site internet Pour toute de...

Page 8: ...l if applicable Caution Risk of injury and or damage and or deterioration of product in case of non compliance to safety requirements CE Conformity Class III electrical equipment Do not dispose of this product with household rubbish Dispose of this product in the nearest recycle centre Please contact your local authority or local recycle centre for further information for its safe disposal Place t...

Page 9: ... not operate with wet hand 3 3 Special warnings when using the product This luminaire is fitted with built in LED lamp which cannot be replaced Do not place the light in a position which may cause anyone to intentionally or unintentionally stare into the light Serious eye injury could result Do not look directly into the light beam The LED light head could be extremely hot during use do not touch ...

Page 10: ...ng holes Make holes with power drill then secure solar panel in location with screws Ensure the method of fixing can support up to a 10kg weight Adjust the angle of solar panel to receive maximum sunlight exposure Connect the power output plug to the spotlight power inlet 4 3 Switch On Off The Power Switch 1 is positioned at the bottom of the spotlight and covered by a gasket 4 4 Settings Light du...

Page 11: ... and turn the LUX dial to sun symbol Direct the motion sensor toward the desired area Have another person to move across the centre of the desired area and slowly adjust the angle of sensor arm and SENS dial until the sensor could properly detect the moving person and the spotlight turn on Adjust the TIME dial to desired lighting duration Adjust the LUX dial to desired light level at which the mot...

Page 12: ...ckaging according to local regulations regarding the protection of the environment Our warranty conditions are available from our STAV department and on our website Should you have any repair requests under the warranty please contact your retailer or our STAV who will inform you on the procedure Should you have any parts and or accessories request you can contact our STAV to ask for the product e...

Page 13: ...bi Assicurarsi di includere questo manuale in caso di vendita prestito o in ogni altro caso di trasferimento di proprietà di questo prodotto Simboli Spiegazione dei simboli usati sull elettroutensile ove applicabile Avviso di sicurezza Conformità CE Apparecchiature elettriche di classe III I rifiuti di prodotti elettrici non devono essere smaltiti insieme ai rifiuti domestici Si prega di riciclare...

Page 14: ...anchi o sotto l effetto di droghe o medicinali Conservare le etichette e la targhetta dei dati per tutta la durata del servizio Non utilizzare con le mani bagnate 3 3 Avvertenze speciali durante l utilizzo del prodotto Questo apparecchio è dotato di una lampada a LED integrata che non può essere sostituita Non posizionare la luce in una posizione che può far sì che qualcuno guardi intenzionalmente...

Page 15: ... 1 Utilizzare la base del pannello come modello per contrassegnare 4 fori di fissaggio Eseguire i fori con un trapano elettrico quindi fissare il pannello solare in posizione con le viti Assicurarsi che il metodo di fissaggio possa supportare un peso fino a 10 kg Regolare l angolo del pannello solare per ricevere la massima esposizione alla luce solare Collegare la spina di uscita dell alimentazio...

Page 16: ...per l uso Impostazione del controllo Spotlight Dopo l installazione accendere l alimentazione e ruotare il quadrante LUX sul simbolo del sole Dirigere il sensore di movimento verso l area desiderata Chiedere a un altra persona di spostarsi al centro dell area desiderata e regolare lentamente l angolo del braccio del sensore e della manopola SENS finché il sensore non è in grado di rilevare corrett...

Page 17: ...colta rifiuti o chiedi consiglio al tuo comune locale Procedere allo smaltimento dell utensile degli accessori e dell imballaggio secondo le normative locali in materia di protezione dell ambiente Le nostre condizioni di garanzia sono disponibili dal nostro STAV e sul nostro sito web Per qualsiasi richiesta di riparazione in garanzia contattare il rivenditore o contattare il nostro STAV che vi dir...

Page 18: ...cifications Caratteristiche FR EN IT Description Description Descrizione Spot solaire à LED avec détecteur de mouvement Solar LED Spotlight with Motion Sensor Proiettore Solare LED con Rilevatore de Movimento Référence Reference Articolo PRSPOTSOL9 1 160306 Modèle Type Model Modello S 11810C Alimentation Panneau solaire Batterie Power Solar panel Battery Alimentazione Pannello solare Batteria 12V ...

Reviews: