background image

Page 

12

 / 

24


cord. Cutting a “live” wire may make exposed metal parts of the tool “live” and could give 
the operator an electric shock. 


Hold the tool firmly with both hands for maximum control. 


Start the planer before the blade is in contact with the workpiece.  


Wait the tool to reach its full speed before operation. 


Check and remove any nails or screws from the workpiece before start planing. Planing over 
metallic objects results in blade damage. 


Use sharp blades only. 


Wait for the cutter to stop before setting the tool down. An exposed rotating cutter may 
engage the surface, leading to possible loss of control and serious injury. 


Switch off the tool and disconnect from main power source before making adjustment, 
changing accessories or removing wood chips. 


Do not use the planer with the blades facing upward. 


IV. GETTING STARTED


4.1- Unpacking 


Remove the product from packaging. 


Check if the product and accessories (if any) are intact. 


4.2- Content 


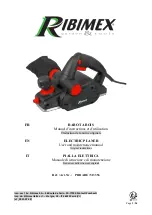
1 planer body 


1 parallel guide 


1 dust collection bag 


1 wrench 


1 instruction manual 


4.3- Assembly  


WARNING!  
Before starting assembly or changing accessories, turn it off and disconnect from main 
power source. 


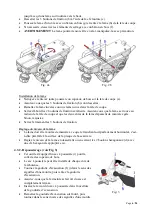
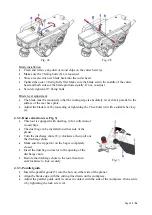
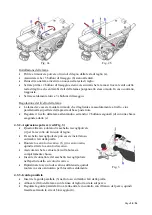
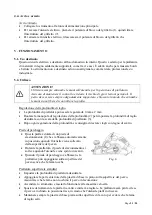
4.3.1- Planer blade (see Fig. 2) 


The cutter head (a) has 2 blades (h). When the blades are dull, they must be replaced.  


Always replace the blades in pair. 


Blade removal 


Turn the planer upside down and rest on a stable workbench. Turn the cutter head (a) until a 
blade facing upward. 


Loosen the 3 fixing bolts (b) with using the provided wrench (c). 


Push the blade from a side with a wooden stick (g) and remove the blade (h) from the cutter 
head. 


If necessary, loosen the clamping elements with a wooden stick (f).  


WARNING!

 The blade could still be shape, handle with care. 


Summary of Contents for 513356

Page 1: ...ER User and maintenance manual Original instructions IT PIALLA ELETTRICA Manuale di istruzione e di manutenzione Traduzioni delle istruzioni originali R f Art Nr PRRABE 513356 Imp par by Ribimex S A 5...

Page 2: ...pliance Incorrect operation may cause injury and or damages Please keep this manual for future reference Note Non contractual information and photos which may be changed without prior notice Actual pr...

Page 3: ...r f rence ult rieure Laisser le manuel avec le produit par ex lors de son utilisation lors de son pr t lors de la cession ou transfert de propri t du produit Symboles Explication des symboles pr sents...

Page 4: ...ation principale Ne laissez jamais le produit fonctionner sans surveillance N utilisez l outil que lorsqu il est tenu la main Gardez une position stable et un bon quilibre tout moment Gardez les poign...

Page 5: ...rifiez et retirez tous les clous ou vis de la pi ce avant de commencer le rabotage Le rabotage sur des objets m talliques endommage la lame Utilisez uniquement des lames tranchantes Attendez que la l...

Page 6: ...s de la lame d passent de mani re gale Sinon r ajustez Serrez fermement les 3 boulons de fixation R glage du niveau de la lame La lame doit tre mont e de mani re ce que le tranchant soit parfaitement...

Page 7: ...nfreiner les chants et feuillures L outil n est pas destin un usage artisanal commercial professionnel et ou industriel 5 2 Utilisation MISE EN GARDE Utilisez toujours les deux mains sur l outil pour...

Page 8: ...constante contre la pi ce Il est recommand de faire un essai du chanfrein avec des chutes de bois Rainurage Tracez une ligne de coupe sur la pi ce Installer le guide parall le 5 selon la section 4 3 3...

Page 9: ...enfants par exemple le verrouiller 6 4 Mise au rebut En fin de vie ne pas jeter le produit avec les ordures m nag res ou dans l environnement Apporter le produit une d chetterie ou un centre de collec...

Page 10: ...ater whenever any questions arise Always be sure to include this manual when selling lending or otherwise transferring the ownership of this product Symbols Explanation of symbols appearing on the too...

Page 11: ...Keep hair loose clothing finger and any parts of body away from openings or moving parts To reduce the risk of electric shock do not use near water or any liquid Do not touch with wet hands Do not ex...

Page 12: ...ood chips Do not use the planer with the blades facing upward IV GETTING STARTED 4 1 Unpacking Remove the product from packaging Check if the product and accessories if any are intact 4 2 Content 1 pl...

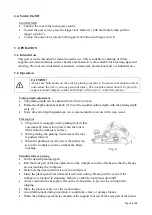
Page 13: ...or tightening the 2 hex bolts d with a suitable hex key e 4 3 2 Dust extraction see Fig 3 This tool is equipped with dust bag i for collection of wood chips The dust bag can be installed on either sid...

Page 14: ...e required cutting depth with the planing depth scale 3 Every time after depth adjustment it is recommended to test cuts with scrap wood Parking foot This planer is equipped with a parking foot l that...

Page 15: ...o maintain the machine in good working condition carry out regular maintenance of the machine after each use and before storage Any breach or inadequate maintenance reduces the life of the machine and...

Page 16: ...ool accessories and packaging according to local regulations regarding the protection of the environment Our warranty conditions are available from our STAV department and on our website Should you ha...

Page 17: ...to manuale a portata di mano in modo da poter far riferimento in un secondo momento in caso di dubbi Assicurasi di includere questo manuale in caso di vendita prestito o in ogni altro caso di trasferi...

Page 18: ...o e grasso Vestirsi adeguatamente Tenere capelli indumenti larghi dita e qualsiasi parte del corpo lontano da aperture o parti in movimento Per ridurre il rischio di scosse elettriche non utilizzarlo...

Page 19: ...ll alimentazione principale prima di effettuare regolazioni cambiare accessori o rimuovere trucioli di legno Non utilizzare la pialla con le lame rivolte verso l alto IV PER INIZIARE 4 1 Apertura dell...

Page 20: ...bulloni esagonali d con una chiave esagonale adatta e 4 3 2 Aspirazione polvere vedi Fig 3 Questo attrezzo dotato di sacchetto raccoglipolvere i per la raccolta dei trucioli di legno Il sacchetto rac...

Page 21: ...a pu essere regolata da 0 mm a 2 mm Ruotare la manopola di regolazione della profondit 2 per impostare la profondit di taglio desiderata con la scala della profondit di piallatura 3 Dopo ogni regolazi...

Page 22: ...ulla superficie del pezzo Accendere lo strumento e lasciarlo funzionare alla massima velocit Spostare l utensile con la guida parallela a filo con il lato del pezzo VI PULIZIA E CONSERVAZIONE AVVERTIM...

Page 23: ...la portata dei bambini ad es Bloccarlo 6 4 Smaltimento Non gettare insieme ai rifiuti domestici Non gettare nell ambiente Smaltire il prodotto in un centro di raccolta per rifiuti di apparecchiature e...

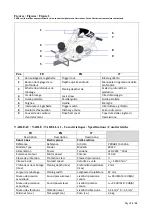
Page 24: ...cinghia di trasmissione TABLEAU TABLE TABELLA 1 Caract ristiques Specifications Caratteristiche FR EN IT Description Description Descrizione Rabot bois Electric planer Pialla elettrica R f rence Refer...

Reviews: