background image

Installation

© 

Rice Lake Weighing Systems


 All Rights Reserved

5

2.0

Installation

The MSI-4260 features a heavy duty, cast aluminum enclosure rated at NEMA Type 4 IP 66. It installs easily by hanging it on a 

crane using properly sized shackles. 

Refer to the Crane Scale Safety and Periodic Maintenance Manual (PN 153105) for safe loading and rigging 

guidelines when installing the model MSI-4260.
Regular maintenance inspections of the lifting system should be performed to ensure safety. Pay particular 

attention for signs of stress on any element in the load train.

Use the appropriate interface hardware for the capacity of the scale. 

• If the interface hardware does not fit properly, Rice Lake Weighing Systems can supply the MSI-4260 with oversize lifting 

eyes or shackle interfaces. 

• If the crane hook is too large to fit in the lifting eye with single point interface, then install the scale using adaptive rigging.

• If multiple attachments are needed, use a shackle or ring to attach the multiple lines to keep a single point attachment to 

the scale. 

Using an oversize shackle or hook to interface with the MSI-4260 can cause off center loading and stress points 

that will reduce the life of the lifting eye or hook.
Single point attachments are necessary to ensure the safety and accuracy of the scale system.

2.1 Unpacking

When unpacking the MSI-4260, ensure that all assembly parts are accounted for. Check the MSI-4260 for any visible damage. 

If any parts were damaged in shipment, notify Rice Lake Weighing Systems and the shipper immediately. If the MSI-4260 must 

be returned, it must be properly packed with sufficient packing materials. Whenever possible, use the original carton when 

shipping the unit back.

2.2 Battery Pack

The MSI-4260 is powered by a 12V Sealed Lead Acid (SLA) rechargeable battery. This battery will operate for up to 100 hours 

(depending on LED brightness setting) before requiring recharging. 

Charging time for a completely discharged battery is up to eight hours. A spare battery pack is recommended to keep the MSI-

4260 in continuous operation.

To obtain maximum service life from batteries, store between -4°F and 122°F (-20°C and +50°C). 

Stored batteries should be recharged every three months. The battery is fully charged when the status indicator 

on the battery charger is flashing. 

2.2.1 Battery Life

The battery life of the MSI-4260 depends on a number of factors:

• The brightness of the LED display and number of segments lit

• The amount of RF activity

• The age of the battery

• The condition of the SLA battery. 

In order to conserve battery life, the MSI-4260 includes the following features.

• Automatic Power Off Mode — Senses no activity after the set amount of minutes and turns the scale off

• Automatic Sleep Mode — Dims the display after a set amount of minutes of no scale activity

The MSI-4260 automatically turns off when the SLA battery drops to approximately 10.5V. Recharge the battery when this 

happens, SLA batteries benefit from frequent recharging and can be recharged when it still has available life. 

Due to the maintenance discharge imposed on the battery by the MSI-4260 electronics, do not store the MSI-4260 with the 

battery inside. Remove the battery if it will not be used for more than two weeks.

Leaving a discharged battery in the scale, which has a maintenance battery drain, can result in a deep 

discharged battery which will shorten its service life.

*If the scale is in continuous use, a fully charged spare battery is recommended. Replace the drained battery as close as possible to the low 

battery warning.
*SLA batteries that have not been deep discharged should withstand 500 to 1500 charging cycles.
*Low battery warning annunciator indicates about two to four hours of additional use before MSI-4260 powers off.
*If MSI-4260 is not going to used again soon, remove SLA battery to prevent deep discharge while unit is in storage.
*Recycle the battery at an authorized recycling center when the average life drops to 20 hours or less.

WARNING

IMPORTANT

IMPORTANT

IMPORTANT

Note

Summary of Contents for MSI-4260B

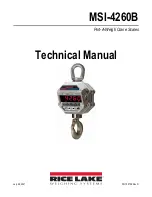
Page 1: ...MSI 4260B Port A Weigh Crane Scales Technical Manual PN 152159 Rev D July 26 2021...

Page 2: ...marks of their respective companies All information contained within this publication is to the best of our knowledge complete and accurate at the time of publication Rice Lake Weighing Systems reserv...

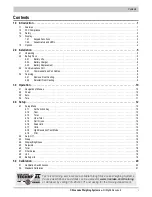
Page 3: ...ery Life 5 2 2 2 Battery Charger 6 2 2 3 Battery Replacement 7 2 3 Communications Port 8 2 3 1 Communications Port Cables 8 2 4 Servicing 9 2 4 1 Remove Front Casting 9 2 4 2 Reinstall Front Casting 9...

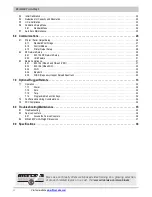
Page 4: ...1 2 Control Modes 27 6 1 3 Printer Output Setup 28 6 2 RF Network Setup 29 6 2 1 802 15 4 RF Network Setup 29 6 2 2 Hold Feature 31 6 3 Radio Compliance 31 6 3 1 802 15 4 XBee 3 and XBee 3 PRO 31 6 3...

Page 5: ...on assures reliable repeatable measurements It can be calibrated without test weights using the C Cal technology Is selectable for kg lb unless prohibited by Legal for Trade regulations Provides autom...

Page 6: ...en weight taking or dynamic load monitoring Do not use any load bearing component that is worn beyond 5 of the original dimension Do not use the scale if any of the components of the load train are cr...

Page 7: ...to zero out residual weight on the scale Tare Key Removes the weight of containers trucks or carriers and places the scale in the Net weight mode User Key Programmable to user selectable functions Se...

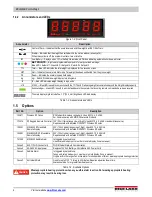
Page 8: ...ng remote commands have been received The main display digits include five 1 2 30 5 mm brightness LED load display Table 1 2 Annunciators and LEDs Part No Option Description 150971 Wireless RF Option...

Page 9: ...arging Charging time for a completely discharged battery is up to eight hours A spare battery pack is recommended to keep the MSI 4260 in continuous operation To obtain maximum service life from batte...

Page 10: ...y charges 1 Remove the battery from the MSI 4260 Figure 2 2 on page 7 2 Connect the charger assembly to the AC power supply 86 260 VAC The power annunciator displays red If the power status light fail...

Page 11: ...acks 7 Close the battery cover 8 Reset the latches Make sure the latches are completely latched and the cover is firmly in place Figure 2 2 Remove Battery Periodically inspect the battery latches for...

Page 12: ...2 following the AT standard for 9 pin serial cables DCE An un terminated cable is also available for wiring the serial cable for RS 232 Table 2 1 shows the wiring color code Figure 2 3 Comm Port Cable...

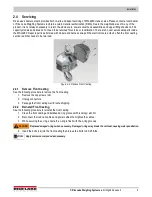
Page 13: ...s are at fault often the front casting section is all that needs to be returned Figure 2 4 Remove Front Casting 2 4 1 Remove Front Casting See the following procedure to remove the front casting 1 Rem...

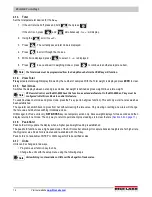
Page 14: ...3 Zero The zero key sets the zero reading of the scale Press to take out small deviations in zero when the scale is unloaded See Section 3 4 on page 11 for zeroing taring a package or pallet weights T...

Page 15: ...ay the net weight press The weight reading must be stable within the motion window for the tare function to work The scale digits display 0 or 0 0 or 0 00 etc and the weight mode changes to NET The ba...

Page 16: ...4 1 2 on page 13 Total Section 4 1 3 on page 14 View Total Function always available on the RF Remote Section 4 1 4 on page 14 Net Gross Function always available on the RF Remote Section 4 1 5 on pa...

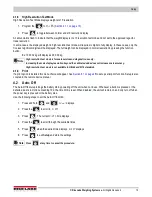
Page 17: ...y voltage Displays followed by the display counting from 00000 to 99999 Displays followed by the C CAL value Other internal tests are performed and if any test fails an error code will display See Sec...

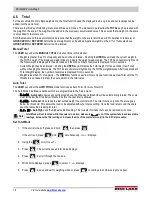
Page 18: ...and gross mode press the F key set to net gross function This will only work if a tare value has been established The operator can switch back to gross from net without clearing the tare value Only c...

Page 19: ...e calibrated value does not increase scale accuracy High resolution test mode is not available in HB 44 and R 76 standards 4 1 9 Print If a print option is installed this menu choice will appear See S...

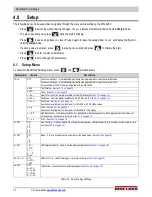
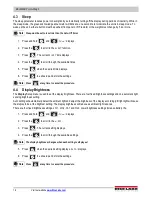
Page 20: ...Display Setup menu is used to set the display brightness There are four fixed brightness settings and one automatic light sensing brightness setting Auto setting will automatically detect the ambient...

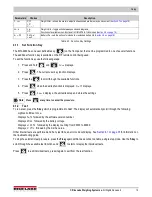
Page 21: ...Step 10 until the desired value displays To enter a decimal point press while the digit is blinking To correct a digit press to step back 12 Press The value will stop blinking and the next setup menu...

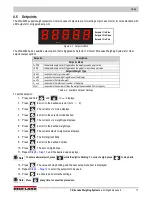
Page 22: ...ight display the number of samples is displayed for two seconds Weight is less than 1 of capacity The USER key functions as View Total only and functions as View Total until the 1 threshold is exceede...

Page 23: ...select will be displayed 6 Press to save and exit to weighing mode or press to continue to another setup menu item 4 8 Unit 1 Press and hold and will display If the unit is on press and simultaneously...

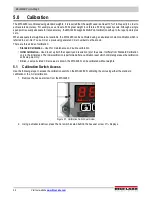
Page 24: ...ber must be known There are three kinds of calibration Standard Calibration Used for maintenance and routine calibration Initial Calibration Used to set up both the capacity and resolution d of the sc...

Page 25: ...save that digit selection Press to save that digit selection Press to save the next digit selection is displayed 8 Press to save the weight entry If the cal value is within limits is briefly displayed...

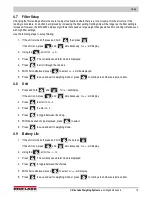
Page 26: ...stability can be achieved by increasing the filtering However never program the resolution that is far greater than needed If the MSI 4260 display is never stable it is recommended that the resolution...

Page 27: ...additional span points as C Cal is only a two point calibration zero and span at 10 of capacity Use the following steps to perform a C Cal calibration 1 Remove the hex seal screw from the MSI 4260 usi...

Page 28: ...and peak hold Handbook 44 Hb 44 Sets the scale to enable only approved features per the NTEP HB 44 rules and regulations Access is denied to Peak Hold and the zero range may be limited The Filter menu...

Page 29: ...dow The AZM capture window usually 1 d and capture time usually eight seconds can be adjusted by MSI to meet custom requirements The settings of AZM are dictated in Legal for Trade standards and canno...

Page 30: ...nnecting to any supported device with an 802 15 4 Modem 802 15 4 operates in the 2 4 GHz ISM band and does not require the end user to obtain a license 802 15 4 can coexist with other 2 4 GHz systems...

Page 31: ...UU SP GROSS CRLF 4 Tare Weight Fixed output length 16 Leading zeros suppressed except for the LSD TTTTTTT SP UU SP TARE CRLF 5 Total Weight Fixed output length 16 Leading zeros suppressed except for t...

Page 32: ...mbers and to set the string number desired 10 When set press again displays 11 Press to enter Current setting flashes 12 Press to scroll through the settings Section 6 1 2 on page 27 13 When desired s...

Page 33: ...9 When ID is set press again displays 10 Press The current channel flashes If the channel number is correct continue to 12 Choices Parameters Range Description Enable RF Affects continuous mode only S...

Page 34: ...ers and to set number 15 When the Net ID is set press again displays 16 Press to enter parameter The current value flashes 17 Press until displays 18 Press displays 19 Press to enter parameter The cur...

Page 35: ...CC and international radio compliance per the certification information listed in this section These modules may have additional international certifications that are not listed in this section Please...

Page 36: ...th the following standards and or other normative documents EN 300 328 V1 8 1 2012 This product is compliant with the following standards and or other normative documents Safety article 3 1A EN 60950...

Page 37: ...aired to an individual device and cannot be reprogrammed in the field Figure 7 1 Rugged Remote 7 1 Operation The Rugged Remote is paired to a single ScaleCore RF device and replicates the front panel...

Page 38: ...I 4260 is unloaded Section 3 4 on page 11 7 1 4 Programmable Function Keys and are programmable in the MSI 4260 Function is defaulted to Test in the MSI 4260 See Section 4 1 1 on page 13 to configure...

Page 39: ...etween Error and UnLd Weight in below the zero range If the scale is in compression remove the source Calibration faulty Recalibrate Faulty load cell or wiring Check the load cell connections The disp...

Page 40: ...oads also when there is a chance of fatigue failure The power up routine will be interrupted when the lift counter exceeds 16383 lifts or the overload counter exceeds 1023 overloads If the screen disp...

Page 41: ...CR 11 105lb 10 000 kg 2 kg 724 mm 101 6 mm 159 mm 66 5 mm 61 2 mm swivel eyenut 47 kg 30 000 lb 10 lb 30 0 in 4 00 in 6 25 in 3 00 in 3 19 in 22 ton alloy CR 11 125lb 15 000 kg 5 kg 762 mm 101 6 mm 1...

Page 42: ...peak hold Display Five digit 1 2 in 30mm LED with programmable brightness control Displayable Units Pounds or kilograms selectable Annunciators COZ Net Gross Total Peak Low Battery lb kg Motion Setpoi...

Page 43: ......

Page 44: ...anada Mexico 800 321 6703 International 715 234 9171 Europe 31 0 26 472 1319 Rice Lake Weighing Systems is an ISO 9001 registered company Rice Lake Weighing Systems Specifications subject to change wi...

Reviews: