AC power cable
• Connect AC power cable (20) to AC wall
outlet
• Connect power cable to AC wall charge
connector port (19)
• AC charge LED (10) glows red while
charging – glows green when fully charged
• Remove cable when fully charged -
(about 5-6 hours)
DC (12V) car cable
• Connect DC 12V car cable (21) to a powered12V
cigarette lighter port in vehicle
• Use 12V only — not compatible with 24V systems
• Connect power cable to Solar/DC charge
connector port (17)
• Solar/DC charge LED (11) glows red while charging
– glows green when fully charged
• Remove cable when fully charged - (about 6-8 hours)
Solar (18V) port
• Connect your own MC4 cable adapter to an
18V 80-100W solar panel (not included)
• Connect opposite end of MC4 cable adapter
to Solar/DC charge connector port (17)
• Solar/DC charge LED (11) glows red while
charging – glows green when fully charged
• Remove cable when fully charged - (about
14-16 hours in direct sunlight)
Note:
• IMPORTANT: Wait for AC charge LED (10) or Solar/DC charge LED (11) to glow green to ensure full charge capacity has been reached.
• Recharge every 3 months in storage. It’s a good idea to top up the charge as often as you want — keeping it fully charged is fine. No need to wait till depleted.
1
2
3
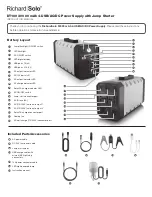
DT100 30000 mAh 4-USB/AC/DC Power Supply with Jump Starter
INSTRUCTION MANUAL
3 ways to charge 30000 mAh 4-USB/AC/DC Power Supply with Jump Starter:
page 2
Connect jump-start cables (22) to jump-start
connector port (13)
Blue connector plug must be secure and fully
seated within the port
Connect RED cable clamp to positive (+) battery
terminal on vehicle
Connect BLACK cable clamp to negative (-)
battery terminal on vehicle
Start vehicle
When motor starts, remove clamps immediately
from battery terminals - leave motor running
Note:
• Maximum cranking power: 400A
• For 12V systems only — DO NOT use with 24V battery
systems
• For best performance when starting vehicles, use
Power Supply at 75% charge capacity or higher.
• DO NOT jump-start vehicles with Power Supply at
30% or less charge capacity to avoid damage to
Power Supply battery.
• DO NOT connect jump-start cable clamps to wrong
+/- battery terminals — RED = (+) positive / BLACK =
(-) negative .
• DO NOT connect jump-start RED/BLACK cable clamps
together
• Make sure jump-start cable clamps are connected
securely to battery terminals
• Always remove clamps within 30 seconds after motor
starts
• Check battery terminals for rust, dirt and corrosion
before using jump-start cables — clean if necessary
to avoid poor performance.
• DO NOT jum- start again after 3 attempts to avoid
damaging Power Supply — check for other vehicle
issues .
12V battery jump-start instructions
1
2
3
4
5
6
Press on DC ON/OFF (3) or AC ON/
OFF switch (12)
LED digital display (4) illuminates
showing remaining power supply
capacity 0 -100%
Press switch again to turn off display
Plug USB charge cable (23) to USB 2.1A port (6)
on power supply
Choose appropriate connector and plug into
your micro-USB or Apple Lightning device
LED digital display (4) illuminates showing
remaining Power Supply charge capacity
Press DC ON/OFF switch to ON position (3)
Monitor charge via charge icon or LED on device
When charge is complete, remove cable and
switch off Power Supply
If left connected, Power Supply continues to
safely trickle charge device
Note:
• Use 2.1A port (6) for larger devices: t
smartphones, music players, small tablets, etc.
• Use 1A port (5) for smaller devices: smartphones,
music players & small tablets.
• Use included USB charge cable or USB cable included
with your own device.
• Included USB charge cable can charge more than one
smaller device at a time via 2.1A USB port (6) using
type-C, Apple 8-pin Lightning, or micro-USB
connectors. Charge times may take longer in this mode.
Check remaining battery
capacity:
Charge smartphones, tablets, etc.
1
1
7
2
2
3
3
4
5
6
LED high-powered
lamp:
Connect LED lamp (25) to 12V
DC port (8)
ON/OFF: press DC ON/OFF
switch (3) to power lamp
Hang lamp via built-in hook to
illuminate room, tent, work,
picnic area, etc.
3
1
2
Power devices / small AC appliances:
Check the wattage on your device / small appliance
— maximum total wattage cannot exceed 400-500W
for devices & small appliances
Connect AC power cord from device/small appliance to
AC Output 1 or 2 (15/16)
Switch Power Supply AC ON/OFF (12) to ON position
AC output indicator LED (9) glows green
LED digital display (4) shows remaining Power
Supply capacity
Switch on device or appliance
When finished, switch Power Supply AC ON/OFF (12) to
OFF position
Note:
• If single device or combined output for 2 connected
devices exceeds 400-500W, Power Supply enters
protection mode and will stop functioning.
• To reset Power Supply, switch OFF and remove overload
source, then reconnect with less wattage requirements.
• If power overload occurs, check AC IN fuse port (14)
and replace with 8A fuse if needed.
3
4
5
1
6
7
2


