background image

TABLE OF CONTENTS

Documentation for This Machine.......................................................................................................................1
Manuals for This Machine.................................................................................................................................5
Notice..................................................................................................................................................................7

Important.........................................................................................................................................................7

How to Read This Manual.................................................................................................................................8

Symbols...........................................................................................................................................................8
Name of Major Item......................................................................................................................................8
Notes...............................................................................................................................................................9

Laws and Regulations......................................................................................................................................10

Legal Prohibition..........................................................................................................................................10

1. When the Machine Does Not Operate As Wanted

Indicators..........................................................................................................................................................11
Panel Tone........................................................................................................................................................12
When the Function Status Indicator Lights Up in Red....................................................................................13
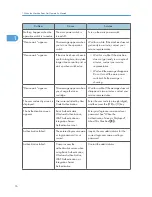
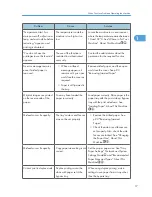
When You Have Problems Operating the Machine.....................................................................................15
When a Job Is Not Performed.........................................................................................................................19

2. Troubleshooting When Using the Copy Function

Messages Displayed When Using the Copy Function..................................................................................21
When You Cannot Make Clear Copies.........................................................................................................23
When You Cannot Make Copies As Wanted...............................................................................................26

When Memory Is Full..................................................................................................................................29

3. Troubleshooting When Using the Facsimile Function

Adjusting the Volume.......................................................................................................................................31
Messages Displayed When Using the Facsimile Function............................................................................34
When You Cannot Send or Receive Fax Messages As Wanted.................................................................45

When Memory Is Full..................................................................................................................................50

If an Error Report Is Printed..............................................................................................................................52
Turning Off the Main Power / In the Event of Power Failure.......................................................................53
When an Error Occurs Using Internet Fax.....................................................................................................54

Error Mail Notification.................................................................................................................................54
Error Report (E-mail)....................................................................................................................................54
Server-Generated Error E-mail...................................................................................................................54

2

Summary of Contents for Aficio MP 171

Page 1: ...structions Remarks Appendix 1 2 3 4 5 6 7 8 Read this manual carefully before you use this machine and keep it handy for future reference For safe and correct use be sure to read the Safety Information in this manual before using the machine About This Machine Operating Instructions ...

Page 2: ......

Page 3: ...g the driver for the printer function Changing the default settings of the printer function and related information Scanner Reference Sending scan files Storing scan files Changing the default settings of the scanner function and related information Network and System Settings Guide Connecting to a network Registering addresses for fax scanner functions Changing the default settings of the system ...

Page 4: ... Computer 13 Notice 14 Important 14 How to Read This Manual 15 Symbols 15 Name of Major Item 15 Note 16 Safety Information 17 Safety During Operation 17 Safety Precautions to be Followed 17 Safety Labels of This Machine 22 Positions of WARNING and CAUTION labels 22 Power Switch Symbols 22 ENERGY STAR Program 23 Energy Saving Functions 24 Laws and Regulations 26 Legal Prohibition 26 Laser Safety 26...

Page 5: ...s 46 Changing the Display Language 47 When the Authentication Screen is Displayed 48 User Code Authentication Using the Control Panel 48 User Code Authentication Using a Printer Driver 49 Login Using the Control Panel 49 Logout Using the Control Panel 49 Login Using a Printer Driver 50 Login Using Web Image Monitor 50 Logout Using Web Image Monitor 50 Changing Modes 52 System Reset 52 Turning On O...

Page 6: ...pes 71 Envelopes 74 Unusable Paper 76 Paper Storage 77 4 Adding Toner Adding Toner 79 Replacing Toner 80 Sending Faxes or Scanned Documents When Toner Has Run Out 81 Used Toner 82 5 Entering Text Entering Text 83 Available Characters 83 Keys 83 How to Enter Text 84 6 Operating Instructions Installing Operating Instructions 93 PDF Manuals 93 How to Use the Operating Instructions 95 Opening from the...

Page 7: ...CD ROM 107 Viewing the Contents of the CD ROM 107 Printer Drivers for This Machine 107 TWAIN Driver 109 LAN Fax Driver 109 DeskTopBinder Lite 110 SmartDeviceMonitor for Admin 110 DeskTopBinder SmartDeviceMonitor for Client 112 Specifications for the Main Unit 113 Specifications for Auto Document Feeder 117 Specifications for Paper Tray Unit Tray 2 and Tray 3 118 Specifications for Wireless LAN Boa...

Page 8: ...ng Provides a guide for resolving common usage related problems Copy Reference Explains Copier functions and operations Also refer to this manual for explanations on how to place originals Facsimile Reference Explains Facsimile functions and operations Printer Reference Explains Printer functions and operations Scanner Reference Explains Scanner functions and operations Network and System Settings...

Page 9: ... Reference Scanner Guide Manuals for DeskTopBinder Lite DeskTopBinder Lite Setup Guide DeskTopBinder Introduction Guide Auto Document Link Guide Manuals provided are specific to machine types For UNIX Supplement please visit our Web site or consult an authorized dealer This manual includes descriptions of functions and settings that might not be available on this machine The following software pro...

Page 10: ...ided About This Machine Yes Yes Yes Troubleshooting Yes Yes Yes Copy Reference No Yes Yes Facsimile Reference No Yes Yes Printer Reference No Yes Yes Scanner Reference No Yes Yes Network and System Settings Guide No Yes Yes Security Reference No Yes Yes PostScript 3 Supplement No Yes Yes 8 ...

Page 11: ...Items Using This Machine as a Copier You can make copies of originals BRA002S You can reduce or enlarge the copy image Copier functions such as Duplex and Combine allow you to save on paper by copying multiple pages onto single sheets You can copy onto various types of paper such as envelopes and OHP transparencies See Copy Reference Using This Machine as a Printer You can print documents created ...

Page 12: ... and Stored Print See Printer Reference Paperless Fax Transmission You can send a file by fax without printing it You can send a fax from your computer over the network Ethernet or wireless LAN to this machine which then forwards the fax via its telephone connection LAN Fax BRA004S To send a fax print from the Windows application you are working with select LAN Fax as the printer and then specify ...

Page 13: ...eception Internet Fax compatible machines and computers that have e mail addresses can receive e mail messages via Internet Fax IP Fax TheIP FaxfunctionsendsorreceivesdocumentsbetweentwofacsimilesdirectlyviaaTCP IPnetwork To send a document specify an IP address or host name instead of a fax number IP Fax Transmission This machine can receive documents sent via Internet Fax IP Fax Reception Using ...

Page 14: ...elivery server or send them to a folder in a computer on the same network For details about the machine s settings see Network Settings Required to Use the Network Delivery Scanner Network and System Settings Guide For details about how to use the function see Delivering Scan Files Scanner Reference Client computers can use this machine as a network TWAIN scanner You can scan originals in full col...

Page 15: ...hemachineusingaWebbrowseronacomputer You can also install SmartDeviceMonitor for Admin on a computer to configure and operate the machine Using Web Image Monitor you can register information in the address book specify the machine s settings and check the machine s status with ease Using Web Image Monitor you can check and specify the initial settings system settings printer features network setti...

Page 16: ...es as a result of handling or operating the machine For good copy quality the supplier recommends that you use genuine toner from the supplier The supplier shall not be responsible for any damage or expense that might result from the use of parts other than genuine parts from the supplier with your office products 14 ...

Page 17: ...r errors This symbol is located at the end of sections It indicates where you can find further relevant information Indicates the names of keys that appear on the machine s display panel Indicates the names of keys on the machine s control panel Indicates instructions in book form Indicates instructions in sheet form Indicates instructions stored in a file on a provided CD ROM Indicates instructio...

Page 18: ...his machine refer to the inch version Some illustrations in this manual might be slightly different from the machine Certain options might not be available in some countries For details please contact your local dealer Depending on which country you are in certain units may be optional For details please contact your local dealer 16 ...

Page 19: ...his section explains safety precautions that should always be followed when using this machine Environments where the machine can be used This section explains safety precautions about environments where the machine can be used Keep the machine away from flammable liquids gases and aerosols A fire or an electric shock might occur Keep the machine away from humidity and dust Otherwise a fire or an ...

Page 20: ...osure of the core disconnection etc contact your service representative to change a new one Operating the machine with a damaged power cord may cause an electric shock or fire It is dangerous to handle the plug with wet hands Doing this may result in receiving an electric shock Unplug the power cord from the wall outlet before you move the machine While moving the machine you should take care that...

Page 21: ... are installed do not pull out more than one tray at a time when you are changing or replenishing paper or resolving paper jams Pressing down forcefully on the machine s upper surfaces can result in malfunctions and or user injury Contact your service representative if you need to lift the machine such as when relocating it to another floor Do not attempt to lift the machine without the assistance...

Page 22: ... been installed so that the machine can be operated safely But take care not to touch the machine during operation An injury might occur Fire and breakdown can result from heavy accumulation of dust inside this machine Consult your service representative for details about and charges for cleaning the machine s interior Handling the machine s supplies This section explains safety precautions about ...

Page 23: ... containers out of reach of children If toner or used toner is inhaled gargle with plenty of water and move into a fresh air environment Consult a doctor if necessary If toner or used toner gets into your eyes flush immediately with large amounts of water Consult a doctor if necessary If toner or used toner is swallowed dilute by drinking a large amount of water Consult a doctor if necessary Avoid...

Page 24: ...achine has labels for WARNING and CAUTION at the positions shown below For safety please follow the instructions and handle the machine as indicated BRA007S High temperature Be careful of hot parts when clearing paper jams Power Switch Symbols The meanings of the symbols for the switches on this machine are as follows POWER ON STANDBY 22 ...

Page 25: ...machine is already in Low Power Mode and remains idle for a specified period it automatically enters Sleep Mode to further reduce its electrical consumption The default delay time the machine waits before entering Sleep Mode is 1 minute This default time can be changed The machine can print jobs from computers and receive faxes while in Sleep Mode Machines with only copier function Machines with f...

Page 26: ...ines with facsimile printer or scanner functions Time of Switch into Off Mode 1 minute TimeofSwitchoutfromOffMode 10 seconds or less For details about how to change the default interval see Timer Settings Network and System Settings Guide 25 ...

Page 27: ...quipment contains a GaAlAs laser diode 6 2 milliwatt 760 800 nanometer wavelength for each emitter This equipment does not emit hazardous light since the beam is totally enclosed during all customer modes of operation and maintenance Caution Use of controls or adjustments or performance of procedures other than those specified in this manual might result in hazardous radiation exposure Notes to us...

Page 28: ...ur in a particular installation If this equipment does cause harmful interference to radio or television reception which can be determined by turning the equipment off and on the user is encouraged to try to correct the interference by one more of the following measures Reorient or relocate the receiving antenna Increase the separation between the equipment and receiver Connect the equipment into ...

Page 29: ...28 ...

Page 30: ...ng multi page documents on both sides of sheets Duplex Copy See Duplex Copying Copy Reference Printing multi page documents and received faxes on a single sheet Combine Copier Fax See Combined Copying Copy Reference See Combine Two Originals Facsimile Reference Printing received faxes on both sides of sheets Two Sided Print See Two Sided Printing Facsimile Reference Converting received faxes to el...

Page 31: ...Sending scan files See Basic Procedure for Sending Scan Files by E mail Scanner Reference Storing scan files in a shared folder See Basic Procedure When Using Scan to Folder Scanner Reference Storing scan files on media See Basic Procedure for Saving Scan Files on a Removable Memory Device Scanner Reference Converting received faxes to electronic formats and sending them to a computer See Forwardi...

Page 32: ...Reference Using Web Image Monitor to registering destinations from a computer See To add new receiver Facsimile Reference Downloading destinations registered in the machine to the LAN Fax driver destination list See Using the Machine s Address Book as the LAN Fax Destination List Facsimile Reference I want to operate the machine more effectively You can find explanations of the functions and proce...

Page 33: ...eference Changing the initial settings Copier Fax Scanner See Accessing User Tools Copy Reference See Accessing User Tools Facsimile Reference See Accessing User Tools Scanner Reference Converting received faxes to electronic formats and sending them to a computer See Forwarding Facsimile Reference 1 Simple Search 32 1 ...

Page 34: ...rk and System Settings Guide See Programming Destinations in the Address Book Facsimile Reference I want to register an IP Fax number See Registering an IP Fax Destination Network and System Settings Guide I want to register an e mail address See Registering an E mail Destination Network and System Settings Guide I want to register an SMB folder See Registering an SMB Folder Network and System Set...

Page 35: ...essing User Tools Scanner Reference Forwarding I want to forward received fax documents to another fax destination See Forwarding Facsimile Reference I want to forward received fax documents to a folder destination on a computer See Forwarding Facsimile Reference I want to forward received fax documents to an e mail address See Forwarding Facsimile Reference I want to forward received fax document...

Page 36: ...n use a Windows Network Printer See Using as a Windows Network Printer Printer Reference I want to install the printer driver so I can use the machine by USB See Installing the Printer Driver Using USB Printer Reference Searching by Keyword 35 1 ...

Page 37: ...1 Simple Search 36 1 ...

Page 38: ...ects near them or leaning things against them If the machine overheats a fault might occur BRA045S 1 ADF If you load a stack of originals in the ADF the ADF will automatically feed the originals one by one See External items This document feeder can be used for two sided originals 2 Exposure glass Place originals here face down 3 Internal tray guide Open out and raise the end fence to support larg...

Page 39: ...n the operation switch indicator goes off See Turning On Off the Power 8 Control panel See Control Panel 9 Internal tray Copied printed paper and fax messages are delivered here 10 Front cover Open to access the inside of the machine 11 Paper tray Load paper here 12 Paper tray unit Tray 2 and Tray 3 See External items BRA009S 1 Right cover Open this cover to remove jammed paper fed from the paper ...

Page 40: ... p 40 External Items p 42 Control Panel p 54 Turning On Off the Power Guide to Components 39 2 ...

Page 41: ...s 3 Media slot With this media slot you can save scan files on a removable memory device Internal Items This section describes the items that can be installed in the machine Printer Scanner unit Allows you to use the printer and scanner functions Hard Disk Drive Option Allows you to use functions such as Collate and sample print in printer mode Allows you to send scan files by E mail or by Scan to...

Page 42: ...nstall embedded software architecture applications IEEE 1284 Interface Board Allows you to connect to an IEEE 1284 cable Wireless LAN board Allows you to install a wireless LAN interface Gigabit Ethernet 1000BASE T Allows you to communicate over 1000BASE T Only one of the following items can be installed on the machine at any one time IEEE 1284 Interface Board Wireless LAN board Other Items 41 2 ...

Page 43: ...3 Memory Trans key facsimile mode Press to carry out memory transmission See Transmission Modes Facsimile Reference 4 On Hook Dial key facsimile mode Press this to hear dial and data tones on the fax line while dialing as if the handset were off the hook For details see On Hook Dial Facsimile Reference 5 Facsimile key Press to activate the facsimile function See Facsimile Reference 6 Search Destin...

Page 44: ...lay Panel 16 Scroll keys Press to select an item scrolls upward scrolls downward scrolls right scrolls left 17 Number keys Press to enter numeric values 18 User Tools Counter key User Tools Press to change default or operation parameters according to requirement See Accessing User Tools Network and System Settings Guide Counter Press to check or print the counter value See Counter 19 Clear Modes k...

Page 45: ...N Faxdocumentsfromacomputer SeeFacsimileReference and Printer Reference 27 Combine Series key copier mode Combine Combines and prints the pages of a multiple sheet original onto a single sheet For details see Copying Copy Reference Series Prints each page of a double page spread as a single page copy 28 Duplex key copier mode Perform duplex printing when copying a multiple sheet original For detai...

Page 46: ...ey Clear Clears an entered numeric value Stop Stops a job in progress such as copying scanning faxing or printing 37 Operation switch Press to turn the power on the operation switch indicator goes on To turn the power off press again the operation switch indicator goes off See Turning On Off the Power p 46 Display Panel p 52 Changing Modes p 54 Turning On Off the Power p 83 Entering Text p 105 Cou...

Page 47: ...nstalled Reading the Display and Using Keys This section explains reading the display panel and using the keys BRA050S 1 Selection keys Correspond to items at the bottom line on the display Example initial copy display When the instruction press Reduce appears in this manual press the left selection key When the instruction press Enlarge appears in this manual press the center selection key When t...

Page 48: ...e same direction Changing the Display Language You can change the language used on the display English is set as default 1 Press the User Tools Counter key BRA052S 2 Select Language using or and then press the OK key 3 Select the language using or and then press the OK key 4 Press the User Tools Counter key Display Panel 47 2 ...

Page 49: ... Authentication is active you cannot use the machine until you enter the user code If you can use the machine you can say that you are logged in When you go out of the operable state you can say that you are logged out After logging in the machine be sure to log out of it to prevent unauthorized usage If authentication fails the Authentication failed message appears Check that the login user name ...

Page 50: ... LDAP Authentication or Integration Server Authentication is set 1 Enter the login user name and then press the OK key 2 Enter the login password and then press the OK key When the user is authenticated the screen for the function you are using appears If authentication fails the Authentication failed message appears Check that the login user name and login password are correct Logout Using the Co...

Page 51: ...pecify a login user name and password For details see the printer driver Help When logged in using a printer driver you do not have to log out Login Using Web Image Monitor This section explains the procedure for logging in to the machine via Web Image Monitor 1 Click Login 2 Enter a login user name and password and then click Login For user code authentication enter a user code in User Name and t...

Page 52: ... Delete the cache memory of a Web browser after logging out When the Authentication Screen is Displayed 51 2 ...

Page 53: ...ing an original The copy display is set as the default screen when the machine is turned on You can change this default setting under Function Priority See System Settings Network and System Settings Guide System Reset This section explains System Reset After finishing a job the machine waits a specified length of time and then restores its settings to the default values specified under Function P...

Page 54: ... the length of time that the machine waits before restoring its settings to their default values use the System Auto Reset Timer setting See System Settings Network and System Settings Guide Changing Modes 53 2 ...

Page 55: ...if you turn this switch off Use this switch only when necessary This machine automatically enters Energy Saver mode or turns itself off if you do not use it for a while To specify the time that the machine waits before it enters Energy Saver mode and or turns itself off configure the Energy Saver Timer and or Auto Off Timer setting respectively See System Settings Network and System Settings Guide...

Page 56: ...is section explains how to turn on the power 1 Press the operation switch The operation switch indicator goes on BRA057S If the power does not come on when the operation switch is pressed check the main power switch is on If it is off turn it on Turning Off the Power This section explains how to turn off the power 1 Press the operation switch The operation switch indicator goes off Turning On Off ...

Page 57: ...itch indicator is not lit 2 Turn off the main power switch The main power indicator goes out When the main power switch is turned off while using the fax function waiting fax and print jobs may be cancelled and incoming fax documents not received If you have to turn off this switch for some reason make sure 100 is shown as available memory on the screen before turning off the main power switch or ...

Page 58: ...ns will not operate in the following cases When a warning message appears When the service call message appears When paper is jammed When the cover is open When the Add toner message appears When toner is being replenished When the User Tools screen is displayed When fixed warm up is in progress When data is being processed When operations are suspended during printing When the On hook dialing fun...

Page 59: ...2 Getting Started 58 2 ...

Page 60: ...ine s upper surfaces can result in malfunctions and or user injury Fan the paper before loading Straighten curled or warped paper before loading For details about paper sizes and types see Recommended Paper Sizes and Types To load paper in the bypass tray see Copying from the Bypass Tray Copy Reference p 71 Recommended Paper Sizes and Types Loading Paper into the Paper Trays This section describes...

Page 61: ...oad it print side up Do not stack paper over the limit mark BRA019S 4 Carefully push the paper tray fully in The illustrations above show Tray 1 When using the optional paper tray unit Tray 2 and Tray 3 load paper flush against the right side of the tray Space between the paper and the tray s sides can cause misfeeds 3 Adding Paper 60 3 ...

Page 62: ...per as shown below For details about Letterhead Setting see Copier Features Copy Reference For details about printing with the printer function see Printer Features Printer Reference Original Orientation Exposure glass ADF 1 Copier 2 Scanner 1 1 When making copies using the duplex function in this orientation by setting Always Specify for Orientation with Copier Features in User Tools specify for ...

Page 63: ...Paper Orientation BRA020S 3 Adding Paper 62 3 ...

Page 64: ...tem Settings specify Letterhead for Paper Type of the paper tray you want to use This setting is only available when the printer scanner and fax units are installed See Tray Paper Settings Network and System Settings Guide Loading Paper 63 3 ...

Page 65: ...ding For details about paper sizes and types see Recommended Paper Sizes and Types p 69 Selecting the Paper Size with User Tools p 71 Recommended Paper Sizes and Types Changing the Paper Size in the Paper Tray Tray 1 This section describes how to change the paper size in the paper tray Tray 1 If a paper tray is pushed vigorously when putting it back into place the position of the tray s side fence...

Page 66: ... with the paper size you want to load Make sure there are no gaps between the paper and side fences BRA024S 5 While pinching the release levers set the end fence to the paper size you want to load Make sure there are no gaps between the paper and end fence BRA025S To load A4 size paper place the end fence in the corner pocket on the left Changing the Paper Size 65 3 ...

Page 67: ...side up Do not stack paper over the limit mark BRA019S 8 Carefully slide the paper tray fully in When setting small quantities of paper be careful not to squeeze in the side fence too much Paper might not feed in properly if the side fences are too tight against the paper s edges 3 Adding Paper 66 3 ...

Page 68: ...ges are aligned with the right side 1 Check that paper in the paper tray is not being used and then pull the tray carefully out until it stops BRA026S 2 Remove paper if loaded 3 While pressing down the release lever slide the side fence until it is aligned with the paper size you want to load Make sure there are no gaps between the paper and side fence BRA027S 4 While pinching the release levers s...

Page 69: ...own until it clicks and then square the paper and load it print side up Do not stack paper over the limit mark BRA029S 6 Carefully slide the paper tray fully in When setting small quantities of paper be careful not to squeeze in the side fence too much Paper might not feed in properly if the side fence is too tight against the paper s edge 3 Adding Paper 68 3 ...

Page 70: ... BRA052S 2 Select System Settings using or and then press the OK key 3 Select Tray Paper Settings using or and then press the OK key 4 Select Paper Size for the paper tray of which paper size will be changed using or and then press the OK key 5 Select the paper size using the scroll keys and then press the OK key Changing the Paper Size 69 3 ...

Page 71: ...6 Press the User Tools Counter key The initial display is shown 7 Load the paper and then gently push the paper tray all the way in 8 Check the paper size on the display panel 3 Adding Paper 70 3 ...

Page 72: ...pacity Standard paper 60 90 g m2 16 24 lb A4 81 2 14 81 2 13 81 2 11 81 4 14 81 4 13 500 sheets Bypass tray Paper type and weight Metric version Inch version Paper capacity Standard paper 60 157 g m2 16 42 lb A4 A5 B5 JIS 81 2 14 81 2 11 51 2 81 2 71 4 101 2 8 13 81 2 13 81 4 14 81 4 13 41 8 91 2 37 8 71 2 16K 100 sheets Standard paper 60 157 g m2 16 42 lb Custom size Vertical 90 0 216 0 mm Horizo...

Page 73: ...of the stack is no higher than the upper limit of the bypass tray Paper capacity varies depending on the thickness and condition of the paper When using thick paper 91 157 g m2 25 42 lb select Thick Paper as the paper type for the bypass tray For details see Copying from the Bypass Tray Copy Reference When copying onto adhesive labels in bypass settings select Thick Paper for the special paper set...

Page 74: ...er type of one tray is recycled or special paper the settings of the other trays must be the same for the Auto Tray Switching function to work This saves interrupting a copy run to replenish paper when making a large number of copies You can set the paper type of the paper trays under Paper Type Tray 1 3 See System Settings Network and System Settings Guide For the setting procedure of the Auto Tr...

Page 75: ...lly shaped Envelope types Supported BAV026S Supported BAV027S Supported BAV028S Supported To print on envelopes load them on the bypass tray and be sure to specify the appropriate paper type See Copying from the Bypass Tray Copy Reference and Setting Paper on the Bypass Tray Printer Reference Specifications for envelopes are as follows Metric version Inch version Weight 72 90 g m2 19 24 lb 3 Addin...

Page 76: ...es the edge going into the printer by running a pencil or ruler across them Some kinds of envelope might cause misfeeds wrinkles or print poorly Print quality on envelopes may be uneven if parts of an envelope have differing thicknesses Print one or two envelopes to check print quality In a hot and humid environment the envelope might be output creased or improper printing quality Envelopes 75 3 ...

Page 77: ... be used For details about types that can be used contact your sales or service representative Faults can occur if you copy or print onto sides that are already printed Take care to copy or print onto unprinted sides only To prevent misfeeds do not use the following kinds of paper Bent folded or creased paper Perforated paper Slippery paper Torn paper Rough paper Thin paper with little stiffness P...

Page 78: ... followed Do not store paper where it will be exposed to direct sunlight Avoid storing paper in humid areas humidity 70 or less Store on a flat surface Do not store paper vertically Under high temperature and humidity conditions or low temperature and humidity conditions store paper in plastic bags Paper Storage 77 3 ...

Page 79: ...3 Adding Paper 78 3 ...

Page 80: ...ctor if necessary If toner or used toner gets into your eyes flush immediately with large amounts of water Consult a doctor if necessary If toner or used toner is swallowed dilute by drinking a large amount of water Consult a doctor if necessary Avoid getting toner on your clothes or skin when removing a paper jam or replacing toner If your skin comes into contact with toner wash the affected area...

Page 81: ...e from direct sunlight Store the toner bottles on a flat surface Do not repeatedly install and remove toner cartridges This will result in toner leakage Do not shake the removed toner cartridge Remaining toner might scatter You can make about 50 copies even after the Add Toner indicator begins flashing but replace toner early to prevent poor copy quality Replacing Toner This section describes how ...

Page 82: ...f toner the indicator on the display lights Note that even if there is no toner left you can still send faxes or scanned documents If number of communications executed after the toner has run out and not listed in the automatically output Journal exceeds 100 communication is not possible 1 Make sure the machine is in facsimile or scanner mode Adding Toner 81 4 ...

Page 83: ...screen does not appear in step 1 press the Facsimile key or the Scanner key Used Toner Toner cannot be re used Bring the stored used container to your sales representative or service representative for recycling through our recycling system If you discard it on your own treat it as general plastic waste material 4 Adding Toner 82 4 ...

Page 84: ...tion the entered character appears before that Available Characters This section explains which characters are available You can enter the following characters Alphabetic characters Symbols Numerals 0123456789 Keys This section explains the keys for entering text BRA059S 1 Shift key Quick Dial 13 key Press to switch between lowercase uppercase User Text and Cyrillic characters 2 Space key Quick Di...

Page 85: ...y How to Enter Text You can enter characters using the Quick Dial 01 to Quick Dial 09 keys To enter a letter press the key repeatedly until the required letter appears The language selected using the control panel determines which characters can be entered There are four types of keyboard For each type you can enter the characters used in the following languages Keyboard Type Language Type A Engli...

Page 86: ...etters repeat step 2 If the next letter you want to enter is assigned to the same Quick Dial key move the cursor by pressing and then press the Quick Dial key The cursor moves to the right and the next letter appears on the display Keyboard Type A BRA032S Keyboard Type B Press one of the following Quick Dial keys to display a basic letter and then press the Quick Dial 16 key to select one of its v...

Page 87: ...s keyboard type allows you to enter Polish Hungarian and Czech letters Press one of the following Quick Dial keys to display a basic letter and then press the Quick Dial 16 key to select one of its variations 5 Entering Text 86 5 ...

Page 88: ... you to enter Russian letters Press the Shift key to enter Cyrillic character mode To enter a letter press the corresponding Quick Dial key indicated in the table below Press the key repeatedly until the required letter is displayed Entering Text 87 5 ...

Page 89: ...r to move the cursor to the position you want to insert Entering symbols 1 Press the Symbols key 2 Select a symbol using the scroll keys 3 Press the OK key This will enter the symbol and shift the cursor Depending on the selected keyboard type you can enter the following symbols 5 Entering Text 88 5 ...

Page 90: ...Keyboard Type A BRA036S Keyboard Type B BRA037S Entering Text 89 5 ...

Page 91: ...Keyboard Type C BRA038S Keyboard Type D BRA039S 5 Entering Text 90 5 ...

Page 92: ... This will delete the character at the cursor position You can delete a character at the right end of a line even if the cursor is placed to the right of the character Adding user text You can select and use a User Text that is registered in Prog Change Del User Text For the registration procedure under Prog Change Del User Text see System Settings Network and System Settings Guide Entering Text 9...

Page 93: ...y repeatedly to display User Text 2 Select the text you want to add using or and then press the OK key 3 To modify the selected text press the Quick Dial keys to enter letters and then press the OK key 5 Entering Text 92 5 ...

Page 94: ...be viewed on a Macintosh Hyperlinks might not work and referenced sections might not appear unless all the HTML manuals have been installed To display referenced sections be sure to install all the HTML manuals 1 Select a language and a product and then click OK 2 Click Install manuals If you want to read manuals from the CD ROM click Read HTML manuals or Read PDF manuals 3 Install the manual you ...

Page 95: ...h The PDF manuals are in the following folder on the CD ROM MANUAL_PDF ENGLISH To view the PDF manuals you need to have Adobe Acrobat Reader Adobe Reader installed on your computer 6 Operating Instructions 94 6 ...

Page 96: ...wser opens and the manual appears Opening from the Start Menu This section explains how to open a manual from the Start menu 1 On the Start menu point to Programs Windows XP All Programs then Product Name and then click the manual you want to view The browser opens and then the manual appears Depending on the settings made during installation menu folder names may differ How to Use the Operating I...

Page 97: ...OM This section explains how to open a manual from the supplied CD ROMs 1 Click Read HTML manuals 2 Click the title of the manual you want to view The browser opens and then the manual appears 6 Operating Instructions 96 6 ...

Page 98: ... is not a malfunction The area around the ventilation holes might feel warm This is caused by exhaust air and is not a malfunction When the machine is not in use and in stand by mode you may hear a small noise inside This is caused by the image stabilization process and is not a malfunction When you use this machine for a long time in a confined space without good ventilation you may detect an odd...

Page 99: ...nt behind the control panel during printing This is water vapor from the paper not a sign of malfunction The machine might not produce good copy images if condensation forms inside as a result of rapid temperature change Be sure to make a note of the registered machine settings in case they are lost due to accident or malfunction The supplier shall not be liable for any loss or damage resulting fr...

Page 100: ...as are for service engineer use only Do not touch these areas Before moving the machine be sure to disconnect all external connections especially the power cord from the wall outlet Damaged power cords are a fire and electric shock hazard If you have to move the machine when the optional paper tray unit is attached do not push on the main unit s top section Doing so can cause the optional paper tr...

Page 101: ...g the machine is well ventilated and spacious Good ventilation is especially important when the machine is used heavily Temperature 10 32 C 50 89 6 F humidity to be 54 at 32 C 89 6 F Humidity 15 80 temperature to be 27 C 80 6 F at 80 A strong and level base The machine must be level within 5 mm 0 2 inches both front to rear and left to right To avoid possible buildup of ozone make sure to locate t...

Page 102: ...e installed contact your service representative Power Connection This section describes power supply Connect this machine only to a power source that matches the specifications shown in Specifications for the Main Unit in this manual and do not use an extension cord Use of this machine with extension cords and power sources other than those that match the specifications shown constitutes an electr...

Page 103: ...he power cord will not be damaged under the machine When you disconnect the power plug from the wall outlet always pull the plug not the cable To disconnect the power cord pull it out by plug Do not drag the cord itself Doing so may result in damage to the cord leading to fire or electric shock Make sure the plug is inserted firmly in the wall outlet Voltage must not fluctuate by more than 10 The ...

Page 104: ...ice representative How to maintain Cleaning the machine Wipe the machine with a soft dry cloth If this does not remove the dirt wipe the machine with a damp and tightly wrung cloth If a damp cloth still does not remove the dirt try using a mild detergent Wipe the machine with a dry cloth to remove the moisture after using a damp cloth Cleaning the Exposure Glass This section describes how to clean...

Page 105: ... Sheet 2 Guiding plate Cleaning the Power Cable Plug Be sure to disconnect the plug from the wall outlet and clean the prongs and the area around the prongs at least once a year Allowing dust to build up on the plug constitutes a fire hazard 7 Remarks 104 7 ...

Page 106: ...Counter You can display the total counter value used for all functions 1 Press the User Tools Counter key BRA052S 2 Select Counter using or and then press the OK key 3 To print a counter list press Print 4 Press the Start key A counter list prints out Counter 105 7 ...

Page 107: ...7 Remarks 106 7 ...

Page 108: ...format For details about using Adobe Acrobat Reader Adobe Reader see Adobe Acrobat Reader Adobe Reader online Help Viewing the Contents of the CD ROM This section explains how to view the contents of the CD ROMs 1 Insert the CD ROM into the CD ROM drive The installer starts 2 Click Browse This CD ROM Explorer starts and displays the contents of the CD ROM Printer Drivers for This Machine This sect...

Page 109: ...rosoft Windows Server 2003 Standard Edition Microsoft Windows Server 2003 Enterprise Edition Microsoft Windows Server 2003 Web Edition Microsoft Windows Server 2003 Datacenter Edition Microsoft Windows Server 2003 R2 Standard Edition Microsoft Windows Server 2003 R2 Enterprise Edition Microsoft Windows Server 2003 R2 Datacenter Edition 5 Microsoft Windows Server 2008 Standard Microsoft Windows Ser...

Page 110: ... colors or higher LAN Fax Driver This section describes the file path and system requirements of the LAN Fax driver You can install the LAN Fax driver from the CD ROM provided with this machine or download it from the supplier s Web site If your operating system is Windows XP x64 Vista x64 or Windows Server 2003 2003 R2 2008 x64 you must download the LAN Fax driver from the supplier s Web site Sel...

Page 111: ... For details about the software installed with DeskTopBinder Lite see Scanning Originals with the Network TWAIN Scanner Scanner Reference File path The software is included in the following folder on the CD ROM labeled Scanner Driver and Utilities provided with this machine UTILITY DESKV2 System requirements Hardware PC AT compatible machines that support the operating system properly Operating sy...

Page 112: ...ded with Windows XP NetWare Client provided with Windows XP Novell Client provided with Windows XP Windows Vista TCP IP provided with Windows Vista Novell Client provided with Windows Vista Windows Server 2003 TCP IP provided with Windows Server 2003 IPX SPX provided with Windows Server 2003 NetWare Client provided with Windows Server 2003 Novell Client provided with Windows Server 2003 Windows Se...

Page 113: ...red in the following folder on the CD ROM labeled Printer Drivers and Utilities NETWORK DEVMON CLIENT DISK1 Operating environment of the printer driver Applicable computer Machines which properly work with the applicable OS below PC AT compatible machine Applicable OS Windows 2000 XP Vista Windows Server 2003 2003 R2 2008 See Scanning Originals with the Network TWAIN Scanner Scanner Reference or H...

Page 114: ...on Scanning originals 600 dpi Printing 600 dpi Exposure glass Stationary original exposure type Original reference position Rear left corner Warm up time 20 C rated voltage From the main power switch Machines with only copier function 10 seconds or less From the main power switch Machines with facsimile printer or scanner functions 30 seconds or less From the operation switch 10 seconds or less Or...

Page 115: ...0 90 0 g m2 16 lb 24 lb Bypass tray 60 0 157 0 g m2 16 lb 42 lb Duplex unit 64 0 90 0 g m2 17 lb 24 lb Non reproduction area Copier Leading edge 1 0 5 0 mm 0 04 0 20 inches Trailing edge 1 0 5 0 mm 0 04 0 20 inches Back of duplex copy 2 2 6 2 mm 0 09 0 25 inches Left edge 0 5 3 5 mm 0 02 0 14 inches Right edge 1 0 4 5 mm 0 02 0 18 inches First copy print time 7 5 seconds or less A4 81 2 11 100 rep...

Page 116: ...rce as above For details about power source see Power Connection Power consumption Main unit only Complete system Warm up Less than 1000 W Less than 1000 W Stand by About 70 W About 75 W During printing About 360 W About 360 W Maximum Less than 1000 W Less than 1000 W The complete system consists of the main unit with full items installed Dimensions W D H up to exposure glass 485 450 371 mm 19 1 1...

Page 117: ...by 34 0 dB A 34 0 dB A Copying 56 0 dB A 60 0 dB A Sound power level and sound pressure level are actual values measured in accordance with ISO 7779 Sound power level and sound pressure level are measured from the position of the bystander The complete system consists of the main unit with full items installed Weight 29 kg 64 0 lb or less p 101 Power Connection 8 Appendix 116 8 ...

Page 118: ...hes Horizontal Original weight 1 sided originals 52 105 g m2 14 28 lb 2 sided originals 52 105 g m2 14 28 lb Originals that are 310 mm 13 inches or longer in the feed direction should be at least 64 g m2 17 lb Number of originals to be set 80 g m2 20 lb 50 sheets Maximum power consumption Less than 50 W Power is supplied from the main unit Dimensions W D H 485 360 120 mm 19 1 14 2 4 8 inches Weigh...

Page 119: ...81 2 14 81 2 13 81 2 11 81 4 13 81 4 14 Paper weight 60 90 g m2 16 24 lb Paper capacity 80 g m2 20 lb 500 sheets Maximum power consumption 15 W Power is supplied from the main unit Dimensions W D H 430 414 140 mm 17 0 16 3 5 6 inches Weight 6 kg 13 3 lb or less Specifications are subject to change without notice 8 Appendix 118 8 ...

Page 120: ...speed Auto select from the following speed 1 Mbps 2 Mbps 5 5 Mbps 6 Mbps 9 Mbps 11 Mbps 12 Mbps 18 Mbps 24 Mbps 36 Mbps 48 Mbps 54 Mbps Frequency range IEEE 802 11a b g wireless LAN 2412 2462 MHz 1 11 channels 5180 5320 MHz 36 40 44 48 52 56 60 and 64 channels Transmission mode Ad hoc mode Infrastructure mode SmartDeviceMonitor and Web Image Monitor are supported Specifications for Wireless LAN Bo...

Page 121: ...The product names of Windows 2000 are as follows Microsoft Windows 2000 Professional Microsoft Windows 2000 Server Microsoft Windows 2000 Advanced Server The product names of Windows XP are as follows Microsoft Windows XP Professional Microsoft Windows XP Home Edition Microsoft Windows XP Media Center Edition Microsoft Windows XP Tablet PC Edition The product names of Windows Vista are as follows ...

Page 122: ...ion Microsoft Windows Server 2003 R2 Datacenter Edition The product names of Windows Server 2008 are as follows Microsoft Windows Server 2008 Standard Microsoft Windows Server 2008 Enterprise Microsoft Windows Server 2008 Datacenter Trademarks 121 8 ...

Page 123: ...8 Appendix 122 8 ...

Page 124: ...ce areas 101 Color scan 12 Color Scan key 42 Combine 9 Combine key 44 Combine Series key 44 Communicating indicator 42 Components 37 Computer 13 Contents of the CD ROM 107 Control panel 38 42 48 49 Copier 9 52 Copy key 43 Counter 105 Counter key 43 D Darker key 44 Data In indicator 44 DataOverWriteSecurity Unit 41 Deleting characters 91 DeskTopBinder Lite 110 DeskTopBinder SmartDeviceMonitor for C...

Page 125: ...38 Internal tray guide 37 Internet Fax and E Mail Transmission 11 Internet Fax Reception and Mail to Print 11 IP Fax 11 IP Fax Reception 11 IP Fax Transmission 11 Items 15 40 J Job Information key 42 K Keys 83 L Label paper adhesive labels 71 LAN Fax 10 109 LAN Fax driver 109 Laser safety 26 Laws 26 Legal Prohibition 26 Letterhead paper 61 Lighter key 44 Load Paper indicator 43 Loading paper 59 Lo...

Page 126: ...04 Power connection 101 Power supply 54 Power switch symbols 22 Printed manuals 8 Printer 9 52 Printer driver 49 50 107 Printer Drivers and Utilities 107 109 110 112 Printer key 43 Printer Scanner unit 40 Printing a PDF file directly 9 Q Quick Dial keys 44 84 R Reading the display panel 46 Receive File indicator 42 Recommended paper sizes and types 71 Redial key 44 Reduce 9 Register Change Delete ...

Page 127: ...8 Tray 3 38 40 67 71 118 Turning off the main power 56 Turning off the power 54 55 Turning on the main power 54 Turning on the power 54 55 TWAIN 12 TWAIN driver 109 Two sided paper 61 U Unusable paper 76 USB memory stick 12 Used toner 82 User Code Authentication 48 49 User Function keys 43 User Text 91 User Tools 69 User Tools key 43 User Tools Counter key 43 Using the keys 46 Using the Print Job ...

Page 128: ...MEMO 127 ...

Page 129: ...MEMO 128 EN USA D069 6752 ...

Page 130: ...Copyright 2008 ...

Page 131: ...Type for 917 LD117 MP 171 Aficio MP 171 Type for 917F LD117F MP 171F Aficio MP 171F Type for 917SPF LD117SPF MP 171SPF Aficio MP 171SPF Operating Instructions About This Machine D069 6752 EN USA ...

Page 132: ... 1 2 3 4 Read this manual carefully before you use this machine and keep it handy for future reference For safe and correct use be sure to read the Safety Information in About This Machine before using the machine Copy Reference Operating Instructions ...

Page 133: ......

Page 134: ...issing Image Area 13 Placing Originals 15 Original Orientation 15 Placing Originals on the Exposure Glass 15 Placing Originals in the ADF 16 Specifying Original Size When a Paper Tray is Selected 17 Specifying Original Size When the Bypass Tray is Selected 20 2 Copying Basic Procedure 25 Copying from the Bypass Tray 27 Copying onto Regular Size Paper 29 Copying onto Custom Size Paper 30 Copying on...

Page 135: ...pies 54 Finishing 56 Sort 56 Adjusting Copy Image Density 58 Selecting the Original Type 59 Selecting Copy Paper 60 3 Copier Features Accessing User Tools 61 Changing Default Settings 61 Quitting User Tools 62 User Tools Menu 63 4 Appendix Function Compatibility 67 Trademarks 69 INDEX 71 2 ...

Page 136: ... PostScript 3 Other manuals UNIX Supplement Quick Reference Copy Guide Quick Reference Fax Guide Quick Reference Printer Guide Quick Reference Scanner Guide Manuals for DeskTopBinder Lite DeskTopBinder Lite Setup Guide DeskTopBinder Introduction Guide Auto Document Link Guide Manuals provided are specific to machine types For UNIX Supplement please visit our Web site or consult an authorized deale...

Page 137: ...ges as a result of handling or operating the machine For good copy quality the supplier recommends that you use genuine toner from the supplier The supplier shall not be responsible for any damage or expense that might result from the use of parts other than genuine parts from the supplier with your office products 5 ...

Page 138: ...ant information Indicates the names of keys that appear on the machine s display panel Indicates the names of keys on the machine s control panel Name of Major Item Major item of this machine is referred to as follows in this manual Auto document feeder ADF Note Contents of this manual are subject to change without prior notice Two kinds of size notation are employed in this manual With this machi...

Page 139: ...prohibited by local law bank notes revenue stamps bonds stock certificates bank drafts checks passports driver s licenses The preceding list is meant as a guide only and is not inclusive We assume no responsibility for its completeness or accuracy If you have any questions concerning the legality of copying or printing certain items consult with your legal advisor 7 ...

Page 140: ...kets 3 Displays the number of copies set 4 Displays frequently used functions Reading the Display and Using Keys BRH202S 1 Selection keys Correspond to items at the bottom line on the display Example When the instruction press Reduce appears in this manual press the left selection key When the instruction press Enlarge appears in this manual press the center selection key When the instruction pres...

Page 141: ...OK key Press to set a selected item or entered numeric value 4 Scroll keys Press to move the cursor to each direction one by one When or appears in this manual press the scroll key of the same direction 9 ...

Page 142: ...10 ...

Page 143: ...originals A4 A5 52 105 g m2 Inch version Original location Original size Original weight Exposure glass Up to 81 2 14 ADF One sided originals 81 2 14 51 2 81 2 14 28 lb Two sided originals 81 2 14 51 2 81 2 14 28 lb About 50 originals 80 g m2 20 lb can be loaded in the ADF Do not place 2 sided originals in the ADF if they are 64 g m2 17 lb or less in weight and 356 mm 14 inches or more in length P...

Page 144: ...ent paper Thin or highly flexible originals Thick originals such as postcards Bound originals such as books Transparent originals such as OHP transparencies or translucent paper Originals that are still wet with ink or correction fluid The original might become dirty if it is written with a pencil or a similar tool Sizes Selectable as Regular Size Originals You can select the following original si...

Page 145: ...ls about custom size originals see Custom sizes For 2 sided originals that can be placed in the ADF the horizontal size is 160 356 mm 6 3 14 inches p 18 Custom sizes p 21 Custom sizes Missing Image Area Even if you place originals in the ADF or on the exposure glass correctly margin of a few millimeters on all four sides of the original might not be copied Originals 13 1 ...

Page 146: ...BAT019S 1 0 5 4 5 mm 0 02 0 18 inches 2 1 0 5 0 mm 0 04 0 20 inches 3 0 5 3 5 mm 0 02 0 14 inches 4 1 0 5 0 mm 0 04 0 20 inches Back of 2 sided copy 2 2 6 2 mm 0 09 0 25 inches 1 Placing Originals 14 1 ...

Page 147: ...rientation You can set the original orientation in the following ways BRH009S 1 ADF 2 Exposure glass Originals should be aligned to the rear left corner when placing them on the exposure glass However some copy functions such as Duplex Combine and Series Copies may produce different results depending on the orientation of the originals For details see the explanations of each function Placing Orig...

Page 148: ... glass cover or ADF Placing Originals in the ADF Place originals in the ADF Settings should be made when placing custom size originals BRH020S When placing custom size originals See Custom sizes and Copying onto Custom Size Paper 1 Adjust the document guides to the original size 2 Set the aligned originals face up into the ADF Do not stack originals beyond the limit mark The first page should be o...

Page 149: ...t multiple sheets from being fed at once fan the original before placing it on the ADF Set the original squarely p 18 Custom sizes p 21 Custom sizes p 30 Copying onto Custom Size Paper Specifying Original Size When a Paper Tray is Selected You can select either regular or custom for the size of the original when a paper tray is selected Regular sizes When placing regular size originals on the expo...

Page 150: ...pears on the top of the copy display To cancel the size you have set press the Clear Modes key Custom sizes When placing a custom size original on the exposure glass or in the ADF specify the size of the original using the number keys Original sizes that can be set with this function are ADF vertical 139 216 mm 5 5 8 5 inches horizontal for 1 sided originals 139 1260 mm 5 5 49 6 inches horizontal ...

Page 151: ...4inches 1 Select the paper tray using or 2 Press the key 3 Select Custom Size using or and then press the OK key 4 Enter the horizontal size of the original Horiz with the number keys and then press the OK key BRH022S 1 Vertical size 2 Horizontal size Placing Originals 19 1 ...

Page 152: ... Size When the Bypass Tray is Selected You can select either regular or custom for the size of the original when the bypass tray is selected Regular sizes When placing regular size originals on the exposure glass or in the ADF specify the size of the originals from the regular sizes shown on the display If you do not specify the original size the machine will make copies on the paper size in the t...

Page 153: ...ay To cancel the size you have set press the Clear Modes key Custom sizes When placing a custom size original on the exposure glass or in the ADF specify the size of the original using the number keys Original sizes that can be set with this function are ADF vertical 139 216 mm 5 5 8 5 inches horizontal for 1 sided originals 139 1260 mm 5 5 49 6 inches horizontal for 2 sided originals 160 356 mm 6...

Page 154: ...s the OK key 5 Enter the horizontal size of the original Horiz with the number keys and then press the OK key 6 Enter the vertical size of the original Vert with the number keys and then press the OK key The Programmed message appears When the custom size originals settings are registered appears on the top of the copy display 1 Placing Originals 22 1 ...

Page 155: ... To change the value you entered press the Clear Stop key and then enter a new value To cancel the size you have set press the Clear Modes key Placing Originals 23 1 ...

Page 156: ...1 Placing Originals 24 1 ...

Page 157: ...d so that the machine accepts copy jobs Ask the administrator for the login user name and password For details see When the Authentication Screen is Displayed About This Machine To copy onto paper other than plain paper specify the paper type under Tray Paper Settings in User Tools For details see System Settings Network and System Settings Guide 1 Make sure Ready appears on the screen If any othe...

Page 158: ... to clear the settings Always log off when you have finished using the machine to prevent unauthorized users from using the machine To stop the machine during a multi copy run press the Clear Stop key To cancel all copy functions and return the machine to the default condition press the Clear Modes key To clear entered values press the Clear Stop key To switch between pages or selectable functions...

Page 159: ...s tray However when paper larger than 356 mm 14 02 inches in size is used the paper may become wrinkled may not be fed into the machine or may cause paper jams When copying onto OHP transparencies paper of 59 9 g m2 about 16 lb or less or paper of above 90g m2 about 24 lb you need to specify the type and size of paper under Tray Paper Settings in User Tools For details about Tray Paper Settings se...

Page 160: ...es to the paper size and then insert the paper face down If the guides are not flush against the paper images might be skewed or paper misfeeds might occur BRH025S 1 Horizontal size 2 Vertical size 3 Extender 4 Paper guides 4 Push down the release lever BRH026S 2 Copying 28 2 ...

Page 161: ...event multiple sheets from being fed at once fan paper before placing it on the tray When the Sort function is selected press the key after all originals have been scanned When the Panel Key Sound is turned off it will not sound if you insert paper into the bypass tray For details about Panel Key Sound see System Settings Network and System Settings Guide Depending on the environment where the mac...

Page 162: ... The Programmed message appears 6 Place the originals and then press the Start key 7 When the copy job is finished press the Clear Modes key to clear the settings Copying onto Custom Size Paper Makes copies onto custom size paper from the bypass tray 1 Insert the paper face down on the bypass tray 2 Press the key 3 Select Paper Size using or and then press the OK key 2 Copying 30 2 ...

Page 163: ... Clear Modes key to clear the settings To change the value you entered press the Clear Stop key and then enter a new value Copying onto OHP Transparencies When copying onto OHP transparencies select the type and size of paper OHP transparencies must be loaded face down in the tray Load OHP transparencies one at time in the bypass tray This prevents multiple sheets being fed in together which can c...

Page 164: ...y job is finished press the Clear Modes key to clear the settings Printing on OHP transparencies may be slower than printing on plain paper Copying onto Thick Paper When copying onto thick paper select the type and size of paper 1 Insert the paper face down on the bypass tray 2 Press the key 3 Select Paper Type using or and then press the OK key 4 Select Thick Paper using or and then press the OK ...

Page 165: ...s Printing on thick paper may be slower than printing on plain paper To prevent multiple sheets from being fed at once fan paper before placing it on the tray Copying onto Envelopes When copying onto envelopes specify the paper type and paper size Before loading envelopes use a pen or similar to flatten their edges BRH013S BRH014S Copying from the Bypass Tray 33 2 ...

Page 166: ...Originals and Envelopes Originals and envelopes must be placed in the same orientation To minimize waste and time check that originals and envelopes are loaded in the same orientation BRH016S The illustration shows the orientation of originals and envelopes 1 Original on the exposure glass 2 Envelope on the bypass tray 3 Top 4 Bottom 5 Horizontal size 6 Vertical size 2 Copying 34 2 ...

Page 167: ...ase lever 2 Press the key 3 Select Paper Size using or and then press the OK key 4 Select Regular Size using or and then press the OK key 5 Select the envelope size using or and then press the OK key The Programmed message appears 6 Press the key Copying from the Bypass Tray 35 2 ...

Page 168: ...y as can be stacked up to 10 5 mm 0 4 inches high Check the envelopes are not damp Load only as many envelopes as can be held between the paper guides on the bypass tray When copying on a small sized envelope align the flap to the paper guide on the left BRH028S Check there is no air in the envelopes before loading To get better print quality it is recommended that you set the right left top and b...

Page 169: ... one size and type of envelope at a time Before loading envelopes check they are rectangular in shape For details about supported envelope types see Envelopes About This Machine Copying from the Bypass Tray 37 2 ...

Page 170: ...he base point of Reduce Enlarge differs depending on how the original is scanned When the original is placed on the exposure glass the upper left corner will be the base point When it is placed in the ADF the bottom left corner will be the base point The figure below is the resulting copy images that differ depending on how the original is scanned BAT031S 1 Base point when placed on the exposure g...

Page 171: ... 4 times A6 A4 141 Area ratio 2 times A5 A4 93 71 Area ratio 1 2 times A4 A5 50 Area ratio 1 4 times A4 A6 Inch version 155 Area ratio 2 times 51 2 81 2 81 2 14 129 51 2 81 2 81 2 11 93 78 81 2 14 81 2 11 65 81 2 11 51 2 81 2 You can select a ratio regardless of the size of an original or copy paper With some ratios parts of the image might not be copied or margins will appear on copies You can ch...

Page 172: ... select a ratio regardless of the size of an original or copy paper With some ratios parts of the image might not be copied or margins will appear on copies Selecting a ratio using the scroll keys Select a ratio using or 1 Press R E 2 Press Reduce or Enlarge and then select a preset ratio which is close to the desired ratio 3 Press Zoom 2 Copying 40 2 ...

Page 173: ...ears 5 Place the original and then press the Start key To change the value you specified in step 3 readjust it using or Entering a ratio using the number keys Select a ratio using the number keys 1 Press R E 2 Press Zoom 3 Enter the desired ratio with the number keys and then press the OK key The Programmed message appears 4 Place the original and then press the Start key Reducing or Enlarging Ori...

Page 174: ... To change the value you entered in step 3 press the Clear Stop key and then enter a new value 2 Copying 42 2 ...

Page 175: ...ed Copies two 1 sided pages on one 2 sided page BAS034S 2 Sided 2 Sided Copies one 2 sided page on one 2 sided page BAS035S Original orientation and completed copies The resulting copy image will differ according to the orientation in which you place your originals or The table shows the orientation of images on the front and back of copies not the orientation of delivery Duplex Copying 43 2 ...

Page 176: ...BAT036S 1 Press the Duplex key BRH204S The indicator goes on 2 Select the duplex mode using or and then press the OK key 2 Copying 44 2 ...

Page 177: ...y for Orientation with Copier Features in User Tools If Do not Specify is selected proceed to step 5 For details about Orientation see User Tools Menu You can change the margins of duplex copies under Duplex Margin in User Tools If you set a binding margin that is too wide parts of the image may not be copied For details about Duplex Margin see User Tools Menu You can use the following copy paper ...

Page 178: ...ls are placed in the ADF the back of the last page of copied paper is blank During copying the image is shifted to allow for the binding margin By default a binding margin is made on the back side p 63 User Tools Menu 2 Copying 46 2 ...

Page 179: ... are 50 200 If the calculated ratio is under the minimum ratio it is automatically adjusted to within available range However with some ratios parts of the image might not be copied You cannot use custom size paper If the orientation of originals is different from that of the copy paper the machine will automatically rotate the image by 90 to make copies properly If the number of originals placed ...

Page 180: ...ies four 1 sided originals to one side of a sheet BAS039S 2 Sided 1 Page Combine 1 Side Copies one 2 sided original to one side of a sheet BAS041S 2 Sided 2 Pages Combine 1 Side Copies two 2 sided originals to one side of a sheet 2 Copying 48 2 ...

Page 181: ... and image position of combine Portrait originals BLF013S Landscape originals BLF014S Placing originals originals placed in the ADF Originals read from left to right BAT046S Originals read from top to bottom BAT047S Combined Copying 49 2 ...

Page 182: ...OK key The Programmed message appears 4 Select the paper size using or and then press the OK key 5 Place the originals and then press the Start key You cannot apply this function to sheets of 357 mm 14 inches or longer that are fed from the bypass tray To cancel the One Sided Combine function in step 1 press the Combine Series key again Make sure the indicator goes off 2 Copying 50 2 ...

Page 183: ...Two Sided Combine Combines various pages of originals onto two sides of one sheet You cannot use the bypass tray with this function There are four types of Two Sided Combine 1 Sided 4 Pages Combine 2 Sides Copies four 1 sided originals to one sheet with two pages per side BAS047S 1 Sided 8 Pages Combine 2 Sides Copies eight 1 sided originals to one sheet with four pages per side BAT048S 1 Front 2 ...

Page 184: ...originals to one sheet with two pages per side BAS050S 2 Sided 4 Pages Combine 2 Sides Copies four 2 sided originals to one sheet with four pages per side BAT051S 1 Front 2 Back 1 Press the Combine Series key BRH205S The indicator goes on 2 Copying 52 2 ...

Page 185: ... Two Sided Combine function in step 1 press the Combine Series key again Make sure the indicator goes off If you set a binding margin that is too wide parts of the image may not be copied When making copies using the Combine function a binding margin is added to copies after the images are combined To display the screens in steps 3 and 4 select Always Specify for Orientation with Copier Features i...

Page 186: ...ets 2 Sided 1 Sided You can make 1 sided copies from 2 sided originals BAS104S 1 Press the Combine Series key BRH205S The indicator goes on 2 Select Series 2Sided Orig using or and then press the OK key 3 Select the original orientation using or and then press the OK key 2 Copying 54 2 ...

Page 187: ...in step 1 press the Combine Series key again Make sure the indicator goes off To display the screen in step 3 select Always Specify for Orientation with Copier Features in User Tools If Do not Specify is selected proceed to step 4 For details about Orientation see User Tools Menu p 63 User Tools Menu Series Copies 55 2 ...

Page 188: ...t with the first page to be copied When placing originals in the ADF set so the first page is on the top When placing originals on the exposure glass press the key after all the originals have been scanned To cancel the Sort function in step 1 press the Sort key again Make sure the indicator goes off The number of copies that can be placed on the internal tray is as follows When the number of copi...

Page 189: ...d when the Sort function is selected 1 While Copying is displayed press the Clear Stop key 2 Press Sets 3 Enter the number of copy sets with the number keys and then press Resume Copying starts again The number of sets you can enter in step 3 differs depending on when the Clear Stop key is pressed Finishing 57 2 ...

Page 190: ...an adjust the density of the overall original in five steps 1 Press the Lighter or Darker key to adjust the image density The density indicator moves BRH207S The image density changes in five increments as follows BRH017S 2 Copying 58 2 ...

Page 191: ...nes of photographs and pictures can be reproduced with this mode When copying developed photographs When copying photographs or pictures that are printed on paper e g magazines When copying originals generated by color copiers 1 Press the Original Type key to select the original type The indicator of the selected original type goes on BRH208S Upper indicator Text Lower indicator Photo Selecting th...

Page 192: ...ecting Copy Paper Select the tray containing the paper you want to copy onto a paper tray or the bypass tray 1 Select the desired tray using or The selected tray and paper size are displayed 2 Copying 60 2 ...

Page 193: ...ools remain in effect even if the main power switch or operation switch is turned off or Clear Modes key is pressed p 62 Quitting User Tools Changing Default Settings This section describes how to change the settings of User Tools If Administrator Authentication Management is specified contact your administrator 1 Press the User Tools Counter key BRH209S 2 Select the menu using or and then press t...

Page 194: ...lay To cancel changes made to settings and return to the initial display press the User Tools Counter key Quitting User Tools This section describes how to quit the settings of User Tools 1 Press the User Tools Counter key BRH209S 3 Copier Features 62 3 ...

Page 195: ...ou can choose these functions after selecting Original Type 1 Text or Original Type 2 Photo Text Mode 1 normal text originals Text Mode 2 newspapers semi transparent originals reverse side print faintly visible Photo Mode 1 text photo images containing mostly photo areas Photo Mode 2 text photo images containing mostly text areas Photo Mode 3 actual photographic paper Special Mode 1 highly transpa...

Page 196: ...oduction Ratio You can select which reduce enlarge or input ratio is shown on the display with priority when Reduce or Enlarge is selected Reduce or Enlarge ratios for setting are as follows The default setting for Ratio 1 is 50 Metric version 65 Inch version The default setting for Ratio 2 is 71 Metric version 78 Inch version The default setting for Ratio 3 is 93 Metric version 93 Inch version Th...

Page 197: ...version 0 2 inch Inch version The default setting for Left Margin is 5 mm Metric version 0 2 inch Inch version Letterhead Setting If you select On for this function the machine rotates the image correctly The default setting is Off Menu Protect You can prevent unauthenticated users from changing the user tools settings For details consult the administrator The default setting is Level 2 User Tools...

Page 198: ...3 Copier Features 66 3 ...

Page 199: ...r Blank These modes can be used together These modes cannot be used together The second mode selected will be the mode you are working in The following shows the combinations of functions BRH018S 1 A function incompatibility message appears if you load a sheet that exceeds 357 mm 14 inches with the two sided original function Copying is not possible until one of the functions is disabled 67 4 ...

Page 200: ...nches Copying is not possible until one of the functions is disabled 3 The mode selected second changes the reduce enlarge ratio 4 A function incompatibility message appears if you select two conflicting functions Copying is not possible until one of the functions is disabled 4 Appendix 68 4 ...

Page 201: ...be Acrobat Acrobat Reader PostScript and Reader are either registered trademarks or trademarks of Adobe Systems Incorporated in the United States and or other countries Other product names used herein are for identification purposes only and might be trademarks of their respective companies We disclaim any and all rights to those marks Trademarks 69 4 ...

Page 202: ...4 Appendix 70 4 ...

Page 203: ...posure glass 11 15 F Finishing 56 Function compatibility 67 H Horizontal size 18 21 30 How to read this manual 6 I Image density 58 Image position of combine 47 Initial display 8 L Legal Prohibition 7 Letterhead Setting 65 M Manuals for this machine 3 Max Number of Sets 64 Menu Protect 65 Missing image area 13 N Name of Major Item 6 Non compatible originals 11 Note 6 Notice 5 O OHP transparencies ...

Page 204: ...er 29 Reproduction Ratio 64 S Selectable original size 12 Selecting a preset ratio 38 Selecting a ratio using the scroll keys 40 Selecting copy paper 60 61 Series Copies 54 Sort 56 Specifying original sizes 17 20 Symbols 6 T Text 59 Thick paper 32 Trademarks 69 Two Sided Combine 51 U User Tools Menu 63 V Vertical size 18 21 30 Z Zoom 40 72 EN USA D069 6801 ...

Page 205: ...Copyright 2008 ...

Page 206: ...Type for 917 LD117 MP 171 Aficio MP 171 Type for 917F LD117F MP 171F Aficio MP 171F Type for 917SPF LD117SPF MP 171SPF Aficio MP 171SPF Operating Instructions Copy Reference D069 6801 EN USA ...

Page 207: ...ey Press to cancel operation or return to the previous display 16 Lighter key Darker key 17 Sort key Press to automatically sort printed copies 18 Duplex key Perform duplex printing when copying a multiple sheet original 19 Combine Series key Combine Combines and prints the pages of a multiple sheet original onto a single sheet Series Prints each page of a double page spread as a single page copy ...

Page 208: ...er Hold Print How to print stored documents on the hard disk Stored Print How to prepare for printing A On the Start menu click Printer and Faxes B Right click the icon of the printer you want to use and then click Set as Default Printer C On the File menu click Properties D On the Accessories tab select the options and specify the paper trays you want to use E Specify the paper size of the origin...

Page 209: ...r safe and correct use be sure to read the Safety Information in About This Machine before using the machine 10 8 9 11 Preparing the Machine Printing Documents Printing Stored Document Printing from DeskTopBinder Lite Printer Features Appendix 1 2 3 4 5 6 7 Operating Instructions Printer Reference ...

Page 210: ......

Page 211: ...rd TCP IP Port 20 Using the LPR Port 21 Using the WSD port 23 Using as a Windows Network Printer 25 Using as a NetWare Print Server Remote Printer 27 Form Feed 28 Banner Page 29 Printing after Resetting the Printer 29 Installing the Printer Driver Using USB 30 Windows 2000 XP Windows Server 2003 2003 R2 USB 30 Windows Vista Windows Server 2008 USB 31 Printing with Parallel Connection 33 Making Opt...

Page 212: ...ed or Two Sided Paper 55 Frequently Used Print Methods 57 Standard Printing 57 Printing on both sides of sheets 58 Combining Multiple Pages into Single Page 60 Using One Click Presets 63 Advanced Printing 65 Menu Names and Brief Overview of Each Function 65 Collate 65 If Error Occurs with the Specified Paper Size and Type 67 Printing from a Selected Tray 67 Canceling a Print Job 68 Spool Printing ...

Page 213: ...Checking the Error Log 99 4 Printing from DeskTopBinder Lite Printing a PDF File Directly 101 Printing Method 101 Using DeskTopBinder Lite 101 PDF Direct Print Properties 103 Using Commands 104 5 Printer Features Accessing User Tools 105 Changing Default Settings 105 Quitting User Tools 105 Menu Protect 106 List Test Print 107 Printing the Configuration Page 107 Maintenance 110 System 111 Host Int...

Page 214: ...anging a Virtual Printer Configuration 122 Confirming a Virtual Printer Configuration 122 Deleting a Virtual Printer 123 Printing Using a Virtual Printer 123 Specifications 125 Trademarks 127 INDEX 129 4 ...

Page 215: ...e Fax Guide Quick Reference Printer Guide Quick Reference Scanner Guide Manuals for DeskTopBinder Lite DeskTopBinder Lite Setup Guide DeskTopBinder Introduction Guide Auto Document Link Guide Manuals provided are specific to machine types For UNIX Supplement please visit our Web site or consult an authorized dealer This manual includes descriptions of functions and settings that might not be avail...

Page 216: ...ges as a result of handling or operating the machine For good copy quality the supplier recommends that you use genuine toner from the supplier The supplier shall not be responsible for any damage or expense that might result from the use of parts other than genuine parts from the supplier with your office products 7 ...

Page 217: ...d at the end of sections It indicates where you can find further relevant information Indicates the names of keys that appear on the machine s display panel Indicates the names of keys on the machine s control panel Note Contents of this manual are subject to change without prior notice Some illustrations in this manual might be slightly different from the machine Certain options might not be avai...

Page 218: ...hecks passports driver s licenses The preceding list is meant as a guide only and is not inclusive We assume no responsibility for its completeness or accuracy If you have any questions concerning the legality of copying or printing certain items consult with your legal advisor This machine is equipped with a function that prevents making counterfeit bank bills Due to this function the original im...

Page 219: ...to 240 V model Indicates information that is specific to the 120 V model Check the label on the right side of the machine to identify the model BRP008S Dimensions in this manual are given in two units of measure metric and inch If your machine is the 220 to 240 V model refer to the metric units If your printer is the 120 V model refer to the inch units 10 ...

Page 220: ...edure that is appropriate to the connection method Network Connection This machine can be used as a Windows printing port or network printer Using this printer as the Windows printing port Network connections can be established through Ethernet and Wireless LAN Available ports are determined based on the combination of Windows operating system version and connection method used BMG021S Windows 200...

Page 221: ...or each type of port For details about SmartDeviceMonitor for Client port see Installing the Printer Driver For details about Standard TCP IP port see Installing the Printer Driver For details about LPR port see Installing the Printer Driver For details about WSD port see Installing the Printer Driver p 14 Installing the Printer Driver Using as a network printer This machine can be used as the Win...

Page 222: ...p 25 Using as a Windows Network Printer p 27 Using as a NetWare Print Server Remote Printer Local Connection Local connections can be established via parallel and USB connections See the explanation about how to install the printer driver for each method of connections For details about USB connections see Installing the Printer Driver Using USB For details about parallel connections see Printing ...

Page 223: ...TopBinder SmartDeviceMonitor for Client are installed under network environment and the TCP IP port will be set To install the printer driver under Windows 2000 XP Vista and Windows Server 2003 2003 R2 2008 youmusthaveanaccountthathasManagePrinterspermission LogonasanAdministrator If you connect using USB see Installing the Printer Driver Using USB and install the printer driver 1 Quit all applica...

Page 224: ...ction For details about bidirectional communication between the machine and computer see Making Option Settings for the Printer p 30 Installing the Printer Driver Using USB p 35 Making Option Settings for the Printer Using the SmartDeviceMonitor for Client Port To install SmartDeviceMonitor for Client under Windows 2000 XP Vista and Windows Server 2003 2003 R2 2008 you must have an account that ha...

Page 225: ...stalling the PCL printer driver TCP IP 1 Quit all applications currently running 2 Insert the CD ROM into the CD ROM drive The installer starts 3 Select an interface language and then click OK 4 Click PCL Printer Driver 5 The software license agreement appears in the License Agreement dialog box After reading the agreement click I accept the agreement and then click Next 6 Select the printer drive...

Page 226: ...prints For details see SmartDeviceMonitor for Admin Help Auto Run may not work with certain operating system settings If this happens launch Setup exe on the CD ROM root directory A message appears if there is a newer version of the printer driver already installed If there is you cannot install the printer driver using Auto Run If you still want to install the printer driver use Add Printer See M...

Page 227: ...fying the printer in IPP Port Name Use a name different from the one of any existing ports If a name is not specified here the address entered in the Printer URL box becomes the IPP port name 15 Click Detailed Settings to make necessary settings For details about the settings see SmartDeviceMonitor for Client Help 16 Click OK 17 Check that the port of the selected printer is displayed in Port 18 S...

Page 228: ... The Printers window appears 2 Click the icon of the printer you want to use On the File menu click Properties 3 On the Ports tab click Configure Port The Configuration dialog box appears Windows XP Windows Server 2003 2003 R2 1 On the Start menu click Printers and Faxes The Printers and Faxes window appears 2 Click the icon of the printer you want to use On the File menu click Properties 3 Click ...

Page 229: ...ws Server 2003 2003 R2 2008 you must have an account that has Manage Printers permission Log on as an Administrators or Power Users group member In an IPv6 environment you cannot use the Standard TCP IP Port Use the SmartDeviceMonitor for Client port Installing the PCL printer driver 1 Quit all applications currently running 2 Insert the CD ROM into the CD ROM drive The installer starts 3 Select a...

Page 230: ...log box reappears 16 Check that the port of the selected printer is displayed in Port 17 Configure the default printer as necessary 18 Click Continue The printer driver installation starts 19 After the installation is completed select one of the options to restart the computer either now or later and then click Finish Restart the computer to complete installation To stop installation of the select...

Page 231: ...ox You can select several printer drivers The PCL6 printer driver is installed in the language specified by your operating system 7 Select the printer model you want to use The printer name can be changed in the Change settings for Printer Name box 8 Click Next 9 Double click the printer name to display the printer settings The details shown in Comment Driver and Port vary depending on the operati...

Page 232: ...To install under Windows Vista or Windows Server 2008 you must have an account that has Manage Printers permission Log on as an Administrator You can connect to the printer only if both the printer and computer are on the same network segment or Network discovery is enabled For details see Windows Help Installing the PCL printer driver 1 Quit all applications currently running 2 On the Start menu ...

Page 233: ...s can t verify the publisher of this driver software message appears click Install this driver software anyway 10 Click Close If installation is successful the icon of the printer connected to the WSD port is added to the Printers window The port name that follows WSD uses random character strings It cannot be changed freely To stop the installation click Cancel before the installation is complete...

Page 234: ... print server notification functions of SmartDeviceMonitor may not be used with the client You can install the printer driver from the CD ROM provided with this printer or download it from the supplier s Web site If your operating system is Windows XP Pro x64 Windows Server 2003 2003 R2 2008 x64 you mustdownloadtheprinterdriverfromthemanufacturer sWebsite Selectthisprinterandtheoperating system yo...

Page 235: ...he printer driver installation starts 18 After the installation is completed select one of the options to restart the computer either now or later and then click Finish Restart the computer to complete installation A user code can be set after the printer driver installation For information about user code see the printer driver Help To stop installation of the selected software click Cancel befor...

Page 236: ... ROM drive The installer starts Auto Run may not work with certain operating system settings In that case launch Setup exe on the CD ROM root directory 2 Select an interface language and then click OK 3 Click PCL Printer Driver 4 The software license agreement appears in the License Agreement dialog box After reading the agreement click I accept the agreement and then click Next 5 Select the print...

Page 237: ...ting tab Under Windows Vista or Windows Server 2003 2003 R2 2008 on the Printer Settings tab clear the Form Feed and Enable Banner check boxes Do not select these check boxes since they are automatically selected by the printer driver If you select the check boxes the printer may not print correctly 19 Click OK to close the printer properties dialog box To stop installation of the selected softwar...

Page 238: ...he printer properties dialog box Printing after Resetting the Printer Printer to print server connection requires 30 40 seconds to resume after the printer is reset During this period jobs may be accepted depending on NetWare specifications but not printed To print after resetting the printer as the remote printer check on the print server that the remote printer is disconnected or wait for two mi...

Page 239: ...plug and play instructions of the printer to install it from the CD ROM provided 1 Check that the power of the printer is off 2 Connect the printer and computer using the USB cable Connect the USB cable firmly 3 Turn on the power of the printer Found New Hardware Wizard starts and USB Printing Support is installed automatically 4 IntheFoundNewHardwareWizarddisplay click Searchforasuitabledriverfor...

Page 240: ...t is added to the Printers window The printer drivers can be installed from the CD ROM provided with this printer If the printer driver is not installed follow the plug and play instructions of the printer to install it from the CD ROM provided 1 Check that the power of the printer is off 2 Connect the printer and computer using a USB cable Connect the USB cable firmly 3 Turn on the power of the p...

Page 241: ...ck Next 8 Click Continue 9 Click Finish If the installation is successful the icon of the printer connected to the USB001 port is added to the Printers and Faxes window To disable Auto Run press the left Shift key when inserting the CD ROM into the drive and keep it pressed until the computer finishes reading from the CD ROM The number after USB varies depending on the number of printers connected...

Page 242: ...currently running 2 Insert the CD ROM into the CD ROM drive The installer starts 3 Select an interface language and then click OK 4 Click PCL Printer Driver 5 The software license agreement appears in the License Agreement dialog box After reading the agreement click I accept the agreement and then click Next 6 Select the printer driver you want to use in the Select Program dialog box You can sele...

Page 243: ...ation of the selected software click Cancel before installation is complete Auto Run may not work with certain operating system settings In that case launch Setup exe on the CD ROM root directory A message appears if there is a newer version of the printer driver already installed If there is you cannot install the printer driver using Auto Run If you still want to install the printer driver use A...

Page 244: ...directional communication The machine must be connected to the computer using the standard parallel cables and parallel connectors Under Windows 2000 Enable bidirectional support must be selected and Enable printer pooling must not be selected on the Ports tab with the PCL printer driver When connected with the network The machine must support bidirectional communication Under Windows 2000 XP Vist...

Page 245: ...rt menu and then click Printers The Printers window appears When using Windows Vista or Windows Server 2008 click Control Panel on the start menu and then click Printer The Printers window appears 2 Click the icon of the printer you want to use 3 On the File menu click Properties When using Windows Vista right click the icon of the printer you want to use and then click the Properties 4 Click the ...

Page 246: ...requires Administrator privilege To install a printer driver by Auto Run log on using an account that has Administrator privilege 1 Quit all applications currently running 2 Insert the CD ROM into the CD ROM drive The installer starts 3 Click Font Manager 4 Follow the instructions on the display Installing Font Manager 37 1 ...

Page 247: ...nstallation The directory is C PM6 RSRC PPD4 For PageMaker 6 5 default installation The directory is C PM65 RSRC USENGLISH PPD4 The USENGLISH may vary depending on your language selection For PageMaker 7 0 default installation The directory is C PM7 RSRC USENGLISH PPD4 The USENGLISH may vary depending on your language selection If the driver is not set correctly after copying the ppd file printing...

Page 248: ...mbers of the Administrators and Power Users groups have Manage Printers permission by default You cannot change the printer default settings for individual users Settings made in the Printer Properties dialog box are applied to all users 1 On the Start menu click Printers and Faxes The Printers and Faxes window appears 2 Click the icon of the printer you want to use 3 On the File menu click Proper...

Page 249: ...g procedure explains how to make printer settings for a specific application using Windows XP WordPad as an example 1 On the File menu click Print The Print dialog box appears 2 In the Select Printer list select the printer you want to use 3 Click Preferences The Printing Preferences dialog box appears 4 Make the settings you require and then click OK Procedures for opening the Printing Preference...

Page 250: ... mm 23 62 in in length is used the paper may become wrinkled may not be fed into the machine or may cause paper jams If you want to use the bypass tray be sure to specify the paper size and paper type The following functions are disabled when printing from the bypass tray Duplex printing Auto Tray Select Auto Tray Switching Certain types of OHP transparencies for color printing cannot be used For ...

Page 251: ...e If the paper size of the paper guide and the paper do not match skewing and misfeeds might occur Do not stack paper over the limit mark otherwise a skewed image or misfeeds might occur Open out the extender to support paper sizes larger than A4 81 2 11 Fan the paper to get air between the sheets to avoid a multi sheet feed BRH025S 1 Horizontal size 2 Vertical size 3 Extender 4 Paper guides 2 Pri...

Page 252: ...nel Key Sound see System Settings Network and System Settings Guide For details about setting printer drivers see the printer driver Help Setting the Paper Size Using the Control Panel Follow the procedure below to set the machine using the control panel when loading standard size paper onto the bypass tray The following procedures are not required if you select Driver Command from Bypass Tray Pri...

Page 253: ... 3 Press the or key to select Tray Paper Settings and then press the OK key 4 Press the or key to select Printer Bypass Paper Size and then press the OK key 5 Press the or key to select the paper size you want to use and then press the OK key 6 Press the User Tools Counter key to return to the initial screen 2 Printing Documents 44 2 ...

Page 254: ...ommand from Bypass Tray Priority in System of Printer Features see Printer Features In that case set the paper size using the printer driver If you select Machine Settings from Bypass Tray Priority in System of Printer Features see Printer Features the settings made using the control panel have priority over the printer driver settings If the printer driver is not used select Machine Settings from...

Page 255: ...Printer Bypass Paper Size and then press the OK key 5 Press the or key to select the Custom Size and then press the OK key 6 Enter the horizontal size of the paper using the number keys and press OK key 7 Enter the vertical size of the paper using the number keys and press OK key 2 Printing Documents 46 2 ...

Page 256: ...t the paper size using the printer driver If you select Machine Settings from Bypass Tray Priority in System of Printer Features see Printer Features the settings made using the control panel have priority over the printer driver settings If the printer driver is not used select Machine Settings from Bypass Tray Priority in System of Printer Features see Printer Features Set the paper size using t...

Page 257: ...ettings and then press the OK key 3 Press the or key to select Tray Paper Settings and then press the OK key 4 Press the or key to select Paper Type Bypass Tray and then press the OK key 5 Press the or key to select the proper items according to the paper type you want to set 2 Printing Documents 48 2 ...

Page 258: ...e control panel when loading envelopes onto the bypass tray The following procedures are not required if you select Driver Command from Bypass Tray Priority in System of Printer Features see Printer Features In that case set the paper size using the printer driver If you select Machine Settings from Bypass Tray Priority in System of Printer Features see Printer Features the settings made using the...

Page 259: ...e stack is not higher than the limit mark on the side guide When loading envelopes be sure to unfold the flaps and position them opposite to the paper feed direction Load type 4 162 114 mm C6 6 38 4 49 in C6 envelopes flap down flap fold against the side guide BRP009S Depending on the envelope type specify an appropriate print image rotation using the printer driver For a type 1 4 envelope rotate ...

Page 260: ...me Before loading envelopes flatten leading edges the side going into the machine by pressing a pencil or ruler across them Before loading envelopes check they are rectangular in shape 1 Open the bypass tray and then insert the envelopes with the side you want to print face down until the beeper sounds BRP010S 2 Press the User Tools Counter key on the control panel BRP005S 3 Press the or key to se...

Page 261: ...lect Printer Bypass Paper Size and then press the OK key 6 Press the or key to select the Custom Size and then press the OK key 7 Press the or key to enter the horizontal value and then press the OK key 8 Press the or key to enter the vertical value and then press the OK key 2 Printing Documents 52 2 ...

Page 262: ...key to select Thick Paper and then press the OK key 11 Press the User Tools Counter key to return to the initial screen When entering the horizontal size for envelopes including the opened out flap in the measurement BAT029S 1 Vertical size 2 Horizontal size Setting Paper on the Bypass Tray 53 2 ...

Page 263: ... For details about envelopes see Envelopes About This Machine 2 Printing Documents 54 2 ...

Page 264: ...aper Orientation Paper Trays 1 3 Multi Bypass tray Letterhead Setting On Always Letterhead Setting Off Letterhead Setting On Always Letterhead Setting Off 1 sided print 2 sided print 1 sided print 2 sided print To print on letterhead paper when Letterhead Setting is set to Auto you must specify Letterhead as the paper type in the PCL printer driver s settings If you change from 1 sided to 2 sided ...

Page 265: ... p 58 Printing on both sides of sheets p 111 System 2 Printing Documents 56 2 ...

Page 266: ...application The Printing Preferences dialog box appears 2 Click the One Click Presets tab if it is not already selected 3 In the Job type list select Normal Print If you want to print multiple copies specify a number of sets in the Copies box 4 In the Document Size list select the size of the original to be printed 5 In the Orientation list select Portrait or Landscape as the orientation of the or...

Page 267: ...ist select the type of paper that is loaded in the paper tray 8 Click OK to close the printer preferences dialog box 9 Print the document using the print function in the document s native application The types of paper loaded in the paper trays are indicated on the printer s display This allows you to see which tray the selected paper type is loaded in However the paper type setting available in t...

Page 268: ...ided list select Open to Left or Open to Top 6 Change any other print settings if necessary 7 To save current setting in the One Click Preset List click Register Current Settings Enter a name and comment that describe the setting and then click OK The newly registered icon appears in the One Click Preset List area 8 Click OK to close the printer preferences dialog box 9 Print the document using th...

Page 269: ...ion explains how to print multiple pages onto a single sheet The combine printing function allows you to economize on paper by printing multiple sheets at reduced size onto a single sheet The combine printing function is not available on a custom size paper To use the combine printing function specify a standard size paper For the PCL 6 printer driver 1 After creating a document open the Printing ...

Page 270: ...log box in the document s native application The Printing Preferences dialog box appears 2 Click the Setup tab if it is not already selected 3 In the Layout list select the combination pattern from the list 4 Change any other print settings if necessary 5 Click OK to close the printer preferences dialog box 6 Print the document using the print function in the document s native application If the d...

Page 271: ...2 pages per sheet BMF018S BMF023S BMF024S 4 pages per sheet BMF019S 2 Printing Documents 62 2 ...

Page 272: ...y by clicking on the one click preset name This helps to avoid incorrect settings and misprints One click presets can be added modified and deleted as required They can also be shared for use by different users By using registered one click presets users without in depth knowledge of the printer driver can utilize advanced printing functions easily For details about registering modifying and delet...

Page 273: ... Only the PCL6 printer driver is supported 2 Printing Documents 64 2 ...

Page 274: ...ting multiple sets of documents such as handouts for meetings you can have prints delivered in batches of ordered sets For details about collate function see Collate p 65 Collate Collate When printing multiple documents such as handouts for meetings you can separate sets into order This function is known as Collate Collate stores data transmitted from a computer to the machine memory or hard disk ...

Page 275: ...BAC016S Set Collate when using the PCL printer driver 2 Printing Documents 66 2 ...

Page 276: ... following settings you can change the tray by canceling the settings Duplex print If Auto Continue is selected form feed paper is printed after a set interval See System p 111 System Printing from a Selected Tray If the printer does not have a tray for the selected paper size or paper type or if the selected paper loaded in the printer has run out a caution message appears If this message appears...

Page 277: ...int job may be cut short or other problems may occur Canceling a Print Job Follow this procedure for canceling the print job if the message prompting form feed appears 1 Press JobReset 2 Press Current The confirmation message appears To resume printing jobs press Resume 3 Press Yes to cancel the print job Press No to return to the previous display 2 Printing Documents 68 2 ...

Page 278: ...g for print data is displayed on the control panel After the interval set in I O Timeout in Host Interface has passed the next print job can be sent A print job sent from a different client computer will not be canceled in this case You cannot stop printing data that has already been processed For this reason printing may continue for a few pages after you press the Job Reset key p 97 Canceling a ...

Page 279: ...Printing cannot be performed Setting Spool Printing Spool Printing can be set using telnet or Web Image Monitor Using Web Image Monitor For details see Network and System Settings Guide or Help for more information Using telnet Type in spoolsw spool on to set Spool Printing For details see Network and System Settings Guide for more information about telnet Viewing Deleting spool jobs in Web Image ...

Page 280: ...s Classification Code Based Process example BJF013S 1 Divisions sections departments project teams users etc to be managed 2 The appropriate classification code for the print job is entered For details see Specifying Classification Code for Print Job 3 The job is printed When printing in an environment where classification codes are required print jobs that do not have a classification code cannot...

Page 281: ...ed for Classification Code in the Common Settings for All Logs column If Required is selected for the classification code requirement setting in Web Image Monitor any print job that without a classification code specified will not be printed 6 Click OK 7 Click Logout 8 Quit Web Image Monitor Specifying the Classification Code for a Print Job When printing in an environment where classification cod...

Page 282: ...ode box This code identifies the user The classification code can contain up to 32 alphanumeric a z A Z 0 9 characters 4 Make any other necessary print settings and then click OK 5 A confirmation message appears Read it and then click OK 6 Execute the print command 7 The print job is sent to the printer The specified classification code is stored in the printer driver To switch between different c...

Page 283: ...2 Printing Documents 74 2 ...

Page 284: ...ess to cancel the current print job If you press it when the machine is offline and Hex Dump is selected Hex Dump is canceled 3 Prt Jobs Displayed when the hard disk is connected Press to display print jobs sent from a computer 4 Menu Press to display the menu to select the following options Form Feed Prints all the data left in the machine s input buffer Show Error Log Displays the error logs of ...

Page 285: ...n operation or return to the previous display 4 Selection keys Correspond to items at the bottom line on the display Example initial printer display When the instruction press JobReset appears in this manual press the left selection key When the instruction press Prt Jobs appears in this manual press the center selection key When the instruction press Menu appears in this manual press the right se...

Page 286: ...screen When the printer is turned on the following screen appears if an optional hard disk is installed in the printer If you press Prt Jobs on the initial screen a screen prompting to select the type of print job appears After selecting a type you can select print files in the list by pressing Job List Displays the Job List screen User ID Displays the User ID screen If you select Sample Print Loc...

Page 287: ... of a file if a password is set To change the password of a Locked Stored Print job press Change enter the current password and then enter the new password on the confirmation screen To clear the password press Change leave the entering confirming a new password box blank and then press the OK key You can also set passwords to the Stored Print files that do not currently have passwords 6 Delete De...

Page 288: ...by the user whose user ID has been selected 5 Job List Switches the screen to the Job List screen Displays the print jobs of the selected user only To cancel selecting a file press JobReset The display is not updated if a new file is stored while the list of stored files is displayed To update the display press the Escape key to return to the initial screen and then press Prt Jobs again If a large...

Page 289: ... it is not selected before sending a print job By default Sample Print jobs are automatically collated by the printer driver If a collate option is selected from the application s Print dialog box more prints than intended may be produced If the first set of the Sample Print files is not as you expected and you do not want to print remaining sets delete the Sample Print file using the display pane...

Page 290: ...es The printer properties dialog box appears 3 In the Job Type list click Sample Print 4 Click Details and then enter a user ID in the User ID box This is used to identify the user The user ID can be entered using up to eight alphanumeric a z A Z 0 9 characters 5 Execute a command to print Make sure to set more than two copies The Sample Print job is sent to the printer and the first set is printe...

Page 291: ... when User ID is pressed in step 7 the changed quantity is applied to all selected files When printing is completed the stored file will be deleted To stop printing after printing has started press JobReset The file will be deleted For details about User ID see Printing from the User ID Screen p 94 Printing from the User ID Screen Deleting Sample Print files If you are not satisfied with the sampl...

Page 292: ...sible to print data using the display panel once it is stored in this printer When using Locked Print it is not possible to print unless a password is entered on the printer s display panel Your confidential documents will be safe from being viewed by other people A Locked Print file cannot be stored if the hard disk is not installed in the printer the total number of Sample Print Locked Print Hol...

Page 293: ...those Locked Print files For details about the error log on the display panel see Checking the Error Log For details about Auto Delete Temporary Jobs or Auto Delete Stored Jobs see System p 99 Checking the Error Log p 111 System Printing a Locked Print file The following procedure describes how to print a Locked Print file with the PCL 6 5e or PostScript 3 printer driver For information about how ...

Page 294: ...hen press the OK key The print confirmation screen appears A confirmation screen will appear if the password is not entered correctly Press Clear to enter the password again If you forget your password contact your administrator for help 7 Press Print The remaining sets are printed Press Cancel to cancel printing When printing is completed the stored file will be deleted To stop printing after pri...

Page 295: ...e using the or key and then press Delete The password screen appears 4 Enter the password using the number keys and then press the OK key The delete confirmation screen appears A confirmation screen will appear if the password is not entered correctly Press Clear to enter the password again If you forget your password contact your administrator for help 5 Press Delete The selected file is deleted ...

Page 296: ...y collated by the printer driver If a collate option is selected from the application s Print dialog box more prints than intended may be produced Hold Print files printed or deleted using Web Image Monitor after you select Hold Print using the control panel will appear on the display panel However an error message will appear if you try to print or delete those Hold Print files If stored files ha...

Page 297: ... Click Details and then enter a User ID in the User ID box You can also set a file name The file name you set will be displayed on the printer s Job List screen 3 Start printing from the application s Print dialog box The Hold Print job is sent to the printer and stored 4 On the printer s control panel press Prt Jobs 5 Select Hold Print Jobs using the or key and then press Job List A list of Hold ...

Page 298: ... Web Image Monitor For details see Web Image Monitor Help For details about User ID see Printing from the User ID Screen p 94 Printing from the User ID Screen Deleting Hold Print files 1 Press Prt Jobs 2 Select Hold Print Jobs using the or key and then press Job List A list of Hold Print files stored in the printer appears Depending on the security settings certain print jobs may not be displayed ...

Page 299: ...plied first If the application has a collate option make sure it is not selected before sending a print job By default Stored Print jobs are automatically collated by the printer driver If a collate option is selected from the application s Print dialog box more prints than intended may be produced Stored Print files printed or deleted using Web Image Monitor after you select Stored Print using th...

Page 300: ...el Store and Print Prints the file at once and also stores the file in the printer For details about configuring the printer drivers see the relevant Help files 2 Click Details and then enter a User ID in the User ID box You can also set a password The same password must be entered when printing or deleting You can also set a file name The file name you set will be displayed on the printer s Job L...

Page 301: ...essed in step 5 the changed quantity is applied to all selected files To stop printing after printing has started press JobReset A Stored Print file is not deleted even if JobReset is pressed The Stored Print file that sent to the printer is not deleted unless you delete a file or select Auto Delete Stored Jobs You can set or delete a password after sending files to the printer Select the file and...

Page 302: ...t jobs may not be displayed 3 Select the file you want to delete using the or key and then press Delete The delete confirmation screen will appear If you set the password in the printer driver enter the password to delete If you forget your password contact your administrator for help 4 Press Delete The selected file is deleted If you do not want to delete the file press Cancel Printing from the P...

Page 303: ...f user IDs whose files are stored in the printer appears 3 Select the user ID whose file you want to print using the or key and then press Job List The print job list of the selected user ID appears 4 Select the file you want to print using the or key and then press Print The confirmation screen appears 5 Press Print The selected file is printed Press Cancel to cancel printing 3 Printing Stored Do...

Page 304: ...using the or key and then press PrintAll The confirmation screen appears 4 Press Print The selected files are printed To cancel printing press Cancel If you print a Sample Locked or Hold Print file the print file saved in the printer is deleted after printing is completed You cannot select a print job that is not stored under the selected user ID When printing multiple Sample Print files without s...

Page 305: ...t specified on the computer is applied for every selected document If you select Locked Print Jobs enter the correct password If there are multiple passwords the printer prints only files that correspond to the entered password If you select Stored Print files and some of these require a password the printer prints files that correspond to the entered password and files that do not require a passw...

Page 306: ... To resume printing jobs press Resume 3 Press Yes to cancel the print job Press No to return to the previous display Windows Canceling a Print Job from the computer You can cancel a print job from the computer if transferring print jobs is not completed 1 Double click the printer icon on the Windows task tray A window appears showing all print jobs currently queued for printing Check the current s...

Page 307: ...indow appears showing all print jobs that are currently queuing to be printed Check the current status of the job you want to cancel Under Mac OS X start Print Center 2 Select the name of the job you want to cancel 3 Click the pause icon and then click the trash icon If the printer is shared by multiple computers be careful not to accidentally cancel someone else s print job If the printer is conn...

Page 308: ...rint jobs it is not deleted Instead it will be stored separately in error logs for each job type up to a maximum of 30 for each log You can check any of these print jobs for error log information If the main power switch is turned off the error log is deleted 1 Press Menu 2 Press the or key to select Error Log and then press the OK key 3 Select a type of print jobs using or key and then press the ...

Page 309: ... To print files that appear in the error log resend them after stored files have been printed or deleted 3 Printing Stored Documents 100 3 ...

Page 310: ...reated using PDF version 1 6 watermark note functions or extended optional contents cannot be printed PDF version 1 7 Acrobat 8 0 files created without any functions that are exclusive to PDF version 1 7 can be printed Paper size errors may occur when printing on custom size paper Printing Method There are the two methods of printing the PDF files directly either using the DeskTopBinder Lite or en...

Page 311: ...pecify and then enter the IP address or host name of the printer 5 Click OK The PDF Direct Print Properties dialog box closes 6 Click Next repeatedly until Finish appears 7 Click Finish Function Palette The Function palette contains buttons for functions that are already configured through DeskTopBinder Lite enhancement Using these buttons you can print Windows files preview printouts convert imag...

Page 312: ...nd drop it there The Output File List PDF Direct Print dialog box appears 2 Highlight the PDF file you want to print and then click OK The PDF file is printed PDF Direct Print Properties BRP007S 1 2 3 4 5 6 7 8 9 10 15 11 12 13 14 1 Setting name Displays the plug in configuration name up to 63 single byte characters 2 Change Icon Changes the icon displayed on the tool bar 3 Printer Displays printe...

Page 313: ...ber of copies to print 11 Collate Sorts printed sheets 12 Range Specify which paper to print 13 Printout paper size Specify the paper size you want copies to be printed onto 14 Color Black and White not supported for this printer Specify color or black and white printing 15 Resolution Specify a print resolution Using Commands You can print PDF files directly using commands such as ftp sftp and lpr...

Page 314: ...shed Any changes you make with User Tools remain in effect even if the main power switch or operation switch is turned off or the Energy Saver or Clear Modes key is pressed Changing Default Settings This section describes how to change the settings of User Tools If Administrator Authentication Management is specified contact your administrator 1 Press the User Tools Counter key BRP005S 2 Press Pri...

Page 315: ... Protect Using Menu Protect you can prevent unauthenticated users from changing the user tools Menu Protect can be specified for each of the following user tools menus Copier Features Fax Features Printer Features Scanner Features For details consult your administrator 5 Printer Features 106 5 ...

Page 316: ... You can check any of these print jobs for error log information Sample Print Locked Print Hold Print Stored Print The records of Auto Job Cancel and jobs canceled manually from the control panel can be printed Menu List You can print a Menu List showing the machine s function menus PCL Config Font Page You can print the current configuration and installed PCL font list PS Config Font Page You can...

Page 317: ...tal Memory Displays the total amount of memory SDRAM installed on the printer Firmware Version Printer Displays the version number of the printer firmware System Displays the version number of the system firmware Engine Displays the version number of the printer engine LCDC Displays the version number of the panel display NIB Displays the version number of the Network interface Device Connection T...

Page 318: ... Displays settings made under PCL Menu PS Menu Displays settings made under PS Menu PDF Menu Displays settings made under PDF Menu Host Interface Displays settings made under the Host Interface menu When DHCP is active on the network the actual IPv4 address subnet mask and gateway address appear in parentheses on the configuration page Interface Information Displays the interface information p 105...

Page 319: ... this setting specify protection level The default setting is Level 2 List Test Print Lock You can lock the List Test Print menu The default setting is Off Delete All Temporary Jobs You can delete all print jobs temporarily stored in the machine Delete All Stored Jobs You can delete all print jobs stored in the machine p 105 Accessing User Tools 5 Printer Features 110 5 ...

Page 320: ...Off Auto Delete Temporary Jobs You can select to automatically delete print jobs temporarily stored in the machine The default setting is Off If you select On you can set up to 200 hours for auto file deleting Auto Delete Stored Jobs You can select to automatically delete print jobs stored in the machine The default setting is On 3 day s If you select On you can set up to 180 days for auto file de...

Page 321: ...area There are only blank characters Edge Smoothing Set this to enable Edge Smoothing The default setting is On If Toner Saving is set to On Edge Smoothing is ignored even if it is set to On Toner Saving Set this to enable Toner Saving The default setting is Off Printer Language Specify the printer language The default setting is Auto Sub Paper Size You can enable the Auto Substitute Paper Size A4...

Page 322: ...r Printer Driver Command or Machine Settings has priority for determining the paper size for the bypass tray The default setting is Driver Command Edge to Edge Print You can select whether or not to print on the entire sheet The default setting is Off Default Printer Lang You can set the default printer language if the machine cannot find the printer language automatically The default setting is P...

Page 323: ...n set to On Auto Tray Switching is enabled and the Auto Tray Switching setting configured in the printer driver is overridden The default setting is Off p 105 Accessing User Tools 5 Printer Features 114 5 ...

Page 324: ...lly it is not necessary to change this setting The default setting is 128 KB I O Timeout You can set how many seconds the machine should wait before ending a print job If data from another port usually arrives in the middle of a print job you should increase this timeout period The default setting is 15 seconds p 105 Accessing User Tools Host Interface 115 5 ...

Page 325: ...efault font you want to use When Resident is selected under Font Source The font number can be specified from 0 to 63 by increments of one The default setting is 0 When RAM HDD or SD is selected under Font Source The font number can be specified from 1 up to number of fonts stored on the machine The default setting is 1 Point Size You can set the point size you want to use for the selected font Th...

Page 326: ...5 ISO 17 ISO 21 ISO 60 ISO 69 Win 3 0 The default setting is PC 8 Courier Font You can select a courier font type The default setting is Regular Ext A4 Width You can extend the printing area width when printing on A4 sheet with PCL The default setting is Off When the setting is On the width will be 81 2 inches Append CR to LF When set to On a carriage return will follow each line feed CR CR LF CR ...

Page 327: ...etween 0 and 999 The default setting is 300 When set to 0 the print job will not be canceled when the end of the job cannot be detected Data Format You can select a data format The default setting is TBCP This setting is not effective when operating the machine with a parallel or EtherTalk connection When operating the machine with a parallel connection and also if the binary data is sent from the...

Page 328: ...The Default setting is On p 105 Accessing User Tools PS Menu 119 5 ...

Page 329: ... password already specified with DeskTopBinder Current Password New Password Confirm Password A password can be set using Web Image Monitor but in this case the password information is sent through the network If security is a priority set the password using this menu from the Control Panel Reverse Order Print When set to On printing starts from the last page of document The default setting is Off...

Page 330: ...ter protocols are available TCP IP Unspecified Normal TCP IP DIPRINT TCP IP RHPP AppleTalk and NetWare 1 Log on to Web Image Monitor as an administrator For details about login user names and passwords see Using Web Image Monitor Network and System Settings Guide 2 Inthemenuarea click Configuration andthenclick VirtualPrinterSettings inthe Printer category A list of the available virtual printers ...

Page 331: ...er configuration see Web Image Monitor Help Confirming a Virtual Printer Configuration Use this procedure to confirm a virtual printer configuration 1 Start Web Image Monitor For details about login user names and passwords see Using Web Image Monitor Network and System Settings Guide 2 Inthemenuarea click Configuration andthenclick VirtualPrinterSettings inthe Printer category A list of available...

Page 332: ... appears 4 Click OK You cannot delete this printer s default virtual printer Delete appears only if you have already added a virtual printer Printing Using a Virtual Printer To print directly from a specified virtual printer assign the virtual printer in the print command Before printing for the first time specify the virtual printer you want to use 1 Log on to Web Image Monitor in administrator m...

Page 333: ...rcp c rcp b path file name path name file name printer s host name Virtual Printer Name ftp ftp put path file name Virtual Printer Name 6 Appendix 124 6 ...

Page 334: ... T USB 2 0 Type A B Optional Giga Ethernet interface 1000BASE T 100BASE TX 10BASE T IEEE 1284 parallel interface IEEE 802 11a b g wireless LAN interface Network protocol TCP IP IPv4 IPv6 IPX SPX AppleTalk Printer language Standard PCL 5e 6 Optional PostScript 3 PDF Fonts PCL 5e 6 45 Intellifonts 13 International fonts PostScript 3 136 fonts Type 2 24 Type 14 112 Memory 640 MB Hard disk Optional 80...

Page 335: ...003 R2 2008 Optional Mac OS 8 6 or later Mac OS X 10 1 or later When using Mac OS use only the standard USB Interface The optional USB interface board is not supported When using Mac OS the USB interface is supported only under Mac OS 9 or later When using the USB Interface Standard with Mac OS 10 3 3 or later USB2 0 is supported 6 Appendix 126 6 ...

Page 336: ...ademarks or trademarks of Novell Inc PCL is a registered trademark of Hewlett Packard Company UNIX is a registered trademark of The Open Group Other product names used herein are for identification purposes only and might be trademarks of their respective companies We disclaim any and all right to those marks The proper names of the Windows operating systems are as follows The product names of Win...

Page 337: ...ct names of Windows Server 2003 R2 are as follows Microsoft Windows Server 2003 R2 Standard Edition Microsoft Windows Server 2003 R2 Enterprise Edition Microsoft Windows Server 2003 R2 Datacenter Edition The product names of Windows Server 2008 are as follows Microsoft Windows Server 2008 Standard Microsoft Windows Server 2008 Enterprise Microsoft Windows Server 2008 Datacenter 6 Appendix 128 6 ...

Page 338: ...bining multiple pages into single page 60 Config page 107 Confirming the connection method 11 Copies 112 Copy Reference 5 Courier font 117 D Data format 118 Default printer lang 113 Delete all stored jobs 110 Delete all temporary jobs 110 DeskTopBinder Lite 101 Enhancements 102 Function palette 102 Install 101 Display 75 Downloading the printer driver 14 Duplex 111 E Edge smoothing 112 Edge to edg...

Page 339: ... PageMaker 38 Parallel connection 33 PCL 14 PCL config font page 107 PCL menu 116 PDF config font page 107 PDF direct print 101 103 PDF Direct Print PDF direct print properties 103 using commands 104 PDF group password 120 PDF menu 120 Point size 116 PostScript 3 14 PostScript 3 Supplement 5 Print compressed data 111 Print error report 111 Print job function 77 Print job screen 77 Printer driver 1...

Page 340: ...ving 112 Trademarks 127 Tray switching 113 Trouble Shooting 5 Types of combined printing 61 Types of duplex printing 60 U USB connection 30 User ID 94 Using one click presets 63 V Virtual printer 121 Adding 121 Changing 122 Confirming 122 Deleting 123 Printing 123 W Wait timeout 118 Web Image Monitor 72 Windows 2000 30 Windows printing port 11 Windows Server 2003 30 Windows Server 2003 R2 30 Windo...

Page 341: ...MEMO 132 GB GB EN USA AE AE D468 ...

Page 342: ...Copyright 2008 ...

Page 343: ...Operating Instructions Printer Reference D468 6701 EN USA ...

Page 344: ...ected item and to proceed to the next display How to fax via a network 1 Transmission 5 Fax via Computer Internet Fax This machine converts scanned document images to e mail format and transmits the data over the Internet Press to display in the destination display column Specify the e mail address as a destination IP Fax The IP Fax function sends or receives documents between two facsimiles direc...

Page 345: ...ia Computer Fax Features Appendix 1 2 3 4 5 6 7 Read this manual carefully before you use this machine and keep it handy for future reference For safe and correct use be sure to read the Safety Information in About This Machine before using the machine Facsimile Reference Operating Instructions ...

Page 346: ......

Page 347: ...ing Keys 14 1 Transmission Transmission Modes 17 Selecting Type of Transmission 18 Memory Transmission 19 Immediate Transmission 24 IP Fax Functions 27 Terminology 29 Notes on Using IP Fax 29 Functions Not Available for IP Fax Transmission 30 Internet Fax Functions 31 Notes on Using Internet Fax 32 Functions Not Available for Internet Fax Transmission 33 Functions Not Available for Internet Fax Re...

Page 348: ...egistering a Fax Destination 66 Changing a Fax Destination 68 Deleting a Fax Destination 71 Programming Destinations from Check Destination Screen 72 Programming Destinations from Redial Screen 73 Searching for a Destination in the Address Book 75 Search by Name 75 Search by Destination List 77 Search by Registration Number 79 Search by Fax Number 80 Search by E mail Address 82 Search by IP Fax De...

Page 349: ...odes for Transmission 112 Setting a Password 114 Setting SEP Codes for Reception 116 Entering a Password 118 SEP Code RX Reserve Report 118 SEP Code RX Result Report 118 Two Sided Transmission Double Sided Transmission 120 3 Reception Types of Reception 123 Immediate Reception 123 Memory Reception 124 Substitute Reception 124 Reception Modes 128 Auto Switch 128 Manual Reception 128 Auto Reception ...

Page 350: ...Memory Print TX Standby File List 151 Printing a File from Memory 153 Checking the Transmission Result TX File Status 155 Confirming on Display 155 Confirming by Report 156 Confirming by E mail 157 Confirming by Report and E mail 158 Communication Result Report Memory Transmission 158 Immediate TX Result Report Immediate Transmission 159 Communication Failure Report 159 Checking the Reception Resu...

Page 351: ... Fax Destination List 189 LAN Fax Operation Messages 191 Viewing Fax Information Using a Web Browser 192 Viewing Printing and Deleting Received Fax Documents Using Web Image Monitor 192 Programming Destination Information from Web Browser 194 6 Fax Features Accessing User Tools 197 Changing Default Settings 197 Quitting User Tools 198 General Settings Adjust 199 Reception Settings 201 E mail Setti...

Page 352: ... Parameter List 237 Changing the Home Position 238 Program Special Sender 241 Authorized Reception 242 Forwarding 243 Memory Lock 243 2 Sided Print 244 Programming Changing Special Senders 244 Programming Initial Set Up of a Special Sender 249 Deleting a Special Sender 250 Printing Special Sender List 251 7 Appendix Optional Equipment 253 Handset 253 Specifications 254 Specifications Required for ...

Page 353: ...e Fax Guide Quick Reference Printer Guide Quick Reference Scanner Guide Manuals for DeskTopBinder Lite DeskTopBinder Lite Setup Guide DeskTopBinder Introduction Guide Auto Document Link Guide Manuals provided are specific to machine types For UNIX Supplement please visit our Web site or consult an authorized dealer This manual includes descriptions of functions and settings that might not be avail...

Page 354: ...ges as a result of handling or operating the machine For good copy quality the supplier recommends that you use genuine toner from the supplier The supplier shall not be responsible for any damage or expense that might result from the use of parts other than genuine parts from the supplier with your office products 9 ...

Page 355: ... panel Indicates the names of keys on the machine s control panel Names of Major Functions This section tells you the names of this machine s major functions Internet Fax by specifying an e mail address Internet Fax Internet Fax by specifying an IP address IP Fax Notes Contents of this manual are subject to change without prior notice Two kinds of size notation are employed in this manual With thi...

Page 356: ...k from lightning Do not use a telephone in the vicinity of a gas leak to report the leak Use only the power cord and batteries indicated in this manual Do not dispose of batteries in a fire They may explode Check with local codes for possible special disposal instructions Save these instructions IMPORTANTES MESURES DE SÉCURITÉ Certaines mesures de sécurité doivent être prises pendant l utilisation...

Page 357: ...er that has the format US AAAEQ TXXXXX The digits represented by are the REN without a decimal point e g 03 is a REN of 0 3 5 If this equipment causes harm to the telephone network the telephone company will notify you in advance that temporary discontinuance of service may be required But if advance notice is not practical the telephone company will notify the customer as soon as possible Also yo...

Page 358: ...identificationofthebusinessorotherentity orotherindividualsendingthemessage and the telephone number of the sending machine or such business other entity or individual The telephone number provided may not be a 900 number or any other number for which charges exceed local or long distance transmission charges InordertoprogramthisinformationintoyourFAXmachine youshouldcompletethefollowingsteps Foll...

Page 359: ...to Reset Timer in System Settings The Fax Features menu includes a user parameter setting switch 17 bit 3 that enables you to configure the machine to return to standby mode whenever it finishes scanning an original see Parameter Settings To return to the standby screen manually do one of the following If you have placed the original in the Auto Document Feeder ADF and have not pressed the Start k...

Page 360: ... move the cursor to each direction one by one When or appears in this manual press the scroll key of the same direction BAM005S 1 Machine status and message 2 Destination entry 3 Selection keys 4 Switches the destination type between fax or IP Fax and Internet Fax To specify fax numbers or IP Fax destinations select To specify Internet Fax destinations e mail addresses select 5 Selectable items Th...

Page 361: ... p 203 E mail Settings p 205 IP Fax Settings 16 ...

Page 362: ...ent away with you You can also send the same original to several destinations For details about a broadcast and Parallel Memory Transmission see Parallel Memory Transmission and Broadcast sequence BBB013S Immediate Transmission Immediately dials the destination number and while scanning the original sends to it It is very convenient when you want to send an original quickly or when you want to che...

Page 363: ...ting sequence p 98 Setting Transmission Function Defaults Home Position Selecting Type of Transmission You can select the transmission type standard fax IP Fax or Internet Fax To select IP Fax destinations or Internet Fax destinations the Hard Disk Drive Option and printer scanner functions must be installed The display differs depending on whether or not the Hard Disk Drive Option and printer sca...

Page 364: ...Internet Fax and IP Fax If there is a power failure the main power switch is turned off or the machine is unplugged for about twelve hours all the documents stored in memory are deleted As soon as the main power switch is turned on the Power Failure Report is printed to help you check the list of deleted files Simply turning off the power by pressing the Operation switch does not delete stored doc...

Page 365: ...an settings see Scan Settings 4 Using the number keys or a Quick Dial key specify a destination If you make a mistake press the Clear Stop key and then enter the correct number 5 When sending the same original to several destinations broadcasting press Add Dest to specify the destinations You do not have to press Add Dest when adding a destination using the destination list 6 Specify the next dest...

Page 366: ...can specify per file Number of destinations you can specify for all files including files in memory p 41 Scan Settings p 58 Using the Quick Dial Keys p 258 Maximum Values Sending originals using the exposure glass Memory Transmission This section explains how to send originals by Memory Transmission using the exposure glass 1 Make sure that Memory Trans indicator lights 2 Place the first page of t...

Page 367: ...enyoustoreanoriginalforMemoryTransmissionwhileanothercommunicationisinprogress When two or more destinations are specified When an original is placed on the exposure glass and then sent You can turn this function on or off with the User Parameter switch 07 bit 2 in the Fax Features menu see Parameter Settings Standard Memory Transmission may be used instead of Parallel Memory Transmission if there...

Page 368: ...s specifythefirstdestination andthenspecifythenextdestinationbypressing Add Dest If you dial several destinations for the same document broadcasting the documents are sent in the order in which they were dialed If the fax document could not be transmitted the machine redials that destination after the last destination specified for broadcasting For example if you specify four destinations A throug...

Page 369: ...original If you run out of memory while storing an original free space reaches 0 scanning will be stopped If this happens the Memory is full Scanning will be stopped and only scanned page s will be stored message appears Press Exit to transmit stored pages only When this happens only the scanned pages are sent If you want to delete the scanned pages and cancel transmission in this case contact you...

Page 370: ...he mode switches to Memory Transmission If you try to select Immediate Transmission after specifying multiple destinations or a group the Dest and functions that could not be specified on immediate transmission is already selected message appears When this happens press Exit 1 Make sure that Memory Trans indicator is not lit BRJ024S If it is lit Memory Transmission mode is selected Press the Memor...

Page 371: ...ls by Immediate Transmission using the exposure glass 1 Make sure that Memory Trans indicator is not lit 2 Place the first page face down on the exposure glass 3 Specify a destination 4 Make the scan settings you require 5 Press the Start key The machine dials the destination 6 Place the next original on the exposure glass within 10 seconds when you send multiple originals and then repeat steps 4 ...

Page 372: ...ad of a fax number for sending When using a gatekeeper specify an alias telephone number When using a SIP server you can send by specifying SIP user name Specify addresses of the gatekeeper or SIP server proxy server registrar server redirect server as appropriate under H 323 Settings SIP Settings or Gateway Settings in the Fax Features menu You can also transmit to a G3 facsimile connected to the...

Page 373: ...ettings correctly specified under IP Fax Settings in Fax Features For details about these settings see IP Fax Settings Before using this function configure the network in the System Settings menu For details about the required settings see Connecting the Machine Network and System Settings Guide IP Fax supported by this machine is ITU T Recommendation T 38 compliant 1 Transmission 28 1 ...

Page 374: ...onnected to an IP network and converts alias telephone numbers to IP addresses and performs authentication functions In addition a gatekeeper governs band transmission rate assignment and access control SIP server A SIP server mediates connection requests between devices connected to an IP network and is composed mainly of servers that have the following three functions Proxy server Receives SIP r...

Page 375: ...er Failure Report is printed to help you check the list of deleted files Simply turning off the power by pressing the operation switch does not delete stored documents See Turning Off the Main Power In the Event of Power Failure Troubleshooting Functions Not Available for IP Fax Transmission This section tells you which functions are not available for IP Fax transmission You can use the following ...

Page 376: ...ions this machine must be connected to a LAN and set up correctly under System Settings For details about the required settings see Connecting the Machine Network and System Settings Guide To send Internet Fax documents in the Fax Features menu under E mail Settings set Internet Fax Settings to On However documents can still be forwarded or delivered to Internet Fax destinations even if Off is sel...

Page 377: ... the specified user code a Communication Result Report is sent after the transmission is completed This makes it possible to verify the result of a transmission The CC function is disabled This function supports both IPv4 and IPv6 addresses p 56 Bypassing the SMTP server p 104 E mail Options p 134 Received images p 155 Checking the Transmission Result TX File Status p 203 E mail Settings Notes on ...

Page 378: ...Power Failure Troubleshooting You may not be able to send large files as e mail depending on e mail environment conditions When available memory is low you may not be able to send Internet Fax documents Because the machine sends documents as e mail messages with an attached TIFF F image viewer applications are required in order to view documents when they are received on a computer With a large vo...

Page 379: ...singtheStampSenderName function see Sender Settings When Stamp Sender Name is set to on From Sender Name Fax Message NO xxxx When Stamp Sender Name is set to off If Own Fax Number and Own Name are programmed From Own Fax Number Own Name Fax Message NO xxxx If only Own Fax Number is programmed From Own Fax Number Fax Message NO xxxx If only Own Name is programmed From Own Name Fax Message NO xxxx I...

Page 380: ...tion capability is updated each time the sender receives new reception capability information The sender can send documents to the receiver based on this information If the receiver is programmed as the simple mode machine or not programmed in the Address Book the receiver s reception capability cannot be registered If you know the receiver s reception capability you can set it manually Requesting...

Page 381: ... in the ADF See Placing Originals in the ADF in Placing Originals Copy Reference Do not lift the ADF while using it to scan originals How to place A4 B5 JIS Japanese Industrial Standard A5 51 2 81 2 81 2 11 and 81 2 14 size originals BKQ004S How to place A5 and 51 2 81 2 size originals BKQ005S Originals that are clipped or creased cannot be scanned using the ADF For details about originals that ar...

Page 382: ...etely dried before placing your original If it is still wet the exposure glass will become marked and those marks will appear on the received image You can send the first page from the exposure glass then the remaining pages from the ADF You cannot change from the ADF to the exposure glass When using the Internet Fax function originals are sent at A4 size Originals larger than A4 are reduced to A4...

Page 383: ...original is correctly placed on the exposure glass or in the ADF a margin of 3 mm 0 1 inch around each edge of the original may not be sent If the receiver uses paper of a smaller width than the original the image is reduced to fit that paper Originals placed face down on the exposure glass are scanned at A4 81 2 11 To scan originals at 81 2 14 change the paper size setting with User Parameters sw...

Page 384: ...smission 216 1200 mm 81 2 47 inches W L BRJ018S During Immediate Transmission the length of the scanning range can decrease to less than 1200 mm 47 inches depending on the resolution of the image and the configuration of the receiving machine Detecting Blank Sheet Upon completion of the first page scanning an alarm sounds if the page is nearly blank The blank sheet detecting function works only wh...

Page 385: ...When sending a document using Immediate Transmission or when all pages have been scanned in Memory Transmission When some pages are left unscanned in Parallel Memory Transmission or Memory Transmission Even if a near blank sheet is detected it is transmitted as normal You can turn this function on or off with the User Parameter switch 11 bit 2 in the Fax Features menu See Parameter Settings To can...

Page 386: ... Density five levels Original Type To optimize image clarity select the appropriate original type The following settings for original types are available Text Select Text to send high contrast black and white image originals Use this setting when you only want to send clearer text even if the original contains text and photographs Photo SelectPhototosendanoriginal containingahalftone image suchasa...

Page 387: ...unction Resolution Specify the resolution according to the size of the text on the original Images and text are scanned into the machine by converting them to a sequence of dots The density of the dots determines the quality of the image and how long it takes to transmit Therefore images scanned at high resolution have high quality but transmission takes longer Conversely low resolution scanning r...

Page 388: ...ard and Detail resolution You can set the resolution type that is selected right after the machine is turned on or whenever the Clear Modes key is pressed See Setting Transmission Function Defaults Home Position When using Internet Fax transmission documents are sent at Detail resolution even if you have specified Fine To send a document at Fine configure the Full Mode when registering the destina...

Page 389: ...8 Setting Transmission Function Defaults Home Position Mixing Scan Settings for a Multiple Page Original When sending an original of several pages you can select a different scan setting for each page It is recommended that originals be placed on the exposure glass when mixing scan settings for a multiple page original If you are using the ADF do not change the Resolution setting while originals a...

Page 390: ...ning is shown on the display Adjust the settings for each page before you press the Start key When placing originals in the ADF 1 Check which pages you want to scan with different settings 2 Make the scan settings before the page you want to change the settings for starts being scanned Depending on what time the scan settings are adjusted the settings may not be reflected in the resulting operatio...

Page 391: ...on the right side of the control panel to enter numbers 1 Press to display 2 Enter the fax number using the number keys If you make a mistake press the Clear Stop key and then enter again When adding a destination pressing switches the destination type between and 3 Press the Start key The machine starts to scan the original and stores it in memory When scanning ends the Communicating indicator li...

Page 392: ...e first digit the Redial screen appears A pause is shown as a on the display You can also program numbers including pauses in the destination list Entering a tone This function allows a machine connected to a pulse dialing line to send tonal signals for example if you want to use a special service on a tone dialing line When you press Tone the machine dials the number using tonal signals This sect...

Page 393: ...5 Press the Start key Transmission starts If you want to cancel a transmission press the Clear Stop key and then remove the originals After transmission the standby display appears Certain services may be unavailable even when using the Tone function A tone is shown as a T on the display and the next numbers are dialed using tonal signals 1 Transmission 48 1 ...

Page 394: ...t in the Fax Features menu configure the IP Fax Settings as follows For details about IP Fax Settings see IP Fax Settings If you are using a gatekeeper server set Enable H 323 to On and configure the gatekeeper settings under H 323 Settings If you are using a SIP server set Enable SIP to On and configure the SIP server settings under SIP Settings 1 Press TX Mode 2 Select Select Line using or and t...

Page 395: ... key press EditDest re enter an IP Fax destination and then press the OK key 7 To add a destination press Add Dest 8 Specify the next destination To add another destination repeat steps 7 and 8 Pressing switches the destination type between and 9 Press the Start key The machine starts to scan the original and stores it in memory When scanning ends the Communicating indicator lights and transmissio...

Page 396: ...a destination key This prevents users accidentally sending documents to the wrong destination See Parameter Settings You can program one of the User Function keys with operations for Select Line User Function keys allow you to omit steps 1 2 and 4 For details about the User Function keys see General Settings Adjust For the maximum number of digits for a destination see Maximum Values p 51 When usi...

Page 397: ...8 specify 5678 To send from an IP Fax to G3 fax without using gatekeeper or SIP server you must register the gateway also An alias telephone number is a number that is registered in the gatekeeper and is available only in the network to which the gatekeeper is connected Pay attention to the number of telephone number digits set in the gateway IP address conversion table to avoid transmission error...

Page 398: ... configuration you may need to specify the host name and port number of the receiving machine For example if the receiver s host name is IPFAX1 and the port number is 2100 specify IPFAX1 2100 Ask the network administrator for details Sending to an E mail Address This section explains how to specify an e mail address as a destination When using Internet Fax transmission specify the e mail address i...

Page 399: ...en this happens press Exit 1 Press to display 2 Press Manual 3 Enter the e mail address destination and then press the OK key If you enter an incorrect character press the Clear Stop key Then re enter the characters correctly To change the e mail address after pressing the OK key press EditDest re enter an e mail address and then press the OK key 4 To add a destination press Add Dest 1 Transmissio...

Page 400: ...ser to press Add Dest whenever s he specifies a destination using a destination key This prevents users accidentally sending documents to the wrong destination See Parameter Settings For the maximum number of digits that can be included in a destination see Maximum Values When the sender is specified the transmission result etc is sent to the sender s e mail address If Auto Specify Sender Name is ...

Page 401: ... specify the IP address at the domain part of the e mail address TosendadocumentoveranIPv6network youmustspecifytheotherparty shostname notIPaddress as the domain part To use this function the other party s fax machine must be compatible with Internet Fax be connected to the same LAN as this machine have its reception protocol set to SMTP SMTP authentication set on the other party s fax machine is...

Page 402: ...o the other party s IP address xxxx the other party s IP address For example if the other party s e mail address is abc defcompany com and the IP address is 192 168 1 10 abc 192 168 1 10 Use the following procedure to bypass the SMTP server 1 Press TX Mode 2 Select Send via SMTP Server using or and then press the OK key 3 Select On or Off using or and then press the OK key 4 Press the Escape key T...

Page 403: ... When sending with the Use device address check box selected the SMTP server setting specified on this machine is enabled p 199 General Settings Adjust Using the Quick Dial Keys You can specify a destination simply by pressing the Quick Dial key to which the destination s number is registered When a Quick Dial key is pressed the destination it is registered to appears on the screen Pressing switch...

Page 404: ... see System Settings Network and System Settings Guide You do not have to press Add Dest when adding the same type of destination as you specified in step 1 using the Quick Dial keys Specifying a group of destinations using the Quick Dial key If you program multiple destinations into a group you can send documents to all destinations in that group using just a few keystrokes Destinations programme...

Page 405: ...re destinations repeat steps 1 and 2 When you add destinations if you switch the destination type between and press Add Dest and then repeat steps 1 and 2 3 Press the Start key To view which destinations are registered in a group print the group list using the Address Book Print List function under System Settings For details about the printing method see System Settings Network and System Setting...

Page 406: ...g or 4 Press the OK key when confirmation is complete The display returns to that of step 1 If you specified a group using the Quick Dial keys the group icon appears to the left of the destination name by pressing the Check Destination key When you specify a destination using the number keys Program appears on the screen by pressing the Check Destination key Press Program to register a selected de...

Page 407: ... dialed using the optional handset or the external telephone Destinations dialed by Redial regarded as already stored in memory Second and later destinations broadcasted to Destinations specified in the LAN Fax Driver on the computer To redial a fax number do not dial any numbers before you press the Pause Redial key If you press the Pause Redial key after entering numbers using the number keys a ...

Page 408: ...on If you want to prevent documents being sent to the wrong destination you can configure the machine to prompt users twice for the destination or to display the entered destination prior to transmission Re entering a fax number to confirm destination Enter the fax number again to confirm the destination is correct Transmission is disabled if the confirmation fax number does not match the first fa...

Page 409: ... want to specify the number of times that the fax number must be dialed contact your service representative Step 3 must be repeated as many times as is set here 1 to 15 You cannot edit the first fax number that is entered Displaying the destination prior to transmission To prevent documents being sent to the wrong destination you can configure the machine to display the destination again after it ...

Page 410: ...he number again 2 Press the Start key Displays the destination and the transmission settings To change the destination press the Escape key and then specify the destination again 3 Press the Start key again Transmission starts After transmission the standby display appears Specifying a Destination 65 1 ...

Page 411: ...acsimile initial display if you change the contents of the Address Book the Settings have been updated The selected dest functions have been cancelled message appears Press Exit to bring back the facsimile initial display You can register destinations in the Address Book using Web Image Monitor or SmartDeviceMonitor for Admin For details about installation or operation of them see Monitoring and C...

Page 412: ...using or and then press the OK key 6 Enter the registration number you want to program using the number keys or the Quick Dial keys and then press the OK key To specify a destination using a Quick Dial key press a registration number from 001 to 016 7 Enter the name and then press the OK key 8 Press Details Programming Destinations in the Address Book 67 1 ...

Page 413: ... enable this function when the faxes you send are printed at the receiver s end the receiver s name is also printed After changing the settings press Exit and then press the OK key 12 Press End 13 Press the OK key 14 Press the User Tools Counter key For details about the procedure in step 11 see Registering Addresses and Users for Facsimile Scanner Functions Network and System Settings Guide Chang...

Page 414: ...ng or and then press the OK key 3 Select Administrator Tools using or and then press the OK key 4 Select Address Book Management using or and then press the OK key 5 Select Program Change using or and then press the OK key Programming Destinations in the Address Book 69 1 ...

Page 415: ...tration number from 001 to 016 7 Enter the new name and then press the OK key 8 Press Details 9 Select Fax Settings using or and then press the OK key 10 Enter the new fax number using the number keys 11 Press Option and then change the settings of SUB Code SEP Code and Label Insertion as necessary After changing the settings press Exit and then press the OK key 1 Transmission 70 1 ...

Page 416: ... and Users for Facsimile Scanner Functions Network and System Settings Guide Deleting a Fax Destination This section explains how to delete destination information from the Address Book 1 Press the User Tools Counter key BRJ032S 2 Select System Settings using or and then press the OK key Programming Destinations in the Address Book 71 1 ...

Page 417: ...g the number keys or the Quick Dial keys and then press the OK key To specify a destination using a Quick Dial key press a registration number from 001 to 016 7 Press Yes 8 Press the User Tools Counter key Programming Destinations from Check Destination Screen This section explains how to register a directly entered fax number e mail address or IP Fax destination to the Address Book using the Chec...

Page 418: ...s the OK key The screen returns to that of step 1 Depending on the security settings Program might not appear and you might not be able to register the destination p 60 Checking the Specified Destination Programming Destinations from Redial Screen This section explains how to register a directly entered fax number e mail address or IP Fax destination to the Address Book using the Redial screen If ...

Page 419: ... for Facsimile Scanner Functions Network and System Settings Guide 3 Make the settings and then press the OK key The screen returns to that of step 1 Depending on the security settings Program might not appear and you might not be able to register the destination p 62 Redial 1 Transmission 74 1 ...

Page 420: ...ers A warning message appears if the search returns more than the maximum number of destinations you can search for at a time Press Exit and change the destination name to view fewer destinations For the maximum number of destinations you can search at a time see Maximum Values p 258 Maximum Values Search by Name This section explains how to search for a destination registered in the Address Book ...

Page 421: ... to search for and then press the OK key Depending on the type of characters to enter press the Shift key to switch the mode If you enter the wrong destination name before pressing the OK key press the Clear Stop key and then enter the correct destination name 6 Check the characters you have entered are correct and then press the OK key When the search is finished the results appear 1 Transmission...

Page 422: ...lready been programmed message appears Press Exit to return to the standby screen Press Add Dest to specify other destinations For details about text entry see Entering Text About This Machine Search by Destination List This section explains how to search for a destination registered in the Address Book using the destination list If LDAP Search is set to Off in Administrator Tools in the System Se...

Page 423: ...mber order 5 Select a destination using or and then press to specify it put a tick against it Multiple destinations can be selected Press to deselect a destination 6 Press the OK key You cannot specify destinations twice If you try the This destination has already been programmed message appears Press Exit to return to the standby screen Press Add Dest to specify other destinations 1 Transmission ...

Page 424: ...Tools in the System Settings menu the display for selecting either Search Address Book or Search LDAP does not appear 1 Press to switch the destination type between and 2 Press the Search Destination key BRJ033S 3 Select Search Address Book using or and then press the OK key 4 Select Search by Registration No using or and then press the OK key Searching for a Destination in the Address Book 79 1 ...

Page 425: ... try the This destination has already been programmed message appears Press Exit to return to the standby screen Press Add Dest to specify other destinations You can program one of the User Function keys with operations for this function Using the User Function keys allow you to omit steps 2 through 4 and 6 For details about the User Function keys see General Settings Adjust p 199 General Settings...

Page 426: ... press the OK key If Search Fax Destination does not appear press the Escape key to return to step 1 and then switch the destination type to 5 Enter the number you want to search for and then press the OK key If you enter the wrong number before pressing the OK key press the Clear Stop key and then enter the correct number Searching for a Destination in the Address Book 81 1 ...

Page 427: ...message appears Press Exit to return to the display of step 4 You cannot specify destinations twice If you try the This destination has already been programmed message appears Press Exit to return to the standby screen Press Add Dest to specify other destinations Search by E mail Address This section explains how to search for a destination registered in the Address Book by e mail address If LDAP ...

Page 428: ... press the Escape key to return to step 1 and then switch the destination type to 5 Enter the e mail address you want to search for and then press the OK key If you enter the wrong e mail address before pressing the OK key press the Clear Stop key and then enter the correct e mail address 6 Check the characters you have entered are correct and then press the OK key Searching for a Destination in t...

Page 429: ...splay of step 4 You cannot specify destinations twice If you try the This destination has already been programmed message appears Press Exit to return to the standby screen Press Add Dest to specify other destinations Search by IP Fax Destination This section explains how to search for a destination registered in the Address Book by IP Fax destination If LDAP Search is set to Off in Administrator ...

Page 430: ...ng or and then press the OK key If Search Fax Destination does not appear press the Escape key to return to step 1 and then switch the destination type to 5 Press IP The Search IP Fax Destination screen appears 6 Enter the IP Fax destination you want to search for and then press the OK key Searching for a Destination in the Address Book 85 1 ...

Page 431: ... key If no destination matches the specified text the Specified destination is not programmed message appears Press Exit to return to the display of step 4 You cannot specify destinations twice If you try the This destination has already been programmed message appears Press Exit to return to the standby screen Press Add Dest to specify other destinations Search by LDAP Server This section explain...

Page 432: ...Select Server using or and then press the OK key 4 If more than one server is programmed select the server you want to search using or and then press the OK key The screen returns to that of step 3 5 Select Advanced Search using or and then press the OK key Searching for a Destination in the Address Book 87 1 ...

Page 433: ...the search criteria are as follows Include Search for strings that include the specified character Example When searching for ABC enter A B or C Exclude Search for strings that do not include the specified character Example When searching for ABC enter D First Word Search for strings that start with the specified character Example When searching for ABC enter A Last Word Search for strings that en...

Page 434: ...d by the search depends on the searching method supported by the LDAP server However the address programmed first is normally retrieved You can add one additional search condition for LDAP servers by specifying the Search Options under Prog Chnge Del LDAP Server under System Settings See System Settings Network and System Settings Guide The string you enter in the Name condition field in step 6 is...

Page 435: ...t to cancel this operation press the On Hook Dial key again 3 Dial The machine immediately dials the destination If you make a mistake press the On Hook Dial or Clear Modes key and then try again 4 When the line is connected and you hear a high pitched tone press the Start key Transmission starts If you want to cancel a transmission press the Clear Stop key and then remove the originals After tran...

Page 436: ...ak with the other party when you hear a voice If you hear a voice before pressing the Start key pick up the optional handset or the handset of the external telephone and tell the receiver you want to send a fax document ask them to switch to facsimile mode The Fax Features menu contains the On Hook Release Time setting which allows you to specify the time after which On Hook mode is deactivated Se...

Page 437: ...d and you hear a high pitched tone press the Start key to send your fax document If you hear a voice tell the receiver that you want to send them a fax document ask them to switch to facsimile mode Transmission starts 5 Replace the handset If you want to cancel a transmission press the Clear Stop key and then remove the originals After transmission the standby display appears To specify a destinat...

Page 438: ...ginal Is Scanned Use this procedure to cancel a transmission before pressing the Start key 1 Press the Clear Modes key BRJ034S When originals are placed into the ADF you can cancel transmission simply by removing them While the Original Is Being Scanned Use this procedure to cancel a transmission while the originals are being scanned after the Start key has been pressed Canceling a Transmission 93...

Page 439: ...you are performing the cancel operation While the Original Is Being Transmitted This section explains how to cancel a transmission while the Communicating indicator is lit 1 Press the Clear Stop key BRJ035S 2 Select the file you want to cancel using or and then press Stop TX 1 Transmission 94 1 ...

Page 440: ...ly one destination number appears Before the Transmission Is Started Use this procedure to cancel a transmission after the original is scanned This function is useful to cancel a transmission when you notice a mistake in destination or with the originals after storing To cancel Memory Transmission search for the file to be canceled among the files stored in memory and then delete it You can cancel...

Page 441: ...The standby display appears If you cancel a transmission while the file is being sent some pages of your file may have already been sent and is received at the other end If the transmission finishes while you are carrying out this procedure transmission cannot be canceled If multiple destinations were specified only the number of the destinations that have not received the document you sent is sho...

Page 442: ...t it is still printed if an original could not be stored You can select whether to include part of the original image on the report with the User Parameter switch 04 bit 7 in the Fax Features menu If user authentication is set you can select whether to display a destination with the User Parameter switch 04 bit 4 in the Fax Features menu If user authentication is set you can select whether to disp...

Page 443: ...default is the value that a setting returns to following power on or whenever the Clear Modes key is pressed You can specify defaults for the following settings Image Density Resolution Original Type Transmission Mode Label Insertion Fax Header For details about how to set see Home Position p 237 Home Position 1 Transmission 98 1 ...

Page 444: ...memory are lost If documents are lost for this reason a Power Failure Report is automatically printed when the operation switch is turned on Use this report to check the list of lost documents For details see Turning Off the Main Power In the Event of Power Failure Troubleshooting This function is unavailable with Immediate Transmission If you specify Immediate Transmission for this function the D...

Page 445: ...er press the Escape key The display returns to that of step 3 6 Press the Escape key The standby display appears To check the settings press TX Mode 7 Specify a destination and then press the Start key You can specify a time within 24 hours of the current time If the current time shown is not correct change it using Set Time under System Settings For details about the setting see System Settings N...

Page 446: ...sses and then specify Register as for Sender Only or Dest Sender If you want senders to receive e mail notification of transmission results you must specify Dest Sender For details about these settings see Registering Addresses and Users for Facsimile Scanner Functions Network and System Settings Guide If user authentication is set the user logged in is set as sender The transmission result is sen...

Page 447: ...t to the registered e mail address The display returns to that of step 3 8 Press the Escape key The standby display appears To check the settings press TX Mode 9 Specify the destination and then press the Start key You can confirm transmission results by using both the E mail TX Result function which sends the results by e mail and the Communication Result Report printed by the machine You can set...

Page 448: ...is set you can check usage by logged in users If User Code is set to sender you can count the number of uses by each user To cancel the Sender Settings cancel the transmission See Canceling a Transmission p 93 Canceling a Transmission p 199 General Settings Adjust p 226 Parameter Settings Sender Settings 103 2 ...

Page 449: ...t for the e mail document you want to send 1 Place the original and then select the scan settings you require 2 Press TX Mode 3 Select E mail Options using or and then press the OK key 4 Select Attach Subject using or and then press the OK key 5 Enter the subject line and then press the OK key Depending on the type of characters to enter press the Shift key to switch the mode The screen returns to...

Page 450: ...just For details about text entry see Entering Text About This Machine For the maximum number of characters for an e mail subject see Maximum Values p 34 E mail Subject p 101 Sender Settings p 134 Received images p 199 General Settings Adjust p 258 Maximum Values Requesting a Reception Notice You can confirm sent documents were properly received using e mail or the Journal When Reception Notice is...

Page 451: ...ings press TX Mode 7 Specify a destination 8 Specify the sender For details see Sender Settings 9 Press the Start key If the fax is not received normally Error appears in the Result column Only the last 50 communications appear in the Journal If you do not receive a reception notice message before the last 50 communications are finished OK might not be printed in the Journal s Result column This m...

Page 452: ...her files lists and transmission reports show Reception notice messages themselves are not recorded in the Journal You can select whether the Reception Notice is printed every time or printed only when an error occurs This can be set with User Parameter switch 21 bit 0 in the Fax Features menu See Parameter Settings You cannot broadcast e mail using Reception Notice The documents are sent to the d...

Page 453: ...On using or and then press the OK key The screen returns to that of step 3 5 Press the Escape key The standby screen returns To check the settings press TX Mode 6 Specify a destination and then press the Start key You can program fax header names using the Program Fax Information function in the Fax Features menu For details about the programming method see Registering Fax Information You can sele...

Page 454: ... Function keys see General Settings Adjust In the USA law requires that your telephone number be included in the Fax Header Register the telephone number own fax number and switch on Fax Header Print with User Parameters switch 18 bit 1 in the Fax Features menu p 199 General Settings Adjust p 217 Registering Fax Information p 226 Parameter Settings Fax Header Print 109 2 ...

Page 455: ...ted as follows Receiver s name printed at the top of the page and preceded by To Set this function as follows Set Label Insertion to On when programming fax destinations Select Programmed Name for Label Insertion when sending fax documents 1 Place the original and then select the scan settings you require 2 Press TX Mode 3 Select Label Insertion using or and then press the OK key 4 Select Programm...

Page 456: ...6 Specify a destination and then press the Start key Programmed Name is selected by default Label Insertion 111 2 ...

Page 457: ... save costs when you send the same document to more than one place in a distant area and saves time since many documents can be sent in a single operation Documents can be sent to facsimiles that have the Personal Box function A SUB Code cannot be used with Internet Fax To use this function set SUB Code TX to On Program this function to one of the User Function keys in advance For details about th...

Page 458: ...returns 6 Enter the fax number of a destination or an IP Fax destination 7 Press the User Function key F1 to F3 programmed with SUB SEP Code BRJ037S 8 Enter a SUB Code and then press the OK key If you make a mistake press the Clear Stop key before pressing the OK key and then try again Setting SUB Codes for Transmission 113 2 ...

Page 459: ...mes and fax numbers in the destination list For registering into the destination list see Registering Addresses and Users for Facsimile Scanner Functions Network and System Settings Guide The SUB Code is printed on lists and reports p 199 General Settings Adjust p 258 Maximum Values Setting a Password There are times when you may want to use an SID Sender ID when sending confidential faxes with th...

Page 460: ... The SID Code is printed on lists and reports p 258 Maximum Values Setting SUB Codes for Transmission 115 2 ...

Page 461: ... received from facsimiles that have Information Boxes A SEP Code cannot be used with Internet Fax To use this function set SEP Code RX to On Program this function to one of the User Function keys in advance For details about the User Function keys see General Settings Adjust 1 Press TX Mode 2 Select SEP Code RX using or and then press the OK key 3 Select On using or and then press the OK key The s...

Page 462: ...screen returns 9 Press the Start key Make sure the number of digits in the SEP Code matches the specification of the machine from which you are receiving For the maximum number of digits for the SEP Code of this machine see Maximum Values You can enter numbers and spaces You can store SEP Codes as well as names and fax numbers in the destination list For registering into the destination list see R...

Page 463: ... Reserve Report This report is printed after SEP Code Reception is set up You can use this report to check the reservations for SEP Code Reception You can turn this function on or off with the User Parameter switch 03 bit 3 in the Fax Features menu If user authentication is set you can select whether to display a destination with the User Parameter switch 04 bit 4 in the Fax Features menu If user ...

Page 464: ...user authentication is set you can select whether to display a sender name with the User Parameter switch 04 bit 5 in the Fax Features menu For details about Parameter Setting see Parameter Settings To view the report without text disruption select a font of even character width in your e mail application s settings You can also check the result of a SEP Code Reception with the Journal p 226 Param...

Page 465: ...you require 2 Press TX Mode 3 Select 2 Sided TX using or and then press the OK key 4 Select the transmission mode using or and then press the OK key Select 2 Sided from 1st Page to send a two sided original from the first page Select 1 Sided for 1st Page if you want to send a cover letter as the first page 5 Select the position of the placed document using or and then press the OK key To cancel Tw...

Page 466: ...entation at the other end specify the original position and page opening orientation BRJ021S For details about acceptable original size and paper thickness for two sided scanning with the ADF see Acceptable Original Sizes You can program one of the User Function keys with operations for this function Using the User Function keys allows you to omit steps 2 3 and 7 For details about the User Functio...

Page 467: ...2 Other Transmission Features 122 2 ...

Page 468: ...the senders The machine may not be able to receive fax documents when free memory space is low If free memory reaches 0 during Immediate Reception any further reception becomes impossible and the current communication is terminated Reception is always by Immediate Reception unless Combine Two Originals or 2 Sided Print is set to On in which cases the machine switches to Memory Reception If the Sub...

Page 469: ...ed Print The machine may not be able to receive fax documents when free memory space is low If free memory reaches 0 during Memory Reception any further reception becomes impossible and the current communication is terminated Reception is always by Immediate Reception unless Combine Two Originals or 2 Sided Print is set to On in which cases the machine switches to Memory Reception Substitute Recep...

Page 470: ... see Reception File Setting The Receive File indicator may light even when receiving documents using Immediate Reception p 214 Reception File Setting Receiving documents unconditionally When faxes cannot be printed as normal Substitute Reception allows fax reception This section describes the conditions under which this will occur If one of the conditions in the following list occurs the machine r...

Page 471: ...Problem with this tray appears All trays are out of action Call your service representative In User Parameters switch 05 bit 2 1 on the Fax Features menu specify the following conditions for Substitute Reception When Own Name or Own Fax Number is received The machine switches to Substitute Reception only when the sender has programmed their Own Name or Own Fax Number If the power is switched off f...

Page 472: ... For details about Parameter Setting see Parameter Settings p 226 Parameter Settings Types of Reception 127 3 ...

Page 473: ...e machine automatically changes to receive fax documents You can change the number of rings using RX Mode Auto Switch Time in the Fax Features menu See Reception Settings When the other party send a fax document the machine changes to receive the fax document automatically You can connect a telephone answering machine with Auto Switch Set a smaller number of rings for the telephone answering machi...

Page 474: ...erate this machine using only the optional handset or the handset of the external telephone You must first press the operation switch to turn on the machine Auto Reception When a telephone call comes in the machine automatically receives it as a fax document Use this setting on a dedicated fax line Switching the Reception Mode This section explains how to switch the reception mode You can switch r...

Page 475: ...andby display appears To cancel the selection press the Escape key For details about Switch Reception Mode see Reception Settings For details about the User Function keys see General Settings Adjust p 199 General Settings Adjust p 201 Reception Settings 3 Reception 130 3 ...

Page 476: ...y according to the file type and the order of the attached files File type attached File to be printed Reception method Text Text Internet Fax Text TIFF Text TIFF Internet Fax Text JPEG JPEG Mail to Print Text TIFF JPEG JPEG Mail to Print Text JPEG TIFF JPEG Mail to Print TIFF TIFF TIFF TIFF Internet Fax JPEG 1 JPEG 2 JPEG 1 Mail to Print TIFF JPEG JPEG Mail to Print JPEG TIFF JPEG Mail to Print T...

Page 477: ...3 R2 reception is not possible With User Parameter switch 21 bit 1 in the Fax Features menu you can have the machine send the return receipt in response to the reception notice request attached to the sent e mail For details about Parameter Setting see Parameter Settings p 226 Parameter Settings Auto e mail reception When this function is turned on the machine periodically checks the e mail server...

Page 478: ...bout the User Function keys see General Settings Adjust 1 Press the User Function key F1 to F3 programmed with Manual E mail Reception BRJ037S 2 Press the Start key The machine accesses the server to check for e mail and receives any new e mail The standby display appears Alternatively press the Job Information key and then select Manual E mail Reception to receive e mail p 199 General Settings Ad...

Page 479: ... name Queries to Administrator s e mail address To check the machine s host name and administrator s e mail address use Host Name or Admin E mail Address under System Settings For details about Host Name and Admin E mail Address see System Settings Network and System Settings Guide BBB034S 1 E mail transmitted without specifying a subject in E mail Options 2 E mail transmitted with a subject speci...

Page 480: ...ble with the following functions CheckeredMark TSIPrint TransmittingSubscriberIdentificationPrint ReceptionTime AutoFaxReception Power Up Memory Lock Program Special Sender Resolution Page Separation and Length Reduction Center Mark 2 Sided Print Communication Page Count Forwarding Auto Paper Select function Just size printing To print a JPEG or PDF file the optional PostScript 3 unit must be inst...

Page 481: ...ack and white even if the image that is received contains color Printed JPEG images and PDF files are counted as printer jobs If an encrypted PDF is received the PDF file is printed only if its password matches this machine s password You can check the results of Mail to Print reception using the Journal In the Journal P 1 is always printed in the number of pages column and S which indicates the S...

Page 482: ...atures menu See Forwarding A fax number Internet Fax address IP Fax destination or folder address can be set as a forwarding destination If an e mail address is programmed as the destination documents received are forwarded as e mail If you would like the machine to forward received documents to a particular destination according to the sender specify the Forwarding destination for each sender und...

Page 483: ...ing of the file name and data loss can result if the receiver s operating system cannot accept certain characters in file names To prevent this use User Parameters switch 37 bit 5 to limit the file names to plain characters only For details see Parameter Settings If you limit file names to plain characters only but errors still occur disable display of the sender s name in the file name of documen...

Page 484: ...s not set in System Settings Also the SMTP server sends error notification e mail to the originator If an error occurs while receiving e mail reception is aborted the e mail is deleted and Error Report is printed Also the SMTP server will send error notification e mail to the originator When the SMTP server attempts to route received documents to this machine while the machine is transmitting e ma...

Page 485: ...number 212 123 4567 specify fax 2121234567 abc company com Single destination programmed in the Quick Dial Keys fax registration number of 3 digits or less host name of this machine domain name Example to transfer to the destination number 001 fax 001 abc company com Group destination programmed in the destination list fax registration number of 3 digits or less host name of this machine domain na...

Page 486: ... 203 E mail Settings p 226 Parameter Settings p 258 Maximum Values JBIG Reception If you use JBIG Joint Bi level Image Experts Group compression you can send photographic originals faster than with other methods of compression It allows you to receive documents sent in the JBIG format through JBIG Transmission This function is not available with Internet Fax function and Mail to Print functions Au...

Page 487: ... p 226 Parameter Settings 3 Reception 142 3 ...

Page 488: ...See Adjusting the Volume Troubleshooting Checkered Mark When this function is turned on a Checkered Mark is printed on the first page of fax documents to help you separate them BBB039S You can turn this function on or off using Checkered Mark in the Fax Features menu See Reception Settings p 201 Reception Settings Center Mark When this function is enabled marks are printed halfway down the left si...

Page 489: ...n it is received You can turn this function on or off using Print Reception Time in the Fax Features menu See Reception Settings When a received document is split and printed on two or more sheets the reception time is printed on the last sheet The time when the document was printed can also be recorded on the document If you need this function contact your service representative p 201 Reception S...

Page 490: ...h this machine BRJ022S This function works only when all pages are of the same width and received into memory This function cannot be used with Combine Two Originals You can turn this function on or off using 2 Sided Print in the Fax Features menu For details see Reception Settings Printouts may vary depending on how the sender sets the originals You can select to have documents only from selected...

Page 491: ... a received document is available Combine Two Originals is not possible BAS038S Two A5 documents are printed side by side on a sheet of A4 Two 81 2 51 2 documents are printed side by side on a sheet of 81 2 11 You can turn this function on or off with the User Parameter switch 10 bit 1 in the Fax Features menu See Parameter Settings This function uses Memory Reception p 226 Parameter Settings Page...

Page 492: ...gth 4 mm 0 16 inch 10 mm 0 39 inch 15 mm 0 59 inch Guideline for split 5 155 mm 5 mm steps 0 2 6 1 inches 0 2 inch steps TSI Print Transmitting Subscriber Identification Print You can have the sender s Own Name or Own Fax Number printed on documents that this machine receives Usually the sender s Fax Header is printed on received documents When you receive an Internet Fax document the e mail addre...

Page 493: ...11 Any documents narrower than A4 or 81 2 11 are received at A4 or 81 2 11 width The length of documents depends on the document The paper size used to print a received document may be different from the size of the sent original p 146 Page Separation and Length Reduction Setting priority trays With the same size of paper loaded into multiple trays you can make the machine use one tray for one fun...

Page 494: ...e When you have loaded new paper press Exit to print the document After pressing Exit procedure varies depending on machine status when the message occurred If any received documents or reports were being printed automatically the machine automatically continues printing from where it left off If any documents or reports were being printed manually the machine does not resume printing Perform the ...

Page 495: ...3 Reception 150 3 ...

Page 496: ... out which files are stored in memory and what their file numbers are Knowing the file number can be useful for example when erasing files 1 Press the Job Information key BRJ036S 2 Select Print TX Standby File List using or and then press the OK key To cancel printing before pressing the OK key press the Escape key The standby display appears 3 Press the Start key To cancel printing after pressing...

Page 497: ... display appears The contents of a file stored in memory can also be printed If user authentication is set you can select whether to display a sender name with the User Parameter switch 04 bit 5 in the Fax Features menu See Parameter Settings p 226 Parameter Settings 4 Confirming Communication Information 152 4 ...

Page 498: ...ent use this procedure to print it out 1 Press the Job Information key BRJ036S 2 Select Check Stop TX File using or and then press the OK key 3 Select the file you want to print using or To cancel printing press the Escape key The display returns to that of step 2 4 Press Print Printing a File from Memory 153 4 ...

Page 499: ...the Start key press the Clear Stop key The display returns to that of step 3 The display returns to that of step 3 after printing a TX Standby File Repeat from step 3 if you want to print another file 6 Press the Escape key twice The standby display appears 4 Confirming Communication Information 154 4 ...

Page 500: ...ax is sent the Own Fax Number or Own Name information of the receiver appears When an Internet Fax is sent the e mail address you entered or the name programmed in the machine s destination list appears For a transmission from a computer LAN Fax is shown 4 Press the Escape key twice The standby display appears Only the transmission results of the latest communications are displayed For the maximum...

Page 501: ...eted if turned on with User Parameter switch 03 bit 0 in the Fax Features menu You can also print the report by programming the Print TX Status Report to a User Function key and pressing this when specifying a destination If you turn the Communication Result Report on the Communication Failure Report is not printed For details about the contents printed in the reports see Communication Result Repo...

Page 502: ...esses see Registering Addresses and Users for Facsimile Scanner Functions Network and System Settings Guide For details about E mail TX Result see Sender Settings For details about the contents of the reports see Communication Result Report Memory Transmission Immediate TX Result Report Immediate Transmission and SEP Code RX Result Report When using the Sender Settings function to select the sende...

Page 503: ...al image on the report with the User Parameter switch 04 bit 7 in the Fax Features menu If user authentication is set you can select whether to display a destination with the User Parameter switch 04 bit 4 in the Fax Features menu For details about Parameter Setting see Parameter Settings The Pg s column gives the total number of pages The Page Not Sent column gives the number of pages that could ...

Page 504: ...ation Failure Report This report is printed when a document could not be successfully transmitted with Memory Transmission If the machine is set up to print a Communication Result Report this report is not printed Use it to keep a record of failed transmissions so you can send them again You can select whether the Communication Failure Report is automatically printed using the User Parameter switc...

Page 505: ...lly Unprogrammed indicates that the document could not be sent because the forwarding destination is not programmed indicates that the Internet Fax document was sent to the mail server programmed in this machine However this does not mean the e mail was delivered p 226 Parameter Settings 4 Confirming Communication Information 160 4 ...

Page 506: ... 3 Check the reception results using or When a fax or IP Fax is received the sender s fax number or Fax Header information appears When an Internet Fax is received the sender s e mail address appears 4 Press the Escape key twice The standby display appears Only the reception results of the latest communications are displayed For the maximum number of communication results you can check on this mac...

Page 507: ...again You can program one of the User Function keys with operations for this function Using the key allows you to omit steps 1 and 2 For details about the User Function keys see General Settings Adjust p 199 General Settings Adjust p 258 Maximum Values Confirming by Report Print a report to confirm reception results Journal Print the Journal to confirm the latest reception results For details see ...

Page 508: ...display returns to that of step 2 The display returns to that of step 2 after printing the Journal 4 Press the Escape key The standby display appears You can set whether the Journal is automatically printed after every 50 communications with the User Parameter switch 03 bit 7 in the Fax Features menu Depending on security settings the Journal is not automatically printed If user authentication is ...

Page 509: ...on Sender name may not appear For the maximum number of communication results printed in the Journal see Maximum Values p 199 General Settings Adjust p 226 Parameter Settings p 258 Maximum Values Journal This section explains the items printed in the Journal BRJ041S 1 Printing date Shows the date and time the report was printed 2 Programmed Fax Header Shows the sender name programmed for printing ...

Page 510: ...t The fax destination details appear on the reception report For Folder destinations Shows the name programmed in the destination list 6 Communication mode For fax transmissions and receptions After G3 T for outgoing faxes or R for incoming faxes and the communication mode appear in alphabetical letters or symbols For Internet Fax transmissions and receptions After e mail mark T for outgoing e mai...

Page 511: ... in the communication mode column regardless of the actual page resolution To prioritize a fax number or name programmed in the destination list contact your service representative Transmitting Journal by E mail Use this function to send the Journal to the administrator s e mail address The Journal is sent automatically after every 50 communications A CSV format Journal is attached to the e mail T...

Page 512: ... so that the Journal is transmitted as e mail it is transmitted to the e mail address of an administrator If user authentication is set you can select whether to display a sender name with the User Parameter switch 04 bit 5 in the Fax Features menu For details about Parameter Setting see Parameter Settings To confirm the administrator s e mail address use Admin E mail Address under System Settings...

Page 513: ...s function the following preparations are required in the Fax Features menu Program your Memory Lock ID under Program Memory Lock ID Set Memory Lock to On For details about these settings see Administrator Tools If the main power switch is turned off for about twelve hours all documents protected by Memory Lock are deleted When this happens the Power Failure Report is printed so you can confirm wh...

Page 514: ...the programmed Memory Lock ID message appears and then the display returns to the previous screen Retry after checking the Memory Lock ID 5 Press the Escape key The standby display appears Even when Memory Lock is available if free memory is insufficient reception is not possible You can also apply a Memory Lock to documents that come only from certain senders Documents received by SEP Code Recept...

Page 515: ...4 Confirming Communication Information 170 4 ...

Page 516: ...paperless faxing from your computer to the other destinations In addition to sending faxes the LAN Fax Driver allows this machine to be used for printing out documents prepared on a computer for proof checking To use the LAN Fax Driver connect this machine to computers and make the necessary network settings and then install the LAN Fax Driver and the related utilities on your computer BBB052S To ...

Page 517: ...llel Connection Printer Reference and Connecting the Machine Network and System Settings Guide When using Ethernet or wireless LAN see Connecting the Machine Network and System Settings Guide Using the Software This section provides information about LAN Fax Driver Address Book and LAN Fax Cover Sheet Editor LAN Fax Driver This driver allows you to use LAN Fax functions All operations cannot be gu...

Page 518: ...Address Book and LAN Fax Cover Sheet Editor can be installed by Auto Run If the plug and play function starts click Cancel in the Found New Hardware dialog box and then insert the CD ROM Auto Run might not work automatically with certain OS settings If this is the case double click Setup exe located on the CD ROM root directory If you want to cancel Auto Run hold down the SHIFT key when your syste...

Page 519: ...nstalling SmartDeviceMonitor for Client see Using the SmartDeviceMonitor for Client Port Printer Reference 1 Quit all applications currently running 2 Insert the CD ROM included with this machine into the CD ROM drive of your computer The installer launches automatically and the language selection window appears Depending on your operating system settings the installer may not launch automatically...

Page 520: ...dows XP Professional Windows Server 2003 2003 R2 select Printers and Faxes on the Start menu In Windows Vista or Windows Server 2008 select Control Panel on the Start menu Then select Hardware and Sound and then Printers 2 Select to highlight LAN Fax M13 then click Properties on the File menu In Windows Vista click Set printer properties 3 Click Printing Preferences to set the following properties...

Page 521: ...ntains the following items besides option configuration items Prohibit manual destination entry Check this option to inhibit direct destination specification Enable E mail Check this when using Internet Fax with the LAN Fax function IP Fax Check this option when using IP Fax After checking this option select a protocol by clicking an appropriate radio button If the options on this machine are not ...

Page 522: ...ine click User Settings 5 Specify necessary options For details about specifying options see Specifying Options and Confirming Transmission Results by E mail 6 Click Send When you click Send Print the fax is sent to the destination and your machine prints a copy of the document you sent The machine can retain documents sent from a LAN Fax Driver as files to be sent For the maximum values of the fo...

Page 523: ...destination list in the Device Address box 4 Click Set as Destination The entered destination is added and appears in the List of Destination box If you add a destination by mistake click the wrong destination and then click Delete from List 5 To specify more destinations repeat steps 3 and 4 For details about specifying destinations see the LAN Fax Driver s Help p 189 Using the Machine s Address ...

Page 524: ...n click Delete from List In the Address Book list box directly enter the name you want to search for You can then jump to the name you entered 6 To specify more destinations repeat steps 2 through 4 For details about specifying destinations see the LAN Fax Driver s Help Destination list contents can be narrowed down by selecting the first letter of a contact name company name or group name in the ...

Page 525: ...and appears in the List of Destination box If you add a destination by mistake click the wrong destination and then click Delete from List 6 To specify more destinations repeat steps 2 through 5 For details about specifying destinations see the LAN Fax Driver s Help For the maximum number of digits that can be included in a destination see Maximum Values p 258 Maximum Values Specifying Options You...

Page 526: ...d Options tab appears 2 Select the Attach a Cover Sheet check box A cover sheet is attached to the document you are sending Click Edit Cover Sheet to edit the cover sheet For details see Editing Fax Cover Sheets p 187 Editing Fax Cover Sheets To specify two sided printing You can configure this machine to perform two sided printing 1 Click Send Options The Send Options tab appears 2 Select the 2 s...

Page 527: ...r a file name manually select the Specify file name when saving check box To have the file assigned a name and saved automatically select the Automatically create a new file check box 6 Click OK 7 Click Save or Save Send If you select Automatically create a new file the image file is assigned a name and saved under the specified folder The file name will be RicHHMMSS tif HH hours MM minutes SS sec...

Page 528: ...smission results use E mail TX results The job history may differ from the machine s transmission results In that case refer to the machine s transmission results See the relevant Help for details p 258 Maximum Values Confirming Transmission Results by E mail After communicating in the LAN Fax mode this function transmits the communication results with the computer by e mail To confirm transmissio...

Page 529: ...ttings and see LAN Fax Result Report for the LAN Fax Result Report p 184 LAN Fax Result Report p 226 Parameter Settings LAN Fax Result Report This section explains the LAN Fax Result Report If E mail TX results is set to Notify if there be any insufficient configurations in the e mail menu on this machine or if Auto Specify Sender Name is set to Off the LAN Fax result notification e mail is not tr...

Page 530: ...n memory if print failed due to problems such as paper shortage or paper jams Make this setting with User Parameters switch 20 bit 5 4 3 2 in the Fax Features menu Data is deleted when the specified length of time elapses See Parameter Settings For details about printing the fax image see the LAN Fax Driver s Help p 182 Saving as files p 226 Parameter Settings Editing Address Book You can program ...

Page 531: ...firmation dialog box does not appear when you have not made any changes after starting Address Book To program the contents of the destination list of this machine to the Address Book select the Use device address check box then enter the destination list s registration number in the Device Address field For Line under Fax Number the following line types are selectable G3 G3 2 G3 3 G4 G3 Dir Auto ...

Page 532: ...then click Address Book The Address Book dialog box appears If LAN Fax Driver has already started up click Edit Address Book 2 Click New Browse and then select the CSV file containing the address list to be edited 3 Select the destination you want to delete so it is highlighted in the list 4 Click Delete 5 Click Yes 6 Click Close 7 If you made changes to a destination a confirmation message appear...

Page 533: ...ct name as sender information Telephone number as sender information Fax number as sender information Date Message 1 On the Start menu point to All Programs LAN Fax Utilities and then click LAN Fax Cover Sheet Editor The LAN Fax Cover Sheet Editor dialog box appears 2 Edit the cover sheet For details about operations see Help 3 Click Save as on the File menu 4 Select a folder and then enter a file...

Page 534: ...n enter a message 8 Click OK 9 Specify a destination 10 Click the Send Options tab and then select the Attach a Cover Sheet check box 11 Click Send or Send Print Managing Facsimile Functions Using SmartDeviceMonitor for Admin You can check information about this machine s fax functions using a computer and save files on a computer using SmartDeviceMonitor for Admin For details about SmartDeviceMon...

Page 535: ...Tools Counter key then select System Settings Interface Settings Network and then Machine IPv4 Address Then press IP Add If the machine s IP address still does not appear in the list check the settings of any security applications that are installed as these settings might be disabling display of the IP address 2 Select the model of your machine click Tools and then click Address Management Tool 3...

Page 536: ...cuments from Computers p 171 Sending Fax Documents from Computers LAN Fax Operation Messages This section explains typical operation error messages displayed on the computer when using the LAN Fax Driver and solutions to those messages Message Causes and Solutions The number of entries in Destinations exceed the limits Up to 300 entries can be entered The number of destinations specified exceeds t...

Page 537: ...File Setting You can also check and manage the documents using DeskTopBinder For details about the operation on DeskTopBinder see the DeskTopBinder s manual and Help For details about using Web Image Monitor see Monitoring and Configuring the Printer Network and System Settings Guide p 214 Reception File Setting Viewing Printing and Deleting Received Fax Documents Using Web Image Monitor This sect...

Page 538: ...stem Settings Guide To enlarge the preview image click Enlarge Image Enlargement cannot be performed without Acrobat Reader installed For more information see Help on the Web Image Monitor To download the document data on the list of received fax documents click TIFF or PDF For details about downloading see the Web Image Monitor Help The method for downloading differs depending on the selected for...

Page 539: ...Received File in the left pane The list of received fax documents appears 4 Select the check box of the fax document to be deleted When viewing a list of the fax documents you can select the thumbnail display icon display or detail display Click or 5 Click Delete 6 Click Delete File s To cancel deletion press Cancel before clicking Delete File s 7 Click OK The display returns to that of step 5 8 C...

Page 540: ...ame of this machine in the address bar The top page of Web Image Monitor is displayed 3 Click Login and then enter the Administrator s name and password 4 Click Address Book in the left pane The Address Book is displayed 5 Click the radio button to the left of the machine you want to modify and then click Change The Change User page appears 6 Set the properties for Internet Fax data format other t...

Page 541: ...he registration number name and e mail address then set the necessary properties You can set the Internet Fax data format after entering the e mail address 7 Click Full Mode under Internet Fax Data Format and set the properties according to the receiver s properties If you change the mode to Simple Mode you cannot set machine properties 8 Click OK at the upper or lower left of the screen To cancel...

Page 542: ...tch is turned off or the Clear Modes key is pressed Default settings are shown in bold type Changing Default Settings This section describes how to change the settings of User Tools If Administrator Authentication Management is specified contact your administrator 1 Press the User Tools Counter key BRJ032S 2 Select the menu using or and then press the OK key To change the Fax Features select Fax F...

Page 543: ...urn to the initial display press the User Tools Counter key Quitting User Tools This section describes how to end User Tools 1 Press the User Tools Counter key BRJ032S You can also quit User Tools by pressing the Escape key 6 Fax Features 198 6 ...

Page 544: ...cify a time to cancel On Hook mode after you transmit using On Hook dialing This is useful when On Hook dialing is cancelled in fax information service The default setting is 3 minutes Set User Function Key Frequently used functions can be programmed as User Function key The User Function keys can be programmed with the following items Print Journal TX File Status Transmission File Status RX File ...

Page 545: ...he default setting for User Function Key 2 is Switch Reception Mode The default setting for User Function Key 3 is Print Journal For details about the display panel and how to use the keys see Reading the Display Panel and Using Keys p 14 Reading the Display Panel and Using Keys p 217 Registering Fax Information 6 Fax Features 200 6 ...

Page 546: ...mber keys and then press the OK key 5 Press the User Tools Counter key Authorized Reception Specify whether or not unwanted fax documents are to be screened out The default setting is Off To use this function program the Special Senders function in advance For details see Programming Initial Set Up of a Special Sender Checkered Mark Specify whether or not a checkered mark is to be printed on the f...

Page 547: ...tting It is recommended that you use Web Image Monitor operating under the same network environment as this machine Otherwise the Web browser may not open and an error may occur The default setting is Do not Set 1 Select Fax Features using or and then press the OK key 2 Select Reception Settings using or and then press the OK key 3 Select Stored Recpt File User Set using or and then press the OK k...

Page 548: ...ing or and then press the OK key 2 Select E mail Settings using or and then press the OK key 3 Select Maximum E mail Size using or and then press the OK key 4 Select On using or and then press the OK key 5 Enter an upper limit on the size of outgoing e mail using the number key and then press the OK key Specify a size limit of 128 102 400 KB If you make a mistake press the Clear Stop key and then ...

Page 549: ... the OK key 4 Select On using or and then press the OK key 5 Enter the authorized e mail address and then press the OK key You can enter up to 128 characters for the e mail address If you make a mistake press the Clear Stop key and then enter again 6 Press the User Tools Counter key For details about the display panel and how to use the keys see Reading the Display Panel and Using Keys p 14 Readin...

Page 550: ... IP addresses for the gatekeeper SIP server and VoIP gateway To obtain the correct IP addresses consult administrator Enable H 323 Specify whether or not H 323 is used for IP Fax transmission The default setting is Off Enable SIP Specify whether or not SIP is used for IP Fax transmission The default setting is Off H 323 Settings Set the IPv4 address and alias telephone number of the gatekeeper To ...

Page 551: ...the OK key A register server registers location information of user agents which correspond to telephones or facsimiles on public telephone lines on an IP network 9 Enter the IP address of the register server and then press the OK key 10 Select SIP User Name using or and then press the OK key 11 Enter SIP User Name and then press the OK key 12 Select SIP Digest Authentication using or and then pre...

Page 552: ... to use the VoIP gateways regardless of the IP Fax destination numbers register only the VoIP gateway addresses without registering the prefix 7 Enter VoIP gateway address and then press the OK key 8 Select H 323 or SIP using or and then press the OK key 9 Press the User Tools Counter key Deleting VoIP gateway 1 Select Fax Features using or and then press the OK key 2 Select IP Fax Settings using ...

Page 553: ...ID cannot print the document This prevents unauthorized users from accessing the document To use Memory Lock program the Memory Lock ID and then switch Memory Lock on To store incoming documents from Special Senders only in Memory Lock program each sender with Program Special Sender This function cannot be used with Internet Fax or Mail to Print The default setting is Off 1 Select Fax Features usi...

Page 554: ...Parameter Settings Program Special Sender Program Change Delete Special Senders perform initial setup and print the Special Sender List You can set functions for each sender if Special Senders are preprogrammed For details see Program Special Sender Program Memory Lock ID Program a Memory Lock ID to be entered before printing documents when the Memory Lock function is activated Preprogram the ID w...

Page 555: ...res using or and then press the OK key 2 Select Administrator Tools using or and then press the OK key 3 Select G3 Analog Line using or and then press the OK key 4 Select Extension Outside using or and then press the OK key 5 Select Extension or Outside using or and then press the OK key 6 Select Outside Access No using or and then press the OK key 7 Enter the Outside Access No using the number ke...

Page 556: ...s feature is turned on Menu Protect Using Menu Protect you can prevent unauthenticated users from changing the User Tools For details consult your administrator p 168 Printing a File Received with Memory Lock p 212 Memory File Transfer p 222 Forwarding p 226 Parameter Settings p 241 Program Special Sender Administrator Tools 211 6 ...

Page 557: ...ere received with Memory Lock Use this function only in emergencies This function is not available with Internet Fax 1 Select Fax Features using or and then press the OK key 2 Select Administrator Tools using or and then press the OK key 3 Select Memory File Transfer using or and then press the OK key 4 Press Line then use or to select G3 H 323 or SIP and then press the OK key 5 Enter the forwardi...

Page 558: ... stored in facsimile memory are forwarded including received with Memory Lock If you program SUB Codes as User Function keys beforehand you can use SUB Codes and a password to specify a forwarding destination Take care to change only those settings that are required For details about the User Function keys see General Settings Adjust p 199 General Settings Adjust Memory File Transfer 213 6 ...

Page 559: ...ns are required 1 Select Fax Features using or and then press the OK key 2 Select Reception Settings using or and then press the OK key 3 Select Reception File Setting using or and then press the OK key 4 Select Store Notify Store Do not Notify or Print using or and then press the OK key If you select Store Notify and specify a notification destination notification that the document was received i...

Page 560: ...T 1Chart You cannot send received documents It is recommended that you use Web Image Monitor running under the same network environment as this machine Otherwise the Web browser may not open and an error may occur p 226 Parameter Settings p 258 Maximum Values Specifying Automatic Deletion of Incoming Faxes when an Error Occurs Even if the machine is set to store documents on its hard disk when it ...

Page 561: ...e mail When a received document is stored this report is sent to the e mail address set as the destination for notification Depending on your e mail application a phishing warning might appear after you receive a Reception Report e mail To prevent phishing warnings appearing after you receive a Reception Report e mail you must add the sender to your e mail application s exclusion list For details ...

Page 562: ...hether or not to print the Fax Header for printing in Print Fax Header under TX Mode For details about how to set see Fax Header Print Own Name The Own Name is sent to the other party when you send or receive a fax This name should include your name The Own Name is shown on the display of the other machine and printed in a report Own Name works only if the other machine is of the same manufacturer...

Page 563: ...t Program Fax Information using or and then press the OK key 4 Select fax information you want to program change using or and then press the OK key 5 Program change the selected fax information and then press the OK key 6 Press the User Tools Counter key Programming Changing Fax Header 1 Select Fax Header using or and then press the OK key 6 Fax Features 218 6 ...

Page 564: ...e Programming Changing Own Name 1 Select Own Name using or and then press the OK key 2 Enter the own name and then press the OK key To change the programmed Own Name press the Clear Stop key and then enter again You can register Own Name using up to 20 alphanumeric characters and symbols For details about entering text see Entering Text About This Machine Programming Changing Own Fax Number 1 Sele...

Page 565: ...ess the Clear Stop key and then enter again You can register Own Fax Number using up to 20 numbers space and symbol Deleting Fax Information 1 Select Fax Features using or and then press the OK key 2 Select General Settings Adjust using or and then press the OK key 3 Select Program Fax Information using or and then press the OK key 4 Select fax information you want to delete using or and then pres...

Page 566: ...5 Press the Clear Stop key The programmed information is deleted 6 Press the OK key 7 Press the User Tools Counter key Registering Fax Information 221 6 ...

Page 567: ... deleted so they must be registered again When a destination is changed a document is transmitted to the new destination If there is no destination of the specified type you can set which destination to be used as an alternative destination in Parameter Setting switch 32 bit 0 See Parameter Settings You can program one of the User Function keys with operations for this function See General Setting...

Page 568: ...o another group a maximum of 150 destinations can be specified in a group 1 Select Fax Features using or and then press the OK key 2 Select Administrator Tools using or and then press the OK key 3 Select Forwarding using or and then press the OK key 4 Select On using or and then press the OK key To cancel forwarding press Off and proceed to step 6 5 Search and select a receiver using the Quick Dia...

Page 569: ...irst register the Specify Dest Reg No function as a User Function key For details about the User Function keys see General Settings Adjust For details about how to register folders see Registering Folders Network and System Settings Guide p 199 General Settings Adjust Quitting the Forwarding Function 1 Select Fax Features using or and then press the OK key 2 Select Administrator Tools using or and...

Page 570: ...arding Mark on receiver s documents that have been forwarded The receiver can distinguish between forwarded and normally received documents BBM015S You can specify whether or not to print a Forwarding Mark in the User Parameters switch 02 bit 0 See Parameter Settings This function is not available when Forwarding is performed to a folder destination p 226 Parameter Settings Forwarding 225 6 ...

Page 571: ...s bit 0 and the left most is bit 7 You can adjust the settings to match your needs by switching the value of bits between 0 and 1 Switch 02 0 0 0 1 1 0 1 1 7 6 5 4 3 2 1 0 User Parameter List User Parameter Switches are outlined in the following list Switch 02 Bit 0 Forwarding Mark 0 Off 1 On Switch 02 Bit 3 TSI Print 0 Off 1 On Switch 03 Bit 0 Automatic printing of the Communication Result Report...

Page 572: ...Automatic printing of the Immediate TX Result Report 0 Off 1 On Switch 03 Bit 7 Automatic printing of the Journal 0 Off 1 On Switch 04 Bit 1 Automatic printing of the Communication Failure Report 0 Off 1 On Switch 04 Bit 4 Indicate the parties 0 Off 1 On Switch 04 Bit 5 Include sender s name on reports 0 Off 1 On Switch 04 Bit 7 Include a portion of the image on reports 0 Off 1 On Parameter Settin...

Page 573: ...nditionally Free 01 Enabled when Own Name Own Fax Number is received 11 Disabled Reception off Switch 05 Bit 5 Just size printing 0 Off 1 On Switch 05 Bit 7 Empty tray alert Paper Empty Warning even when one paper tray is empty 0 Off 1 On Switch 07 Bit 2 Parallel Memory Transmission 0 Off 1 On Switch 08 Bit 2 Authorized Reception Type 0 Receiving from specified senders only 1 Receiving all documen...

Page 574: ...when scanning 0 Off 1 On Switch 11 Bit 6 Local print when forwarding 0 Off 1 On Switch 14 Bit 0 Print documents received with Auto Power On Reception 0 Immediate printing On 1 When turning on the operation switch Off Switch 14 Bit 1 Long Document Transmission Well Log 0 Off 1 On Switch 14 Bit 3 Reset when function changed 0 Off 1 On Switch 15 Bit 2 1 0 Selecting the available paper feed tray You c...

Page 575: ...cessary Switch 17 Bit 3 Whether or not to reset the settings when original is scanned 0 On 1 Off Switch 18 Bit 0 Print date with Fax Header 0 Off 1 On Switch 18 Bit 1 Print transmitter origin with Fax Header 0 Off 1 On Switch 18 Bit 2 Print file number with Fax Header 0 Off 1 On Switch 18 Bit 3 Print page number with Fax Header 0 Off 1 On Switch 19 Bit 1 Sort Journal by transmission type 0 Off 6 F...

Page 576: ...tes 0110 6 minutes 0111 7 minutes 1000 8 minutes 1001 9 minutes 1010 10 minutes 1011 11 minutes 1100 12 minutes 1101 13 minutes 1110 14 minutes 1111 15 minutes Switch 21 Bit 0 Print results of sending Reception Notice Request message 0 Off print only when an error occurs 1 On print every time Switch 21 Bit 1 Respond to e mail reception acknowledgment request 0 Off 1 On Switch 21 Bit 2 Choose wheth...

Page 577: ... Switch 21 Bit 6 Not displaying Network Errors 0 Off 1 On Switch 21 Bit 7 Transmit Error Mail Notification 0 On 1 Off Switch 22 Bit 0 Detect a dial tone before sending faxes when using the telephone line 0 Not detect Off 1 Detect On Switch 32 Bit 0 Select priority order for alternative destinations if there is no destination of the specified type 0 Paper Output Priority Priority Order 1 IP Fax des...

Page 578: ...x 0 Off 1 On Switch 37 Bit 4 Displaythesender sinformationinthe filenameof documentsthatareforwardedtofolderdestinations 0 Off 1 On Switch 37 Bit 5 Specify whether or not to limit the file names of documents that are forwarded to folder destinations to plain characters only 0 Off 1 On Switch 38 Bit 7 6 5 4 3 2 1 0 Maximum number of resends the machine attempts after failing to forward a fax from a...

Page 579: ...ay require options or other settings may need to be made beforehand It is recommended that you print and store the Parameter Settings List when you program or change parameter settings Do not change any bit switches other than those shown on the previous pages 1 Select Fax Features using or and then press the OK key 2 Select Administrator Tools using or and then press the OK key 3 Select Parameter...

Page 580: ...Press the OK key 8 Repeat steps 5 through 7 to change the switch settings 9 After all the settings are finished press the User Tools Counter key For details about how to print parameter settings list see Printing the Parameter Settings List p 235 Printing the Parameter Settings List Printing the Parameter Settings List Print this list to see the current Parameter Settings However only items of imp...

Page 581: ...ess the OK key 3 Select Parameter Setting using or and then press the OK key 4 Select Parameter Settings List using or and then press the OK key 5 Press the Start key To cancel printing a list press the Escape key The display returns to that of step 4 6 Press the User Tools Counter key 6 Fax Features 236 6 ...

Page 582: ...mission Modes Label Insertion For details about Label Insertion see Label Insertion Fax Header For details about Fax Header see Fax Header Print p 17 Transmission Modes p 41 Original Type p 42 Resolution p 43 Image Density Contrast p 108 Fax Header Print p 110 Label Insertion Home Position Parameter List For details about setting parameters see Parameter Settings Do not change switches other than ...

Page 583: ...ows either Immediate Transmission or Memory Transmission to be set as the home position 0 Memory transmission 1 Immediate transmission Switch 02 Bit 2 Allows the label insertion as the home position to be set to on or off 0 Off 1 On Switch 02 Bit 6 5 Allows the fax header as the home position to be set to on or off 00 Off 01 On p 226 Parameter Settings Changing the Home Position 1 Select Fax Featu...

Page 584: ...ter Setting using or and then press the OK key 4 Select Home Position using or and then press the OK key 5 Select the switch number you want to change using the scroll keys and then press the OK key 6 Select the bit number you want to change 7 Press the OK key Home Position 239 6 ...

Page 585: ...8 Press the User Tools Counter key 6 Fax Features 240 6 ...

Page 586: ...g the Special Sender Registration function The following items can be programmed Special Senders Up to 30 Special Senders can be registered A maximum of 24 characters can be used for each name Full Agreement Partial Agreement When you program own names and facsimile names for multiple destinations you can program a common sequence of characters to identify destinations Using a Full agreement Desti...

Page 587: ...ify whether or not to configure Initial Set UP of a Special Sender use the Special RX Function setting in Initial Set Up For details see Programming Initial Set Up of a Special Sender p 249 Programming Initial Set Up of a Special Sender p 251 Printing Special Sender List Authorized Reception Use this function to limit incoming senders The machine only receives faxes from programmed Special Senders...

Page 588: ...on IP Fax destination and folder destination as a forward destination Set folder destinations using the Address Book Management function under System Settings See Registering Folders Network and System Settings Guide If you have specified a folder for forwarding you can specify the file format you want to use for forwarding in Parameter Setting switch 21 bit 3 See Parameter Settings p 226 Paramete...

Page 589: ...on describes how to program and change Special Senders 1 Select Fax Features using or and then press the OK key 2 Select Administrator Tools using or and then press the OK key 3 Select Program Special Sender using or and then press the OK key 4 Select Program Change using or and then press the OK key 6 Fax Features 244 6 ...

Page 590: ...and then press the OK key 8 Select items using or and then press the OK key You must select only the item you want to program To cancel these settings press the Escape key The display returns to that of step 5 9 Press Exit 10 Press the User Tools Counter key For details about specifying items in step 8 see Authorized RX Authorized Reception Forwarding Memory Lock or 2 Sided Print Program Special S...

Page 591: ...f using or and then press the OK key Forwarding This section describes how to specify Forwarding Specify when programming a Special Sender One forward destination can be registered for each Special Sender To register two or more forward destinations use group destinations Up to 100 destinations can be specified in a group However when adding a group to another group a maximum of 150 destinations c...

Page 592: ...r details about the User Function keys see General Settings Adjust Set folder destinations using Address Book Management under System Settings For details about registering folder destinations see Registering Folders Network and System Settings Guide When a folder is specified as the forward destination you can set a file format for forwarding See Parameter Settings switch 21 bit 3 Deleting a dest...

Page 593: ... Tools 1 Select Memory Lock using or and then press the OK key 2 Select On or Off using or and then press the OK key Selecting Same as Basic Settings will result in the same setting made for Memory Lock under Administrator Tools p 208 Administrator Tools 2 Sided Print This section describes how to specify 2 Sided Print Specify when programming a Special Sender 1 Select 2 Sided Print using or and t...

Page 594: ...pecial Sender This section describes how to program Initial Set Up of a Special Sender Program the Initial Set Up of a Special Sender 1 Select Fax Features using or and then press the OK key 2 Select Administrator Tools using or and then press the OK key 3 Select Program Special Sender using or and then press the OK key 4 Select Initial Set Up using or and then press the OK key Program Special Sen...

Page 595: ...he OK key 7 Press the User Tools Counter key Deleting a Special Sender This section describes how to delete a Special Sender 1 Select Fax Features using or and then press the OK key 2 Select Administrator Tools using or and then press the OK key 3 Select Program Special Sender using or and then press the OK key 6 Fax Features 250 6 ...

Page 596: ...ss Yes To cancel deleting a special sender press No The display returns to that of step 5 7 Press the User Tools Counter key Printing Special Sender List You can display programmed Special Senders 1 Select Fax Features using or and then press the OK key 2 Select Administrator Tools using or and then press the OK key Program Special Sender 251 6 ...

Page 597: ...elect Print Special Sender List using or and then press the OK key 5 Press the Start key The screen returns to step 4 after completion of printing To cancel printing press the Escape key The screen returns to step 4 6 Press the User Tools Counter key 6 Fax Features 252 6 ...

Page 598: ...tion Optional Equipment This section explains the functions of options Handset You can make or receive calls by installing the optional handset and dialing manually For details about the functions see On Hook Dial and Manual Dial p 90 On Hook Dial p 92 Manual Dial 253 7 ...

Page 599: ...ion method MH MR MMR JBIG Maximum original size Standard A4 81 2 14 Custom 216 1200 mm 81 2 47 inches Maximum scanning size 216 1200 mm 81 2 47 inches Print process Printing on standard paper using a laser Transmission speed G3 33 600 31 200 28 800 26 400 24 000 21 600 19 200 16 800 14 400 12 000 9 600 7 200 4 800 2 400bps auto shift down system Power Consumption Component Specifications Immediate...

Page 600: ...x compatible machines IP Fax transmission function Specify an IP address and send faxes to an IP Fax compatible fax through a network AlsocapableofsendingfaxestoaG3faxconnectedtoatelephone line via a VoIP gateway IP Fax reception function Receive faxes sent from an IP Fax compatible fax through a network Also capable of receiving faxes from a G3 fax connected to a telephone line via a VoIP gateway...

Page 601: ...mail transmission Memory transmission only E mail receive functions AutomaticdetectionandprintingofappendedTIFF F MH filesand ASCII text Memory reception only 1 Full mode Specifications Required for the Internet Fax Destination Machines This section explains the specifications required for the Internet Fax destination machine When communicating with full mode compatible machines you can take advan...

Page 602: ... MIME Base64 Content Type Image tiff Multipart mixed text plain Image tiff attached file forms Data format Profile TIFF Profile S Coding MH Original size A4 Resolution dpi 200 100 200 200 or 204 98 204 196 p 254 Specifications Specifications 257 7 ...

Page 603: ...ions you can search for at a time 100 Number of redials the machine can store 10 Number of digits that can be included in a destination 128 Number of characters you can enter in the e mail subject line 128 Number of digits for a SEP SUB PWD SID Code 20 Number of communication results you can check on this machine 100 Number of communication results printed in the Journal 50 Number of special sende...

Page 604: ...register in the Address Book of the LAN Fax 2 000 Number of destinations you can specify at once using LAN Fax 300 The maximum number of pages that can be stored or transmitted may decrease depending on the contents of documents Maximum Values 259 7 ...

Page 605: ...roduct names of Windows XP are as follows Microsoft Windows XP Professional Microsoft Windows XP Home Edition Microsoft Windows XP Media Center Edition Microsoft Windows XP Tablet PC Edition The product names of Windows Vista are as follows Microsoft Windows Vista Ultimate Microsoft Windows Vista Business Microsoft Windows Vista Home Premium Microsoft Windows Vista Home Basic Microsoft Windows Vis...

Page 606: ...Microsoft Windows Server 2008 Standard Microsoft Windows Server 2008 Enterprise Microsoft Windows Server 2008 Datacenter Trademarks 261 7 ...

Page 607: ...7 Appendix 262 7 ...

Page 608: ...while the original is being transmitted 94 Canceling an Immediate Transmission 93 Center Mark 143 201 Changing a fax destination 68 Changing default settings 197 Changing the Home Position 238 Changing the User Parameters 234 Check Destination key 60 Check Stop TX File 95 Checkered Mark 143 201 Checking files stored in memory 151 Checking the reception result 161 Checking the result of the communi...

Page 609: ...imile key 14 Fax 203 205 Fax Header Print 108 Fax via computer 171 Fine 42 Folder TX Result Report 208 Forwarding 208 222 243 246 Forwarding destination 137 Forwarding Mark 225 Forwarding received documents 137 Full mode 34 194 Functions not available for internet fax reception 34 Functions not available for internet fax transmission 33 Functions not available for IP Fax transmission 30 G G3 Analo...

Page 610: ...Transmission sequence 23 Menu Protect 211 Mixing scan settings for a multiple page original 44 N Names of major functions 10 Network and System Settings Guide 7 Notes on using Internet Fax 32 Notes on using IP Fax 29 Notice 9 O OK key 14 On Hook Dial 90 On Hook Dial key 90 On Hook Release Time 199 Operation switch 141 Original size 37 Original Type 41 P Page separation and length reduction 146 Pap...

Page 611: ...d using keys 14 Receive File indicator 124 168 Received images 134 Receiving documents according to parameter specified settings 126 Receiving documents unconditionally 125 Receiving e mail 131 Receiving Internet Fax documents 132 Reception File Setting 202 214 Reception functions 137 Reception modes 128 Reception Notice 105 Reception notice message 105 Reception Report e mail 216 Reception Settin...

Page 612: ...Quick Dial keys 58 Specifying a group of destinations using the Quick Dial keys 59 Specifying an IP address 49 Specifying automatic deletion of incoming faxes when an error occurs 215 Specifying options 180 Stamp 101 Standard 42 Start Manual Reception 128 Stop TX 94 95 Stored Reception File User Setting 202 Stored Recpt File User Set 202 SUB Code TX 112 SUB SEP Code 112 116 Subject 104 Substitute ...

Page 613: ...he software 172 V Viewing fax information using a Web browser 192 Viewing received fax documents using a Web browser 192 W Web Image Monitor 192 When placing an original into the ADF 39 When placing an original on the exposure glass 38 When using a gatekeeper server or SIP server 51 268 EN USA D069 7101 ...

Page 614: ...Copyright 2008 ...

Page 615: ...Type for 917SPF LD117SPF MP 171SPF Aficio MP 171SPF Type for 917F LD117F MP 171F Aficio MP 171F Operating Instructions Facsimile Reference D069 7101 EN USA ...

Page 616: ...witch between screens 6 3 Destination field 6 4 Options 7 Scroll keys 8 User Tools Counter key 9 Clear Modes key 10 Clear Stop key clears an entered numeric value stops scanning 11 Main power indicator 12 Operation switch Press this to turn the machine on off 13 Start key Press this to begin scanning or sending 14 key Enter key 15 Number keys 16 OK key 17 Original key 18 Escape key 19 Lighter key ...

Page 617: ...canning Originals with the Network TWAIN Scanner Various Scan Settings Scanner Features Appendix 1 2 3 4 5 6 7 Read this manual carefully before you use this machine and keep it handy for future reference For safe and correct use be sure to read the Safety Information in About This Machine before using the machine 8 9 Scanner Reference Operating Instructions ...

Page 618: ......

Page 619: ...ic Procedure for Sending Scan Files by E mail 21 Specifying E mail Destinations 24 Selecting a Destination Registered to a Quick Dial Key 24 Selecting the Destination from the Machine s Address Book 24 Entering an E mail Address Manually 30 Selecting Destinations by Searching an LDAP Server 31 Registering a Directly Entered Destination in the Address Book 34 Specifying the E mail Sender 36 Selecti...

Page 620: ...o an FTP Server 71 Sending Files to NetWare Server 73 Registering the Path to the Selected Destination in the Address Book 78 3 Sending Scan Files Using WSD Before Sending Scan Files Using WSD 81 Overview of Sending Scan Files Using WSD 81 Preparation for Sending Files Using WSD 83 Using the WSD Scanner Push Type 87 WSD Scanner Push Type Screen 87 Basic Procedure for Sending Scan Files Using WSD P...

Page 621: ... Sender Registered to a Quick Dial Key 118 Selecting a Sender by Searching the Delivery Server s Destination List 119 Entering the Subject of the E mail to Be Transmitted via the Delivery Server 125 6 Scanning Originals with the Network TWAIN Scanner Before Using the Network TWAIN Scanner 127 Overview of the Network TWAIN Scanner 127 Preparing to Use the Network TWAIN Scanner 128 Installing the TW...

Page 622: ...or Tools 164 9 Appendix Relationship between Resolution and Scan Size 165 When Using the E mail Folder Sending WSD Scanner or Network Delivery Functions 165 When Using as a TWAIN Scanner 166 Software Supplied on CD ROM 168 Auto Run Program 168 TWAIN Driver 168 DeskTopBinder Lite 169 Values of Various Set Items for Transmission Delivery Function 171 Transmission function 171 Network Delivery Functi...

Page 623: ...ting Provides a guide for resolving common usage related problems Copy Reference Explains Copier functions and operations Also refer to this manual for explanations on how to place originals Facsimile Reference Explains Facsimile functions and operations Printer Reference Explains Printer functions and operations Scanner Reference Explains Scanner functions and operations Network and System Settin...

Page 624: ... Reference Scanner Guide Manuals for DeskTopBinder Lite DeskTopBinder Lite Setup Guide DeskTopBinder Introduction Guide Auto Document Link Guide Manuals provided are specific to machine types For UNIX Supplement please visit our Web site or consult an authorized dealer This manual includes descriptions of functions and settings that might not be available on this machine The following software pro...

Page 625: ...ges as a result of handling or operating the machine For good copy quality the supplier recommends that you use genuine toner from the supplier The supplier shall not be responsible for any damage or expense that might result from the use of parts other than genuine parts from the supplier with your office products 7 ...

Page 626: ... appear on the machine s display panel Indicates the names of keys on the machine s control panel Note Contents of this manual are subject to change without prior notice Two kinds of size notation are employed in this manual Colors on color keys or the color circle may differ slightly from the colors of actual copies The color samples in this manual may differ slightly from the colors of actual co...

Page 627: ...hecks passports driver s licenses The preceding list is meant as a guide only and is not inclusive We assume no responsibility for its completeness or accuracy If you have any questions concerning the legality of copying or printing certain items consult with your legal advisor This machine is equipped with a function that prevents making counterfeit bank bills Due to this function the original im...

Page 628: ...re servers For details see chapter 2 Sending Scan Files to Folders Sending using WSD Push Type You can use Web Services on Devices WSD to send scan files to a client computer For details see chapter 3 Sending Scan Files Using WSD Delivering You can deliver scan files using a delivery server For details see chapter 5 Delivering Scan Files Scanning originals from a client computer WSD Pull Type You ...

Page 629: ...e not available through direct USB connection p 15 Sending Scan Files by E mail p 51 Sending Scan Files to Folders p 81 Sending Scan Files Using WSD p 103 Delivering Scan Files p 127 Scanning Originals with the Network TWAIN Scanner p 99 Saving Scan Files on a Removable Memory Device 11 ...

Page 630: ...creen p 87 WSD Scanner Push Type Screen p 107 Network Delivery Scanner Screen Reading the Display and Using Keys This section explains how to read the display and use the selection keys BRB006S 1 Selection keys Press to select an item displayed at the bottom of the screen Example the standby screen When the instruction press to switch to the E mail screen is given in this manual press the left sel...

Page 631: ...ination key switches the screen from the initial scanner screen to the Check Dest screen Check Dest ARO002S 1 Destination Displays the transmission or delivery destinations When multiple destinations are specified you can change the display by pressing the or key 2 Transmission function icon Displays the icon of the transmission function e mail Scan to Folder or delivery function in use 3 Program ...

Page 632: ...livery function If you have selected multiple destinations the first selected destination is displayed Other destinations appear as X X indicates the number of destinations when sending files by e mail or delivering them 3 Number of scanned pages Displays the number of scanned pages 4 Status One of the following transmission status is displayed Done Sending Waiting Error or Canceled 5 Print Press ...

Page 633: ...o the scan files you send by e mail 2 SMTP server You need to have an access to an e mail server that supports SMTP Simple Mail Transfer Protocol to send scan files by e mail However it is not essential to have an e mail server inside the LAN where this machine belongs It transfers a received e mail to a specified destination through a LAN or the Internet 3 Client computer Use e mail client softwa...

Page 634: ...guring the network settings in System Settings Configure the network settings in System Settings according to your environment and how you will be using the machine The following procedure explains connecting this machine to an IPv4 network using Ethernet cable Note that the settings you must configure will vary depending on your operating environment For details about network settings and configu...

Page 635: ... then press the OK key 8 Select File Transfer select SMTP Server and then press the OK key 9 Select Server Name enter the SMTP server host name or IPv4 address and then press the OK key If an extended wireless LAN board optional is installed press LAN Type on Interface Settings then press Ethernet and then configure the network settings Configuring the necessary settings in Scanner Features Using ...

Page 636: ...egister frequently used e mail addresses in the address book 1 Press the User Tools Counter key select System Settings and then press the OK key The System Settings screen appears 2 Select Administrator Tools and then press the OK key 3 Select Address Book Management and then press the OK key For details about registering e mail addresses in the address book see Registering Addresses and Users for...

Page 637: ... Depending on the machine type you may not be able to use the machine when it is updating the address book using CSV files retrieved using SmartDeviceMonitor for Admin that contain user codes Encrypted files can be sent by e mail only to destinations for which decryption is set For details about sending encrypted files by e mail see Security Settings to E mails p 47 Security Settings to E mails E ...

Page 638: ...ns when sending the same file to both e mail and Scan to Folder destinations at the same time 4 Manual When specifying a destination that is not registered press Manual and then enter the e mail address of the destination using the Quick Dial keys 5 Options Press to make the scan settings and specify formats of files you want to send 6 Add Dest When selecting multiple destinations after a manual e...

Page 639: ...the original type For details see Selecting Original Type 5 If necessary specify the scanning density For details see Adjusting Image Density 6 Select the destination You can specify multiple destinations For details see Specifying E mail Destinations 7 Press Options to select Sender s Name and then specify the e mail sender For details see Specifying the E mail Sender 8 If necessary select Return...

Page 640: ...n in the destination field and then press the Clear Stop key In System Settings you can specify the administrator s e mail address as the default sender name Thisletsyousende mailwithoutenteringanythingfor Sender sName Fordetails see FileTransfer Network and System Settings Guide Depending on the security setting the logged on user may be specified as Sender s Name To use Message Disposition Notif...

Page 641: ...tinations p 36 Specifying the E mail Sender p 45 Setting the Return Receipt Function p 46 Entering the E mail Subject p 47 Security Settings to E mails p 137 Specifying Send Options p 13 Check destination Basic Procedure for Sending Scan Files by E mail 23 1 ...

Page 642: ...ick Dial Key This section explains how to select a destination registered to a Quick Dial key For details about how to register an e mail destination to a Quick Dial key see Registering Addresses and Users for Facsimile Scanner Functions Network and System Settings Guide 1 Press the Quick Dial key to which the destination is registered Repeat this step to add more destinations BRB005S The illustra...

Page 643: ...s registration number Search for a destination by name Search for a destination by e mail address Selecting a destination from the list Use the following procedure to select the destination from the destination list 1 Press the Search Destination key BRB003S 2 Press the or key to select Display List and then press the OK key 3 Press the or key to select the destination from the list and then press...

Page 644: ...s some destinations may not appear in the destination list Selecting destinations by entering the registration numbers Select the destination from the machine s address book using its registration number 1 Press the Search Destination key BRB003S The illustration is an example The actual appearance may be different 2 Press the or key to select Search by Registration No and then press the OK key 3 ...

Page 645: ... On the screen select Search Address Book and then press the OK key Searching for a destination by name Use the following procedure to search by name for a destination in the machine s address book 1 Press the Search Destination key BRB003S The illustration is an example The actual appearance may be different 2 Select Search by Name and then press the OK key Specifying E mail Destinations 27 1 ...

Page 646: ...be displayed as search results If under System Settings LDAP Search is set to On a screen to select a search object appears when you press the Search Destination key On the screen select Search Address Book and then press the OK key To cancel a selected destination press the or key to select the target destination and then press the key Searching for a destination by e mail address Use the followi...

Page 647: ...ddress and then press the OK key 3 Enter the beginning of the e mail address and then press the OK key twice Destinations that match the search conditions are displayed 4 Press the or key to select the destination and then press the key The check box on the left side of the selected destination is selected 5 Press the OK key Specifying E mail Destinations 29 1 ...

Page 648: ... E mail Address Manually This section explains how to enter an e mail address manually 1 Press Manual 2 Enter the e mail address 3 Press the OK key Depending on the security settings Manual may not be displayed For details consult the administrator To modify or change an entered e mail address press EditDest To add another destination press Add Dest and then enter an e mail address You can registe...

Page 649: ...LDAP server must be connected to the network It is necessary to register the LDAP server under System Settings Also set LDAP Search to On under System Settings For details see System Settings Network and System Settings Guide 1 Press Search Destination key BRB003S The illustration is an example The actual appearance may be different 2 Select Search LDAP and then press the OK key 3 Select Select Se...

Page 650: ...vanced Search and then press the OK key 6 Specify the search conditions The following example uses fuzzy search by destination name Select Name and then press the OK key 7 Enter a part of the destination name Search can be by surname or first name depending on the LDAP server s settings Consult your administrator 8 Press the OK key 9 Select a search criterion and then press the OK key 1 Sending Sc...

Page 651: ...t the number of characters that can be specified see Sending E mail You can register multiple e mail addresses in individual LDAP server accounts However only one e mail address will be displayed as the search result Usually the address that was registered first on the LDAP server is the address that is displayed You can select criteria from the following list Include The names which contain an en...

Page 652: ... the system supported by the LDAP server p 171 Sending E mail Registering a Directly Entered Destination in the Address Book This section explains how to register a directly entered destination in the machine s address book You can also register a destination selected from the LDAP server 1 Press the Check Destination key BRB004S The illustration is an example The actual appearance may be differen...

Page 653: ... Registering Addresses and Users for Facsimile Scanner Functions Network and System Settings Guide 5 Press the Escape key Depending on the security settings Program may not appear In such case you cannot complete the registration To register in the machine s address book a destination searched for and selected from the LDAP server display the destination and then press Program Specifying E mail De...

Page 654: ... you can specify the administrator s e mail address as the default sender name This lets you send e mail without entering anything for Sender s Name For detail see File Transfer Network and System Settings Guide Depending on the security setting the logged on user may be specified as Sender s Name Whenaprotectioncodehasbeenset ascreenforenteringtheprotectioncodeappearsafterselecting the sender Ent...

Page 655: ...S The illustration is an example The actual appearance may be different 4 Press the OK key Programmed appears and then the Send Options screen reappears Selecting a Sender from the List This section explains how to select a sender from the machine s address book list 1 Press Options Specifying the E mail Sender 37 1 ...

Page 656: ...fferent 4 Press the or key to select Display List and then press the OK key 5 Press the or key to select the sender and then press the key The check box on the left side of the selected sender is selected To cancel a selected sender press the or key to select the target sender and then press the key 6 Press the OK key 1 Sending Scan Files by E mail 38 1 ...

Page 657: ...Sender Name Select the sender using the registration numbers specified by senders in the machine s address book 1 Press Options 2 Select Sender s Name and then press the OK key 3 Press the Search Destination key BRB003S The illustration is an example The actual appearance may be different Specifying the E mail Sender 39 1 ...

Page 658: ... and then press the OK key Example To enter 001 Press the 1 key and then press the OK key 6 Press the OK key 7 Press the OK key Programmed appears and then the Send Options screen reappears Searching for a Sender by Name This section explains how to search by name for a sender in the machine s address book 1 Press Options 1 Sending Scan Files by E mail 40 1 ...

Page 659: ...ample The actual appearance may be different 4 Select Search by Name and then press the OK key 5 Enter the beginning of the sender name and then press the OK key twice Senders that match the search conditions are displayed 6 Press the or key to select the sender and then press the key Specifying the E mail Sender 41 1 ...

Page 660: ...rs Up to 100 destinations can be displayed as search results Searching for a Sender by E mail Address This section explains how to search by e mail address for a sender in the machine s address book 1 Press Options 2 Select Sender s Name and then press the OK key 1 Sending Scan Files by E mail 42 1 ...

Page 661: ...ect Search by E mail Address and then press the OK key 5 Enter the beginning of the sender s e mail address and then press the OK key twice Destinations that match the search conditions are displayed 6 Press the or key to select the destination and then press the key 7 Press the OK key Specifying the E mail Sender 43 1 ...

Page 662: ...8 Press the OK key Programmed appears and then the Send Options screen reappears Up to 100 destinations can be displayed as search results 1 Sending Scan Files by E mail 44 1 ...

Page 663: ...e Send Options screen reappears To use the Return Receipt function you must specify the sender Note however that the Return Receipt notification e mail may not be transmitted if the e mail software of the recipient does not support Message Disposition Notification When the administrator s e mail address is automatically specified as a sender notification e mail will not be sent even if Return Rece...

Page 664: ... Select the user text and then press the OK key 4 Enter the subject and then press the OK key Programmed appears and then the Send Options screen reappears If you do not specify the e mail subject the settings specified in Default E mail Subject on the Send Settings tab under Scanner Features will be applied For details see Send Settings p 160 Send Settings 1 Sending Scan Files by E mail 46 1 ...

Page 665: ...le size attached to the e mail If such an error occurs change the resolution or other scan settings and then send the e mail again For details see Scan Settings Applying security to e mail can reduce transmission speed p 157 Scan Settings Sending Encrypted E mail Use the following procedure to specify a destination for which encryption is configured and encrypt and send an e mail Destinations for ...

Page 666: ...f the setting specified in E mail Encryption If you have selected multiple destinations including destinations for which encryption has not been configured e mail sent to such destinations will not be encrypted even if you specify encryption Sending E mail with a Signature Use the following procedure to apply a signature to an e mail that has scan file attachments 1 Press Options 2 Press the or ke...

Page 667: ...e administrator E mail Signature does not appear This is because you cannot apply signatures to scan files that are sent by e mail You cannot change the E mail Signature settings This is because a signature is always applied to scan files that are sent by e mail If you do not want to send signed e mail select Do not Use Signatures in step 4 Security Settings to E mails 49 1 ...

Page 668: ...1 Sending Scan Files by E mail 50 1 ...

Page 669: ...y Scan to Folder This section describes the process for sending scan files by Scan to Folder Sending files to shared folders ZZZ802S 1 This machine You can send scan files to shared network folders To send scan files to shared network folders use the SMB protocol 2 Computer with a shared folder To use this function it is necessary to create a shared folder in advance You can specify a shared folde...

Page 670: ... It is essential to have the FTP server inside the LAN WAN where this machine belongs It is not possible to access an FTP server via a proxy server 3 Client computer You can browse scanned files saved to an FTP server from a client computer You need to have an FTP client program on the computer to connect to an FTP server Sending files to a NetWare server ZZZ804S 1 This machine You can send scan f...

Page 671: ... properly connected to the network For details about how to connect this machine to a network see Connecting to the Interfaces Network and System Settings Guide Configuring the network settings in System Settings Configure the network settings in System Settings according to your environment and how you will be using the machine The following procedure explains connecting this machine to an IPv4 n...

Page 672: ... Netware folders select NetWare and then select Active 6 Select LAN Type and Ethernet and then press the OK key If an extended wireless LAN board optional is installed press LAN Type on Interface Settings then press Ethernet and then configure the network settings Configure the necessary settings in Scanner Features Using Scanner Features you can make or change various settings related to the scan...

Page 673: ... For details about registering the address of a destination folder in the address book see Registering Addresses and Users for Facsimile Scanner Functions Network and System Settings Guide You can register entries in the address book using Web Image Monitor or SmartDeviceMonitor for Admin For details about how to display Web Image Monitor or install SmartDeviceMonitor for Admin see Monitoring and ...

Page 674: ...up is selected for destination ZZZ606S 1 Scan to Folder icon Indicates that the Scan to Folder screen is displayed 2 Destination field Displays a selected destination If multiple destinations are selected press the or key to display the destinations in the order they were selected To check the selected destination press the Check Destination key 2 Sending Scan Files to Folders 56 2 ...

Page 675: ... specifying a destination that is not registered press Dest and then enter the path to the destination using the Quick Dial keys 5 Options Press to make the scan settings and specify formats of files you want to send 6 Add Dest Press to add a manually entered folder path as a destination 7 EditDest Press to modify or change a manually entered folder path 8 View Press to check the destinations regi...

Page 676: ...sary select the original type For details see Selecting Original Type 5 If necessary specify the scanning density For details see Adjusting Image Density 6 Select a destination You can specify multiple destinations For details see Specifying Scan to Folder Destinations 7 If necessary press Options to specify the resolution and orientation of the originals For details see Specifying Send Options 8 ...

Page 677: ...he destinations can be made to appear one by one by pressing the or key To cancel a selected destination display the destination in the destination field and then press the Clear Stop key To cancel a destination selected from the address book press the selected destination again To cancel scanning press the Clear Stop key p 151 Selecting Original Type p 153 Adjusting Image Density p 60 Specifying ...

Page 678: ...ered to a Quick Dial Key This section explains how to select a destination registered to a Quick Dial key For details about how to register a Scan to Folder destination to a Quick Dial key see Registering Addresses and Users for Facsimile Scanner Functions Network and System Settings Guide 1 Press the Quick Dial key to which the destination is registered Repeat this step to add more destinations B...

Page 679: ...k the screen for entering the address protection code appears Enter the protection code and then press the OK key If the protection code you entered is correct you can specify Scan to Folder destinations from the address book Depending on the security setting some destinations may not appear in the destination list Selecting a destination folder from the list Use the following procedure to select ...

Page 680: ... key to select the target destination and then press the key Depending on the security settings some destinations may not appear in the destination list Using a registration number to select a destination folder Select the destination from the machine s address book using its registration number 1 Press the Search Destination key BRB003S The illustration is an example The actual appearance may be ...

Page 681: ... the OK key Example To enter 002 Press the 2 key and then press the OK key 4 Press the OK key Searching for a destination by name Use the following procedure to search by name for a destination in the machine s address book 1 Press the Search Destination key BRB003S The illustration is an example The actual appearance may be different Specifying Scan to Folder Destinations 63 2 ...

Page 682: ...Press the or key to select the destination and then press the key The check box on the left side of the selected destination is selected 5 Press the OK key Up to 100 destinations can be displayed as search results Search for a destination by folder path Use the following procedure to search by folder path for a destination in the machine s address book 2 Sending Scan Files to Folders 64 2 ...

Page 683: ...ning of the folder path and then press the OK key twice Enter the folder path in the following format computer name folder name Destinations that match the search conditions are displayed 4 Press the or key to select the destination and then press the key The check box on the left side of the selected destination is selected 5 Press the OK key Specifying Scan to Folder Destinations 65 2 ...

Page 684: ...ws Server 2003 2003 R2 2008 and Mac OS X 10 2 or later Depending on the operating system of the client computer access to the shared folder may require authentication This machine does not support DFS Distributed File System You can send a file to a shared folder over the network by any of the following methods Enter the path to the destination manually Specifying the destination folder path by br...

Page 685: ...s desk01 desk01 user Instead of specifying the destination using its computer name you can also use its IPv4 address 5 Enter a user name used to log on to the client computer and then press the OK key 6 Enter the password used to log on to the client computer and then press the OK key The Confirm Destination screen appears 7 Press Com Test A connection test starts Specifying Scan to Folder Destina...

Page 686: ...r its folder path The connection test may take time Even if the connection test was successful the machine may fail to transfer the file if you do not have write privileges for the file or there is not enough free hard disk space You can register the path to the destination in the machine s address book For details see Registering the Path to the Selected Destination in the Address Book p 78 Regis...

Page 687: ...s the or key Select the computer and then press the OK key The computer folder opens Press Up or the Escape key to go up one level 6 A login screen appears if authentication is required Enter a user name and password used to log on to the client computer and then press the OK key 7 Select the destination folder and then press Apply If you cannot find the destination folder press the or key Select ...

Page 688: ...word a confirmation message appears If you press Cancel while browsing the network the Path Entry Method screen reappears Computer and shared folder names containing more than 12 characters cannot be displayed Up to 100 computers and shared folders can be displayed on the Browse Ntwrk screen The machine may fail to transfer the file if you do not have the write privileges for the shared folder or ...

Page 689: ...tions when sending files to an FTP server Entering the path to an FTP server manually You can enter the path to an FTP server manually 1 Press Dest 2 Select FTP and then press the OK key 3 Enter the FTP server name and then press the OK key Instead of specifying the destination using its server name you can also use its IPv4 address 4 If you change the port number specified under System Settings e...

Page 690: ... the destination folder and then press the OK key The following is an example of a path where the sub folder name is lib and the folder name is user user lib A destination confirmation screen appears 8 Press Com Test A connection test starts 9 The test result appears Press Exit 2 Sending Scan Files to Folders 72 2 ...

Page 691: ...etWare Server This section explains how to specify destinations when sending files to a NetWare server The NetWare folder of the destination can be specified in an NDS tree or on a NetWare Bindery server depending on the NetWare environment Consult your administrator You can send a file to NetWare server by any of the following methods Enter the destination path of the Netware server directly Spec...

Page 692: ...you set the connection type to NDS the NDS tree name is tree the name of the context including the volume is context the volume name is volume and the folder name is folder the path will be tree volume context folder If you set the connection type to Bindery the NetWare server name is server the volume name is volume and the folder name is folder the path will be server volume folder 6 Enter a use...

Page 693: ...ress Exit 10 Press the OK key If you change the protocol after entering the path name user name or password a confirmation message appears You can connect only to folders that you have the read privileges for The connection test may take time Even if the connection test was successful the machine may fail to transfer the file if you do not have write privileges for the file or there is not enough ...

Page 694: ... tree or on a NetWare Bindery server 1 Press Dest 2 Select NCP and then press the OK key 3 Select the connection type and then press the OK key Select NDS to specify a folder in the NDS tree Select Bindery to specify a folder on the NetWare Bindery server 4 Press Browse Network and then press the OK key A list of NetWare Bindery servers or NDS trees on the network appears 2 Sending Scan Files to F...

Page 695: ...thentication is required Enter a user name and password and then press the OK key 7 Select a context or volume that contains the required destination folder and then press the OK key A list of destination folders appears 8 Select the destination folder and then press Apply 9 The path to the selected folder is displayed Check the path is correct and then press the OK key Specifying Scan to Folder D...

Page 696: ...rver If you log on to the NDS tree enter a user name and then enter the name of the context containing the user object If the user name is user and the name of the Context is context the user name will be user context The machine may fail to transfer the file if you do not have write privileges for the folder or there is not enough free hard disk space You can register the path to the destination ...

Page 697: ...egister and the press Program 3 Enter the name and then press the OK key 4 Press Details and Reg No to specify registration information After you have made all settings press the OK key Depending on the security settings Program may not appear In such case you cannot complete registration For details consult your administrator Specifying Scan to Folder Destinations 79 2 ...

Page 698: ...2 Sending Scan Files to Folders 80 2 ...

Page 699: ...you to send scanning requests to this machine from a client computer through the network To begin a scan job send a scanning request from a client computer This function is available only if your computer has a WSD compliant operating system such as Windows Vista Check your computer s settings before using the WSD scanner The example explanations shown in this manual are based on Windows Vista Ult...

Page 700: ...rk Sending files using WSD Pull Type ZZZ805S 1 This machine Scans originals after receiving a scanning request from a client computer and then sends the scan files over the network to the client computer 2 Client computers WSD compliant You can specify scan settings and send scanning requests from client computers using Windows Fax and Scan or a similar application Client computers can receive fil...

Page 701: ... Guide Configuring the network settings in System Settings Configure the network settings in System Settings according to your environment and how you will be using the machine The following procedure explains connecting this machine to an IPv4 network using Ethernet cable Note that the settings you must configure will vary depending on your operating environment For details about network settings...

Page 702: ...thernet and then configure the network settings Enabling WSD using Web Image Monitor To use this machine as a WSD scanner you must first configure the following settings using Web Image Monitor on a client computer Settings for WSD Push Type and WSD Pull Type WSD protocol default setting Active Click Configuration click IPv4 or IPv6 under Network and then enable WSD Scanner Settings to enable WSD ...

Page 703: ... Monitor Help Registering the machine to a client computer Use the following procedure to register this machine to a client computer You must log on as an Administrators group member to register the machine The client computer cannot detect the machine if they are on different network segments or if the Windows Vista Network Search setting is disabled For details see Windows Help 1 On the Start me...

Page 704: ... p 95 Changing a Scan Profile 3 Sending Scan Files Using WSD 86 3 ...

Page 705: ...or key to display the destinations in the order they were selected To check the selected destination press the Check Destination key 3 E mail Scan to Folder Network Delivery Scanner WSD Scanner Press to switch between screens 4 WSD Dest The list of available destinations is displayed here If all of the destinations cannot be displayed press the or key to move through the list 5 Options Press to ma...

Page 706: ...one destination per scan job To cancel a specified destination press the destination again or press the Clear Stop key To cancel scanning press the Clear Stop key You cannot scan originals while other originals are being scanned Two sided originals are scanned for sideways opening top to top orientation If scanning takes too long the client computer might time out causing the message Automatic Sca...

Page 707: ...uter from the destination list Searching for a destination computer and then selecting it If you are using this machine as a WSD scanner you can specify only one destination per scan job Selecting a destination client computer from the destination list Use the following procedure to select a destination client computer from the destination list Destinations appear in the destination list after you...

Page 708: ...ail to Computer Name Scan for Fax to Computer Name Scan for OCR to Computer Name Scan for OCR to Computer Name might not be available depending on the destination client computer If the target destination does not appear take one of the following steps Display the destination by selecting the initial letter of its title Display the destination by pressing the or key You can also search for the des...

Page 709: ...rch Cond Name 1 and then press the OK key 3 Enter a part of the destination name 4 Press the OK key 5 Select a search criterion and then press the OK key appears on the left side of the specified setting You can also refine the search by setting multiple search conditions 6 Press Search Using the WSD Scanner Push Type 91 3 ...

Page 710: ...arch for ABC enter A B or C Exclude The names which do not contain an entered character or characters are targeted For example to search for ABC enter D First Word The names which start with the entered character or characters are targeted For example to search for ABC enter A Last Word The names which end with the entered character or characters are targeted For example to search for ABC enter C ...

Page 711: ...s scanned Send the scan data by e mail as an attachment or save it as a file If the Administrator Tools are not enabled in Web Image Monitor you cannot use the WSD scanner function To use this function you must set the external scan setting to Do not Prohibit For details see Enabling WSD using Web Image Monitor Only one original can be scanned per scanning request If you select Feeder Scan one sid...

Page 712: ...e Detect function is not available when you are using the WSD scanner Pull Type To scan an original correctly place it as shown in the following table Placing an original Scanning method Exposure glass ADF Original orientation Exposure glass top corner touching top left corner of exposure glass Auto Document Feeder ADF top edge leading p 96 Scan Profile Items and Settings p 84 Enabling WSD using W...

Page 713: ...les window appears 4 Select a profile and then click Edit The changed profile dialog box appears 5 Configure the necessary settings For details see Scan Profile Items and Settings 6 Click Save Profile The changed scan settings are saved as a profile If a profile does not appear in the Scanner and Cameras dialog box the associated machine might be turned off or the required WSD scanner settings mig...

Page 714: ...file You can register multiple profiles If multiple profiles are registered the profile specified as default in the Scan Profiles dialog box is applied To specify a scan profile as the default profile perform one of the following procedures In the Scan Profiles dialog box click the scan profile and then click Set as Default After you create a new scan profile in the Add New Profile dialog box sele...

Page 715: ...t Select one of the following Color Grayscale Black and white File type Select one of the following BMP Bitmap Image JPG JPEG Image PNG PNG Image TIF TIFF Image Resolution DPI Specify the resolution Brightness The setting you specify here will not be applied for scanning Contrast The setting you specify here will not be applied for scanning Configuring the Scan Settings on a Client Computer 97 3 ...

Page 716: ...3 Sending Scan Files Using WSD 98 3 ...

Page 717: ...emory device is FAT16 Saving might fail if the USB memory stick features password protection or other security features Certain types of USB memory sticks cannot be used To save files on a removable memory device you must attach the optional media slot to the machine Do not connect the optional media slot to other machines Connect only USB memory sticks to the optional media slot not any other for...

Page 718: ...3 Client Computer Using applications on a client computer scan files saved on a removable memory device can be printed and viewed Files saved on a removable memory device cannot be printed or sent using the functions of this machine To perform operations on files saved on a removable memory device you must use an application on a client computer 4 Saving Scan Files on a Removable Memory Device 100...

Page 719: ... 3 Make sure that no previous settings remain If a previous setting remains press the Clear Modes key 4 Place originals 5 Press Options to select Output Method and then press the OK key 6 Select Store to Memory Device and then press the OK key 7 Press the Escape key 8 Press Options to select Send Options and then press the OK key For details see Specifying Send Options 9 If necessary select the or...

Page 720: ...movable memory device new files might not be saved even if there appears to be sufficient free space If the removable memory device is partitioned files are saved on the first partition To cancel writing press the Clear Stop key If files are being written when writing is cancelled any partially written files are deleted Only complete files are stored on the removable memory device The LED lamp on ...

Page 721: ...tware seethemanuals that are supplied with it Overview of Scan File Delivery This section describes the process for delivering files using the network delivery scanner ZZZ808S 1 This machine You can send scan files to the delivery server 2 Delivery server Install the ScanRouter delivery software on this computer to use it as the delivery server After receiving a scan file the delivery server deliv...

Page 722: ...etwork Check that this machine is properly connected to the network For details about how to connect this machine to a network see Connecting to the Interfaces Network and System Settings Guide Configuring the network settings in System Settings Configure the network settings in System Settings according to your environment and how you will be using the machine The following procedure explains con...

Page 723: ...rnet and then press the OK key 8 Select File Transfer and then press the OK key 9 Select Delivery Option and then select On If an extended wireless LAN board optional is installed press LAN Type on the Interface Settings then press Ethernet and then configure the network settings Configure the necessary settings in Scanner Features Using Scanner Features you can make or change various settings rel...

Page 724: ...s about network settings see Connecting the Machine Network and System Settings Guide p 106 Installing DeskTopBinder Lite from the Supplied CD ROM Installing DeskTopBinder Lite from the Supplied CD ROM This section explains how to install DeskTopBinder Lite on a client computer from the supplied CD ROM To view or receive files delivered to the in trays you must install DeskTopBinder Lite on the cl...

Page 725: ...twork Delivery Scanner icon Indicates that the Network Delivery Scanner screen is displayed 2 Destination field Displays a selected destination If multiple destinations are selected press the or key to display the destinations in the order they were selected To check the selected destination press the Check Destination key 3 E mail Scan to Folder Network Delivery Scanner Press to switch between sc...

Page 726: ...ow to send a file by e mail via the delivery server see the ScanRouter delivery software manuals 5 Options Press to make the scan settings 6 Add Dest When selecting multiple destinations after a manual entry of an e mail address press Add Dest and then enter the e mail address of the destination 7 EditDest When changing an e mail address that has been entered press EditDest and then enter the new ...

Page 727: ...mail or Scan to Folder screen is displayed press to switch to the Network Delivery Scanner screen 3 Place originals 4 If necessary select the original type For details see Selecting Original Type 5 If necessary specify the scanning density For details see Adjusting Image Density 6 Select the destination You can specify multiple destinations For details see Specifying Delivery Destinations 7 If nec...

Page 728: ... then enter a destination e mail address For details about the procedure for manually entering e mail addresses see Entering an E mail Address Manually If you have selected two or more destinations the destinations can be made to appear one by one by pressing the or key To cancel a selected destination display the destination in the destination field and then press the Clear Stop key You can use t...

Page 729: ...ncel scanning press the Clear Stop key p 151 Selecting Original Type p 153 Adjusting Image Density p 112 Specifying Delivery Destinations p 137 Specifying Send Options p 118 Specifying the Sender p 125 Entering the Subject of the E mail to Be Transmitted via the Delivery Server p 30 Entering an E mail Address Manually p 45 Setting the Return Receipt Function p 13 Check destination Basic Procedure ...

Page 730: ...see Registering Addresses and Users for Facsimile Scanner Functions Network and System Settings Guide 1 Press a Quick Dial key of the same number as the Short ID of the destination registered in the delivery server Repeat this step to add more destinations BRB005S The illustration is an example The actual appearance may be different For details about how to set Short IDs see the manuals supplied w...

Page 731: ... destination from the list 1 Press the Search Destination key BRB003S The illustration is an example The actual appearance may be different 2 Press the or key to select Display List and then press the OK key 3 Press the or key to select the destination and then press the key The check box on the left side of the selected destination is selected Repeat this step to add more destinations Specifying ...

Page 732: ...ing the ScanRouter delivery software For details about how to set Short IDs see the manuals supplied with the ScanRouter delivery software 1 Press the Search Destination key BRB003S The illustration is an example The actual appearance may be different 2 Press the or key to select Search by Registration No and then press the OK key 3 Usingthenumberkeys enterthethree digitregistrationnumberassignedt...

Page 733: ...in the delivery server s Destination List 1 Press the Search Destination key BRB003S The illustration is an example The actual appearance may be different 2 Select Search by Name and then press the OK key 3 Enter the beginning of the destination name and then press the OK key twice Specifying Delivery Destinations 115 5 ...

Page 734: ...ch by comment for a destination in the delivery server s Destination List The Search by Comment function searches for a destination using the comment one of the registration items required by the ScanRouter delivery software as a keyword 1 Press the Search Destination key BRB003S The illustration is an example The actual appearance may be different 2 Select Search by Comment and then press the OK ...

Page 735: ...ment and then press the OK key twice 4 Press the or key to select the destination and then press the key The check box on the left side of the selected destination is selected 5 Press the OK key Specifying Delivery Destinations 117 5 ...

Page 736: ...t entering anything for Sender s Name For detail see File Transfer Network and System Settings Guide Depending on the security setting the logged on user may be specified as Sender s Name Whenaprotectioncodehasbeenset ascreenforenteringtheprotectioncodeappearsafterselecting the sender Enter the protection code and then press the OK key If the protection code you entered is correct the sender name ...

Page 737: ...ins how to select a sender by searching the delivery server s Destination List There are four methods of selecting a sender that is registered in the delivery server s Destination List Select the sender from the sender list Select the sender by entering the registration number Select the sender by name Selecting a Sender from the List This section explains how to select a sender from the sender li...

Page 738: ... appearance may be different 4 Press the or key to select Display List and then press the OK key 5 Press the or key to select the sender and then press the key The check box on the left side of the selected sender is selected To cancel a selected sender press the or key to select the target sender and then press the key 5 Delivering Scan Files 120 5 ...

Page 739: ...nd Options screen reappears Using a Registration Number to Specify a Sender Name Select the sender using the registration numbers specified by senders in the machine s address book 1 Press Options 2 Select Sender s Name and then press the OK key Specifying the Sender 121 5 ...

Page 740: ...4 Press the or key to select Search by Registration No and then press the OK key 5 Use the number keys to enter the three digit number assigned to the sender and then press the OK key Example To enter 001 Press the 1 key and then press the OK key 6 Press the OK key 7 Press the OK key 5 Delivering Scan Files 122 5 ...

Page 741: ...ow to search by name for a sender in the machine s address book 1 Press Options 2 Select Sender s Name and then press the OK key 3 Press the Search Destination key BRB003S The illustration is an example The actual appearance may be different 4 Select Search by Name and then press the OK key Specifying the Sender 123 5 ...

Page 742: ... OK key twice Senders that match the search conditions are displayed 6 Press the or key to select the sender and then press the key 7 Press the OK key 8 Press the OK key Programmed appears and then the Send Options screen reappears 5 Delivering Scan Files 124 5 ...

Page 743: ...tach Subject and then press the OK key 3 Enter the subject and then press the OK key Programmed appears and then the Send Options screen reappears If you specify a default subject line in Default E mail Subject under Scanner Features you will not have to enter a subject line for each e mail you send For details see Send Settings p 160 Send Settings Entering the Subject of the E mail to Be Transmit...

Page 744: ...5 Delivering Scan Files 126 5 ...

Page 745: ...iver from the Supplied CD ROM To use the network TWAIN scanner a TWAIN compliant application such as DeskTopBinder must be installed on the client computer DeskTopBinder Lite is on the supplied CD ROM For details about installing DeskTopBinder Lite see Installing DeskTopBinder Lite from the Supplied CD ROM p 130 Installing the TWAIN Driver from the Supplied CD ROM p 106 Installing DeskTopBinder Li...

Page 746: ... press Exit Preparing to Use the Network TWAIN Scanner To use this machine as a network TWAIN scanner you must first perform the following Check the machine is properly connected to the network Configure the network settings in System Settings Install the TWAIN driver on a client computer Install a TWAIN compliant application on the same client computer Checking the machine is properly connected t...

Page 747: ...key To specify a static IPv4 address for this machine select Specify and then press the left selection key to select IP Add Enter the IP address by using the number keys and then press the OK key To obtain an IPv4 address from a DHCP server automatically for this machine select Auto Obtain DHCP and then press the OK key 5 Select IPv4 Gateway Address and then press the OK key 6 Select Effective Pro...

Page 748: ...r on a client computer 1 Start Windows and then insert the CD ROM labeled into the CD ROM drive of the client computer The installer starts 2 Click TWAIN Driver 3 The installer of the TWAIN driver starts Follow the instructions Before you start the installation check the system requirements for the TWAIN driver For details about the system requirements see Software Supplied on CD ROM You can insta...

Page 749: ... p 168 Software Supplied on CD ROM p 168 Auto Run Program Before Using the Network TWAIN Scanner 131 6 ...

Page 750: ... 4 Select the name of the machine you want to use in the list and then click Select 5 Click OK 6 Place originals 7 On the File menu point to Add Document and then click Scan to display the Scanner Control dialog box The Scanner Control dialog box and DeskTopBinder viewer will appear A dialog box that is used to control a scanner using the TWAIN driver is referred to as the Scanner Control dialog b...

Page 751: ...t check that the scanner is correctly connected to the network and that its IPv4 address has been specified If the correct scanner still does not appear in the Network Connection Tool that is installed with the TWAIN driver select the Use a specific scanner check box and then specify the IP address or host name of the scanner you want to use For details see the Help for the Network Connection Tool...

Page 752: ...ox For details about how to open the Scanner Control dialog box see Basic Network TWAIN Scanner Procedure 2 In the Original Scan Method list select the place where the original is placed 3 If you placed an original on exposure glass in the Orig Orientn list select or 4 In the Orientation list select or 5 If you placed originals on ARDF select 1 Sided 2 Sided Top to Top or 2 Sided Top to Bottom in ...

Page 753: ... edge touches rear of exposure glass bottom edge touches left side of exposure glass bottom edge touches top of exposure glass ADF Original Orientation TWAIN Scanner Control Dialog Box Key top edge of original placed first top edge touches rear of ADF bottom edge touches left side of ADF bottom edge touches top of ADF Scan Settings When Using TWAIN Scanner 135 6 ...

Page 754: ...tual shape of the original is different the combination of original orientation and the orientation specified on the scanner driver does not change For details about the Scanner Control dialog box see the TWAIN driver Help Depending on the settings originals of different sizes are scanned differently 6 Scanning Originals with the Network TWAIN Scanner 136 6 ...

Page 755: ...mail Signature see chapter 1 Sending Scan Files by E mail p 15 Sending Scan Files by E mail p 36 Specifying the E mail Sender p 46 Entering the E mail Subject p 45 Setting the Return Receipt Function p 47 Security Settings to E mails Resolution Select resolution for scanning originals Select 100 dpi 200 dpi 300 dpi 400 dpi or 600 dpi as the scanning resolution 1 Press Options 2 Press the or key to...

Page 756: ...This section explains how to correctly display the top bottom orientation of scanned originals on a client computer screen 1 Press Options 2 Press the or key to select Original Orientation and then press the OK key 3 Select or for the same orientation as the original and then press the OK key Programmed appears and then the Send Options screen reappears 4 Press the Escape key 7 Various Scan Settin...

Page 757: ...wn on the exposure glass Original orientation and control panel key selection Original orientation Control panel key top edge touches top left corner of exposure glass BPS005S top edge touches rear of exposure glass BPS006S ARDF Hold the original so that its text is in the natural readable orientation and then place it face up in the ARDF Original orientation and control panel key selection Origin...

Page 758: ...al Setting and then press the OK key 3 Select 1 Sided Original to scan one sided originals and then press the OK key Select 2 Sided Orig T to T or 2 Sided Orig T to B to scan two sided originals and then press the OK key The following table explains the relationship between the page opening orientation and control panel selection key Page opening orientation Page opening orientation Control panel ...

Page 759: ...ms and sizes can be selected Template size A4 A5 A5 B5 JIS 81 2 14 81 2 13 81 2 11 51 2 81 2 51 2 81 2 Custom Size Scans in a specified size Horizontal width 139 356 mm 5 5 14 0 inches Vertical length 139 216 mm 5 5 8 5 inches 1 Press Options 2 Press the or key to select Scan Size and then press the OK key 3 Press the scroll keys to select the scan size in the list and then press the OK key Specif...

Page 760: ...size This section explains how to specify a custom size To scan a custom size original measure its width and length and enter these figures as the Horiz and Vert settings The following figure shows the Horiz and Vert of an original Placing an original in the ARDF ALO031S 1 Vertical 2 Horizontal Placing an original on the exposure glass ALO032S 1 Vertical 2 Horizontal 7 Various Scan Settings 142 7 ...

Page 761: ...ey 4 Using the number keys enter the horizontal width and then press the OK key or key 5 Using the number keys enter the vertical length and then press the OK or key Programmed appears and then the Send Options screen reappears 6 Press the Escape key File Type This section explains the procedure for selecting a file type Specifying Send Options 143 7 ...

Page 762: ...e and the number of files sent is the same as the number of pages scanned Multi page TIFF Multi page PDF If you select a multi page file type when scanning multiple originals scanned pages are combined and sent as a single file Selectable file types differ depending on the scan settings and other conditions For details about file types see Notes About and Limitations of File Types 1 Press Options ...

Page 763: ...nal Type and Compress Gray Full Clr is set to On under Scanner Features you cannot select Multi page TIFF PDF Security Encryption This section explains security settings for PDF files Use security settings to prevent unauthorized access to PDF files Security settings can be made for PDF files only Encrypting PDF file Set a password to protect a PDF file Only users who have the password can open th...

Page 764: ...d entered here will be required to open the PDF file 6 Enter the password again and then press the OK key Programmed appears and then the PDF Security Encryption screen reappears 7 Press the Escape key twice The Encryption Password must be different from the Master Password which is used for changing PDF Security Permissions You can enter up to 32 alphanumeric characters for a document password 7 ...

Page 765: ...and then press the OK key 4 Select 40 bit or 128 bit and then press the OK key Programmed appears and then the PDF Security Encryption screen reappears 5 Press the Escape key twice PDF file created under the 128 bit Encryption Level cannot be viewed using Adobe Acrobat Reader 3 0 and 4 0 If Permit Low Resolution Only is specified as the print permission in PDF Security Permissions you cannot selec...

Page 766: ...le only for scan files sent by e mail or Scan to Folder You cannot reset or change a file s restriction setting without the Master Password Make sure you do not forget the Master Password 1 Press Options 2 Press the or key to select PDF Security Permissions and then press the OK key 3 Select Master Password and then press the OK key 4 Select On and then press the OK key The password entry screen a...

Page 767: ...Permissions and then press the OK key 8 Change the PDF security settings You can specify the following security settings Print permission Prohibit Permit All and Permit Low Resolution Only Changing permission Prohibit or Permit Copying or extracting content permission Prohibit or Permit The following is a procedure to prohibit printing of scanned PDF files 9 Select Print and then press the OK key ...

Page 768: ...1 Press the Escape key three times The Master Password must be different from the Encryption Password You can enter up to 32 alphanumeric characters for a Master Password If 40 bit is selected as the PDF encryption level you cannot select Permit Low Resolution Only as the print permission 7 Various Scan Settings 150 7 ...

Page 769: ...ip with Original Type Setting Default settings are shown in bold type How to select an original type Color Scan key Original key Original Type Setting On Text Type 1 Colour Text Full Colour Text Photo Full Colour Glossy Photo On Photo Type 2 Colour Photo Full Colour Text Photo Full Colour Glossy Photo Off Text Type 3 B W Text Text Line Art Text Text Photo Photo Gray Scale Off Photo Type 4 B W Phot...

Page 770: ...ype and then Type 3 B W Text or Type 4 B W Photo select Gray Scale Then to scan your originals in gray scale select the original type that you set to Gray Scale For details about Original Type see Scanner Features If images scanned in gray scale are not clear enough you can rescan them by selecting Type 1 Colour Text or Type 2 Colour Photo p 155 Scanner Features 7 Various Scan Settings 152 7 ...

Page 771: ...he density There are five levels of scanning density 1 Press the Lighter or Darker key to adjust the density BRB013S The density indicator moves one place per button push The image density changes in five increments as follows ABU042S Adjusting Image Density 153 7 ...

Page 772: ...7 Various Scan Settings 154 7 ...

Page 773: ...stem settings For details about returning to the initial screen see Closing User Tools Any changes you make in Scanner Features remain in effect even if the main power switch or operation switch is turned off or the Clear Modes key is pressed Depending on the sending method some settings cannot be applied p 156 Closing User Tools Changing User Tools This section describes how to change the setting...

Page 774: ...instructions on the display and then press the OK key Press the Escape key to return to the previous display To cancel changes made to the settings and return to the initial display press the User Tools Counter key Closing User Tools This section describes how to end User Tools 1 Press the User Tools Counter key BRB001S 8 Scanner Features 156 8 ...

Page 775: ... to 356 0 mm 5 5 to 14 0 inch Original Setting This setting is available only when you have installed the optional ARDF Set the default for whether originals are one sided or two sided and if two sided the relationship betweenthosesides When theoriginalsarealwaysthesame setthisforthe defaulttomakeoperation easier 1 Sided Original 2 Sided Orig Top to Top 2 Sided Orig Top to Bottom Orig Orientation ...

Page 776: ... Detect Use the Blank Page Detect function to prevent blank pages being scanned If the first page of the originals is blank the machine beeps to warn you that you might have placed blank originals On Off When the Blank Page Detect function is set to On the outermost 1mm of an original s edge border cannot be scanned Blank pages of custom size originals may not be detected This function is availabl...

Page 777: ... the machine is in the initial state E mail Folder Delivery Server WSD Update Server Dest List Normally the delivery server destination list is automatically updated This function allows manual updating at any time To update the delivery server destination list select Update Server Dest List and then press the OK key Dest List Priority 2 In the machine s address book select which address book appe...

Page 778: ...ives a TWAIN or WSD Pull Type scanning request The default setting is On 10 second s If you select Off the machine will switch to the network TWAIN or WSD Pull Type scanner function immediately If you select On use the number keys to enter a standby time 3 30 seconds The machine will switch to the network TWAIN or WSD Pull Type scanner function when the time specified here elapses following the la...

Page 779: ... Delete Oldest Transmission delivery results are deleted one by one as new results are stored Do not Print Disable Send Transmission delivery cannot be performed when the journal is full Print Scanner Journal The scanner journal is printed and deleted Delete Scanner Journal The scanner journal is deleted without being printed Max E mail Size Select whether or not to limit the size of an e mail to ...

Page 780: ...nguages BritishEnglish AmericanEnglish German French Italian Spanish Dutch Portuguese Polish Czech Swedish Finnish Hungarian Norwegian Danish Japanese Simplified Chinese Traditional Chinese Russian Hangul Catalan and Turkish The e mail text which is a template cannot be changed Default E mail Subject If an e mail subject is not entered when sending e mail the default e mail subject is applied when...

Page 781: ...der Scanner Features Default settings are shown in bold type Output Method Priority Specify whether to send scan files or save them on a removable memory device Send Store to Memory Device If Output Method Priority is displayed the Removable Memory Device function is available Output Settings 163 8 ...

Page 782: ...vels for functions whose settings can be changed by users other than the administrator Using Menu Protect you can prevent unauthenticated users from changing the user tools Menu Protect is a Scanner Features setting item You can also specify user access levels for the default setting for each function For details consult your administrator 8 Scanner Features 164 8 ...

Page 783: ...WSD Scanner or Network Delivery Functions This section explains the relationship between resolution and scan size when using the e mail Scan to Folder WSD Scanner or network delivery functions If Type 3 B W Text or Type 4 B W Photo is selected as the original type All combinations up to A4 and Legal 81 2 14 and 600 dpi can be scanned If Gray Scale is selected as the original type Refer to the tabl...

Page 784: ... TWAIN scanner directly see the TWAIN driver Help Certain original types and resolution settings can reduce scanning quality If Binary Text Binary Photo or 8 Colors is selected in Col Grad The scan size determines the maximum possible resolution Refer to the table below for the maximum resolution available for each scan size Scan size and maximum resolution Scan size Maximum resolution dpi A4 B5 A...

Page 785: ... 51 2 81 2 600 If 16770K colors is selected in Col Grad Scan size and maximum resolution Scan size Maximum resolution dpi Legal 81 2 14 300 81 2 13 312 A4 333 Letter 81 2 11 339 B5 385 A5 472 51 2 81 2 479 B6 546 A6 600 Relationship between Resolution and Scan Size 167 9 ...

Page 786: ...r finishes reading from the CD ROM If Cancel is pressed during installation the installation of all the software thereafter will be stopped If cancelled reinstall the remaining software after restarting the client computer TWAIN Driver This section tells you the file path to the TWAIN driver and the TWAIN driver s system requirements You must install this driver if you want to scan originals or us...

Page 787: ...rating system Microsoft Windows 2000 Professional SP1 or later Microsoft Windows 2000 Server SP1 or later Microsoft Windows 2000 Advanced Server SP1 or later Microsoft Windows XP Professional Home Edition Microsoft Windows Vista Ultimate Enterprise Business Home Premium Home Basic Microsoft Windows Server 2003 Standard Edition Enterprise Edition Microsoft Windows Server 2003 R2 Standard Edition En...

Page 788: ...SmartDeviceMonitor for Client provides functions for continuous device status monitoring on the network via TCP IP or IPX SPX 9 Appendix 170 9 ...

Page 789: ...ing by E mail Item Maximum value Comments Number of subject line characters 128 alphanumeric characters Number of e mail address characters 128 alphanumeric characters E mailaddressesfoundviaLDAP server search cannot be selected if they contain more than 128 characters Number of addresses you can specify at the same time 100 addresses You can specify 50 destinations by direct entry including LDAP ...

Page 790: ...n FTP 64 alphanumeric characters Number of password characters on FTP 64 alphanumeric characters Number of path name characters on NCP 256 alphanumeric characters Number of user name characters on NCP 128 alphanumeric characters Number of password characters on NCP 64 alphanumeric characters Number of addresses that can be specified simultaneously 50 addresses You can specify a maximum of 32 direc...

Page 791: ...aximum values available for the WSD scanner function settings Values of Set Items for WSD Scanner Transmission Item Maximum value Comments Number of destinations you can specify at the same time 1 destination Sendable file size 31 875 MB per file Sendable number of pages 250 pages per file Network Delivery Function The following table tells you the values of setting items for the network delivery ...

Page 792: ... entry including LDAP search Select the remaining 50 destinations from registered addresses The maximum number of destinations you can specify differs depending on which ScanRouter delivery software youareusing Fordetails seethe manuals supplied with the ScanRouter delivery software Sendable file size 31 875 MB per file 9 Appendix 174 9 ...

Page 793: ...le or not available with the TWAIN and WIA scanners For details about the TWAIN scanner see Scanning Originals with the Network TWAIN Scanner p 127 Scanning Originals with the Network TWAIN Scanner Functions of the TWAIN and WIA scanners Functions TWAIN WIA 1 Scan Scan from the exposure glass Yes Yes Continuous scan from the ADF Yes Yes Specify the number of files for scanning from the ADF Yes 1 Y...

Page 794: ...2 Orientation Yes Yes 2 Scan Settings 1 Sided Yes Yes 2 Sided Yes Yes 2 Sided Top to Top Top to Bottom Yes No Resolution Yes Yes Brightness Yes Yes Contrast Yes Yes Threshold Yes Yes 2 Col Grad Binary Yes Yes Gray Scale Yes Yes 8 Colors Yes No Full colour Yes Yes Gam Curve Yes No Eras Bgrnd Yes No Advanced Filter Filter Dropout Col Yes No Color Matching ICM Inversion Yes No 9 Appendix 176 9 ...

Page 795: ...Authentication Basic authentication Yes Yes Network Connection Settings for using a specific scanner Yes Yes SNMP V3 Auth information Yes Yes Version information display Yes Yes 1 You might not be able to specify settings for this function from some applications 2 The preview does not reflect changes made for settings while it is displayed To display the preview image with the changed settings app...

Page 796: ...e Scan to Removable device network delivery scanner function Original size A4 Resolution 200 dpi 1 side scanning Black and white 22 page min Original Type Setting Text Line Art Compression B W MH ITU T No1 Chart Full color 10 page min Original Type Setting Full Colour Text Photo Compresss Gray Full Clr Default Original Chart Scanning speed differs depending on the following operating environment o...

Page 797: ... scanning resolutions when using the Scan to Folder function main scanning sub scanning 100 dpi 200 dpi 300 dpi 400 dpi 600 dpi Protocol for Scan to Folder SMB FTP NCP SendablefileformatswhenusingtheScantoFolder function TIFF JPEG PDF Protocol for sending using WSD Web Services on Devices for scanning Selectable scanning resolutions when using the Network delivery scanner function main scanning su...

Page 798: ...ions when using WIA scanner main scanning sub scanning 100 dpi to 600 dpi Protocol for WIA scanner TCP IP Operating system for WIA scanner Windows Vista SP1 or later Windows Server2008 Specifications are subject to change without notice 9 Appendix 180 9 ...

Page 799: ...osoft Windows 98 The product name of Windows Me is Microsoft Windows Millennium Edition Windows Me The product names of Windows 2000 are as follows Microsoft Windows 2000 Professional Microsoft Windows 2000 Server Microsoft Windows 2000 Advanced Server The product names of Windows XP are as follows Microsoft Windows XP Home Edition Microsoft Windows XP Professional The product names of Windows Vis...

Page 800: ...8 Standard Microsoft Windows Server 2008 Enterprise Microsoft Windows Server 2008 Datacenter The product names of Windows NT 4 0 are as follows Microsoft Windows NT Workstation 4 0 Microsoft Windows NT Server 4 0 9 Appendix 182 9 ...

Page 801: ...he registration numbers 114 selecting from a Quick Dial key 112 selecting from the delivery server s address book 112 selecting from the list 113 Destination e mail entering manually 30 registering a directly entered destination in the address book 34 searching an LDAP server 31 searching by e mail address 28 searching by name 27 selecting by entering the registration numbers 26 selecting from a Q...

Page 802: ...iority 157 Original orientation TWAIN scanner 134 Original Orientation 138 Original Setting 140 157 Original type 151 Original Type Setting 157 Outline delivering scan files 103 network TWAIN scanner 127 saving on a memory device 99 sending scan files by e mail 15 sending scan files by Scan to Folder 51 WSD scanner 81 Output Settings 163 P PC Scan Command Stdby Time 160 PDF Security Encryption 145...

Page 803: ...rching by name 40 selecting by entering a registration number 39 selecting from a Quick Dial key 36 selecting from the list 37 Sender Name 37 39 119 121 Sending files WSD scanner Pull Type 82 WSD scanner Push Type 82 Sending scan files by e mail 15 21 Sending scan files by Scan to Folder 58 Sending scan files to folders 51 Sending scan files using WSD scanner Pull Type 93 Sending scan files using ...

Page 804: ...W Web Image Monitor 19 WIA Scanning 175 WSD scanner 81 WSD scanner destination 89 WSD scanner screen 87 186 ...

Page 805: ...MEMO 187 ...

Page 806: ...MEMO 188 GB GB EN USA AE AE D468 ...

Page 807: ...Copyright 2008 ...

Page 808: ...Operating Instructions Scanner Reference D468 6751 EN USA ...

Page 809: ...simile Scanner Functions Special Operations under Windows Appendix 1 2 3 4 5 6 7 Read this manual carefully before you use this machine and keep it handy for future reference For safe and correct use be sure to read the Safety Information in About This Machine before using the machine Network and System Settings Guide Operating Instructions ...

Page 810: ......

Page 811: ...ser Tools 18 Changing Default Settings 18 Exiting User Tools 19 1 System Settings General Features 21 Tray Paper Settings 24 Timer Settings 26 Interface Settings 28 Network 28 Parallel Interface 32 Wireless LAN 33 Print I F Settings List 34 File Transfer 36 Administrator Tools 40 Programming the LDAP server 46 Programming the LDAP server 46 Changing the LDAP server 53 Deleting the LDAP server 54 P...

Page 812: ...ernet Fax 72 Ethernet 72 Wireless LAN 74 Network Settings Required to Use E mail Function 76 Ethernet 76 Wireless LAN 77 Network Settings Required to Use Scan to Folder Function 80 Ethernet 80 Wireless LAN 81 Network Settings Required to Use the Network Delivery Scanner 83 Ethernet 83 Wireless LAN 84 Network Settings Required to Use WSD Scanner 86 Ethernet 86 Wireless LAN 87 Network Settings Requi...

Page 813: ...Web Image Monitor 117 Displaying Top Page 118 When User Authentication is Set 120 About Menu and Mode 120 Access in the Administrator Mode 122 List of Setting Items 123 Displaying Web Image Monitor Help 129 Using SmartDeviceMonitor for Admin 131 Installing SmartDeviceMonitor for Admin 132 Changing the Network Interface Board Configuration 133 Locking the Menus on the Machine s Control Panel 134 Ch...

Page 814: ...tion 152 Auto E mail Notification 153 On demand E mail Notification 154 Format of On demand E mail Messages 154 Remote Maintenance by telnet 156 Using telnet 156 8021x 157 access 158 appletalk 159 authfree 160 autonet 160 bonjour 161 devicename 163 dhcp 163 dhcp6 164 diprint 165 dns 165 domainname 167 etherauth 168 etherconfig 168 help 168 hostname 169 ifconfig 169 info 170 ipp 171 ipsec 171 ipv6 ...

Page 815: ...yslog 187 upnp 187 web 188 wiconfig 189 wins 192 wsmfp 193 SNMP 195 Getting Printer Information over the Network 196 Current Printer Status 196 Printer configuration 202 Understanding the Displayed Information 204 Print Job Information 204 Print Log Information 204 Configuring the Network Interface Board 205 Message List 216 System Log Information 216 5 ...

Page 816: ...entication Information 235 Registering a User Code 235 Changing a User Code 238 Deleting a User Code 241 Displaying the Counter for Each User 244 Printing the Counter for Each User 245 Printing the Counter for All Users 247 Clearing the Number of Prints 248 Fax Destination 251 Registering a Fax Destination 252 Changing a Fax Destination 254 Deleting a Fax Destination 261 Registering an IP Fax Dest...

Page 817: ...eting a Group within Another Group 328 Changing a Group Name 330 Deleting a Group 332 Registering a Protection Code 334 Registering a Protection Code to a Single User 334 Registering a Protection Code to a Group User 337 Registering SMTP and LDAP Authentication 341 SMTP Authentication 341 LDAP Authentication 344 Searching 348 Searching by Name 348 Searching from the Display List 349 Searching by R...

Page 818: ...ynamic DNS Function 366 Updating 366 DNS Servers Targeted for Operation 367 DHCP Servers Targeted for Operation 367 Setting the Dynamic DNS Function 367 Precautions 369 Connecting a Dial Up Router to a Network 369 NetWare Printing 370 When the IEEE 802 11 Interface Unit is Installed 372 Configuring IEEE 802 1X 373 Installing a Site Certificate 373 Installing Device Certificate 374 Setting Items of...

Page 819: ...SASL 383 MD4 384 MD5 384 Samba Ver 3 0 4 384 RSA BSAFE 385 Open SSL 385 Open SSH 387 Open LDAP 391 Heimdal 392 IPSTM print language emulations 392 Trademarks 393 INDEX 395 9 ...

Page 820: ... Reference Scanner Guide Manuals for DeskTopBinder Lite DeskTopBinder Lite Setup Guide DeskTopBinder Introduction Guide Auto Document Link Guide Manuals provided are specific to machine types For UNIX Supplement please visit our Web site or consult an authorized dealer This manual includes descriptions of functions and settings that might not be available on this machine The following software pro...

Page 821: ...es as a result of handling or operating the machine For good copy quality the supplier recommends that you use genuine toner from the supplier The supplier shall not be responsible for any damage or expense that might result from the use of parts other than genuine parts from the supplier with your office products 12 ...

Page 822: ...ns and instructions on resolving user errors This symbol is located at the end of sections It indicates where you can find further relevant information Indicates the names of keys that appear on the machine s display panel Indicates the names of keys on the machine s control panel Names of Major Items Major options of this machine are referred to as follows in this manual Auto Document Feeder ADF ...

Page 823: ...cal dealer This machine comes in two models which vary in copy print speed To ascertain which model you have see Machine Types About This Machine About IP Address In this manual IP address covers both IPv4 and IPv6 environments Read the instructions that are relevant to the environment you are using 14 ...

Page 824: ...hecks passports driver s licenses The preceding list is meant as a guide only and is not inclusive We assume no responsibility for its completeness or accuracy If you have any questions concerning the legality of copying or printing certain items consult with your legal advisor This machine is equipped with a function that prevents making counterfeit bank bills Due to this function the original im...

Page 825: ... appears Press the or key to scroll to the setting you want to specify or change and then press the OK key to display the screen for specifying that setting 2 The number of pages in the displayed settings menu appears If you cannot see the entire menu press the or key to scroll the screen Reading the Display and Using Keys This section explains how to read the display and use the Selection keys If...

Page 826: ...Printer display When the instruction press JobReset appears in this manual press the left selection key When the instruction press Prt Jobs appears in this manual press the center selection key When the instruction press Menu appears in this manual press the right selection key 3 Escape key Press to cancel an operation or return to the previous display 4 OK key Press to set a selected item or an e...

Page 827: ...lt Settings This section describes how to change the settings of User Tools If Administrator Authentication Management is specified contact your administrator 1 Press the User Tools Counter key BKR020S 2 Select System Settings using the or and then press the OK key 3 Change settings by following instructions on the display and then press the OK key Press the Escape key to return to the previous di...

Page 828: ...Exiting User Tools This section describes how to end User Tools 1 Press the User Tools Counter key BKR020S 19 ...

Page 829: ...20 ...

Page 830: ...elect Program Change to program Change text phrases using or and then press the OK key 6 Select Not Programmed using or and then press the OK key To change programmed text phrases select the text phrases you want to change 7 Enter the text phrases you want to program and then press the OK key Enter the user text using up to 80 characters 8 Press the User Tools Counter key Delete 1 Press the User T...

Page 831: ...opier Print Priority Gives print priority to the mode displayed The default setting is Display mode When Interleave is selected the current print job will be interrupted after a maximum of five sheets Function Reset Timer You can set the length of time the machine waits before changing modes when using the multi access function This is useful if you are making many copies and have to change settin...

Page 832: ...ions of the Lighter and Darker keys when those keys are pressed and held down The default setting is Normal Measurement Unit You can switch the measurement between mm and inch The default setting is inch p 18 Accessing User Tools General Features 23 1 ...

Page 833: ...51 2 81 2 41 8 91 2 37 8 71 2 A4 A5 A5 B5 JIS C5 Env C6 Env DL Env 16K Custom Size The default setting is A4 81 2 11 You can specify a custom size of between 90 0 216 0 mm 3 55 8 50 in vertically and between 139 0 600 0 mm 5 48 23 62 in horizontally Paper Type Bypass Tray Sets the display so you can see what type of paper is loaded in the bypass tray The paper types you can set for the bypass tray...

Page 834: ...g for Duplex is On APS Auto Paper Select can only be selected for the copier function if No Display Plain Paper and Recycled Paper are selected If Off is selected Auto Paper Select is not valid For details about the relations between possible paper sizes and thickness see Recommended Paper Sizes and Types About This Machine Ppr Tray Priority Copier copier Specify the tray to supply paper for outpu...

Page 835: ...15 min Energy Saver may not work when error messages appear The machine automatically prints any fax or printer data received while in Energy Saver mode System Auto Reset Timer The System Reset setting automatically switches the screen to that of the function set in Function Priority when no operations are in progress or when an interrupted job is cleared This setting determines the system reset i...

Page 836: ... On 60 sec Set Date Set the date for the copier s internal clock using the number keys To change between year month and day press and key Set Time Set the time for the copier s internal clock using the number keys Enter the time using the 12 hour format in 1 second increments To change between hours minutes and seconds press and key Auto Logout Timer Specify whether or not to automatically log out...

Page 837: ...o set the subnet mask press Subnet M When the physical address MAC address appears press Mac Add IPv4 Gateway Address A gateway is a connection or interchange point between two networks Specify the gateway address for the router or host computer used as a gateway The default setting is 0 0 0 0 Machine IPv6 Address Displays the machine s IPv6 network address Link local Address The machine s specifi...

Page 838: ...63 characters WINS Configuration Specify the WINS server settings The default setting is On If On is selected enter the WINS Server IPv4 address as xxx xxx xxx xxx x indicates a number The default settings of WINS server 1 2 are 0 0 0 0 If DHCP is in use press Scope ID and then specify the scope ID Enter a scope ID using up to 31 characters Effective Protocol Select the Protocol to use in the netw...

Page 839: ...entered Do not set a computer name starting with RNP and rnp Use uppercase letters for alphabets SMB Work Group Specify the SMB work group Enter the computer name using up to 15 characters and spaces cannot be entered Use uppercase letters for alphabet Ethernet Speed Set the access speed for networks The default setting is Auto Select Select a speed that matches your network environment Auto Selec...

Page 840: ...ck the following and then retry the ping command Make sure that IPv4 in Effective Protocol is set to Active Check that the machine with assigned IPv4 address is connected to the network There is a possibility that the same IPv4 address is used for the specified equipment Permit SNMPv3 Communictn Set the encrypted communication of SNMPv3 The default setting is Encryption Cleartext If you select to ...

Page 841: ...the select signal of the parallel interface The default setting is High Input Prime Set whether to validate or invalidate the input prime signal upon reception Normally you do not need to change this setting The default setting is Inactive Bidirectional Comm Set the printer s response mode to a status acquisition request when using a parallel interface If you experience problems using another manu...

Page 842: ...nel that matches the type of wireless LAN being used The following channels are available IEEE 802 11b g 2 4GHz 1 13 channels IEEE 802 11a 5GHz 36 40 44 and 48 channels The default setting is 11 The channel in use might differ depending on the country Security Method Specify the encryption of the Wireless LAN The default setting is Off If you select WEP always enter WEP key If you select WPA speci...

Page 843: ...rastructure mode you can check the machine s radio wave status using the control panel Radio wave status is displayed when you press Wireless LAN Signal Restore Defaults You can return the wireless LAN settings to their defaults p 18 Accessing User Tools p 373 Configuring IEEE 802 1X Print I F Settings List This section describes how to print the configuration page You can check items related to t...

Page 844: ...r and then press the OK key 4 Select Print I F Settings List using or and then press the OK key 5 Press the Start key The configuration page is printed 6 Press the User Tools Counter key p 18 Accessing User Tools Interface Settings 35 1 ...

Page 845: ...number with the Direct SMTP server SMTP Authentication Specify SMTP authentication PLAIN LOGIN CRAMMD5 DIGEST MD5 When sending e mail to an SMTP server you can enhance the SMTP server security level using authentication that requires entering the user name and password If the SMTP server requires authentication set SMTP Authentication to On and then specify the user name password and encryption En...

Page 846: ...haracters Spaces cannot be entered Password Enter the password using up to 128 characters Spaces cannot be entered To enable POP server authentication before sending e mail via the SMTP server set POP before SMTP to On E mail is sent to the SMTP server after the time specified for Wait Time after Auth has elapsed If you select On enter server name in POP3 IMAP4 Settings Also check POP3 port number...

Page 847: ... registered When conducting SMTP authentication for the transmitted files under the Internet fax function the Administrator s E mail Address will appear in the From box If you have specified the user name and e mail address in SMTP Authentication make sure to specify this setting Enter up to 128 characters On e mailed scanned documents if Auto Specify Sender Name is Off specify the sender E mail C...

Page 848: ...y e mail under the fax function or if the specified e mail address is not registered in the machine s address book the machine s e mail address will appear in the From box If the machine does not have an e mail address the administrator s e mail address will appear in the From box Off If you select Off the specified e mail address will appear in the From box but you cannot send e mail without spec...

Page 849: ...ion Reg No Auth Info You can register a user code and specify the functions available to each user code You can also register user names and passwords to be used when accessing an LDAP server Auth Protect You can register a protection code Fax Settings You can register a fax number international TX mode label insertion E mail Settings You can register e mail address Folder Info You can register th...

Page 850: ...eviceMonitor for Admin Use SmartDeviceMonitor for Admin provided with the printer scanner unit Address Book Print List You can print the destination list registered in the Address Book Destination List Prints the list of names in the Address Book Group Destination List Prints the list of groups in the Address Book Quick Dial Labels Prints the quick dial label 1 Press the User Tools Counter key 2 S...

Page 851: ...set those values to 0 The number of prints may differ from the counter values shown in Disp Print User Counter Display Press or to show all the numbers of prints Copier Counter Printer Counter Facsimile Print Fax TX Page Counter Scanner Send Counter F Clr Scanner Send Counter B W Print All Users Prints the counter values for all the users Per User Prints the counter values for each user Clear All ...

Page 852: ...agement For details about this function consult your administrator Key Counter Management Specify the functions you want to manage with the key counter Copier Facsimile Printer Scanner External Charge Unit Mng For details about this function consult your administrator Enhanced Ext Charge Unit For details about this function consult your administrator Extended Security You can specify whether or no...

Page 853: ... to use the LDAP server for searching The default setting is Off If you select Off LDAP server list will not appear on the searching display Prog Change Delete Realm Program the realm to be used for Kerberos authentication Realm Name KDC Server Name Domain Name Be sure to set both the realm name and KDC server name when programming a realm For details about Prog Change Delete Realm see Programming...

Page 854: ... Fixed USB Port Specify whether or not to fix the USB port The default setting is Off If a computer with the printer driver installed is connected to another device of the same model through the USB interface selecting Level 1 for this option eliminates the additional installation of the driver to the computer If you want to select Level 2 contact your sales or service representative p 18 Accessin...

Page 855: ...e Password andthe RealmName If Digest Authentication or Cleartext Authentication is selected be sure to set the User Name and Password To use the LDAP server in Administrator Tools select On under LDAP Search The LDAP version 2 0 does not support Digest Authentication To select Kerberos Authentication a realm must be registered in advance Programming the LDAP server This section describes how to p...

Page 856: ...K key 6 Select the LDAP server you want to program or change using or and then press the OK key When programming the server select Not Programmed 7 Select Name using or and then press the OK key 8 Enter the name and then press the OK key 9 Select Server Name using or and then press the OK key Programming the LDAP server 47 1 ...

Page 857: ... dc salesdepartment o ABC In this example the description is for an active directory dc is for the organization unit and o is for the company Search base registration may be required depending on your server environment When registration is required unspecified searches will result in error Check your server environment and enter any required specifications 13 Select Port No using or and then pres...

Page 858: ...ng must be enabled on this machine For details consult your network administrator 17 Select Authentication using or and then press the OK key 18 Select Kerberos Authentication Digest Authentication Cleartext Authentication or Off using or and then press the OK key To make a search request to the LDAP server use the administrator account for authentication Authentication settings must comply with y...

Page 859: ...f proceed to step 22 19 Enter the User Name and then press the OK key When Kerberos Authentication Digest Authentication or Cleartext Authentication is selected for the authentication setting use the administrator account name and password Do not enter the administrator account name and password when using authentication for each individual or each search Procedures for the user name setting diffe...

Page 860: ...earch conditions or the search base 25 Select necessary search items such as Name E mail Address Fax Number Company Name and Department Name using or and then press the OK key You can enter an attribute as a typical search keyword Using the entered attribute the function searches the LDAP server s Address Book 26 Enter attribute and then press the OK key The attribute value may change depending on...

Page 861: ...egistered in your LDAP server and the name to be displayed on the control panel during the search For example to search e mail address by Employee No in the key display field The attribute value may change depending on the server environment Check the attribute complies with your server environment before setting it 30 Enter the Key Display and then press the OK key The registered Key Display appe...

Page 862: ... Select System Settings using or and then press the OK key 3 Select Administrator Tools using or and then press the OK key 4 Select Prog Chnge Del LDAP Server using or and then press the OK key 5 Select Program Change using or and then press the OK key 6 Select the LDAP server you want to program or change using or and then press the OK key Programming the LDAP server 53 1 ...

Page 863: ...ection describes how to delete the programmed LDAP server 1 Press the User Tools Counter key 2 Select System Settings using or and then press the OK key 3 Select Administrator Tools using or and then press the OK key 4 Select Prog Chnge Del LDAP Server using or and then press the OK key 5 Select Delete using or and then press the OK key 1 System Settings 54 1 ...

Page 864: ...6 Select the LDAP server you want to delete using or and then press the OK key 7 Press Yes 8 Press the User Tools Counter key Programming the LDAP server 55 1 ...

Page 865: ...ent specify the necessary items You can register up to 5 realms Programming the Realm This section describes how to program the Realm 1 Press the User Tools Counter key 2 Select System Settings using or and then press the OK key 3 Select Administrator Tools using or and then press the OK key 4 Select Prog Change Delete Realm using or and then press the OK key 5 Select Program Change using or and t...

Page 866: ...ame or host name You can enter a realm name using up to 64 characters If you enter the realm name proceed to step 11 9 Enter the KDC Server Name and then press the OK key Enter the KDC server name host name or IPv4 address You can enter a KDC server name using up to 64 characters If you enter the KDC server name proceed to step 11 10 Enter the Domain Name and then press the OK key Enter the domain...

Page 867: ...Select Prog Change Delete Realm using or and then press the OK key 5 Select Program Change using or and then press the OK key 6 Select the Realm you want to change using or and then press the OK key 7 Set each item as necessary 8 Press the OK key after setting each item 9 Press the User Tools Counter key Deleting the Realm This section describes how to delete the programmed Realm 1 Press the User ...

Page 868: ... or and then press the OK key 4 Select Prog Change Delete Realm using or and then press the OK key 5 Select Delete using or and then press the OK key 6 Select the realm you want to delete using or and then press the OK key 7 Press Yes 8 Press the User Tools Counter key Programming the Realm 59 1 ...

Page 869: ...1 System Settings 60 1 ...

Page 870: ...r RF interference suppression BKR005S 1 USB Host Interface Port for connecting the USB cable It is used to connect device such as a digital camera to this machine 2 IEEE 1284 port optional Port for connecting the IEEE 1284 interface cable 3 USB 2 0 port Port for connecting the USB2 0 interface cable 4 10BASE T 100BASE TX port Port for connecting the 100BASE TX or 10BASE T cable 5 Wireless LAN port...

Page 871: ...air Cable STP and Category type 5 or more 1 A ferrite core for the Ethernet interface cable is supplied with this machine Attach the ferrite core at the machine end of the Ethernet cable BKR010S 2 Make sure the main power switch of the machine is off 3 Connect the Ethernet interface cable to the 10BASE T 100BASE TX port BKR006S 4 Connect the other end of the Ethernet interface cable to a network c...

Page 872: ...stalling the printer driver see Preparing the Machine Printer Reference Connecting to the Gigabit Ethernet Interface This section describes how to connect the Ethernet interface cable to the Gigabit Ethernet port If the main power switch is on turn it off Use the following Ethernet cables When using 100BASE TX 10BASE T Unshielded Twisted Pair Cable UTP or Shielded Twisted Pair Cable STP and Catego...

Page 873: ... machine is off 3 Connect the Ethernet interface cable to the Gigabit Ethernet port BKR008S 4 Connect the other end of the Ethernet interface cable to a network connection device such as a hub 5 Turn on the main power switch of the machine BKR021S 1 Indicator yellow When 100BASE TX is operating the LED is lit yellow When 10BASE T is operating it is turned off 2 Connecting the Machine 64 2 ...

Page 874: ... USB2 0 port Properly shielded and grounded cables and connectors must be used for connections to a host computer and or peripheral in order to meet emission limits 1 Connect the USB2 0 interface cable to the USB2 0 port BKR007S 2 Connect the other end to the USB2 0 port on the host computer This machine does not come with a USB interface cable Make sure you purchase the appropriate cable for the ...

Page 875: ...ter consult your sales or service representative 4 Connect the other end of the cable into the interface connector on the host computer Check the shape of the connector to the computer Connect the cable firmly 5 Turn on the main power switch of the machine 6 Turn on the host computer WhenusingWindows2000 XP VistaandWindowsServer2003 2003R2 2008 aprinterdriver installation screen might appear when ...

Page 876: ... wireless LAN according to the following procedure BBM002S Select 802 11Ad hocMode whenconnectingWindowsXPasawirelessLANclientusingWindows XP standard driver or utilities or when not using the infrastructure mode When 802 11 Ad hoc Mode is selected in Communication mode select the channel for Channel Set a channel that matches the type of wireless LAN being used For details about setting the chann...

Page 877: ...ings p 373 Configuring IEEE 802 1X Checking the signal This section describes how to check the machine s radio wave status When using in infrastructure mode you can check the machine s radio wave status using the control panel 1 Press the User Tools Counter key 2 Select System Settings using or and then press the OK key 3 Select Interface Settings using or and then press the OK key 4 Select Wirele...

Page 878: ...d Interface Settings Network Machine IPv6 Address As required Interface Settings Network IPv6 Gateway Address As required Interface Settings Network IPv6 Stateless Setting As required Interface Settings Network DNS Configuration As required Interface Settings Network DDNS Configuration As required Interface Settings Network IPsec As required Interface Settings Network Domain Name As required Inter...

Page 879: ... Ethernet and wireless LAN are both connected the selected interface has priority p 28 Interface Settings Wireless LAN This section lists the settings required for using the printer or LAN Fax function with a wireless LAN connection For details about how to specify the settings see Interface Settings Menu User Tool Setting Requirements Interface Settings Network Machine IPv4 Address Necessary Inte...

Page 880: ...ictn As required Interface Settings Network Permit SSL TLS Comm As required Interface Settings Network Host Name As required Interface Settings Network Machine Name As required Interface Settings Wireless LAN Communication Mode Necessary Interface Settings Wireless LAN Ad hoc Channel As required Interface Settings Wireless LAN SSID Setting As required Interface Settings Wireless LAN Security Metho...

Page 881: ...chine IPv6 Address As required Interface Settings Network IPv6 Gateway Address As required Interface Settings Network IPv6 Stateless Setting As required Interface Settings Network DNS Configuration As required Interface Settings Network DDNS Configuration As required Interface Settings Network IPsec As required Interface Settings Network Domain Name As required Interface Settings Network WINS Conf...

Page 882: ...tive Protocol setting check that the protocol you want to use is set to Active LAN Type is displayed when the wireless LAN interface board is installed If both Ethernet and wireless LAN are connected the selected interface takes precedence SMTP Server and Fax E mail Account must be specified in order to send Internet Fax When POP before SMTP is set to On also make settings for Reception Protocol a...

Page 883: ...ork DDNS Configuration As required Interface Settings Network IPsec As required Interface Settings Network Domain Name As required Interface Settings Network WINS Configuration As required Interface Settings Network Effective Protocol Necessary Interface Settings Network LAN Type Necessary Interface Settings Network Permit SNMPv3 Communictn As required Interface Settings Network Permit SSL TLS Com...

Page 884: ...ess LAN and LAN Type are displayed when the wireless LAN interface board is installed If both Ethernet and wireless LAN are connected the selected interface takes precedence SMTP Server and Fax E mail Account must be specified in order to send Internet Fax When POP before SMTP is set to On you must also make settings for Reception Protocol and POP3 IMAP4 Settings When SMTP Authentication is set to...

Page 885: ...terface Settings Network Machine IPv6 Address As required Interface Settings Network IPv6 Gateway Address As required Interface Settings Network IPv6 Stateless Setting As required Interface Settings Network DNS Configuration As required Interface Settings Network DDNS Configuration As required Interface Settings Network IPsec As required Interface Settings Network Domain Name As required Interface...

Page 886: ...rface board is installed If both Ethernet and wireless LAN are connected the selected interface takes precedence When POP before SMTP is set to On also make settings for Reception Protocol and POP3 IMAP4 Settings When setting POP before SMTP to On check POP3 port number in E mail Communication Port p 28 Interface Settings p 36 File Transfer Wireless LAN This section lists the settings required for...

Page 887: ...quired Interface Settings Network Permit SSL TLS Comm As required Interface Settings Network Host Name As required Interface Settings Wireless LAN Communication Mode Necessary Interface Settings Wireless LAN SSID Setting As required Interface Settings Wireless LAN Ad hoc Channel As required Interface Settings Wireless LAN Security Method As required File Transfer SMTP Server Necessary File Transfe...

Page 888: ...selected interface takes precedence When POP before SMTP is set to On you must also make settings for Reception Protocol and POP3 IMAP4 Settings When setting POP before SMTP to On check POP3 port number in E mail Communication Port p 28 Interface Settings p 36 File Transfer Network Settings Required to Use E mail Function 79 2 ...

Page 889: ...erface Settings Network Machine IPv6 Address As required Interface Settings Network IPv6 Gateway Address As required Interface Settings Network IPv6 Stateless Setting As required Interface Settings Network DNS Configuration As required Interface Settings Network DDNS Configuration As required Interface Settings Network IPsec As required Interface Settings Network Domain Name As required Interface ...

Page 890: ...etails about how to specify the settings see Interface Settings and File Transfer Menu User Tool Setting Requirements Interface Settings Network Machine IPv4 Address Necessary Interface Settings Network IPv4 Gateway Address Necessary Interface Settings Network Machine IPv6 Address As required Interface Settings Network IPv6 Gateway Address As required Interface Settings Network IPv6 Stateless Sett...

Page 891: ... LAN SSID Setting As required Interface Settings Wireless LAN Ad hoc Channel As required Interface Settings Wireless LAN Security Method As required File Transfer Default User Name PW Send As required For the Effective Protocol setting check that the protocol you want to use is set to Active Wireless LAN and LAN Type are displayed when the wireless LAN interface board is installed If both Ethernet...

Page 892: ...ed Interface Settings Network Machine IPv6 Address As required Interface Settings Network IPv6 Gateway Address As required Interface Settings Network IPv6 Stateless Setting As required Interface Settings Network DNS Configuration As required Interface Settings Network DDNS Configuration As required Interface Settings Network IPsec As required Interface Settings Network Domain Name As required Inte...

Page 893: ...ettings required for delivering data to the network with an wireless LAN connection For details about how to specify the settings see Interface Settings and File Transfer Menu User Tool Setting Requirements Interface Settings Network Machine IPv4 Address Necessary Interface Settings Network IPv4 Gateway Address As required Interface Settings Network Machine IPv6 Address As required Interface Setti...

Page 894: ... required Interface Settings Wireless LAN Ad hoc Channel As required Interface Settings Wireless LAN Security Method As required File Transfer Delivery Option Necessary For the Effective Protocol setting check that the protocol you want to use is set to Active Wireless LAN and LAN Type are displayed when the wireless LAN interface board is installed When both Ethernet and wireless LAN are connecte...

Page 895: ... Machine IPv6 Address As required Interface Settings Network IPv6 Gateway Address As required Interface Settings Network IPv6 Stateless Setting As required Interface Settings Network DNS Configuration As required Interface Settings Network DDNS Configuration As required Interface Settings Network IPsec As required Interface Settings Network Domain Name As required Interface Settings Network WINS C...

Page 896: ...cted interface has priority p 28 Interface Settings Wireless LAN This section lists the settings required for using WSD Scanner function with a wireless LAN connection For details about how to specify the settings see Interface Settings Menu User Tool Setting Requirements Interface Settings Network Machine IPv4 Address Necessary Interface Settings Network IPv4 Gateway Address As required Interface...

Page 897: ...equired Interface Settings Network Permit SSL TLS Comm As required Interface Settings Network Host Name As required Interface Settings Network Machine Name As required Interface Settings Wireless LAN Communication Mode Necessary Interface Settings Wireless LAN Ad hoc Channel As required Interface Settings Wireless LAN SSID Setting As required Interface Settings Wireless LAN Security Method As requ...

Page 898: ...nfiguration As required Interface Settings Network DDNS Configuration As required Interface Settings Network IPsec As required Interface Settings Network Domain Name As required Interface Settings Network WINS Configuration As required Interface Settings Network Effective Protocol Necessary Interface Settings Network Ethernet Speed As required Interface Settings Network IEEE802 1X Auth Ethernet As...

Page 899: ...tion As required Interface Settings Network DDNS Configuration As required Interface Settings Network IPsec As required Interface Settings Network Domain Name As required Interface Settings Network WINS Configuration As required Interface Settings Network Effective Protocol Necessary Interface Settings Network LAN Type Necessary Interface Settings Network Permit SNMPv3 Communictn As required Inter...

Page 900: ... set to Active Wireless LAN and LAN Type are displayed when the wireless LAN interface board is installed When both Ethernet and wireless LAN are connected the selected interface takes precedence p 28 Interface Settings Network Settings Required to Use Network TWAIN Scanner 91 2 ...

Page 901: ...o make Interface settings using utilities Change settings by using Web Image Monitor SmartDeviceMonitor for Admin and telnet Network Machine IPv4 Address Auto Obtain DHCP Web Image Monitor Can be used for specifying the setting SmartDeviceMonitor for Admin Can be used for specifying the setting telnet Can be used for specifying the setting Network Machine IPv4 Address Specify IPv4 Address Web Imag...

Page 902: ...b Image Monitor Can be used for specifying the setting SmartDeviceMonitor for Admin Cannot be used for specifying the setting telnet Can be used for specifying the setting Network DNS Configuration Specify DNS Server 1 3 Web Image Monitor Can be used for specifying the setting SmartDeviceMonitor for Admin Cannot be used for specifying the setting telnet Can be used for specifying the setting Netwo...

Page 903: ...t be used for specifying the setting telnet Can be used for specifying the setting Network WINS Configuration Off Web Image Monitor Can be used for specifying the setting SmartDeviceMonitor for Admin Cannot be used for specifying the setting telnet Can be used for specifying the setting Network Effective Protocol IPv4 Web Image Monitor Can be used for specifying the setting SmartDeviceMonitor for ...

Page 904: ...itor for Admin Can be used for specifying the setting telnet Cannot be used for specifying the setting Network NCP Delivery Protocol IPX Only Web Image Monitor Can be used for specifying the setting SmartDeviceMonitor for Admin Can be used for specifying the setting telnet Cannot be used for specifying the setting Network NCP Delivery Protocol TCP IP Only Web Image Monitor Can be used for specifyi...

Page 905: ... for Admin Cannot be used for specifying the setting telnet Can be used for specifying the setting Network SMB Work Group Web Image Monitor Can be used for specifying the setting SmartDeviceMonitor for Admin Cannot be used for specifying the setting telnet Can be used for specifying the setting Network Ethernet Speed Web Image Monitor Cannot be used for specifying the setting SmartDeviceMonitor fo...

Page 906: ...ed for specifying the setting telnet Can be used for specifying the setting Network Permit SSL TLS Comm Ciphertext Only Web Image Monitor Can be used for specifying the setting SmartDeviceMonitor for Admin Cannot be used for specifying the setting telnet Cannot be used for specifying the setting Network Permit SSL TLS Comm Ciphertext Priority Web Image Monitor Can be used for specifying the settin...

Page 907: ...ng SmartDeviceMonitor for Admin Cannot be used for specifying the setting telnet Can be used for specifying the setting Wireless LAN Ad hoc Channel Web Image Monitor Can be used for specifying the setting SmartDeviceMonitor for Admin Cannot be used for specifying the setting telnet Can be used for specifying the setting Wireless LAN Security Method Web Image Monitor Can be used for specifying the ...

Page 908: ...for specifying the setting telnet Cannot be used for specifying the setting File Transfer Reception Protocol SMTP Web Image Monitor Can be used for specifying the setting SmartDeviceMonitor for Admin Cannot be used for specifying the setting telnet Cannot be used for specifying the setting File Transfer POP3 IMAP4 Settings Web Image Monitor Can be used for specifying the setting SmartDeviceMonitor...

Page 909: ...Storage in Server Web Image Monitor Can be used for specifying the setting SmartDeviceMonitor for Admin Cannot be used for specifying the setting telnet Cannot be used for specifying the setting File Transfer Default User Name PW Send Web Image Monitor Can be used for specifying the setting SmartDeviceMonitor for Admin Cannot be used for specifying the setting telnet Cannot be used for specifying ...

Page 910: ...ype before you start BKR001S 1 G3 analog line interface connector 2 External telephone connector Selecting the Line Type Select the line type to which the machine is connected There are two types tone and pulse dial Select the line type using Administrator Tools This function is not available in some regions Connecting the Optional Handset or an External Telephone You can connect the optional hand...

Page 911: ... the On Hook Dial key after talking off the receiver Specifying the handset line type BHJ310S DP TT Theswitchonthehandsetshouldbeintheappropriateposition TT ToneDialing orDP PulseDialing Adjusting the handset bell volume Ringer x BHJ311S Adjust the handset ringer volume using the volume switch Adjusting the handset receiver volume Receiver BKR030S 2 Connecting the Machine 102 2 ...

Page 912: ...justing the handset receiver volume using the volume switch Some external telephones may not be connected or may suffer reduced functionality Connecting the Machine to a Telephone Line and Telephone 103 2 ...

Page 913: ...2 Connecting the Machine 104 2 ...

Page 914: ...and Faxes window you need Printer Management access authentication under Windows Vista or Windows Server 2008 Full Control access authentication Log on to the file server as an Administrator or member of the PowerUsers group 1 Open the Printers and Faxes window from the Start menu The Printers and Faxes window appears 2 Click the icon of the machine you want to use On the File menu click Propertie...

Page 915: ...nment is already prepared for normal NetWare running the printing service setting The procedure is explained with the following example settings File server s name CAREE Print server s name PSERV Printer s name R PRN Queue name R QUEUE Using SmartDeviceMonitor for Admin TousethemachineinaNetWareenvironment useSmartDeviceMonitorforAdmintosettheNetWare printing environment Printers listed by SmartDe...

Page 916: ...ile server is searched for This item is mandatory Use up to 47 characters NDS Tree To enable NDS mode enter the name of the NDS tree you want to log on to Use up to 32 alphanumeric characters NDS Context Name To enable NDS mode enter the print server context Use up to 127 characters Operation Mode Specify whether to use the interface board as a print server or a remote printer Remote Printer No Th...

Page 917: ... see Security Reference which is the administrator s manual p 117 Using Web Image Monitor Setting Up as a Print Server NetWare 4 x 5 5 1 6 6 5 Follow the procedure below to connect the machine as a print server using NetWare 4 x NetWare 5 5 1 or NetWare 6 6 5 When using the printer as a print server in NetWare 4 x NetWare 5 5 1 or NetWare 6 6 5 set it to the NDS mode When using NetWare 5 5 1 or Ne...

Page 918: ... 6 6 5 Environment Follow the procedure below to connect the machine as a print server in a pure IP environment of NetWare 5 5 1 or NetWare 6 6 5 When creating a queued print server in a pure IP environment of NetWare 5 5 1 or NetWare 6 6 5 create a print queue on the file server using NetWare Administrator This printer is not available as a remote printer for use in a pure IP environment To use t...

Page 919: ...ck Print Server and then click OK For NetWare 5 click Print Server Non NDPS 19 In the Print Server Name box enter the print server name Use the same print server name specified using SmartDeviceMonitor for Admin 20 Select the Define additional properties check box and then click Create 21 Click Assignments and then click Add in the Assignments area 22 In the Available objects box click the queue y...

Page 920: ...al p 117 Using Web Image Monitor Setting Up as a Remote Printer NetWare 3 x Follow the procedure below to use the machine as a remote printer under NetWare 3 x Setting up using PCONSOLE 1 Enter PCONSOLE from the command prompt F PCONSOLE 2 Create a print queue When using the existing print queue go to the procedure for creating a printer 3 From the Available Options menu select Print Queue Informa...

Page 921: ...elect the printer created 19 Press the Insert key to select a queue serviced by the printer You can select several queues 20 Follow the instructions on the screen to make other necessary settings Following these steps check that the queues are assigned 21 Press the Esc key until Exit appears and then select Yes to exit PCONSOLE 22 Start the print server by entering the following from the console o...

Page 922: ...ow to use the printer as a remote printer under NetWare 4 x 5 5 1 and 6 6 5 To use the printer as a remote printer under NetWare 4 x 5 5 1 6 6 5 set it to NDS mode Do not use the printer as a remote printer when Pure IP is used Setting up using NWadmin 1 From Windows start NWadmin For details about NWadmin see the NetWare manuals 2 Set up the network connection to a print queue Select the object i...

Page 923: ...server name Use the same print server name specified using SmartDeviceMonitor for Admin 19 Select the Define additional properties check box and then click Create 20 Assign the printer to the created print server Click Assignments and then click Add in the Assignments area 21 In the Available objects box click the queue you created and then click OK 22 In the Printers area click the printer you as...

Page 924: ...before restarting Web Image Monitor 6 Click Logout 7 Quit Web Image Monitor If you cannot identify the printer you want to configure check the printer name against the configuration page printed from the printer If no printer names appear in the list match the frame types of IPX SPXs for the computer and printer Use the Network dialog box of Windows to change the frame type of the computer For det...

Page 925: ...3 Using a Printer Server 116 3 ...

Page 926: ...ing machine settings Making network protocol settings Making security settings Configuring the machine To perform the operations from Web Image Monitor TCP IP is required After the machine is configured to use TCP IP operations from Web Image Monitor become available Recommended Web browser Windows Internet Explorer 5 5 SP2 or higher Firefox 1 0 or higher Mac OS Firefox 1 0 or higher Safari 1 0 1 ...

Page 927: ...your computer Use the most recent available version We recommend Internet Explorer 6 0 or later When you are using Firefox fonts and colors may be different or tables may be out of shape When using a host name under Windows Server 2003 2003 R2 2008 or Windows Vista with IPv6 protocol perform host name resolution using an external DNS server The host file cannot be used To use JAWS 7 0 under Web Im...

Page 928: ... or download Help file contents 5 Display area Displays the contents of the item selected in the menu area Machine information in the display area is not automatically updated Click Refresh at the upper right in the display area to update the machine information Click the Web browser s Refresh button to refresh the entire browser screen When using a host name under Windows Server 2003 2003 R2 2008...

Page 929: ...in Login User Name and then click Login The procedure may differ depending on the Web browser used Log out using Web Image Monitor Click Logout to log off When you log on and made the setting always click Logout About Menu and Mode There are two modes available with Web Image Monitor guest mode and administrator mode Displayed Items may differ depending on the machine type Guest Mode Intheguestmod...

Page 930: ...splays received fax files 3 Printer Print Jobs Allows you to display list of Sample Print Locked Print Hold Print and Stored Print jobs 4 Job Displays all print files 5 Configuration Displays current machine and network settings Administrator Mode In the administrator mode you can configure various machine settings Using Web Image Monitor 121 4 ...

Page 931: ...the machine interface and security can be made 6 Reset Device Click to reset the printer If a print job is being processed the printer will be reset after the print job is completed This button is located on Top Page 7 Reset Printer Job Click to reset current print jobs and print jobs in queue This button is located on Top Page Access in the Administrator Mode Follow the procedure below to access ...

Page 932: ... following modes to log on Web Image Monitor Guest mode logged on as a user Administrator mode logged on as an administrator Home Status Menu Guest mode Administrator mode Reset Device None Modify Reset Printer Job None Modify Status Read Read Toner Read Read Input Tray Read Read Output Tray Read Read Device Info Menu Guest mode Administrator mode Functions Read Read System Read Read Version Read ...

Page 933: ...tor mode Fax Received File Read Modify None Printer Print Jobs Menu Guest mode Administrator mode Print Job List Read Modify Read Modify Job Job List Menu Guest mode Administrator mode Current Waiting Jobs Read Read Modify Job History Read Read Printer Menu Guest mode Administrator mode Spool Printing Read Read Job History Read Read Error Log Read Read Fax History 4 Monitoring and Configuring the ...

Page 934: ...strator mode System Read Read Modify Paper Read Read Modify Date Time Read Read Modify Timer Read Read Modify Logs None Read Modify Download Logs None Read Modify E mail Read Read Modify Auto E mail Notification None Read Modify On demand E mail Notification None Read Modify File Transfer None Read Modify User Authentication Management None Read Modify Administrator Authentication Management None ...

Page 935: ...ify Tray Parameters PS None Read Modify Virtual Printer Settings Read Read Modify PDF Temporary Password Modify None PDF Group Password None Modify PDF Fixed Password None Modify Fax Menu Guest mode Administrator mode General Settings None Read Modify Administrator Tools None Read Modify E mail Settings None Read Modify IP Fax Settings None Read Modify IP Fax Gateway Settings None Read Modify Para...

Page 936: ...gs Read Read Modify Wireless LAN Settings Read Read Modify Network Menu Guest mode Administrator mode IPv4 Read Read Modify IPv6 Read Read Modify NetWare Read Read Modify AppleTalk Read Read Modify SMB Read Read Modify SNMP None Read Modify SNMPv3 None Read Modify SSDP None Read Modify Bonjour Read Read Modify System Log Read Read Security Menu Guest mode Administrator mode Network Security None R...

Page 937: ...ify IEEE 802 1X WPA WPA2 None Read Modify S MIME None Read Modify RC Gate Menu Guest mode Administrator mode Setup RC Gate None Read Modify Update RC Gate Firmware None Read RC Gate Proxy Server None Read Modify Webpage Menu Guest mode Administrator mode Webpage Read Read Modify Extended Feature Settings Menu Guest mode Administrator mode Startup Setting None Read Modify Extended Feature Info None...

Page 938: ...splaying Web Image Monitor Help When using Help for the first time clicking the icon marked makes the following screen appear in which you can view Help in two different ways as shown below Viewing Help on our Web site Downloading Help to your computer Downloading and Checking Help You can download Help to your computer As the Help URL you can specify the path to the local file to view the Help wi...

Page 939: ...er or Web server to the button 1 Log on to Web Image Monitor in the administrator mode 2 In the menu area click Configuration 3 Click Webpage 4 In the Set Help URL Target box enter the URL of the help file If you saved the help file to C HELP EN enter file C HELP For example if you saved the file to a Web server and the URL of the index file is http a b c d HELP EN index html enter http a b c d HE...

Page 940: ...03 Windows Vista Windows Server 2008 TCP IP Available operations The following functions are available Limits settings done from the control panel and disables changes made to certain items Enables selection of paper type loaded in the machine Switches to and comes out of Energy Saver mode Checks information about printing paper quantity etc Simultaneously monitors multiple printers When there are...

Page 941: ...M into the CD ROM drive The installer starts 3 Select an interface language and then click OK The following languages are available Czech Danish German English Spanish French Italian Hungarian Dutch Norwegian Polish Portuguese Finnish Swedish Chinese Simple and Chinese Traditional 4 Click SmartDeviceMonitor for Admin 5 Click Next The software license agreement appears in the License Agreement dial...

Page 942: ...nge 4 On the Tools menu click NIB Setup Tool A Web browser opens and the window for entering the login user name and password for the Web Image Monitor administrator appears NIB Setup Tool starts Click Web browser and then click OK 5 Enter the login user name and password and then click Login For details about the login user name and password consult your network administrator 6 Configure settings...

Page 943: ...em A Web browser opens and the window for entering the login user name and password for the Web Image Monitor administrator appears 5 Enter the login user name and password and then click Login For details about the user name and password consult your network administrator The System page of Web Image Monitor appears 6 On the Protect Printer Display Panel select Level 1 or Level 2 7 Click OK 8 Cli...

Page 944: ...s 5 Enter the login user name and password and then click Login For details about the login user name and password consult your network administrator The Paper page appears Select a paper type in the Paper Type list for each tray Enter required setting items 6 Click Logout 7 Quit Web Image Monitor 8 Quit SmartDeviceMonitor for Admin For details about login user names and passwords see Security Ref...

Page 945: ...b browser opens and the window for entering the login user mane and password for the Web Image Monitor administrator appears 5 Enter the user name and password and then click Login For details about the user name and password consult your network administrator User Management Tool starts For details about login user names and passwords see Security Reference which is the administrator s manual For...

Page 946: ...agement Tool 2 Click the User Counter Information tab of User Management Tool 3 On the File menu click Export User Statistics List 4 Specify the save location and file name and then click Save 5 Click Exit on the File menu to quit User Management Tool Resetting the number of pages printed to 0 Follow the procedure below to reset the number of pages printed under each user to 0 1 Start SmartDeviceM...

Page 947: ...on message appears 6 Click OK The count for the selected paper type becomes 0 and Modified is displayed for Status 7 On the Edit menu click Apply Settings Changes are applied to information on the User Counter Information tab 8 Click Exit on the File menu to quit User Management Tool 4 Monitoring and Configuring the Printer 138 4 ...

Page 948: ...menu of User Management Tool click Restrict Access To Device 5 Select the check box of the functions you want to restrict 6 Click OK A confirmation message appears 7 Click Yes The settings are applied 8 Click Exit on the File menu to quit User Management Tool Setting Applicable Functions to New Users Follow the procedure below to add new users and set functions applicable to them 1 Start SmartDevi...

Page 949: ...w user If the check boxes are unavailable there is no restriction to use that function 6 Click OK The user is added and New is displayed for Status 7 On the Edit menu click Apply Settings The settings are applied 8 Click Exit on the File menu to quit User Management Tool For details about setting restrictions see SmartDeviceMonitor for Admin Help 4 Monitoring and Configuring the Printer 140 4 ...

Page 950: ...e settings for all machines in the selected group select no machine 4 Click the Group menu point to Energy Save Mode Set Individually and then click On To select all the machines in the group select Set By Group To disable Energy Save mode click Off 5 Quit SmartDeviceMonitor for Admin For details about the setting for Energy Save mode see SmartDeviceMonitor for Admin Help Setting a Password Follow...

Page 951: ... consult your network administrator 6 Click Configuration 7 Click Program Change Administrator on the Device Settings area and then change the settings 8 Click OK 9 Click Logout 10 Quit Web Image Monitor 11 Quit SmartDeviceMonitor for Admin For details about login user names and passwords see Security Reference which is the administrator s manual Checking the Machine Status Follow the procedure be...

Page 952: ... the name and comment for the machine 1 Start SmartDeviceMonitor for Admin 2 On the Group menu point to Search Device and then click IPv4 IPX SPX or IPv4 SNMPv3 A list of machines using the selected protocol appears Select the protocol of the machine whose configuration you want to change If you are using IPv4 SNMPv3 enter the user authentication 3 Select a machine in the list and then click NIB S...

Page 953: ...achine whose configuration you want to change If you are using IPv4 SNMPv3 enter the user authentication 3 Select a machine in the list and then click Load Fax Journal on the Tools menu A Web browser opens and the window for entering the login user name and password for the Web Image Monitor administrator appears 4 Enter the login user name and password and then click Login For details about the l...

Page 954: ... user name and password and then click Login For details about the login user name and password consult your network administrator Spool Printing Job List appears in the Web Image Monitor 5 Click Logout 6 Quit Web Image Monitor 7 Quit SmartDeviceMonitor for Admin To display Spool Printing Job List Spool Printing must be set to Active on Web Image Monitor in advance To delete the Spool Printing Job...

Page 955: ...ol on the Tools menu The dialog box for entering the login user name and password appears 4 Enter the login user name and password and then click OK For details about the login user name and password consult your network administrator Address Management Tool starts Make the necessary settings 5 Click Exit 6 Quit SmartDeviceMonitor for Admin For details see Address Management Tool Help For details ...

Page 956: ...rties and then click Monitor Device Settings The SmartDeviceMonitor for Client Options dialog box appears 2 On the Printers Folder tab select the machine you want to monitor and then select the To Be Monitored check box in the Monitoring Information Settings area To display the machine status on the task bar you must first select the To be Monitored check box and then select the Displayed on Task ...

Page 957: ...onitor for Client cannot access the network printer and times out it will stop sending the print job In this case you should cancel the paused status from the print queue window SmartDeviceMonitor for Client will resume access to the network printer You can delete the print job from the print queue window but canceling a print job printed by the network printer might cause the next job sent from a...

Page 958: ...ommended If the Security Alert dialog box appears when accessing the machine using IPP to create or configure an IPP port or when printing install the certificate To select the certificate store location when using Certificate Import Wizard click Place all certificates in the following store and then click Local Computer under Trusted Root Certification Authorities For details about SSL settings c...

Page 959: ...tification functions you can set are as follows Auto e mail notification Information including the machine status is automatically sent by e mail Before you use this function register the e mail address to be used On demand e mail notification Information including the machine status is sent by e mail when a request from the administrator is received The information that can be notified by auto e ...

Page 960: ... in the E mail Notification Account column Specify these items If you want to use e mail notification 5 Click OK 6 Click Logout 7 Quit Web Image Monitor For details about login user name and password see Security Reference which is the administrator s manual For details about the settings see Web Image Monitor Help For details about Web Image Monitor see Using Web Image Monitor p 117 Using Web Ima...

Page 961: ...Web Image Monitor in administrator mode 2 Click Configuration in the menu area and then click E mail on the Device Settings area 3 Make the following settings in SMTP column SMTP Server Name Enter the IP address or host name of the SMTP server SMTP Port No Enter the port number used when sending e mail to the SMTP server SMTP Authentication Enable or disable SMTP authentication SMTP Auth E mail Ad...

Page 962: ... Image Monitor in administrator mode 2 Click Configuration in the menu area and then click Auto E mail Notification on the Device Settings area The dialog box for making notification settings appears 3 Make the following settings Notification Message You can set this according to your needs for example the machine s location service representative contact information Items in the Groups to Notify ...

Page 963: ...s Info Select whether or not to allow access to the information such as the machine settings and status Items in the Receivable E mail Address Domain Name Settings column Enter an e mail address or domain name to use for requesting information by e mail and to receive its return e mail 4 Click OK 5 Click Logout 6 Quit Web Image Monitor For details about Web Image Monitor see Using Web Image Monito...

Page 964: ...ent to the address specified here A mail message must be within 1 MB in size E mail may be incomplete if sent immediately after power on The subject is not case sensitive The body of a request e mail has no meaning Any text written in the e mail body is ignored Printer Status Notification by E Mail 155 4 ...

Page 965: ...work administrator For user authentication enter a login user name and password For user code authentication enter a user code in User Name 3 Enter a command 4 Quit telnet msh logout The configuration message about saving the changes appears 5 Enter yes to save the changes and then press the Enter key If you do not want to save the changes enter no and then press the Enter key To make further chan...

Page 966: ... EAP TTLS you can select chap mschap mschapv2 pap or md5 If you select PEAP you can select mschapv2 or tls username character string You can specify the login user name for the Radius server Usable characters ASCII 0x20 0x7e 31 bytes The default is blank username2 character string You can specify the phase 2 username for EAP TTLS PEAP phase 2 authentication Usable characters ASCII 0x20 0x7e 31 byt...

Page 967: ...cted setting to its default value If you specify all all settings will be restored to their default values However IEEE 802 1x Auth status enable or disable for Ethernet and wireless LAN will not be initialized access Use the access command to view and configure access control You can also specify two or more access ranges View settings msh access IPv4 configuration display msh access ID range IPv...

Page 968: ...xlen The access range restricts computers from use of the machine by IP address If you do not need to restrict printing make the setting 0 0 0 0 for IPv4 and for IPv6 Valid ranges must be from lower start address to higher end address For IPv4 and IPv6 you can select an ID number between 1 and 5 IPv6 can register and select the range and the mask for each access ranges IPv6 mask ranges between 1 1...

Page 969: ...authfree ID range6_addr1 range6_addr2 IPv6 address mask configuration msh authfree ID mask6_addr1 masklen Parallel USB settings msh authfree parallel usb on off To enable authfree set to on To disable authfree set to off Always specify the interface Authentication exclusion control initialization msh authfree flush autonet Use the autonet command to configure AutoNet parameters View settings The f...

Page 970: ...e the bonjour command to display Bonjour related settings View settings Bonjour settings are displayed msh bonjour Bonjour service name setting You can specify the Bonjour service name msh bonjour cname computer name The computer name can be entered using up to 63 alphanumeric characters If you do not specify a character string the current setting is displayed Bonjour Installation location informa...

Page 971: ... configuration msh bonjour linklocal interface_name If you do not specify an interface the Ethernet interface is selected automatically If many types of interface are installed configure the interface that communicates with linklocal address If you do not specify an interface the Ethernet interface is automatically selected wlan can be specified only when the IEEE 802 11 interface is installed Int...

Page 972: ... settings The following command displays the current DHCP settings msh dhcp Configuration You can configure DHCP msh dhcp interface_name on off Click on to enable dhcp Click off to disable DHCP If the DNS server address and domain name are obtained from DHCP be sure to click on wlan can be specified only when the IEEE 802 11 interface is installed Interface name Interface configured ether Ethernet...

Page 973: ...server specify dhcp To use the domain name set by a user specify static p 363 Using DHCP dhcp6 Use the dhcp6 command to display or configure DHCPv6 settings View settings The following command displays the current DHCPv6 settings msh dhcp6 DHCPv6 lite configuration and display msh dhcp6 interface_name lite on off Viewing and specifying DNS server address selection obtained from the dhcpv6 server u...

Page 974: ...5535 You can specify the timeout interval to use when the printer is expecting data from the network The default is 300 seconds This command functions in conjunction with the lpr command Specifying the number of concurrent connections msh diprint conn multi single The above command specifies the number of concurrent diprint connections Specify multi for multiple connections or single for a single ...

Page 975: ... interface_name ddns on off You can set the dynamic DNS function active or inactive on means active and off means inactive wlan can be specified only when the IEEE 802 11 interface is installed Interface name Interface configured ether Ethernet interface wlan IEEE 802 11 interface Specifying the record overlap operation msh dns overlap update add You can specify operations performed when records o...

Page 976: ...solv conf display msh dns resolv Specifying the protocol when asking names during dual stacking msh dns resolv protocol ipv4 ipv6 Appears during dual stacking only domainname Use the domainname command to display or configure the domain name settings You can configure the Ethernet interface or IEEE 802 11 interface View settings The following command displays the current domain name msh domainname...

Page 977: ...on off on means active and off means inactive etherconfig Use the etherconfig command to view and configure the Ethernet parameters View settings msh etherconfig Specify Ethernet speed msh etherconfig speed auto 10f 10h 100f 100h auto Auto Select 10f 10 Mbps Full Duplex 10h 10 Mbps Half Duplex 100f 100 Mbps Full Duplex 100h 100 Mbps Half Duplex The default is auto help Use the help command to disp...

Page 978: ...ified only when the IEEE 802 11 interface is installed If you do not specify an interface the Ethernet interface is selected automatically Interface name Interface configured ether Ethernet interface wlan IEEE 802 11 interface Initializing the printer name for each interface msh hostname interface_name clear name ifconfig Use the ifconfig command to view and configure TCP IP IP address subnet mask...

Page 979: ... ifconfig ether netmask 255 255 255 0 Broadcast address configuration msh ifconfig interface_name broadcast address Changing the interface msh ifconfig interface up When using the optional IEEE 802 11 interface unit you can specify either Ethernet or IEEE 802 11 interface To get the above addresses contact your network administrator Use the default configuration if you cannot obtain setting addres...

Page 980: ...PP user authorization to restrict users to print with IPP The default is off msh ipp auth basic digest off User authorization settings are basic and digest If user authorization is specified register a user name You can register up to 10 users IPP user name configuration Configure IPP users according to the following messages msh ipp user The following message appears msh Input user number 1 to 10...

Page 981: ...turned on This setting allows information from the router to be obtained constantly and periodically refreshes the effective period of the stateless address logout Use the logout command to save the changes and quit telnet Quit telnet msh logout A confirmation message appears yes no return Enter yes no or return by typing the word and then press the Enter key To save the changes and quit telnet en...

Page 982: ... netware Use the netware command to view and configure the NetWare settings such as the print server name or file server name NetWare Printer Server Names msh netware pnamecharacter string Enter the NetWare print server name using up to 47 characters NetWare File Server Names msh netware fname character string Enter the NetWare file server name using up to 47 characters Encap type msh netware enca...

Page 983: ...v4 ipx If you do not specify the protocol the current setting is displayed Protocol Set Protocol ipv4pri IPv4 IPX IPv4 ipxpri IPv4 IPX IPX ipv4 IPv4 ipx IPX pathmtu Use the pathmtu command to display and configure the PathMTU Discovery service function View settings msh pathmtu Configuration msh pathmtu on off The default is on If the MTU size of the sent data is larger than the router s MTU the r...

Page 984: ...ional details about a print job p 204 Understanding the Displayed Information rhpp Use the rhpp command to view and configure RHPP settings View settings msh rhpp Changing rhpp port number msh rhpp 1024 65535 The default is 59100 Setting timeout msh rhpp timeout 30 65535 The default is 300 seconds RHPP is an abbreviation of Reliable Host Printing Protocol which is a manufacturer original printing ...

Page 985: ...fy host net the host setting is automatically selected IPv4 address of destination can be specified Setting IPv6 Default Gateway msh route add6 default gateway Adding a specified IPv6 destination to Routing Table msh route add6 destination prefixlen 1 128 gateway Specify the IPv6 address to destination and gateway If the prefix of the address is between 1 and 127 the network is selected If the pre...

Page 986: ...erfaces Prefixlen is a number between 1 and 128 set Use the set command to set the protocol information display active or inactive View settings The following command displays protocol information active inactive msh set ipv4 msh set ipv6 msh set ipsec msh set appletalk msh set netware msh set smb msh set protocol When protocol is specified information about TCP IP AppleTalk NetWare and SMB appear...

Page 987: ...n to disable protocol You can set the protocol to active or inactive msh set ipv4 up down If you disable IPv4 you cannot use remote access after logging off If you did this by mistake you can use the control panel to enable remote access via IPv4 Disabling IPv4 also disables lpr ftp rsh diprint web snmp ssl ipp http bonjour wsdev and sftp msh set ipv6 up down If you disable IPv6 you cannot use rem...

Page 988: ...down msh set web up down msh set snmp up down msh set ssl up down msh set ssl6 up down If Secured Sockets Layer SSL an encryption protocol function is not available for the printer you cannot use the function by enabling it msh set nrs up down msh set rfu up down msh set rfu6 up down msh set ipp up down msh set ipp6 up down msh set http up down msh set http6 up down msh set bonjour up down msh set...

Page 989: ...ure SLP settings msh slp ttl ttl_val 1 255 You can search the NetWare server using SLP in the PureIP environment of NetWare 5 5 1 Using the slp command you can configure the value of TTL which can be used by SLP multicast packet The default value of TTL is 1 A search is executed only within a local segment If the router does not support multicast the settings are not available even if the TTL valu...

Page 990: ...ing group name msh smb clear group Deleting comment msh smb clear comment View protocol msh smb protocol snmp Use the snmp command to display and edit SNMP configuration settings such as the community name View settings msh snmp Default access settings 1 is as follows Community name public IPv4 address 0 0 0 0 IPv6 address IPX address 00000000 000000000000 Access type read only Effective Protocol ...

Page 991: ...r settings The community name can be entered using up to 15 characters Deleting community name msh snmp number clear name Access type configuration msh snmp number type access_type Access type Type of access permission no not accessible read read only write read and write trap user is notified of trapmessages Protocol configuration Use the following command to set protocols active or inactive If y...

Page 992: ...v6 enter ipv4 or ipv6 followed by a space and then the IPv4 or IPv6 address To specify IPX SPX enter ipx followed by a space the IPX address followed by a decimal and then the MAC address of the network interface board sysLocation configuration msh snmp location Deleting sysLocation msh snmp clear location sysContact setting msh snmp contact Deleting sysContact msh snmp clear contact SNMP v1v2 fun...

Page 993: ...figuring an SNMP v3 encryption algorithm msh snmp v3auth md5 sha1 Configuring SNMP v3 encryption msh snmp v3priv auto on Set auto for automatic encryption configuration If you select on plain text communication becomes impossible only encrypted communication is possible Encrypted communication means an encrypted password is set on the machine sntp The printer clock can be synchronized with a NTP s...

Page 994: ...k and NTP server clock The values are between 12 00 and 13 00 You can only select either the address or host name for the ntp server spoolsw Use the spoolsw command to view and configure Job Spool settings You can only specify diprint trap lpr ipp ftp sftp wsd printer and smb TCP IP protocol The spoolsw command for configuring Job Spool settings is available only when the optional hard disk is ins...

Page 995: ...400 The default is 10800 seconds Advertise packet TTL settings msh ssdp ttl 1 255 The default is 4 ssh Use the ssh command to view and configure SSH settings View settings msh ssh Data compression communication settings msh ssh compression on off The default is on SSH SFTP communication port setting msh ssh port 22 1024 65535 The default is 22 SSH SFTP communication timeout setting msh ssh timeout...

Page 996: ...key with the default value will be created Deleting open key for ssh sftp communication msh ssh delkey If you do not specify a character string current setting is displayed ssh can be used only with sftp status Use the status command to display the printer status View messages msh status p 196 Getting Printer Information over the Network syslog Use the syslog command to display the information sto...

Page 997: ... Resetting URLs registered as link destinations msh web ID clear url Specify 1 or 2 for ID as the corresponding number to the URL Link name configuration You can enter the name for URL that appears on Web Image Monitor msh web ID name Name you want to display Specify 1 or 2 for ID the corresponding number to the link name Resetting URL names registered as link destinations msh web ID clear name Sp...

Page 998: ...chine will connect to the nearest access point The default SSID is blank channel frequency channel no In 802 11 ad hoc mode you can select a channel between 1 and 14 or 36 40 44 or 48 Be sure to set the same channel for all ports that will transmit and receive data The default is 11 key key value val 1 2 3 4 You can specify the WEP key when entering in hexadecimal With a 64 bit WEP you can use 10 ...

Page 999: ...to1 when making these omissions The default is blank encval 1 2 3 4 You can specify which of the four WEP keys is used for packet encoding 1 is set if a number is not specified wepauth open shared You can set an authorization mode when using WEP The specified value and authorized mode are as follows open open system authorized default shared shared key authorized rate security none wep wpa You can...

Page 1000: ...lect chap mschap mschapv2 pap or md5 If you select PEAP you can select mschapv2 or tls username character string You can specify the login user name for the Radius server Usable characters ASCII 0x20 0x7e 31 bytes The default is blank username2 character string You can specify the phase 2 username for EAP TTLS PEAP phase 2 authentication Usable characters ASCII 0x20 0x7e 31 bytes The default is bl...

Page 1001: ...ll all settings will be restored to their default values miccheck on off You can enable or disable the MIC check function The default setting is On enabled If you specify Off you cannot perform MIC checks We recommend you specify On for the MIC check function when using this machine wins Use the wins command to configure WINS server settings View settings msh wins If the IPv4 address obtained from...

Page 1002: ...scope ID msh wins interface_name scope scope ID The scope ID can be entered using up to 31 alphanumeric characters Be sure to specify the interface wlan can be specified only when the IEEE 802 11 interface is installed Interface name Interface configured ether Ethernet interface wlan IEEE 802 11 interface wsmfp Use the wsmfp command to view and configure WSD Device WSD Printer and WSD Scanner sett...

Page 1003: ...prnport port_number The Default is 53001 WSD Printer Timeout configuration msh wsmfp prntimeout 30 65535 The default is 900 seconds WSD Scanner TCP port configuration msh wsmfp scnport port_number The Default is 53002 Comment initialization msh wsmfp clear comments Location initialization msh wsmfp clear location Presentation URL initialization msh wsmfp clear url 4 Monitoring and Configuring the ...

Page 1004: ...ne s encrypted password If you changed the machine s community name change the configuration of the connected computer accordingly using SNMP Setup Tool For details see SNMP Setup Tool Help Thedefaultcommunitynamesare public and admin YoucangetMIBinformationusingthesecommunity names Start SNMP Setup Tool Windows 2000 Click the Start button Point to SmartDeviceMonitor for Admin on the Programs menu...

Page 1005: ... specified Adjusting The machine is initializing or calibrating Call Service Center There is a malfunction in the machine Canceled The job is reset Canceling Job The job is being reset Cannot Eject Original Through The original cannot be ejected Cannot multi install SD Card The SD card has been configured using another device Card Counter not inserted The machine is waiting for prepaid card or key...

Page 1006: ...ccurred Error HDD Board A hard disk drive board error has occurred Error Media Link Board An error has occurred on the File Format Converter Error Memory Switch A memory switch error has occurred Error Optional Font An error has occurred in the font file of the machine Error Optional RAM An error has occurred in the optional memory unit Error Parallel I F Board An error has occurred in the paralle...

Page 1007: ...ependent supplier Toner Toner that is not recommended is set Jobs Suspended All jobs are suspended Key Card not inserted The machine is waiting for key card to be inserted Key Card Counter not inserted The machine is waiting for key card or key counter to be inserted Key Counter not inserted The machine is waiting for key counter to be left in it Malfunction Bypass Tray There is a problem with the...

Page 1008: ... Not Detected Input Tray The paper feed tray is not correctly set Not Detected Transfer Unit The transfer unit is not correctly set Not Detected Tray 1 Tray 1 is not correctly set Not Detected Tray 2 Tray 2 is not correctly set Not Detected Tray 3 Tray 3 is not correctly set Not Detected WasteToner Bottle Waste toner bottle is not correctly set Not Detected Int Transfer Unit Int transfer unit is n...

Page 1009: ...t RC Gate Connection Error Failed connect with RC Gate Basil Readjusting The machine is readjusting itself Ready The machine is ready to print Renewing Remote Certificate The remote certificate is being renewed Replace Black PCU It is time to replace the black photoconductor unit Replace Charger Kit It is time to replace the charger kit Replace Cleaning Web It is time to replace the Cleaning Web R...

Page 1010: ... Aborted The transmission was interrupted Transmission Complete The transmission completion was completed Transmission Failed The transmission has failed Tray Error Chaptering The paper feed tray specification error has occurred because chaptering as well as the normal paper use the same tray for printing Tray Error Duplex Printing Selected paper tray cannot be used for duplex printing Unit Left O...

Page 1011: ...Page Size Size of paper loaded in the paper tray Status Current status of the paper tray Normal Normal NoInputTray No tray PaperEnd No paper Output Tray Item Description No ID number of the output tray Name Name of the output tray Status Current status of the output tray Normal Normal PaperExist Paper exist OverFlow Paper is full Error Other errors Printer Language Item Description No ID number of...

Page 1012: ...Item Description Version Version of the printer language For details about UNIX commands and parameters see UNIX Supplement Getting Printer Information over the Network 203 4 ...

Page 1013: ...reparing for printing 1st 2nd 3rd 4th Waiting to be transferred to the printer Owner Print request user name Job Print request number Files The name of the document Total Size The size of the data spooled The default is 0 bytes For details about UNIX commands and parameters see UNIX Supplement Print Log Information This is a record of the most recent jobs printed Use the following command to displ...

Page 1014: ...e to the ftp or rprinter command Time Time the print requested was received Time of print request reception User ID when designating Job ID on telnet Printer driver configured User ID Appears when the print request ID is specified JobName when designating Job ID on telnet Name of the document for printing Appears when the print request ID is specified For details about UNIX commands and parameters...

Page 1015: ...Talk IPv4 IPv6 IPsec NetWare SMB Device Up Down Device Settings Parallel USB Ethernet interface Syslog priority NVRAM version Device name Comment Location Contact Soft switch AppleTalk AppleTalk settings Mode Net Object Type 4 Monitoring and Configuring the Printer 206 4 ...

Page 1016: ...on Zone TCP IP TCP IP settings Mode IPv4 Mode IPv6 ftp lpr rsh telnet diprint web http ftpc snmp ipp autonet Bonjour ssl nrs rfu nbt ssdp ssh sftp WSD Device WSD Printer Understanding the Displayed Information 207 4 ...

Page 1017: ...HCP Address Netmask Broadcast Gateway IPv6 Stateless Manual Gateway DHCPv6 lite DUID DHCPv6 option lifetime IPsec Manual Mode Excluded Protocol https dns dhcp wins EncapType Host name DNS Domain 4 Monitoring and Configuring the Printer 208 4 ...

Page 1018: ...5 SNTP Server Time settings Time Zone SNTP Server polling time SYSLOG server Websys settings Home page URL1 Home page link name1 Home page URL2 Home page link name2 Help page URL RHPP Port RHPP timeout NetWare EncapType RPRINTER number Print server name File server name Context name Switch Mode NDS Bindery Understanding the Displayed Information 209 4 ...

Page 1019: ...ransfer Protocol SMB SMB settings Switch Mode Direct print Notification Workgroup name Computer name Comment Share name 1 Protocol Wireless LAN Wireless LAN settings Host Name Communication Mode SSID Channel Security WEP Authentication WEP Encryption key number 4 Monitoring and Configuring the Printer 210 4 ...

Page 1020: ...sword Phase 2 user name Phase 2 Method TTLS Phase 2 Method PEAP Server cert Intermediate CA Server ID Sub domain MIC check Ethernet 802 1X Authentication DNS DNS settings IPv4 Server X X can be set between 1 and 3 Selected IPv4 DNS Server IPv6 Server X X can be set between 1 and 3 Selected IPv6 DNS Server Understanding the Displayed Information 211 4 ...

Page 1021: ...WINS settings ether Primary WINS Secondary WINS wlan Primary WINS Secondary WINS SSDP SSDP settings UUID Profile TTL UPnP UPnP settings URL Bonjour Bonjour settings Computer Name cname Local Hostname ether Local Hostname wlan Location 4 Monitoring and Configuring the Printer 212 4 ...

Page 1022: ...tings SNMPv1v2 SNMPv3 protocol v1Trap v2Trap v3Trap SNMPv1v2 Remote Setting SNMPv3 Privacy ssh ssh settings Compression Port TimeOut Login TimeOut AuthFree Authfree settings IPv4 AuthFree Entry X X can be set between 1 and 5 IPv6 AuthFree Entry X X can be set between 1 and 5 Understanding the Displayed Information 213 4 ...

Page 1023: ...vice Name Comments Location Presentation URL WSD Device TCP Port WSD Printer TCP Port WSD Printer Job Timeout WSD Scanner TCP Port MetadataVersion UUID IEEE 802 1X IEEE 802 1X settings User name Domain name EAP Type Password Phase 2 user name Phase 2 Method TTLS 4 Monitoring and Configuring the Printer 214 4 ...

Page 1024: ...Item Description Phase 2 Method PEAP Server cert Intermediate CA Server ID Sub domain Shell mode Remote maintenance tool mode Understanding the Displayed Information 215 4 ...

Page 1025: ... because Security option is not installed Encryption password has not been specified account is unavailable same account name be used User account is disabled This could be because it use the same account name as the administrator account account is unavailable The authentication password is not set up Useraccountisdisabled Thiscouldbebecausethe authentication password is not set and only the encr...

Page 1026: ... server mode Attached to the print queue centrod is disabled Communication via parallel connections unavailable because centrod is disabled in the security mode Enable centrod in the security mode child process exec error process name The network service failed to start Turn the printer off and then on If this does not work contact your service or sales representative Connected DHCPv6 server IPv6 ...

Page 1027: ...t been made IEEE 802 11 Card does NOT support WPA A wireless card that does not support WPA is installed Install a wireless card that supports WPA IEEE 802 11 Card Firmware REV version Displays the version number of the 802 11 card s firmware IEEE 802 11 current channel channel number Displays the current channel number of the active wireless card in ad hoc and infrastructure mode IEEE 802 11 MAC ...

Page 1028: ... s ISAKMP SA Hash Algorithm 2 Make sure thismachine sISAKMPSAHashAlgorithmmatches that of the communicating host IKE s is disable set PSK text The specified IKE entry invalid Enter the PSK text Interface started with IP IP address IP address IPv4 or IPv6 address has been set for the interface and is operating inetd start The inetd service has started job canceled jobid d The spooled job was cancel...

Page 1029: ... serviced by printer 0 print server name In the print server mode The print queue cannot be established Make sure that print queue exists on the specified file server Print server print server name has no printer In the print server mode The printer is not assigned to the print server Using NWadmin assign the printer and then restart it Print sessions full No more print jobs can be accepted Wait a...

Page 1030: ...in the DNS server SMTPC failed to connect smtp server timeout Connection to the SMTP server failed due to timeout This could be because the specified SMTP server name is incorrect or no connection to the network has been established or the network configuration is incorrect so there is no response from the SMTP server Check the SMTP server name or the network connection and configuration SMTPC ref...

Page 1031: ...erver failed because the specified SMTP user name is incorrect or the specified SMTP password is incorrect Check the SMTP user name and password Snmp over IPv4 is ready Communication over IPv4 with snmp is available Snmp over IPv6 is ready Communication over IPv6 with snmp is available Snmp over IPX is ready Communication over IPX with snmp is available snmpd start The snmpd service has started Th...

Page 1032: ...l file Turn off the power of the printer and then turn it on again If the error recurs contact your service representative The print job that was being spooled when the error occurred will not be printed WSD Device started WS Device has started WSD Printer started WS Printer has started WSD Scanner started WS Scanner has started nfa process ID time date Failed to send logos to a log collection ser...

Page 1033: ...4 Monitoring and Configuring the Printer 224 4 ...

Page 1034: ... register and manage the following items in the Address Book Name You can register the name of the user and the key display This is the basic information required for managing users of the machine To register a fax number or e mail address in the address book you must register information such as the user name and destination name in advance Auth Info Authentication Information You can register us...

Page 1035: ...ou can register the IP Fax destination and select the protocol E mail Settings You can register e mail destinations in the Address Book Folder Info Folder Information You can register the protocol path name and server name SMB FTP NCP 5 Registering Addresses and Users for Facsimile Scanner Functions 226 5 ...

Page 1036: ...es in the Address Book By registering a name and key display beforehand you can specify e mail and folder destinations simply by selecting the name key p 230 Registering Names Sending fax by Quick Dial Register a fax number in the Address Book so you can specify it only by selecting the fax destination shown on the fax initial display when sending a fax When label insertion is set to On the receiv...

Page 1037: ...ile display whenever sending files using the facsimile function to a shared folder You can also connect to a shared folder by selecting the destination shown on the initial scanner display whenever sending files using the scanner function To share the folder using Windows select the SMB protocol To register the folder to the FTP server select the FTP protocol To register the folder to the NetWare ...

Page 1038: ... Printer Scanner p 235 Authentication Information Address Book 229 5 ...

Page 1039: ...tion describes how to register names 1 Press the User Tools Counter key 2 Select System Settings using and and then press the OK key 3 Select Administrator Tools using and and then press the OK key 4 Select Address Book Management using and and then press the OK key 5 Select Program Change using and and then press the OK key 5 Registering Addresses and Users for Facsimile Scanner Functions 230 5 ...

Page 1040: ... automatically specify registration numbers 001 016 by pressing the Quick Dial key 7 Enter the name and then press the OK key For the user name up to 20 characters are usable 8 Press the OK key 9 Press the User Tools Counter key Changing a Registered Name This section describes how to change a name 1 Press the User Tools Counter key 2 Select System Settings using and and then press the OK key Regi...

Page 1041: ...he number keys or the Quick Dial keys and then press the OK key If you do not wish to change the registration number proceed to the next step You can automatically specify registration numbers 001 016 by pressing the Quick Dial key Press Search to search by name registration number user code fax destination E mail address folder name 7 Enter the new name and then press the OK key 5 Registering Add...

Page 1042: ...r key You can search by the registered name or fax number Deleting a Registered Name This section describes how to delete a name 1 Press the User Tools Counter key 2 Select System Settings using and and then press the OK key 3 Select Administrator Tools using and and then press the OK key 4 Select Address Book Management using and and then press the OK key Registering Names 233 5 ...

Page 1043: ...ck Dial keys and then press the OK key You can automatically specify registration numbers 001 016 by pressing the Quick Dial key Press Search to search by name destination list registration number user code fax number 7 Press Yes 8 Press the User Tools Counter key 5 Registering Addresses and Users for Facsimile Scanner Functions 234 5 ...

Page 1044: ...using the scanner function is counted for each user code This allows you to check each user s usage To automatically register the printer driver user code select Auto Program under Printer for the printer in User Code Authentication To use the user code set in User Tools set the user codes registered in User Tools for the printer driver For details about setting user codes for the printer driver s...

Page 1045: ...ation number you want to program using the number keys or the Quick Dial keys and then press the OK key You can automatically specify registration numbers 001 016 by pressing the Quick Dial key Press Search to specify by name destination list registration number user code fax number e mail address or folder destination 7 Press the OK key 5 Registering Addresses and Users for Facsimile Scanner Func...

Page 1046: ... and then press the OK key If you have entered a wrong code press the Clear Stop key and then enter the correct code again You can use up to eight digits for specifying the user code 12 Select Function Permissions using or and then press the OK key 13 Select the function you want to set the user code for using and then press the OK key Authentication Information 237 5 ...

Page 1047: ...name see Registering Names p 230 Registering Names Changing a User Code This section describes how to change a user code Even if you change a user code the counter value will not be cleared 1 Press the User Tools Counter key 2 Select System Settings using or and then press the OK key 5 Registering Addresses and Users for Facsimile Scanner Functions 238 5 ...

Page 1048: ... 6 Enter the registration number you want to change using the number keys or the Quick Dial keys and then press the OK key You can automatically specify registration numbers 001 016 by pressing the Quick Dial key Press Search to specify by name destination list registration number user code fax number e mail address or folder destination 7 Press the OK key Authentication Information 239 5 ...

Page 1049: ...r code using the number keys and then Press the OK key 12 Select permit Functions on Auth using or and then press the OK key 13 Check the registered function you want to change the user code for and then press the OK key To select the check box use To clear the check box use 5 Registering Addresses and Users for Facsimile Scanner Functions 240 5 ...

Page 1050: ...lay and title see Registering Name p 230 Registering Names Deleting a User Code This section describes how to delete a user code After clearing the user code the counter is automatically cleared 1 Press the User Tools Counter key 2 Select System Settings using or and then press the OK key Authentication Information 241 5 ...

Page 1051: ... the registration number you want to delete using the number keys and then press the OK key You can automatically specify registration numbers 001 016 by pressing the Quick Dial key Press Search to specify by name destination list registration number user code fax number e mail address or folder destination 7 Press the OK key 5 Registering Addresses and Users for Facsimile Scanner Functions 242 5 ...

Page 1052: ...he OK key 10 Select User Code using or and then press the OK key 11 Press the Clear Stop key to the user code and then press the OK key 12 Press the Escape key 13 Press End 14 Press the OK key 15 Press the User Tools Counter key Authentication Information 243 5 ...

Page 1053: ...e counter for each user 1 Press the User Tools Counter key 2 Select System Settings using or and then press the OK key 3 Select Administrator Tools using or and then press the OK key 4 Press Disp Print User Counter using or and then press the OK key 5 Select Display using or and then press the OK key 5 Registering Addresses and Users for Facsimile Scanner Functions 244 5 ...

Page 1054: ...ting the Counter for Each User This section describes how to display the counter for each user 1 Press the User Tools Counter key 2 Select System Settings using or and then press the OK key 3 Select Administrator Tools using or and then press the OK key 4 Press Disp Print User Counter using or and then press the OK key Authentication Information 245 5 ...

Page 1055: ...he user to print If you select Manual in step 7 enter the user code and then press the OK key If you select Display Destination List in step 7 confirm the user code using and then press the OK key 9 Select the function you want to print the counter for using or then confirm it by pressing and then press the OK key 5 Registering Addresses and Users for Facsimile Scanner Functions 246 5 ...

Page 1056: ...e counter for all users 1 Press the User Tools Counter key 2 Select System Settings using or and then press the OK key 3 Select Administrator Tools using or and then press the OK key 4 Select Disp Print User Counter using or and then press the OK key 5 Select Print using or and then press the OK key Authentication Information 247 5 ...

Page 1057: ...OK key 8 Press the Start key 9 Press the User Tools Counter key Clearing the Number of Prints This section describes how to clear the counter 1 Press the User Tools Counter key 2 Select System Settings using or and then press the OK key 3 Select Administrator Tools using or and then press the OK key 5 Registering Addresses and Users for Facsimile Scanner Functions 248 5 ...

Page 1058: ... or and then press the OK key 7 Select the method of user selection using or and then press the OK key 8 Select the user to clear If you select Manual in step 7 enter the user code and then press the OK key If you select Display Destination List in step 7 confirm the user code using and then press the OK key Authentication Information 249 5 ...

Page 1059: ...f you want to clear the counter for all users select All Users using or and then press the OK key 12 Select the function you want to clear the counter for using or then confirm it by pressing and then press the OK key 13 Press Yes 14 Press the User Tools Counter key 5 Registering Addresses and Users for Facsimile Scanner Functions 250 5 ...

Page 1060: ...rk if that network is behind a firewall You can program the following items in a fax destination Fax number Registers the destination s fax number You can enter a fax number using up to 128 digits You must include every digit in the number SUB Code Registering a SUB Code allows you to use Confidential Transmission to send messages to the other fax machines which support a similar function called S...

Page 1061: ...ort a similar function called SUB Code See SUB Code Facsimile Reference SEP Code Registering a SEP Code allows you to use Polling Reception to receive faxes from the other fax machines which support Polling Reception See SEP Code Facsimile Reference Select Protocol Select the protocol for the IP Fax transmission This setting only works if the IP Fax function has been selected Registering a Fax Des...

Page 1062: ...u want to register using the number keys or the Quick Dial keys and then press the OK key You can automatically specify registration numbers 001 016 by pressing the Quick Dial key Press Search to specify by name destination list registration number user code fax number e mail address or folder destination 7 Press the OK key 8 Press Details Fax Destination 253 5 ...

Page 1063: ... key If you press the Escape key without pressing the OK key the entered number is not registered To register the name see Registering Names When a group is registered you can also add this fax destination to the group For details about registering groups see Registering Names to a Group p 230 Registering Names p 319 Registering Names to a Group Changing a Fax Destination This section describes ho...

Page 1064: ...ram Change using or and then press the OK key 6 Enter the registration number you want to change using the number keys or the Quick Dial keys and then press the OK key You can automatically specify registration numbers 001 016 by pressing the Quick Dial key Press Search to specify by name destination list registration number user code fax number e mail address or folder destination Fax Destination...

Page 1065: ...ed 11 Press End 12 Press the OK key 13 Press the User Tools Counter key To change the name see Registering Name p 230 Registering Names Using a fax destination as a sender Following describes the procedure for using a fax number as the sender sending number 5 Registering Addresses and Users for Facsimile Scanner Functions 256 5 ...

Page 1066: ... Protect using or and then press the OK key 3 Select Register as using or and then press the OK key 4 Select Sender Only using or and then press the OK key 5 Press the Escape key 6 Press End 7 Press the OK key Fax Destination 257 5 ...

Page 1067: ... To program the SUB Code This section describes how to program the SUB Code 1 Press Option 2 Select SUB Code using or and then press the OK key 3 Enter the SUB Code using the number keys and then press the OK key 4 Enter the password using the number keys and then press the OK key 5 Registering Addresses and Users for Facsimile Scanner Functions 258 5 ...

Page 1068: ... to program the SEP Code 1 Press Option 2 Select SEP Code using or and then press the OK key 3 Enter the SUB Code using the number keys and then press the OK key 4 Enter the password using the number keys and then press the OK key 5 Press Exit Fax Destination 259 5 ...

Page 1069: ...ss the OK key 3 Select On or Off using or and then press the OK key 4 Press Exit To set label insertion This section describes how to set label insertion When Label Insertion is set to ON the receiver s name is printed on the fax message when it is received at the other end 1 Press Option 5 Registering Addresses and Users for Facsimile Scanner Functions 260 5 ...

Page 1070: ...es p 230 Registering Names Using the tone This function allows the machine to send tonal signals when it is connected to a pulse dialing line for example to use a special service on a tone dialing line 1 Press Tone A tone is shown as a T on the display Deleting a Fax Destination This section describes how to delete a registered fax destination Fax Destination 261 5 ...

Page 1071: ...d then press the OK key 4 Select Address Book Management using or and then press the OK key 5 Select Program Change using or and then press the OK key 6 Enter the registration number you want to delete using the number keys or the Quick Dial keys and then press the OK key You can automatically specify registration numbers 001 016 by pressing the Quick Dial key Press Search to specify by name desti...

Page 1072: ...nd then press the OK key 10 Press the Clear Stop key to delete the fax number and then press the OK key 11 Press End 12 Press the OK key 13 Press the User Tools Counter key To delete the name and title see Registering Names p 230 Registering Names Fax Destination 263 5 ...

Page 1073: ...and then press the OK key 5 Select Program Change using or and then press the OK key 6 Enter the registration number you want to register using the number keys or the Quick Dial keys and then press the OK key You can automatically specify registration numbers 001 016 by pressing the Quick Dial key Press Search to specify by name destination list registration number user code fax number e mail addr...

Page 1074: ... Press Details 9 Select Fax Settings using or and then press the OK key 10 Press IP 11 Select the protocol using or and then press the OK key 12 Enter the IP Fax destination and then press the OK key Fax Destination 265 5 ...

Page 1075: ...tering Names p 230 Registering Names Changing a Registered IP Fax Destination This section describes how to change an IP Fax Destination 1 Press the User Tools Counter key 2 Select System Settings using or and then press the OK key 3 Select Administrator Tools using or and then press the OK key 5 Registering Addresses and Users for Facsimile Scanner Functions 266 5 ...

Page 1076: ...ou want to change using the number keys or the Quick Dial keys and then press the OK key You can automatically specify registration numbers 001 016 by pressing the Quick Dial key Press Search to specify by name destination list registration number user code fax number e mail address or folder destination 7 Press the OK key 8 Press Details Fax Destination 267 5 ...

Page 1077: ...ser Tools Counter key To change the name key display and title see Registering Names p 230 Registering Names To change the protocol and IP Fax destination This section describes how to select the protocol 1 Press IP 2 Select the protocol using or and then press the OK key 5 Registering Addresses and Users for Facsimile Scanner Functions 268 5 ...

Page 1078: ...is section describes how to program the SUB Code 1 Press Option 2 Select SUB Code using or and then press the OK key 3 Enter the SUB Code using the number keys and then press the OK key 4 Enter the password using the number keys and then press the OK key 5 Press Exit Fax Destination 269 5 ...

Page 1079: ...r keys and then press the OK key 4 Enter the password using the number keys and then press the OK key 5 Press Exit To set label insertion This section describes how to set label insertion When Label Insertion is set to On the receiver s name is printed on the fax message when it is received at the other end 5 Registering Addresses and Users for Facsimile Scanner Functions 270 5 ...

Page 1080: ...ng Names Deleting a Registered IP Fax Destination This section describes how to delete a registered IP Fax destination If you delete a destination that is a specified delivery destination messages to its registered Personal Box for example cannot be delivered Be sure to check the settings in the fax function before deleting any destinations 1 Press the User Tools Counter key Fax Destination 271 5 ...

Page 1081: ...hen press the OK key 6 Enter the registration number you want to delete using the number keys or the Quick Dial keys and then press the OK key You can automatically specify registration numbers 001 016 by pressing the Quick Dial key Press Search to specify by name destination list registration number user code fax number e mail address or folder destination 5 Registering Addresses and Users for Fa...

Page 1082: ... 10 Press IP and then press the OK key 11 Press the Clear Stop key to delete the IP Fax destination then press the OK key twice 12 Press End 13 Press the OK key 14 Press the User Tools Counter key To change the name and title see Registering Names p 230 Registering Names Fax Destination 273 5 ...

Page 1083: ...ction code on the sender address to prevent unauthorized access You can select an e mail address from an LDAP server and then register it in the Address Book See Sending Scan File by E mail Scanner Reference You can set the machine to send a Transmission Result Report by e mail whenever a transmission is sent See Facsimile Reference Registering an E mail Destination This section describes how to r...

Page 1084: ...want to register using the number keys or the Quick Dial keys and then press the OK key You can automatically specify registration numbers 001 016 by pressing the Quick Dial key Press Search to specify by name destination list registration number user code fax number e mail address or folder destination 7 Press the OK key 8 Press Details E mail Destination 275 5 ...

Page 1085: ...ernet Fax Dest only using or and then press the OK key 12 Select On or Off to specify whether or not SMTP server is to be used using or and then press the OK key 13 Press End 14 Press the OK key 15 Press the User Tools Counter key You can enter up to 128 characters for the e mail address To register the name see Registering Names 5 Registering Addresses and Users for Facsimile Scanner Functions 27...

Page 1086: ...s using or and then press the OK key 3 Select Administrator Tools using or and then press the OK key 4 Select Address Book Management using or and then press the OK key 5 Select Program Change using or and then press the OK key 6 Enter the registration number you want to change using the number keys or the Quick Dial keys and then press the OK key E mail Destination 277 5 ...

Page 1087: ...ess or folder destination 7 Press the OK key 8 Press Details 9 Select E mail Settings using or and then press the OK key 10 Enter the new e mail address using the number keys and the Quick Dial keys and then press the OK key 11 Select E mail Internet Fax Dest or Internet Fax Dest only using or and then press the OK key 5 Registering Addresses and Users for Facsimile Scanner Functions 278 5 ...

Page 1088: ...ls Counter key To change the name and title see Registering Names p 230 Registering Names Deleting an E mail Destination This section describes how to delete an e mail destination 1 Press the User Tools Counter key 2 Select System Settings using or and then press the OK key 3 Select Administrator Tools using or and then press the OK key E mail Destination 279 5 ...

Page 1089: ...he number keys or the Quick Dial keys and then press the OK key You can automatically specify registration numbers 001 016 by pressing the Quick Dial key Press Search to specify by name destination list registration number user code fax number e mail address or folder destination 7 Press the OK key 8 Press Details 5 Registering Addresses and Users for Facsimile Scanner Functions 280 5 ...

Page 1090: ... OK key 10 Press the Clear Stop key to delete the mail address then press the OK key 11 Press End 12 Press the OK key 13 Press the User Tools Counter key To delete the name and title see Registering Names p 230 Registering Names E mail Destination 281 5 ...

Page 1091: ...bout protocols server names and folder levels consult your network administrator You can prevent unauthorized users from accessing folders from the machine See Registering a Protection Code You can only select either SMB FTP or NCP If you change protocol after finishing your settings all previous entries are cleared p 334 Registering a Protection Code Registering an SMB Folder This section describ...

Page 1092: ...key 6 Enter the registration number you want to register using the number keys or the Quick Dial keys and then press the OK key You can automatically specify registration numbers 001 016 by pressing the Quick Dial key Press Search to specify by name destination list registration number user code fax number e mail address or folder destination 7 Press the OK key Registering Folders 283 5 ...

Page 1093: ...0 Select Folder Authentication using or and then press the OK key 11 Select Specify Other Auth Info using or and then press User 12 Enter the login user name and then press the OK key 13 Press Password 5 Registering Addresses and Users for Facsimile Scanner Functions 284 5 ...

Page 1094: ... key 15 Enter the password again to confirm and then press the OK key 16 Press the OK key 17 Press the Escape key 18 Select Folder Info using or and then press the OK key 19 Select SMB using or and then press the OK key Registering Folders 285 5 ...

Page 1095: ...cating the folder using Browse Network 21 Press Com Test to check the path is set correctly 22 Press Exit 23 Press the Escape key 24 Press End 25 Press the Escape key 26 Press the User Tools Counter key To register the name see Registering Names You can enter up to 64 characters for the user name You can enter up to 64 characters for the password 5 Registering Addresses and Users for Facsimile Sca...

Page 1096: ... Locating the SMB folder manually This section describes how to locate the SMB folder manually 1 Select Manual Entry using or and then press the OK key 2 Enter the path and then press the OK key If the format of the entered path is not correct a message appears Press Exit and then enter the path again Enter the path using this format ServerName Share Name PathName You can also enter an IPv4 addres...

Page 1097: ...ct a client computer using the scroll keys and then press the OK key Shared folders under it appear You can press Up to switch between levels 4 Select the folder you want to register using the scroll keys and then press Apply 5 Press the OK key If a login screen appears This section describes how to log on to the machine if the login screen appears when you try to access a folder by browsing the n...

Page 1098: ...ntication 2 Enter the password and then press the OK key The path to the selected folder appears If a message appears press Exit and then enter the login user name and password again Changing an SMB Folder This section describes how to change settings of the registered SMB folder 1 Press the User Tools Counter key 2 Select System Settings using or and then press the OK key 3 Select Administrator T...

Page 1099: ...he number keys or the Quick Dial keys and then press the OK key You can automatically specify registration numbers 001 016 by pressing the Quick Dial key Press Search to specify by name destination list registration number user code fax number e mail address or folder destination 7 Press the OK key 8 Press Details 5 Registering Addresses and Users for Facsimile Scanner Functions 290 5 ...

Page 1100: ...Network using or and then press the OK key To specify a folder you can either enter the path manually or locate the folder by browsing the network See Locating the folder manually and Locating the folder using Browse Network 12 Specify the folder 13 Press Com Test to check the path is set correctly 14 Press Exit Registering Folders 291 5 ...

Page 1101: ... see Registering Names p 230 Registering Names Changing the protocol This section describes how to change the protocol 1 Select FTP or NCP using or and then press the OK key A confirmation message appears 2 Press Yes 3 Enter each item again 5 Registering Addresses and Users for Facsimile Scanner Functions 292 5 ...

Page 1102: ...Management using or and then press the OK key 5 Select Program Change using or and then press the OK key 6 Enter the registration number you want to delete using the number keys or the Quick Dial keys and then press the OK key You can automatically specify registration numbers 001 016 by pressing the Quick Dial key Press Search to specify by name destination list registration number user code fax ...

Page 1103: ...or and then press the OK key 10 Select the protocol which is not currently selected using or and then press the OK key A confirmation message appears 11 Press Yes 12 Press the Escape key twice 5 Registering Addresses and Users for Facsimile Scanner Functions 294 5 ...

Page 1104: ...s Registering an FTP Folder This section describes how to register an FTP folder 1 Press the User Tools Counter key 2 Select System Settings using or and then press the OK key 3 Select Administrator Tools using or and then press the OK key 4 Select Address Book Management using or and then press the OK key Registering Folders 295 5 ...

Page 1105: ...key You can automatically specify registration numbers 001 016 by pressing the Quick Dial key Press Search to specify by name destination list registration number user code fax number e mail address or folder destination 7 Press the OK key 8 Press Details 9 Select Auth Info using or and then press the OK key 5 Registering Addresses and Users for Facsimile Scanner Functions 296 5 ...

Page 1106: ...Select Specify Other Auth Info using or and then press User 12 Enter the login user name and then press the OK key 13 Press Password 14 Enter the password and then press the OK key 15 Enter the password again to confirm and then press the OK key Registering Folders 297 5 ...

Page 1107: ... FTP using or and then press the OK key 20 Enter the server name and then press the OK key 21 If you want to change the port number enter the new port number and then press the OK key Otherwise just press the OK key You can enter 1 to 65535 5 Registering Addresses and Users for Facsimile Scanner Functions 298 5 ...

Page 1108: ... 24 Press Exit 25 Press the Escape key 26 Press End 27 Press the OK key 28 Press the User Tools Counter key To register the name see Registering Names You can enter up to 64 characters for the user name You can enter up to 64 characters for the password You can enter a server name using up to 64 characters Registering Folders 299 5 ...

Page 1109: ...le Transfer settings applies For details see File Transfer If the connection test fails check the settings and then try again If User Authentication is specified contact your administrator p 36 File Transfer p 230 Registering Names Changing an FTP Folder This section describes how to change the registered FTP folder 1 Press the User Tools Counter key 2 Select System Settings using or and then pres...

Page 1110: ...nd then press the OK key You can automatically specify registration numbers 001 016 by pressing the Quick Dial key Press Search to specify by name destination list registration number user code fax number e mail address or folder destination 7 Press the OK key 8 Press Details 9 Select Folder Info using or and then press the OK key Registering Folders 301 5 ...

Page 1111: ...OK key 12 To change the port number enter the new port number and then press the OK key Otherwise just press the OK key 13 To change the path enter the new path and then press the OK key Otherwise just press the OK key 14 Press Com Test to check the path is set correctly 15 Press Exit 5 Registering Addresses and Users for Facsimile Scanner Functions 302 5 ...

Page 1112: ...ame see Registering Names p 230 Registering Names Changing the protocol This section describes how to change the protocol 1 Select SMB or NCP using or and then press the OK key A confirmation message appears 2 Press Yes Changing the protocol will clear all settings made under the previous protocol 3 Enter each item again Registering Folders 303 5 ...

Page 1113: ... then press the OK key 5 Select Program Change using or and then press the OK key 6 Enter the registration number you want to delete using the number keys or the Quick Dial keys and then press the OK key You can automatically specify registration numbers 001 016 by pressing the Quick Dial key Press Search to specify by name destination list registration number user code fax number e mail address o...

Page 1114: ...lect Folder Info using or and then press the OK key 10 Select the protocol which is not currently selected using or and then press the OK key A confirmation message appears 11 Press Yes 12 Press the Escape key twice Registering Folders 305 5 ...

Page 1115: ...P Folder This section describes how to register an NCP folder 1 Press the User Tools Counter key 2 Select System Settings using or and then press the OK key 3 Select Administrator Tools using or and then press the OK key 4 Select Address Book Management using or and then press the OK key 5 Registering Addresses and Users for Facsimile Scanner Functions 306 5 ...

Page 1116: ... and then press the OK key You can automatically specify registration numbers 001 016 by pressing the Quick Dial key Press Search to specify by name destination list registration number user code fax number e mail address or folder destination 7 Press the OK key 8 Press Details 9 Select Auth Info using or and then press the OK key Registering Folders 307 5 ...

Page 1117: ...th Info using or and then press User 12 Enter the login user name and then press the OK key 13 Press Password 14 Enter the password and then press the OK key 15 Enter the password again to confirm and then press the OK key 5 Registering Addresses and Users for Facsimile Scanner Functions 308 5 ...

Page 1118: ...ess the OK key 20 Select the connection type using or and then press the OK key If you want to specify a folder in an NDS tree press NDS If you want to specify a folder on a NetWare server press Bindery 21 Select Manual Entry or Browse Network to specify the path entry method using or and then press the OK key Registering Folders 309 5 ...

Page 1119: ...y To register the name see Registering Names You can enter up to 64 characters for the user name If you select NDS for the connection type after the user name enter the context name where the user object resides If the user name is user and the context name is context the user name you would enter is user context You can enter up to 64 characters for the password To specify a folder you can either...

Page 1120: ...f you set Connection Type to NDS and if the NDS tree name is tree the name of the context including the volume is context the volume name is volume and the folder name is folder then the path will be tree volume context folder If you set Connection Type to Bindery and if the NetWare server name is server the volume name is volume and the folder name is folder then the path will be server volume fo...

Page 1121: ...n press Apply You can press Up to switch between levels 4 Press the OK key Only the folders you are allowed to access appear in Browse Network If the languages used on the machine and the destination you want to view differ the items in the list may not appear correctly Up to 100 items can be displayed in the list Changing an NCP Folder This section describes how to change the registered NCP folde...

Page 1122: ...m Change using or and then press the OK key 6 Enter the registration number you want to change using the number keys or the Quick Dial keys and then press the OK key You can automatically specify registration numbers 001 016 by pressing the Quick Dial key Press Search to specify by name destination list registration number user code fax number e mail address or folder destination Registering Folde...

Page 1123: ... connection type using or and then press the OK key If you want to specify a folder in an NDS tree press NDS If you want to specify a folder on a NetWare server press Bindery 12 Select Manual Entry or Browse Network to specify the path entry method using or and then press the OK key 5 Registering Addresses and Users for Facsimile Scanner Functions 314 5 ...

Page 1124: ...r manually and Locating the folder using Browse Network 13 Specify the folder 14 Press Com Test to check the path is set correctly 15 Press Exit 16 Press the Escape key 17 Press End 18 Press the OK key 19 Press the User Tools Counter key To change the name see Registering Names p 230 Registering Names Registering Folders 315 5 ...

Page 1125: ...ll clear all settings made under the previous protocol 3 Enter each item again Deleting an NCP Folder This section describes how to delete the registered NCP folder 1 Press the User Tools Counter key 2 Select System Settings using or and then press the OK key 3 Select Administrator Tools using or and then press the OK key 5 Registering Addresses and Users for Facsimile Scanner Functions 316 5 ...

Page 1126: ... want to delete using the number keys or the Quick Dial keys and then press the OK key You can automatically specify registration numbers 001 016 by pressing the Quick Dial key Press Search to specify by name destination list registration number user code fax number e mail address or folder destination 7 Press the OK key 8 Press Details Registering Folders 317 5 ...

Page 1127: ...g or and then press the OK key A confirmation message appears 11 Press Yes 12 Press the Escape key twice 13 Press End 14 Press the OK key 15 Press the User Tools Counter key To delete a name entirely see Registering Names p 230 Registering Names 5 Registering Addresses and Users for Facsimile Scanner Functions 318 5 ...

Page 1128: ...up with over 10 folders registered The maximum number of destinations registerable to a group is 100 You can set a protection code to prevent unauthorized access to the folders registered in a group For details see Registering a Protection Code p 230 Registering Names Registering a Group This section describes how to register a group 1 Press the User Tools Counter key 2 Select System Settings usin...

Page 1129: ...y registration numbers 001 016 by pressing the Quick Dial key 7 Enter the group name and then press the OK key 8 Press the OK key 9 Press the User Tools Counter key Registering Names to a Group This section describes how to register names to a registered group You can put names that have been registered in the Address Book into a group When registering new names you can also register groups at the...

Page 1130: ...Select Program Change using or and then press the OK key 6 Enter the registration number you want to change using the number keys or the Quick Dial keys and then press the OK key You can automatically specify registration numbers 001 016 by pressing the Quick Dial key Press Search to specify by name destination list registration number user code fax number e mail address or folder destination Regi...

Page 1131: ... which you want to register using and then press the OK key 11 Press End 12 Press the OK key 13 Press the User Tools Counter key Adding a Group to Another Group This section describes how to add a group to another group 1 Press the User Tools Counter key 5 Registering Addresses and Users for Facsimile Scanner Functions 322 5 ...

Page 1132: ...Change using or and then press the OK key 6 Enter the registration number of the group that you want to put into another group using the number keys or the Quick Dial keys and then press the OK key You can automatically specify registration numbers 001 016 by pressing the Quick Dial key Press Search to search by name destination list or registration number 7 Press the OK key Registering Names to a...

Page 1133: ...ess the OK key 11 Press End 12 Press the OK key 13 Press the User Tools Counter key Displaying Names Registered in a Group This section describes how to display names registered in a group You can check the names or groups registered in each group 1 Press the User Tools Counter key 5 Registering Addresses and Users for Facsimile Scanner Functions 324 5 ...

Page 1134: ...5 Select Program Change using or and then press the OK key 6 Enter the registration number you want to display using the number keys or the Quick Dial keys and then press the OK key You can automatically specify registration numbers 001 016 by pressing the Quick Dial key Press Search to search by name destination list or registration number 7 Press the OK key Registering Names to a Group 325 5 ...

Page 1135: ...oving a Name from a Group This section describes how to remove a name from a group 1 Press the User Tools Counter key 2 Select System Settings using or and then press the OK key 3 Select Administrator Tools using or and then press the OK key 4 Select Address Book Management using or and then press the OK key 5 Registering Addresses and Users for Facsimile Scanner Functions 326 5 ...

Page 1136: ... press the OK key You can automatically specify registration numbers 001 016 by pressing the Quick Dial key Press Search to search by name destination list registration number user code fax number e mail address or folder destination 7 Press the OK key 8 Press Details 9 Select Register Group to using or and then press the OK key Registering Names to a Group 327 5 ...

Page 1137: ...n Another Group This section describes how to delete a group within another group 1 Press the User Tools Counter key 2 Select System Settings using or and then press the OK key 3 Select Administrator Tools using or and then press the OK key 4 Select Prgrm Change Delete Group using or and then press the OK key 5 Registering Addresses and Users for Facsimile Scanner Functions 328 5 ...

Page 1138: ...er keys or the Quick Dial keys and then press the OK key You can automatically specify registration numbers 001 016 by pressing the Quick Dial key Press Search to search by name destination list or registration number 7 Press the OK key 8 Press Details 9 Select Register Group to using or and then press the OK key Registering Names to a Group 329 5 ...

Page 1139: ...Changing a Group Name This section describes how to change a group name 1 Press the User Tools Counter key 2 Select System Settings using or and then press the OK key 3 Select Administrator Tools using or and then press the OK key 4 Select Prgrm Change Delete Group using or and then press the OK key 5 Registering Addresses and Users for Facsimile Scanner Functions 330 5 ...

Page 1140: ...pressing the Quick Dial key Press Search to search by name destination list or registration number 7 Enter the new group name using the number keys and the Quick Dial keys and then press the OK key 8 To change the registration number press Reg No 9 Enter the new registration number using the number keys or the Quick Dial keys and then press the OK key 10 Press the OK key 11 Press the User Tools Co...

Page 1141: ...te Group using or and then press the OK key 5 Select Delete using or and then press the OK key 6 Enter the registration number you want to delete using the number keys or the Quick Dial keys and then press the OK key You can automatically specify registration numbers 001 016 by pressing the Quick Dial key Press Search to search by name destination list or registration number 5 Registering Addresse...

Page 1142: ...7 Press Yes 8 Press the User Tools Counter key Registering Names to a Group 333 5 ...

Page 1143: ... Sender s names You can prevent misuse of sender s names Registering a Protection Code to a Single User This section describes how to register a Protection code to a single user 1 Press the User Tools Counter key 2 Select System Settings using or and then press the OK key 3 Select Administrator Tools using or and then press the OK key 4 Select Address Book Management using or and then press the OK...

Page 1144: ...en press the OK key You can automatically specify registration numbers 001 016 by pressing the Quick Dial key Press Search to specify by name destination list registration number user code fax number e mail address or folder destination 7 Press the OK key 8 Press Details 9 Select Auth Protect using or and then press the OK key Registering a Protection Code 335 5 ...

Page 1145: ...er using or and then press the OK key If you select Destination Only in Register as only Folder can be selected If you select Sender Only in Register as only Sender can be selected 14 Select Protect or Do not protect using or and then press the OK key Protect or Do not protect can be selected for both Folder and Sender at the same time 15 Press the Escape key 5 Registering Addresses and Users for ...

Page 1146: ...ss End 20 Press the OK key 21 Press the User Tools Counter key Specify a protection code of up to eight digits You can also specify Protection without specifying a protection code Registering a Protection Code to a Group User This section describes how to register a Protection Code to a Group User 1 Press the User Tools Counter key Registering a Protection Code 337 5 ...

Page 1147: ... using or and then press the OK key 6 Enter the registration number of group you want to protect using the number keys or the Quick Dial keys and then press the OK key You can automatically specify registration numbers 001 016 by pressing the Quick Dial key Press Search to search by name destination list or registration number 7 Press the OK key 5 Registering Addresses and Users for Facsimile Scan...

Page 1148: ...Select Folder Protect using or and then press the OK key 11 Select On using or and then press the OK key 12 Select Dest Protect Code using or and then press the OK key 13 Enter a protection code using the number keys and then press the OK key Registering a Protection Code 339 5 ...

Page 1149: ...e OK key 16 Press the User Tools Counter key Specify a protection code of up to eight digits You can also specify Protection without specifying a protection code 5 Registering Addresses and Users for Facsimile Scanner Functions 340 5 ...

Page 1150: ...need to program it beforehand When Do not Specify is selected for SMTP Authentication the User Name and Password that you have specified in SMTP Authentication of File Transfer settings applies For details see File Transfer 1 Press the User Tools Counter key 2 Select System Settings using or and then press the OK key 3 Select Administrator Tools using or and then press the OK key 4 Select Address ...

Page 1151: ... by pressing the Quick Dial key Press Search to specify by name destination list registration number user code fax number e mail address or folder destination 7 Press the OK key 8 Press Details 9 Select Auth Info using or and then press the OK key 10 Select SMTP Authentication using or and then press the OK key 5 Registering Addresses and Users for Facsimile Scanner Functions 342 5 ...

Page 1152: ... the login user name and then press the OK key 13 Press Password 14 Enter the password and then press the OK key 15 Enter the password again to confirm and then press the OK key 16 Press the Escape key 17 Press the Escape key Registering SMTP and LDAP Authentication 343 5 ...

Page 1153: ...ister LDAP Authentication For each user registered in the Address Book you can register a login user name and login password to be used when accessing an LDAP server To use an LDAP server you need to program it beforehand For details see Programming the LDAP server When Do not Specify is selected for LDAP Authentication the User Name and Password that you have specified in Program Change LDAP Serv...

Page 1154: ... the registration number you want to register using the number keys or the Quick Dial keys and then press the OK key You can automatically specify registration numbers 001 016 by pressing the Quick Dial key Press Search to specify by name destination list registration number user code fax number e mail address or folder destination 7 Press the OK key Registering SMTP and LDAP Authentication 345 5 ...

Page 1155: ...10 Select LDAP Authentication using or and then press the OK key 11 Select Specify Other Auth Info using or and then press User 12 Enter the login user name and then press the OK key 13 Press Password 5 Registering Addresses and Users for Facsimile Scanner Functions 346 5 ...

Page 1156: ...nd 19 Press the OK key 20 Press the User Tools Counter key To register the name see Registering Names You can enter up to 128 characters for the user name You can enter up to 128 characters for the password To change the LDAP Authentication settings repeat step 3 to 19 p 46 Programming the LDAP server p 230 Registering Names Registering SMTP and LDAP Authentication 347 5 ...

Page 1157: ... search by name registration number user code or fax number For details about accessing Address Book Management see Registering Names p 230 Registering Names Searching by Name Search the address book using a destination or user name 1 Press Search 2 Select Search by Name using or and then press the OK key 3 Enter the name you want to search for and then press the OK key You can also search by ente...

Page 1158: ...etails about entering text see Entering Text About This Machine Searching from the Display List Search the address book by displaying a list of registered user names and destinations 1 Press Search 2 Select Display List using or and then press the OK key The list of registered user names or destination names appears Searching 349 5 ...

Page 1159: ... address book using the registration number of a user destination 1 Press Search 2 Select Search by Registration No using or and then press the OK key 3 Enter the registration number you want to search using the number keys and then press the OK key 4 Select the name using or then confirm it by pressing and then press the OK key 5 Registering Addresses and Users for Facsimile Scanner Functions 350...

Page 1160: ...d then press the OK key 3 Enter the user code you want to search using the number keys and then press the OK key 4 Press the OK key The search results appear 5 Select the name using or then confirm it by pressing and then press the OK key Searching by Fax Number Search the address book using the registered fax numbers Searching 351 5 ...

Page 1161: ...y To search by IP Fax number press IP enter the IP Fax number and then press the OK key 4 Press the OK key The search results appear 5 Select the name using or then confirm it by pressing and then press the OK key Searching by E mail Address Search the address book using registered e mail addresses 5 Registering Addresses and Users for Facsimile Scanner Functions 352 5 ...

Page 1162: ...arch for and then press the OK key You can also search by entering part of the e mail address 4 Press the OK key The search results appear 5 Select the name using or then confirm it by pressing and then press the OK key Searching by Destination Folder Name Search the address book using destination folder names Searching 353 5 ...

Page 1163: ...n folder name and then press the OK key You can also search by entering part of the destination folder name 4 Press the OK key The search results appear 5 Select the name using or then confirm it by pressing and then press the OK key 5 Registering Addresses and Users for Facsimile Scanner Functions 354 5 ...

Page 1164: ...s 1 Enable TCP IP with the control panel and then set up the printer s network environment about TCP IP including IP addresses TCP IP of the printer is set as default 2 Install a TCP IP in Windows to set up the network environment Consult the network administrator for the local setting information 3 To print under Windows 2000 XP Vista Windows Server 2003 2003 R2 2008 install Printing service for ...

Page 1165: ... a space or tab between 192 168 15 16 and host between host and NP respectively using one line for this format 2001 DB 100 host NP 2001 DB 100 is the IPv6 address host is the printer s host name and NP is replaced by comments Insert a space or tab between 2001 DB 100 and host between host and NP respectively using one line for this format 3 Save the file When using a host name under Windows Server...

Page 1166: ...and lowercase L When using a printer with the host name host to print a PostScript file named file 1 located in the C PRINT directory the command line is as follows c lpr Shost Pfiletype RPS ol C PRINT file1 Printing from the virtual printer c lpr S printer s IP address P virtual printer name ol path name file name For details about the virtual printer configuration see Using the Virtual Printer P...

Page 1167: ...rmulate the printer s IP address or the host name of the hosts file printer as an argument and use the ftp command ftp printer s IP address 2 Enter the user name and password and then press the Enter key For details about the user name and password consult your network administrator User Password When user authentication is set enter a login user name and password 3 When printing a binary file set...

Page 1168: ...Image Monitor to create an open key For details see Web Image Monitor help If personal authentication Basic Windows LDAP or Integrated Server Authentication is enabled only authenticated users users authenticated by login user name and password can log on For mput command and can be used as wild cards in file names When printing a binary file in ASCII mode print may not come out correctly For deta...

Page 1169: ...6 Special Operations under Windows 360 6 ...

Page 1170: ...ons are built in Windows Terminal Service or Citrix Presentation Server Citrix XenApp Windows Terminal Service In the Windows Terminal Service environment some of the printer driver s functions are unavailable In an environment where Windows Terminal Service is installed some of the printer driver s functions are unavailable even if any function of Windows Terminal Service is not used When you ins...

Page 1171: ...uipment is disconnected The settings for optional equipment will be restored to its defaults each time the client computer logs on to the server When printing a large number of bitmap images or using the server in a WAN environment over dial up lines such as ISDN printing may not be possible or errors may occur depending on data transfer rates Citrix Presentation Server Citrix XenApp Printer drive...

Page 1172: ...in increased line charges This is because your computer connects to the ISDN line whenever a packet is transferred from the printer If there is more than one DHCP server use the same setting for all servers The machine operates using data from the DHCP server that responds first DHCP servers can operate in an IPv6 environment but they cannot be configured to allocate IPv6 addresses or obtain host ...

Page 1173: ...Using Web Image Monitor 1 Start a Web browser 2 Enter http machine s IP address or host name in the address bar to access the printer whose settings you want to change Top Page of Web Image Monitor appears 3 Click Login The dialog box for entering the user name and password appears 4 Enter the user name and password and then click Login Contact your administrator for information about the settings...

Page 1174: ...Use the wins command to make the setting with telnet p 156 Remote Maintenance by telnet Configuring the WINS Server 365 7 ...

Page 1175: ...with the host name CNAME will not be registered For DHCPv4 settings As a substitute for the printer the DHCP server updates the record and one of the following occurs When the printer acquires the IP address from the DHCP server the DHCP server updates the A and PTR records When the printer acquires the IP address from the DHCP server the printer updates the A record and the DHCP server updates th...

Page 1176: ...h standard Windows 2000 Server Windows Server 2003 2003 R2 2008 features BIND 8 2 3 or higher DNS servers with standard NetWare 5 or a higher version features For IPv6 setting Microsoft DNS servers with standard Windows Server 2003 2003 R2 2008 features BIND 9 2 3 or higher DHCP Servers Targeted for Operation As a substitute for the printer DHCP servers capable of updating the A record and PTR rec...

Page 1177: ... For details see Remote Maintenance by telnet p 156 Remote Maintenance by telnet 7 Appendix 368 7 ...

Page 1178: ...iguring the router Filter packets so they do not pass over the dial up router The MAC address of the filtering printer is printed on the printer configuration page For more information about configuring the printer if the router cannot be configured see the following instructions Configuring the printer with NetWare 1 Following the setup method described earlier in this manual configure the file s...

Page 1179: ...ter will dial and go online whenever a connection to the delivery server is made Telephone charges may be incurred When connected to a computer that uses dial up access Do not install the ScanRouter delivery software on a computer which uses dial up access WhenusingtheScanRouterdeliverysoftware DeskTopBinder AutoDocumentLink oraTWAIN driver on a computer with dial up access a dial up connection ma...

Page 1180: ... 2003 2003 R2 2008 clear the Enable banner check box on the NetWare Settings tab in the printer properties dialog box Printing after resetting the machine After resetting the remote printer the connection from the print server will be cut off for about 30 40 seconds before re connecting Depending on the NetWare specification print jobs may be accepted but they will not be printed during this inter...

Page 1181: ...hey do not touch The exposure glass cover and the ADF do not knock the antennas If the network area provides poor radio environment Where radio wave conditions are bad the network may not function due to interrupted or failed connections When checking the wireless LAN signal and the access point follow the procedure below to improve the situation Position the access point nearer to the machine Cle...

Page 1182: ...e SSL For details about setting SSL configuration see Protection Using Encryption Security Reference To set IEEE 802 1X you must use Web Image Monitor Installing a Site Certificate 1 Access the authentication server and obtain the CA certificate Methods of obtaining certificates differ according to the operating system you are using 2 Log on to Web Image Monitor in the administrator mode 3 Click C...

Page 1183: ...ice Certificate window and then click Install 11 Using a text editor open the CA signified certificate downloaded in step 9 and then copy over all the text 12 In the Install Certificate window paste all the text copied into the CA signified certificate 13 Click OK 14 Updating appears Wait for about one or two minutes and then click OK 15 Check that the Device Certificate shows Installed 16 Click C...

Page 1184: ...d then enter the user name set in the RADIUS server Select CHAP MSCHAP MSCHAPv2 PAP or MD5 in Phase 2 Method Certain methods might not be available depending on the RADIUS server you want to use Make the following settings according to the operating system you are using Select On or Off in Authenticate Server Certificate Select On or Off in Trust Intermediate Certificate Authority Enter the host n...

Page 1185: ...domain name in Domain Name 6 Select EAP Type Configurations differ according to the EAP Type EAP TLS Make the following settings according to the operating system you are using Select On or Off in Authenticate Server Certificate Select On or Off in Trust Intermediate Certificate Authority Enter the host name of the RADIUS server on Server ID LEAP Click Change in Password and then enter the passwor...

Page 1186: ... on Server ID 7 Click OK 8 Click Configuration and then click Wireless LAN Settings in the Interface area 9 Select Wireless LAN in LAN Type 10 Select Infrastructure Mode in Communication Mode 11 Enter the alphanumeric characters a z A Z or 0 9 in SSID according to the access point you want to use 12 Select WPA in Security Method 13 Select TKIP or CCMP AES in WPA Encryption Method according to the ...

Page 1187: ...g Frame type Ethernet II IEEE 802 2 IEEE 802 3 SNAP Printer LAN Fax TCP IP IPv4 IPv6 LPR RSH RCP DIPRINT FTP IPP IPP SSL RHPP IPX SPX NetWare AppleTalk SMB WSD Printer Internet Fax TCP IP IPv4 IPv6 SMTP SMTP C POP3 IMAP4 Network Scanner IPv4 IPv6 FTP FTP C 7 Appendix 378 7 ...

Page 1188: ...ent port To use IPP under Windows XP Vista Windows Server 2003 2003 R2 2008 use the Standard IPP port To use IPP under Windows 2000 use SmartDeviceMonitor for Client AppleTalk can be used when the PostScript 3 module is installed Under Windows Vista or Windows Server 2008 WSD Printer WSD Scanner uses the WSD Port Only the rsh rcp commands in Unix OS standard command set are supported Specification...

Page 1189: ...nished to do so subject to the following conditions The above copyright notice and this permission notice shall be included in all copies or substantial portions of the Software THE SOFTWARE IS PROVIDED AS IS WITHOUT WARRANTY OF ANY KIND EXPRESS OR IMPLIED INCLUDING BUT NOT LIMITED TO THE WARRANTIES OF MERCHANTABILITY FITNESS FOR A PARTICULAR PURPOSE AND NONINFRINGEMENT IN NO EVENT SHALL THE AUTHO...

Page 1190: ... ANY DIRECT INDIRECT INCIDENTAL SPECIAL EXEMPLARY OR CONSEQUENTIAL DAMAGES INCLUDING BUT NOT LIMITED TO PROCUREMENT OF SUBSTITUTE GOODS OR SERVICES LOSS OF USE DATA OR PROFITS OR BUSINESS INTERRUPTION HOWEVER CAUSED AND ON ANY THEORY OF LIABILITY WHETHER IN CONTRACT STRICT LIABILITY OR TORT INCLUDING NEGLIGENCE OR OTHERWISE ARISING IN ANY WAY OUT OF THE USE OF THIS SOFTWARE EVEN IF ADVISED OF THE ...

Page 1191: ...Ginger Alliance Ltd All Rights Reserved a The application software installed on this product includes the Sablotron software Version 0 82 hereinafter Sablotron 0 82 with modifications made by the product manufacturer The original code of the Sablotron 0 82 is provided by Ginger Alliance Ltd the initial developer and the modified code of the Sablotron 0 82 has been derived from such original code p...

Page 1192: ...ote products derived from this software without prior written permission For permission or any other legal details please contact Office of Technology Transfer Carnegie Mellon University 5000 Forbes Avenue Pittsburgh PA 15213 3890 412 268 4387 fax 412 268 7395 tech transfer andrew cmu edu 4 Redistributions of any form whatsoever must retain the following acknowledgment This product includes softwa...

Page 1193: ...ftware or this function License is also granted to make and use derivative works provided that such works are identified as derived from the RSA Data Security Inc MD5 Message Digest Algorithm in all material mentioning or referencing the derived work RSA Data Security Inc makes no representations concerning either the merchantability of this software or the suitability of this software for any par...

Page 1194: ...edistributions of source code must retain the above copyright notice this list of conditions and the following disclaimer 2 Redistributions in binary form must reproduce the above copyright notice this list of conditions and the following disclaimer in the documentation and or other materials provided with the distribution 3 All advertising materials mentioning features or use of this software mus...

Page 1195: ...com The implementation was written so as to conform with Netscapes SSL This library is free for commercial and non commercial use as long as the following conditions are aheared to The following conditions apply to all code found in this distribution be it the RC4 RSA lhash DES etc code not just the SSL code The SSL documentation included with this distribution is covered by the same copyright ter...

Page 1196: ...mponents of this software fall under are as follows First we will summarize and say that all components are under a BSD licence or a licence more free than that OpenSSH contains no GPL code 1 Copyright c 1995 Tatu Ylonen ylo cs hut fi Espoo Finland All rights reserved As far as I am concerned the code I have written for this software can be used freely for any purpose Any derived versions of this ...

Page 1197: ...UT WARRANTY OF ANY KIND EITHER EXPRESSED OR IMPLIED INCLUDING BUT NOT LIMITED TO THE IMPLIED WARRANTIES OF MERCHANTABILITY AND FITNESS FOR A PARTICULAR PURPOSE THE ENTIRE RISK AS TO THE QUALITY AND PERFORMANCE OF THE PROGRAM IS WITH YOU SHOULD THE PROGRAM PROVE DEFECTIVE YOU ASSUME THE COST OF ALL NECESSARY SERVICING REPAIR OR CORRECTION IN NO EVENT UNLESS REQUIRED BY APPLICABLE LAW OR AGREED TO I...

Page 1198: ... documentation and or other materials provided with the distribution 3 Neither the name of the University nor the names of its contributors may be used to endorse or promote products derived from this software without specific prior written permission THIS SOFTWARE IS PROVIDED BY THE REGENTS AND CONTRIBUTORS AS IS AND ANY EXPRESS OR IMPLIED WARRANTIES INCLUDING BUT NOT LIMITED TO THE IMPLIED WARRA...

Page 1199: ...EQUENTIAL DAMAGES INCLUDING BUT NOT LIMITED TO PROCUREMENT OF SUBSTITUTE GOODS OR SERVICES LOSS OF USE DATA OR PROFITS OR BUSINESS INTERRUPTION HOWEVER CAUSED AND ON ANY THEORY OF LIABILITY WHETHER IN CONTRACT STRICT LIABILITY OR TORT INCLUDING NEGLIGENCE OR OTHERWISE ARISING IN ANY WAY OUT OF THE USE OF THIS SOFTWARE EVEN IF ADVISED OF THE POSSIBILITY OF SUCH DAMAGE 5 Portable OpenSSH contains th...

Page 1200: ...ication are permitted provided that the following conditions are met 1 Redistributions in source form must retain copyright statements and notices 2 Redistributions in binary form must reproduce applicable copyright statements and notices this list of conditions and the following disclaimer in the documentation and or other materials provided with the distribution and 3 Redistributions must contai...

Page 1201: ...bove copyright notice this list of conditions and the following disclaimer in the documentation and or other materials provided with the distribution 3 Neither the name of the Institute nor the names of its contributors may be used to endorse or promote products derived from this software without specific prior written permission THIS SOFTWARE IS PROVIDED BY THE INSTITUTE AND CONTRIBUTORS AS IS AN...

Page 1202: ... either registered trademarks or trademarks of Novell Inc PCL is a registered trademark of Hewlett Packard Company UNIX is a registered trademark in the United States and other countries licensed exclusively through X Open Company Limited Other product names used herein are for identification purposes only and might be trademarks of their respective companies We disclaim any and all right to those...

Page 1203: ... Datacenter Edition The product names of Windows Server 2003 R2 are as follows Microsoft Windows Server 2003 R2 Standard Edition Microsoft Windows Server 2003 R2 Enterprise Edition Microsoft Windows Server 2003 R2 Datacenter Edition The product names of Windows Server 2008 are as follows Microsoft Windows Server 2008 Standard Microsoft Windows Server 2008 Enterprise Microsoft Windows Server 2008 D...

Page 1204: ...hts 380 D DDNS Configuration 29 Default User Name Password send 39 Delete All Logs 45 Deleting a fax destination 261 Deleting a group 332 Deleting a group within another group 328 Deleting a registered IP Fax destination 271 Deleting a registered name 233 Deleting a user code 241 Deleting an e mail destination 279 Deleting an FTP folder 304 Deleting an NCP folder 316 Deleting an SMB registered fol...

Page 1205: ... Prime 32 Interface Settings 28 Internet Fax ethernet 72 wireless LAN 74 IP address 14 IPP 171 IPsec 29 IPv4 Gateway Address 28 IPv6 172 IPv6 Gateway Address 28 IPv6 Stateless Address Autoconfiguration 28 K Key Counter Management 43 Key Repeat 23 L LAN Type 31 Laws and regulations 15 LDAP 46 changing 53 deleting 54 programming 46 LDAP authentication 344 LDAP Search 44 Legal prohibition 15 Limitati...

Page 1206: ... 24 tray 1 3 25 Parallel Communication Speed 32 Parallel Interface 32 Parallel Timing 32 Permit SNMPv3 Communication 31 Permit SSL TLS Communication 31 Ping Command 31 POP before SMTP 37 POP3 IMAP4 Settings 37 Preventing unauthorized user access to shared folders from the machine 228 Print I F Setting List 34 Print job information ftp 204 info 204 rcp 204 rsh 204 sftp 204 Print log information ftp...

Page 1207: ... Registering folders 282 Registering names 230 Registering names to a group 319 Remote maintenance 156 Remote printer NetWare 3 x 111 NetWare 4 x 113 NetWare 5 113 NetWare 5 1 113 NetWare 6 113 NetWare 6 5 113 Removing a name from a group 326 Restore Factory Defaults 34 Restore IEEE 802 1X Authentication to Defaults 31 rsh 196 202 204 216 S Scan to folder function ethernet 80 wireless LAN 81 Scann...

Page 1208: ... appletalk 159 authfree 160 autonet 160 bonjour 161 devicename 163 dhcp 163 dhcp6 164 diprint 165 dns 165 domainname 167 etherauth 168 help 168 hostname 169 ifconfig 169 info 170 ipsec 171 logout 172 lpr 172 netware 173 pathmtu 174 prnlog 175 rhpp 175 route 175 set 177 show 180 slp 180 smb 180 snmp 181 sntp 184 spoolsw 185 ssdp 186 ssh 186 status 187 syslog 187 upnp 187 web 188 wiconfig 189 wins 1...

Page 1209: ...120 login 120 mail authentication 152 menu 120 mode 120 on demand e mail notification 154 setting items 123 top page 118 WINS Configuration 29 WINS server 364 telnet 364 Web Image Monitor 364 Wireless LAN 33 372 Wireless LAN interface checking the signal 68 connecting 66 setup procedure 67 Wireless LAN Signal 34 WSD scanner ethernet 86 wireless LAN 87 400 EN USA D069 6901 ...

Page 1210: ...Copyright 2008 ...

Page 1211: ...ating instructions Network and System Settings Guide D069 6901 EN USA Type for 917 LD117 MP 171 Aficio MP 171 Type for 917F LD117F MP 171F Aficio MP 171F Type for 917SPF LD117SPF MP 171SPF Aficio MP 171 SPF ...

Page 1212: ...rinter Utility for Mac Appendix 1 2 3 4 5 6 7 Read this manual carefully before you use this machine and keep it handy for future reference For safe and correct use be sure to read the Safety Information in About This Machine before using the machine PostScript 3 Supplement ...

Page 1213: ......

Page 1214: ...stScript 3 Printer Driver Windows Vista Windows Server 2008 IPP 18 Changing the Port Settings DeskTop Binder SmartDeviceMonitor for Client 20 Using the Standard TCP IP Port 22 Installing the PostScript 3 Printer Driver Windows 2000 22 Installing the PostScript 3 Printer Driver Windows XP Windows Server 2003 2003 R2 23 Installing the PostScript 3 Printer Driver Windows Vista Windows Server 2008 24 ...

Page 1215: ...rver 2008 42 If a Message Appears during Installation 44 Making Option Settings for the Printer 46 Setting Up the Printer Driver 47 Windows 2000 Accessing the Printer 47 Windows XP Windows Server 2003 2003 R2 Accessing the Printer Properties 48 Windows Vista Windows Server 2008 Accessing the Printer Properties 50 2 Mac OS Configuration Mac OS 53 Installing the PostScript 3 Printer Driver and PPD F...

Page 1216: ... Rotate by 180 degrees 81 Copies 81 Orientation Override 82 Layout Booklet 82 Page Order 83 Draw Border 83 Duplex Printing 83 Collate 85 Reverse Order Print 85 Paper Type 86 Watermark 86 Watermark Text 86 Watermark Font 87 Watermark Size 87 Watermark Angle 87 Watermark Style 88 Dithering 88 Image Smoothing 89 Print Mode 90 4 Printer Utility for Mac Installing Printer Utility for Mac 91 3 ...

Page 1217: ...r s Fonts 94 Deleting Fonts 95 Initializing the Printer Disk 95 Page Setup 96 Printing Fonts Catalog 96 Printing Fonts Sample 96 Renaming the Printer 96 Restarting the Printer 97 Downloading PostScript Files 97 Selecting the Zone 98 Displaying the Printer Status 99 Launching the Dialogue Console 99 5 Appendix Trademarks 101 INDEX 103 4 ...

Page 1218: ... PostScript 3 Other manuals UNIX Supplement Quick Reference Copy Guide Quick Reference Printer Guide Quick Reference Fax Guide Quick Reference Scanner Guide Manuals for DeskTopBinder Lite DeskTopBinder Lite Setup Guide DeskTopBinder Introduction Guide Auto Document Link Guide Manuals provided are specific to machine types For UNIX Supplement please visit our Web site or consult an authorized deale...

Page 1219: ...ges as a result of handling or operating the machine For good copy quality the supplier recommends that you use genuine toner from the supplier The supplier shall not be responsible for any damage or expense that might result from the use of parts other than genuine parts from the supplier with your office products 7 ...

Page 1220: ...rmation Indicates the names of keys that appear on the machine s display panel Indicates the names of keys on the machine s control panel Note Contents of this manual are subject to change without prior notice Some illustrations in this manual might be slightly different from the machine Certain options might not be available in some countries For details please contact your local dealer Depending...

Page 1221: ...hecks passports driver s licenses The preceding list is meant as a guide only and is not inclusive We assume no responsibility for its completeness or accuracy If you have any questions concerning the legality of copying or printing certain items consult with your legal advisor This machine is equipped with a function that prevents making counterfeit bank bills Due to this function the original im...

Page 1222: ...10 ...

Page 1223: ...r starts 3 Select an interface language and then click OK 4 Click DeskTopBinder SmartDeviceMonitor for Client 5 Select an interface language and then click Next 6 Themessagetoquitallotherapplicationsappears Quitallapplications andthenclick Next 7 The software license agreement appears in the License Agreement dialog box After reading through its contents click Yes 8 Click Full install or Custom in...

Page 1224: ...e printer driver with the selected language will be installed The English printer driver is installed when the following language is selected Suomi Magyar Cestina Polski Portugues Russian Catala Turkce 4 Click PostScript 3 Printer Driver Add Printer Wizard starts 5 Click Next 6 Click Local printer and then click Next 7 Click Create a new port 8 Click DeskTop Binder SmartDeviceMonitor and then clic...

Page 1225: ...r starts 3 Select an interface language and then click OK The printer driver with the selected language will be installed The English printer driver is installed when the following language is selected Suomi Magyar Cestina Polski Portugues Russian Catala Turkce 4 Click PostScript 3 Printer Driver Add Printer Wizard starts 5 Click Next 6 Click Local printer attached to this computer and then click ...

Page 1226: ...Next 16 Specify whether or not to share the printer and then click Next 17 Specify whether or not to print a test page and then click Next 18 Click Finish The printer driver installation starts A user code can be set after the printer driver installation For information about user code see the printer driver Help Auto Run may not work with certain operating system settings In that case launch Setu...

Page 1227: ...hen click OK Only printers that respond to a broadcast from the computer appear To use a machine not listed here click Specify Address and then enter the IP address or host name of the machine 11 Check that the name of the machine whose driver you want to install is selected and then click Next 12 Change the printer name if you want and then click Next Select the Yes check box to configure the pri...

Page 1228: ...stalled The English printer driver is installed when the following language is selected Suomi Magyar Cestina Polski Portugues Russian Catala Turkce 4 Click PostScript 3 Printer Driver Add Printer Wizard starts 5 Click Next 6 Click Local printer attached to this computer and then click Next 7 Click Create a new port 8 Click DeskTop Binder SmartDeviceMonitor and then click Next 9 Click IPP 10 In the...

Page 1229: ...ation starts A user code can be set after the printer driver installation For information about user code see the printer driver Help Auto Run may not work with certain operating system settings In that case launch Setup exe on the CD ROM root directory Installing the PostScript 3 Printer Driver Windows Vista Windows Server 2008 TCP IP Installing this printer driver requires Administrators permiss...

Page 1230: ...e machine whose driver you want to install is selected and then click Next 11 Change the printer name if you want and then click Next Select the Yes check box to configure the printer as default 12 Specify whether or not to print a test page and then click Finish The printer driver installation starts Depending on the environment you are using the AutoPlay dialog box may appear If this happens cli...

Page 1231: ...inder SmartDeviceMonitor and then click Next 8 Click IPP 9 In the Printer URL box enter http machine s IP address or host name printer as the printer s address If the server authentication is issued to enable SSL a protocol for encrypted communication enter https machine s IP address or host name printer Internet Explorer 5 01 or a higher version must be installed example IP address 192 168 15 16 ...

Page 1232: ...tings In that case launch Setup exe on the CD ROM root directory Changing the Port Settings DeskTop Binder SmartDeviceMonitor for Client Follow the procedure below to change the DeskTop Binder SmartDeviceMonitor for Client settings such as TCP IP timeout recovery parallel printing and printer groups Windows 2000 1 Open the Printers window from the Start menu 2 Click the icon of the printer you wan...

Page 1233: ...ox appears For TCP IP timeout setting can be configured User proxy and timeout settings can be configured for IPP For information about these settings see DeskTop Binder SmartDevice Monitor for Client Help How to enable Recovery Parallel Printing If no settings on the Recovery Parallel Printing tab are available follow the procedure below 1 Start DeskTop Binder SmartDeviceMonitor for Client and th...

Page 1234: ...ter Driver Add Printer Wizard starts 5 Click Next 6 Click Local printer and then click Next 7 Click Create a new port 8 Click Standard TCP IP Port and then click Next 9 Click Next in the Add Standard TCP IP Printer Port Wizard dialog box 10 Enter the printer name or IP address in the Printer Name or IP Address box The Port Name text box automatically obtains a port name Change this name if necessa...

Page 1235: ...ided with this machine or download it from the supplier s Web site If your operating system is Windows XP Professional x64 Windows Server 2003 2003 R2 x64 you must download the printer driver from the manufacturer s Web site Select this printer and the operating system you are using and then download it 1 Quit all applications currently running 2 Insert the CD ROM into the CD ROM drive The install...

Page 1236: ...after the printer driver installation For information about user code see the printer driver Help Auto Run may not work with certain operating system settings In that case launch Setup exe on the CD ROM root directory Installing the PostScript 3 Printer Driver Windows Vista Windows Server 2008 Installing this printer driver requires Administrators permission Log on using an account that has Admini...

Page 1237: ...ne whose driver you want to install is selected and then click Next 13 Change the printer name if you want and then click Next Select the Yes check box to configure the printer as default 14 Specify whether or not to print a test page and then click Finish The printer driver installation starts Depending on the environment you are using the AutoPlay dialog box may appear If this happens click Run ...

Page 1238: ... Click Local printer and then click Next 7 Click Create a new port 8 Click LPR Port and then click Next 9 Enter the printer s IP address in the Name or address of server providing lpd box 10 Enter Ip in the Name of printer or print queue on that server box and then click OK 11 Check that the name of the machine whose driver you want to install is selected and then click Next 12 Change the printer ...

Page 1239: ...ns currently running 2 Insert the CD ROM into the CD ROM drive The installer starts 3 Select an interface language and then click OK The printer driver with the selected language will be installed The English printer driver is installed when the following language is selected Suomi Magyar Cestina Polski Portugues Russian Catala Turkce 4 Click PostScript 3 Printer Driver Add Printer Wizard starts 5...

Page 1240: ...ns currently running 2 Insert the CD ROM into the CD ROM drive The installer starts 3 Select an interface language and then click OK The printer driver with the selected language will be installed The English printer driver is installed when the following language is selected Suomi Magyar Cestina Polski Portugues Russian Catala Turkce 4 Click PostScript 3 Printer Driver Add Printer Wizard starts 5...

Page 1241: ...s happens click Run SETUP EXE If the User Account Control dialog box appears click Continue to allow the auto play program to run A user code can be set after the printer driver installation For information about user code see the printer driver Help Auto Run may not work with certain operating system settings In that case launch Setup exe on the CD ROM root directory Using the LPR Port 29 1 ...

Page 1242: ...selected Suomi Magyar Cestina Polski Portugues Russian Catala Turkce 4 Click PostScript 3 Printer Driver Add Printer Wizard starts 5 Click Next 6 Click Network printer and then click Next 7 Select the location method from the Locate Your Printer screen and then click Next 8 Double click the computer name you want to use as a print server in the Shared printers window 9 Select the printer you want ...

Page 1243: ...Select this printer and the operating system you are using and then download it 1 Quit all applications currently running 2 Insert the CD ROM into the CD ROM drive The installer starts 3 Select an interface language and then click OK The printer driver with the selected language will be installed The English printer driver is installed when the following language is selected Suomi Magyar Cestina P...

Page 1244: ...h this machine or download it from the supplier s Web site If your operating system is Windows Vista x64 Windows Server 2008 x64 you must download the printer driver from the manufacturer s Web site Select this printer and the operating system you are using and then download it 1 Quit all applications currently running 2 Insert the CD ROM into the CD ROM drive The installer starts 3 Select an inte...

Page 1245: ...ve an account that has Manage Printers permission Log on as an Administrator If the machine is connected using the WSD port bi directional communication is not possible For details about bi directional communication see Making Option Settings for the Printer You can connect to the machine only if both the machine and computer are on the same network segment or Network discovery is enabled For deta...

Page 1246: ...Close If installation is successful the icon of the printer connected to the WSD port is added to the Printers window Depending on the environment you are using the AutoPlay dialog box may appear If this happens click Run SETUP EXE If the User Account Control dialog box appears click Continue to allow the auto play program to run The port name that follows WSD uses random character strings It cann...

Page 1247: ...rocedure below to set up the PostScript 3 printer driver 1 In the Printers or Printers and Faxes window open the printer properties 2 Click the Device Settings tab 3 Select a No on the Send CTRL D before job and Send CTRL D after job and then click OK 4 Click OK to close the printer properties dialog box Using as the NetWare Print Server Remote Printer 35 1 ...

Page 1248: ...og on using an account that has Administrators permission If the printer driver has already been installed plug and play is enabled and the icon of the printer connected to the USB port is added to the Printers window If the printer driver is not installed follow the plug and play instructions of the printer to install it from the CD ROM provided 1 Connect the machine to the computer using the USB...

Page 1249: ... to the Printers window The printer drivers can be installed from the CD ROM provided with this machine If the printer driver is not installed follow the plug and play instructions of the printer to install it from the CD ROM provided 1 Connect the machine to the computer using the USB cable Connect the USB cable firmly 2 In the Found New Hardware Wizard display click Install the software automati...

Page 1250: ...talled follow the plug and play instructions of the printer to install it from the supplied CD ROM 1 Connect the machine to the computer using the USB cable Connect the USB cable firmly 2 In the Found New Hardware display select Locate and install driver software Recommended Click Continue if the User Account Control window appears 3 When a message prompting insertion of the CD ROM insert the CD R...

Page 1251: ...reconnect the USB cable and then turn it on again Windows has already configured the USB settings Open Windows Device Manager and then under Universal Serial Bus controllers remove any conflicting devices Conflicting devices have a yellow or icon by them Take care not to accidentally remove required devices For details see Windows Help WhenusingWindows2000 XP VistaorWindowsServer2003 2003R2 2008 a...

Page 1252: ...la Turkce 4 Click PostScript 3 Printer Driver Add Printer Wizard starts 5 Click Next 6 Click Local printer and then click Next A dialog box for selecting the printer manufacturer and model name appears 7 Select LPT1 at the Printer Port dialog box and then click Next 8 Select whether or not to share the printer and then click Next 9 Select the name of the machine whose driver you want to install an...

Page 1253: ...sh printer driver is installed when the following language is selected Suomi Magyar Cestina Polski Portugues Russian Catala Turkce 4 Click PostScript 3 Printer Driver Add Printer Wizard starts 5 Click Next 6 Click Local printer attached to this computer and then click Next 7 Select the port you want to use and then click Next A dialog box for selecting the printer manufacturer and model name appea...

Page 1254: ...into the CD ROM drive The installer starts 3 Select an interface language and then click OK The printer driver with the selected language will be installed The English printer driver is installed when the following language is selected Suomi Magyar Cestina Polski Portugues Russian Catala Turkce 4 Click PostScript 3 Printer Driver Add Printer Wizard starts 5 Click Local printer attached to this com...

Page 1255: ...log box appears click Continue to allow the auto play program to run A user code can be set after the printer driver installation For information about user code see the printer driver Help Auto Run may not work with certain operating system settings In that case launch Setup exe on the CD ROM root directory Printing with Parallel Connection 43 1 ...

Page 1256: ...s XP Professional and Windows Server 2003 2003 R2 1 On the Start menu click Printers and Faxes 2 Click Add a printer 3 Follow the instructions in Add Printer Wizard If the printer driver is on a CD ROM the location of the PostScript 3 printer driver is D DRIVERS PS XP_VISTA Language DISK1 If the installer starts click Cancel to quit For Windows XP Home Editions 1 On the Start menu click Control Pa...

Page 1257: ...ick Printer in Hardware and Sound 3 Click Install Printer 4 Follow the instructions in Add Printer Wizard If the printer driver is on a CD ROM the location of the PostScript 3 printer driver is D DRIVERS PS XP_VISTA Language DISK1 If the installer starts click Cancel to quit If a Message Appears during Installation 45 1 ...

Page 1258: ...oup member 1 On the Start menu click Printers and Faxes or Printers The Printers and Faxes or Printers window appears 2 Click the icon of the printer you want to use 3 On the File menu click Properties Under Windows Vista Windows Server 2008 Right click the icon of the printer you want to use and then click the Properties 4 Click the Device Settings tab 5 Selectoptionsinstalledfromthe InstallOptio...

Page 1259: ...er you want to use 3 On the File menu click Properties The printer properties dialog box appears 4 Make the necessary settings and then click OK Settings you make here are used as the default settings for all applications Do not make a setting for Form to Tray Assignment For details see the printer driver Help Making printer default settings Printing Preferences You cannot change the printer defau...

Page 1260: ...ails see the manuals provided with the application you use Any settings you make in the following procedure are valid for the current application only General users can change the properties displayed in the Print dialog box of an application Settings made here are used as defaults when printing from this application For details see the printer driver Help Windows XP Windows Server 2003 2003 R2 Ac...

Page 1261: ...of the printer you want to use 3 On the File menu click Printing Preferences The Printing Preferences dialog box appears 4 Make the necessary settings and then click OK Settings you make here are used as the default settings for all applications For details see the printer driver Help Making printer settings from an application You can make printer settings for a specific application To make print...

Page 1262: ...ers of the Administrators and Power Users groups have Manage Printers permission by default You cannot change the printer default settings for each user Settings made in the printer properties dialog box are applied to all users 1 On the Start menu click Control Panel The Control Panel window appears 2 Click Printer in Hardware and Sound 3 Right click the icon of the printer you want to use and th...

Page 1263: ...lains how to make settings for the WordPad application provided with Windows XP 1 On the File menu click Print The Print dialog box appears 2 Select the printer you want to use in the Select Printer list and then click Preferences 3 Make the necessary settings and then click OK The procedure to open the Printing Preferences dialog box may vary depending on the application For details see the manua...

Page 1264: ...1 Windows Configuration 52 1 ...

Page 1265: ...r and PostScript Printer Description PPD files to print from a Mac OS Follow the procedure below to install a printer driver and a PPD file into a Mac OS using Mac OS 8 6 and higher PostScript 3 Printer Driver 1 Insert the CD ROM into the CD ROM drive 2 Double click the CD ROM drive icon 3 Double click the Mac OS 8 and 9 folder 4 Double click the PS Driver folder 5 Double click the folder of the l...

Page 1266: ... name in the list Follow the procedure on Setting Up Options to make option settings otherwise close the Chooser dialog box Setting Up Options 1 On the Apple menu click Chooser 2 Click the Adobe PS icon 3 In the Select a PostScript Printer list click the name of the printer you want to use and then click Setup 4 Click Configure A list of options appears 5 Select the option you want to set up and t...

Page 1267: ...ng 9 On the Apple menu open Control Panel and then click ATM 10 The ATM control panel opens For details about installation see the operating instructions in the ATM folder Installing Screen fonts Follow the procedure below to install screen fonts The screen fonts described below can be found in the Fonts folder on the CD ROM 1 Start a Mac OS 2 Insert the CD ROM into the CD ROM drive The CD ROM dri...

Page 1268: ...If you change zones select a name on the Current zone pop up menu 4 Close the AppleTalk control panel 5 Restart the computer TheproceduresusedtoconfigureMacOSmayvarydependingontheMacOSversion Thefollowing describes how to configure Mac OS 9 1 If you are using a different version of Mac OS use the following procedures as a reference and see the manuals for your Mac OS version Confirm the Connection...

Page 1269: ...e and a password phrase For details consult your network administrator 1 Insert the CD ROM into the CD ROM drive 2 Double click the CD ROM drive icon 3 Double click the Mac OS X folder 4 Double click the MacOSX PPD Installer folder 5 Double click the installer icon 6 Follow the instructions on the screen Setting Up the PPD File 1 Start Printer Setup Utility 2 Click Add Mac OS X 10 4 or later Click...

Page 1270: ...ption you want to select is not displayed PPD files may not be set up correctly To complete the setup check the name of the PPD file displayed in the dialog box Using USB Interface Follow the procedure below to set up USB connection 1 Start Printer Setup Utility 2 Click Add Mac OS X 10 4 or later Click a printer that has USB indicated in the Connection column Other Mac OS X Click USB on the pop up...

Page 1271: ...dezvous on the pop up menu If the zone is set select the zone from the second pop up menu 3 Select the name of the connected printer from the list of printer models and then click Add Under Mac OS X 10 4 or later Installable Options window appears Select the option you want to set up and then select an appropriate setting for it and then Continue 4 Quit Printer Setup Utility When printing with a R...

Page 1272: ...tive check box 5 To change AppleTalk zones select a name from the AppleTalk Zone pop up menu 6 When the settings are made click Apply Now For information about installing applications required for EtherTalk see the Mac OS manuals 2 Mac OS Configuration 60 2 ...

Page 1273: ...Configuring the Printer Use the control panel to enable AppleTalk The default is active Configuring the Printer 61 2 ...

Page 1274: ...2 Mac OS Configuration 62 2 ...

Page 1275: ...ng Adobe PageMaker 6 0 6 5 or 7 0 you have to set up options in the Adobe PageMaker s print dialog box You can set up any of the options using the following tabs Windows 2000 XP Vista Windows Server 2003 2003 R2 2008 Installable Options on the Device Settings tab Mac OS For Ethernet Chooser on the Apple Menu For USB Change Setup from the Printing menu to open the Desktop printer Mac OS X Printer S...

Page 1276: ... Job Type function can be used Mac OS X in the tables below refers to Mac OS X 10 2 3 Depending on the version Features x is displayed as Set x x is a number Make adjustments according to the version you use Under Windows 2000 XP Vista and Windows Server 2003 2003 R2 2008 all the tab names explained here indicate the icons displayed in the Menu area on the Detailed Settings tab Some of the setting...

Page 1277: ...User ID helps you distinguish your print job from others For details about how to use Sample Print see Job Type Locked Print Use this function to save documents in the machine memory with a password and then edit and print them as you want The User ID can contain to eight alphanumeric a z A Z 0 9 characters The Password must be 4 8 digits Entering the User ID helps you distinguish your print job f...

Page 1278: ...ord must be 4 8 digits The File Name can contain to 16 alphanumeric a z A Z 0 9 characters You can assign a password to a saved document but password assignment is not mandatory Entering the User ID helps you distinguish your print job from others For details about how to use Stored Print see Job Type How to Use Sample Print Follow the procedure below to print a document using the Sample Print fun...

Page 1279: ...ing on the security settings certain print jobs may not be displayed You can print files also by pressing User ID 14 Select the file you want to print using the or key and then press Print A list of print files stored in the machine appears 15 Enter the new number of sets using the number keys and then press Print If you do not want to change the set quantity perform the following steps You can en...

Page 1280: ...hen press Job List A list of sample print files stored in the machine appears Depending on the security settings certain print jobs may not be displayed You can print files also by pressing User ID 10 Select the file you want to print using the or key and then press Print A list of print files stored in the machine appears 11 Press Print to change the number of sets to be printed 12 Enter the new ...

Page 1281: ...e Locked Print function Windows 2000 XP Vista Windows Server 2003 2003 R2 2008 1 In the application on the File menu click Print The Print dialog box appears If you are using Windows 2000 select the printer and then perform the following steps If you are using Windows XP or Windows Server 2003 2003 R2 2008 select the printer and then click Preferences 2 Click the Detailed Settings tab 3 Click the ...

Page 1282: ...ars A confirmation screen will appear if the password is not entered correctly Press Clear to enter the password again If you forget your password contact your administrator for help 15 Press Print The locked file is printed To cancel printing press Cancel Then press JobReset After it has started the file is deleted If the application has a collate option make sure it is not selected before sendin...

Page 1283: ...g the number keys and then press OK key The print confirmation screen appears A confirmation screen will appear if the password is not entered correctly Press Clear to enter the password again If you forget your password contact your administrator for help 11 Press Print The locked file is printed To cancel printing press Cancel Then press JobReset After it has started the file is deleted Deleting...

Page 1284: ...up to eight alphanumeric a z A Z 0 9 characters File Name can also be set The user ID associates the user with his her jobs 7 Click OK to close the Job Type Details dialog box 8 Click OK to close the printer properties dialog box If you are using Windows 2000 perform the following steps 9 Start the printing from the application s Print dialog box The document file is saved in the machine To print ...

Page 1285: ...lick Hold Print 4 In the User ID box enter the user ID using up to eight alphanumeric a z A Z 0 9 characters File Name can also be set The user ID associates the user with his her jobs 5 After making the necessary settings click Print The document file is saved in the machine To print the document perform the following steps To delete the document see Job Type 6 On the machine s control panel pres...

Page 1286: ...elected file is deleted If you do not want to delete the file press Cancel How to Use Stored Print Store and Print Follow the procedure below to print a document using the Stored Print function Windows 2000 XP Vista Windows Server 2003 2003 R2 2008 1 In the application on the File menu click Print The Print dialog box appears If you are using Windows 2000 select the printer and then perform the fo...

Page 1287: ...Jobs A list of print files stored in the machine appears 12 Select Stored Print Jobs using the or key and then press Job List A list of stored print files stored in the machine appears You can print files also by pressing User ID 13 Select the file you want to print using the or key and then press Print A confirmation screen appears If you have already set a password proceed to the following step ...

Page 1288: ...ith his her jobs You can assign a password to a saved document but password assignment is not mandatory The password must be entered when printing or deleting 5 After making the necessary settings click Print The document file is saved in the machine To print the document perform the following steps To delete the document see Job Type 6 On the machine s control panel press the Printer key to displ...

Page 1289: ...Select Stored Print Jobs using the or key and then press Job List A list of sample print files stored in the machine appears 3 Select the file you want to print using the or key and then press Delete A confirmation screen appears 4 Press Delete The selected file is deleted If you do not want to delete the file press Cancel If you have already set a password in the printer driver enter it to delete...

Page 1290: ... 2003 2003 R2 2008 Paper Size on Basic tab in the Printing Preference dialog box Mac OS Paper on the Page Attributes tab in the Page Setup dialog box Mac OS X Paper Size in the Page Setup dialog box For details about the paper sizes supported by this machine see General Setting Guide Reduce Enlarge Specify a scaling mode to reduce or enlarge the print size of documents The following table shows th...

Page 1291: ... Printing Preferences dialog box Mac OS Scaling on the Page Attributes tab in the Page Setup dialog box Mac OS X Scale in the Page Setup dialog box Under Windows 2000 XP Vista or Windows Server 2003 2003 R2 2008 Zoom must be selected for Reduce Enlarge to specify this item Print On Specify the paper size to reduce enlarge the print size of document The following table shows the tabs or menus where...

Page 1292: ...than the selected paper size the driver reduces the print size If the paper size is larger than the size of document to be printed print is not to fit the paper size Nearest Size and Crop When the paper size is smaller than the size of document to be printed print is adjusted to meet the paper size Input Slot Select the paper sources The following table shows the tabs or menus where you can select...

Page 1293: ...selectthebuttonthatmeans Landscape or Portrait Under Mac OS Rotated Landscape cannot be selected Rotate by 180 degrees Rotate the print image by 180 degrees The following table shows where you can select this function Windows 2000 XP Vista Windows Server 2003 2003 R2 2008 Rotate by 180 degrees on Basic tab in the Printing Preference dialog box Mac OS Rotate by 180 degrees in Printer Specific Optio...

Page 1294: ...nces dialog box Mac OS Orientation Override on Printer Specific Options in the print dialog box Mac OS X Orientation Override on the Features x tab on Printer Features in the print dialog box You can select the following items Off Landscape Portrait Layout Booklet Specify the number of pages to print on a single sheet The following table shows the tabs or menus where you can select this function W...

Page 1295: ... to draw a page boundary for each page The following table shows the tabs or menus where you can select this function Windows 2000 XP Vista Windows Server 2003 2003 R2 2008 Draw Border on Edit tab in the Printing Preferences dialog box Mac OS Border on Layout in the print dialog box Mac OS X Border on Layout in the print dialog box Duplex Printing Select whether to enable duplex printing To use th...

Page 1296: ...bound along the long edge Short Edge Prints output so that you can open it to the short edge when bound along the short edge If you are using a Mac OS click to select the button that means Flip on Long Edge or Flip on Short Edge Mac OS X The following functions are selectable under Mac OS X 10 3 or higher for Mac OS X 10 2 or earlier see Windows 2000 XP Windows Server 2003 2003 R2 Mac OS in Duplex...

Page 1297: ...indows 2000 XP Vista Windows Server 2003 2003 R2 2008 Set the number of copies to two or more and then click the Collate on the Finishing tab in the Printing Preference dialog box Mac OS Collate on Printer Specific Options in the print dialog box Mac OS X Collate on the Features x tab on Printer Feature in the printer dialog box Reverse Order Print Specify the order of pages to print The following...

Page 1298: ...g Guide Watermark Set the Watermark function Windows 2000 XP Vista Windows Server 2003 2003 R2 2008 Watermark on the Effects tab in the Printing Preferences dialog box Mac OS X Watermark on the Features x tab in the Print dialog box When using this function under Mac OS see the printer driver Help The following explains the procedure for Windows 2000 XP Vista Windows Server 2003 2003 R2 2008 Water...

Page 1299: ...wing explains the procedure for Windows 2000 XP Vista Windows Server 2003 2003 R2 2008 Watermark Size Select the Watermark size Windows 2000 XP Vista Windows Server 2003 2003 R2 2008 Watermark Size on the Effects tab in the Printing Preferences dialog box Mac OS X Watermark Size on the Features x tab in the Print dialog box When using this function under Mac OS see the printer driver Help The foll...

Page 1300: ... see the printer driver Help The following explains the procedure for Windows 2000 XP Vista Windows Server 2003 2003 R2 2008 Dithering Set the Image Rendering mode The following table shows the tabs or menus where you can select this function Windows 2000 XP Vista Windows Server 2003 2003 R2 2008 Dithering on Print Quality tab in the Printing Preferences dialog box Mac OS Dithering on Printer Spec...

Page 1301: ...ptions in the print dialog box Mac OS X Image Smoothing on the Features x tab on Printer Features in the print dialog box You can select the following items Off Disables image smoothing On Performs image smoothing unconditionally Auto Performs image smoothing automatically for images that have a resolution less than 25 of supported printer resolution Less than 90 ppi Less than 300 ppi Performs ima...

Page 1302: ...ting Preferences dialog box Mac OS Print Mode on Printer Specific Options in the print dialog box Mac OS X Print Mode on the Features x tab on Printer Features in the print dialog box You can select the following items Off Disables print mode Edge Smoothing Smoothes jagged lines in text and graphics to produce a finer image Toner Saving Reduces the amount of toner used when printing 3 Using PostSc...

Page 1303: ...Double click the Mac OS folder Under Mac OS X double click the Mac OS X folder 5 Double click the PS Utility folder on the CD ROM and then drag the Printer Utility for Mac file and then drop it into the Macintosh hard disk 6 Drag the CD ROM icon and drop it into Trash to eject the CD ROM Printer Utility for Mac is installed Printer Utility for Mac is included on the CD ROM labeled Printer Drivers ...

Page 1304: ...ter Utility for Mac will take a few seconds to start Mac OS X 1 Double click the Printer Utility for Mac icon The Printer Utility for Mac dialog box appears 2 Click OK 3 In the Available Printers box select the printer you want to use If you change zones select a name from Available Network Zones Click Choose Printer on the Printer Utility for Mac menu if you want to change the printer 4 Select th...

Page 1305: ...alog Print the names of available fonts See Printing Fonts Catalog Print Fonts Sample Print a sample of fonts See Printing Fonts Sample Rename Printer Change the printer s name when viewed via AppleTalk See Renaming the Printer Restart Printer Restart the printer See Restarting the Printer Utility menu Download PostScript File Download a PostScript file See Downloading PostScript Files Select Zone...

Page 1306: ...s 3 Click to select the desired font files and then click Open The list of selectable font names appears 4 After adding all the fonts you want to download click OK The dialog box of selected fonts to download appears 5 Click Download The fonts begin to download and the download status is shown 6 When the completion message appears click OK 7 Click Cancel Some fonts cannot be downloaded Before down...

Page 1307: ...r Disk When initializing the printer s hard disk drive all the fonts downloaded to the printer s hard disk drive are deleted Before initializing be sure to check the fonts on the hard disk drive When initializing the printer s hard disk drive from the operation panel all of the data on the printer s hard disk drive is deleted Before initializing be sure to check the data on the hard disk drive Do ...

Page 1308: ...s downloaded to the hard disk drive or memory 1 Select Print Fonts Sample on the File menu 2 Click Print Print by using the paper selected on Page Setup Renaming the Printer YoucanchangetheprinternamedisplayedunderAppleTalk Ifyouconnectseveralprintersonthenetwork assign different names so you can identify them If several printers have the same name a digit appears next to the printer name in Choos...

Page 1309: ...lect the zone for the Macintosh in use 7 In the Available Printers list select the printer whose name you changed and then click Choose Restarting the Printer You can restart the printer 1 Select Restart Printer on the File menu 2 Confirm the message that appears on the screen and then click Restart The printer restarts The fonts that you downloaded in the printer s memory will be deleted If the p...

Page 1310: ...e A confirmation message appears 4 Click OK 5 On the Apple menu click Chooser 6 Click the AdobePS icon 7 In the AppleTalk zone list select the zone you changed 8 In the Select a PostScript Printer list select the printer you want to use 9 Close the Chooser dialog box Mac OS X 1 On the Utility menu click Select Zone The zone to which the printer belongs and the available zone list appear 2 Select t...

Page 1311: ...Launch Dialogue Console is recommended for users with an understanding of PostScript Do not download any file other than PostScript files to the printer Launch Dialogue Console must be used at your own responsibility 1 Select Launch Dialogue Console on the Utility menu Open the editing screen The Dialogue Console menu bar appears 2 Type the PostScript command in the editor screen To edit a PostScr...

Page 1312: ...4 Printer Utility for Mac 100 4 ...

Page 1313: ...to those marks The proper names of the Windows operating systems are as follows The product names of Windows 2000 are as follows Microsoft Windows 2000 Professional Microsoft Windows 2000 Server Microsoft Windows 2000 Advanced Server The product names of Windows XP are as follows Microsoft Windows XP Professional Microsoft Windows XP Home Edition Microsoft Windows XP Media Center Edition Microsoft...

Page 1314: ...dition Microsoft Windows Server 2003 R2 Enterprise Edition Microsoft Windows Server 2003 R2 Datacenter Edition The product names of Windows Server 2008 are as follows Microsoft Windows Server 2008 Standard Microsoft Windows Server 2008 Enterprise Microsoft Windows Server 2008 Datacenter 5 Appendix 102 5 ...

Page 1315: ...for Client port 11 IPP 11 LPR 26 Parallel 40 Standard TCP IP 22 TCP IP 11 USB 36 Windows network printer 30 WSD 33 Installing Adobe Type Manager Mac OS 55 Installing screen fonts Mac OS 55 Installing the PostScript 3 printer driver and PPD file Mac OS 53 Installing the PPD files Mac OS X 57 Installing the Printer Driver Using USB Windows 2000 36 IP address 8 J Job type 64 L Launching the dialogue ...

Page 1316: ...X 58 Setting up PPD files Mac OS 54 Setting up the PPD file Mac OS X 57 Store and print 74 Stored print 74 Symbols 8 T Trademarks 101 Trouble Shooting 5 Troubleshooting for using USB 39 U User code 77 Using bonjour Mac OS X 59 Using USB interface Mac OS X 58 W Watermark 86 Watermark angle 87 Watermark font 87 Watermark size 87 Watermark style 88 Watermark text 86 Windows 2000 printer properties Po...

Page 1317: ...Copyright 2008 ...

Page 1318: ...PostScript 3 Supplement EN USA D468 6800 AE AE GB GB ...

Page 1319: ... Hard Disk Managing Access to the Machine Enhanced Network Security Specifying the Extended Security Functions Troubleshooting Appendix 1 2 3 4 5 6 Read this manual carefully before you use this machine and keep it handy for future reference For safe and correct use be sure to read the Safety Information in About This Machine before using the machine Security Reference Operating Instructions ...

Page 1320: ......

Page 1321: ...thentication and Managing Users 18 Ensuring Information Security 18 Limiting and Controlling Access 20 Enhancing Network Security 20 2 Configuring Administrator Authentication Administrators 21 User Administrator 21 Machine Administrator 22 Network Administrator 22 File Administrator 22 Supervisor 22 About Administrator Authentication 23 Enabling Administrator Authentication 25 Specifying Administ...

Page 1322: ...ndows Authentication 61 Installing Internet Information Services IIS and Certificate Services 67 Creating the Server Certificate 67 If the fax number cannot be obtained 68 Installing the Device Certificate Issued by a Certificate Authority 68 LDAP Authentication 70 Specifying LDAP Authentication 71 Integration Server Authentication 78 Specifying Integration Server Authentication 78 Printer Job Aut...

Page 1323: ...ns 118 Encrypting Data in the Address Book 120 Encrypting Data on the Hard Disk 124 Enabling the Encryption Settings 124 Printing the Encryption Key 126 Updating the Encryption Key 127 Canceling Data Encryption 129 Deleting Data on the Hard Disk 132 Auto Erase Memory 132 Erase All Memory 136 6 Managing Access to the Machine Preventing Changes to Machine Settings 141 Menu Protect 143 Specifying Men...

Page 1324: ...on 188 Transmission Using IPsec 190 Encryption and Authentication by IPsec 190 Encryption Key Auto Exchange Settings and Encryption Key Manual Settings 191 IPsec Settings 192 Encryption Key Auto Exchange Settings Configuration Flow 200 Encryption Key Manual Settings Configuration Flow 205 telnet Setting Commands 206 Authentication by telnet 214 authfree Command 214 Authentication by IEEE802 1X 215...

Page 1325: ...41 Logging off as the Supervisor 242 Changing the Supervisor 242 Resetting the Administrator s Password 245 Machine Administrator Settings 248 System Settings 248 Copier Features 250 Fax Features 250 Printer Features 251 Scanner Features 252 Settings via Web Image Monitor 253 Settings via SmartDeviceMonitor for Admin 257 Network Administrator Settings 258 System Settings 258 Fax Features 259 Print...

Page 1326: ...or User Account Settings in the Address Book 267 User Settings Control Panel Settings 270 Copier Features 271 Printer Features 272 Scanner Features 276 Fax Features 278 System Settings 281 User Settings Web Image Monitor Settings 287 Device Settings 288 Printer 294 Scanner 300 Fax 302 Interface 305 Network 307 Webpage 311 Functions That Require Options 312 Trademarks 313 INDEX 315 6 ...

Page 1327: ...ide Manuals for DeskTopBinder Lite DeskTopBinder Lite Setup Guide DeskTopBinder Introduction Guide Auto Document Link Guide Manuals provided are specific to machine types For UNIX Supplement please visit our Web site or consult an authorized dealer This manual includes descriptions of functions and settings that might not be available on this machine The following software products are referred to...

Page 1328: ...ges as a result of handling or operating the machine For good copy quality the supplier recommends that you use genuine toner from the supplier The supplier shall not be responsible for any damage or expense that might result from the use of parts other than genuine parts from the supplier with your office products 9 ...

Page 1329: ... and instructions on resolving user errors This symbol is located at the end of sections It indicates where you can find further relevant information Indicates the names of keys that appear on the machine s display panel Indicates the names of keys on the machine s control panel Display The display panel shows machine status error messages and function menus When you select or specify an item on t...

Page 1330: ...d item or entered numeric value 4 Scroll keys Press to move the cursor to each direction one by one When or key appears in this manual press the scroll key of the same direction IP Address In this manual IP address covers both IPv4 and IPv6 environments Read the instructions that are relevant to the environment you are using Note Contents of this manual are subject to change without prior notice S...

Page 1331: ...rohibited by local law bank notes revenue stamps bonds stock certificates bank drafts checks passports driver s licenses The preceding list is meant as a guide only and is not inclusive We assume no responsibility for its completeness or accuracy If you have any questions concerning the legality of copying or printing certain items consult with your legal advisor 12 ...

Page 1332: ...there is a risk of security breaches by users 3 Before setting this machine s security features and to ensure appropriate operation by users administrators must read the Security Reference completely and thoroughly paying particular attention to the section entitled Before Using the Security Functions 4 Administrators must inform users regarding proper usage of the security functions 5 Administrat...

Page 1333: ... the machine on 2 Press the User Tools Counter key BQP002S 3 Press System Settings using or and then press the OK key 4 Press Interface Settings using or and then press the OK key 5 Select Network using or and then press the OK key 6 Specify IPv4 Address For details on how to specify the IPv4 address see Interface Settings Network and System Settings Guide 7 Connect the machine to the network 1 Ge...

Page 1334: ...r s default account user name admin password blank is unencrypted between steps 7 to 10 If acquired during this time this account information could be used to gain unauthorized access to the machine over the network If you consider this risky we recommend that you specify a temporary administrator password for accessing Web Image Monitor for the first time before connecting to the network in step ...

Page 1335: ... Access Limits Using authentication administrators manage the machine and its users To enable authentication information about both administrators and users must be registered in order to authenticate users via their login user names and passwords Four types of administrators manage specific areas of machine usage such as settings and user registration Access limits for each user are specified by ...

Page 1336: ...ticated by a login user name and login password supplied by the user when specifying the machine s settings or accessing the machine over the network The user s login user name and password as well as such personal information items as facsimile number and e mail address are stored in the machine s Address Book Personal information can be obtained from the Windows domain controller Windows authent...

Page 1337: ...ilable to registered users By making this setting you can limit the functions available to users For information on how to specify which functions are available see Limiting Available Functions p 39 Configuring User Authentication p 48 Basic Authentication p 147 Limiting Available Functions Ensuring Information Security Printing Confidential files Using the printer s Locked Print you can store fil...

Page 1338: ...is information to help prevent data leaks To transfer the log data Web SmartDeviceMonitor is required For details about managing log files see Managing Log Files Encrypting Data on the Hard Disk Encrypt data stored on the hard disk to prevent information leakage The HDD Encryption Unit is required for hard disk data encryption For details see Encrypting Data on the Hard Disk Overwriting the Data o...

Page 1339: ...tect the Address Book and default settings For details about preventing unauthorized access see Preventing Unauthorized Access Encrypting Transmitted Passwords Prevent login passwords group passwords for PDF files and IPP authentication passwords from being revealed by encrypting them for transmission Also encrypt the login password for administrator authentication and user authentication For deta...

Page 1340: ... specify a supervisor who can change each administrator s password Administrators cannot use functions such as copying and printing To use these functions the administrator must be authenticated as the user For instructions on registering the administrator see Registering the Administrator and for instructions on changing the administrator s password see Supervisor Operations For details on Users ...

Page 1341: ...s for sending and receiving e mail can only be specified by the network administrator By making this setting you can prevent unauthorized users from changing the settings and disabling the machine and thus ensure correct network operation File Administrator Thisistheadministratorwhomanagesfiles ThefileadministratorcancarryoutsuchtasksasdeletingLocked Print files and changing passwords Supervisor T...

Page 1342: ...enable only the machine administrator to set log deletion and other defaults 3 Network Administrator This administrator manages the network settings You can set the machine so that network settings such as the IP address and settings for sending and receiving e mail can be specified by the network administrator only 4 File Administrator This is the administrator who manages files The file administ...

Page 1343: ... p 21 Administrators 2 Configuring Administrator Authentication 24 2 ...

Page 1344: ...are limited to managing themachine ssettingsandcontrollinguseraccess sotheycannotusefunctionssuchascopyingandprinting To use these functions the administrator must register as a user in the Address Book and then be authenticated as the user Specify administrator authentication and then specify user authentication For details about specifying authentication see Configuring User Authentication Admin...

Page 1345: ... login password If you do forget them a service representative will have to return the machine to its default state This will result in all data in the machine being lost Charges may also apply to the service call 1 Press the User Tools Counter key 2 Press System Settings using or and then press the OK key 3 Select Administrator Tools using or and then press the OK key 4 Press Admin Auth Managemen...

Page 1346: ... p 33 Logging off Using Administrator Authentication p 147 Limiting Available Functions Registering the Administrator If administrator authentication has been specified we recommend only one person take each administrator role The sharing of administrator tasks eases the burden on individual administrators while also limiting unauthorized operation by a single administrator You can register up to ...

Page 1347: ... Press the User Tools Counter key 2 Select System Settings using or and then press the OK key 3 Select Administrator Tools using or and then press the OK key 4 Select Program Change Admin using or and then press the OK key 5 Select Permissions using or and then press the OK key 6 Select the administrator and then press the OK key 2 Configuring Administrator Authentication 28 2 ...

Page 1348: ...a selected item is checked To deselect the item press 8 Press the OK key 9 Press Exit 10 Select Admin Detailed Settings using or and then press the OK key 11 Select the setting you want to specify and then press the OK key 12 Select Login User Name using or and then press the OK key Enabling Administrator Authentication 29 2 ...

Page 1349: ...low the password policy to make the login password more secure For details about the password policy and how to specify it see Specifying the Extended Security Functions 16 If a password reentry screen appears enter the login password and then press the OK key 17 Select Encryption Password using or and then press the OK key 2 Configuring Administrator Authentication 30 2 ...

Page 1350: ...asswords are case sensitive User names cannot contain numbers only a space colon or quotation mark nor can they be left blank Do not use Japanese Traditional Chinese Simplified Chinese or Hangul double byte characters when entering the login user name or password If you use multi byte characters when entering the login user name or password you cannot authenticate using Web Image Monitor p 32 Logg...

Page 1351: ...e administrator for the first time press the OK key without entering login password Authenticating Please wait appears followed by the screen for specifying the default To log on as an administrator enter the administrator s login user name and login password If you try to log on from an operating screen Privileges are required Administrator login is limited to setting changes only appears Press t...

Page 1352: ... Tocombinetheauthoritiesofmultiple administrators assign multiple administrators to a single administrator For example to assign machine administrator authority and user administrator authority to Administrator 1 press Administrator 1 in the lines for the machine administrator and the user administrator For details about logging on and logging off with administrator authentication see Logging on U...

Page 1353: ...rmissions using or and then press the OK key 6 Select the administrator and then press the OK key 7 Select Administrator 1 Administrator 2 Administrator 3 or Administrator 4 using or and then press the key The box next to a selected item is checked To deselect the item press 8 Press the OK key 2 Configuring Administrator Authentication 34 2 ...

Page 1354: ...nitor to Configure Administrator Authentication Using Web Image Monitor you can log on to the machine and change the administrator settings This section describes how to access Web Image Monitor For details about Web Image Monitor see Web Image Monitor Help 1 Open a Web browser 2 Enter http the machine s IP address or host name in the address bar When entering an IPv4 address do not begin segments...

Page 1355: ...nd then click Login 5 Make settings as desired When logging on as an administrator use the login name and password of an administrator set in the machine The default login name is admin and the password is blank 2 Configuring Administrator Authentication 36 2 ...

Page 1356: ...n allow only people registered in the Address Book to use the machine Users can be managed in the Address Book by the user administrator For details about administrator see Administrators For details about registering users in the Address Book see Administrator Tools Network and System Settings Guide SmartDeviceMonitor for Admin Help or Web Image Monitor Help If user authentication is not possible...

Page 1357: ...e machine such as copying and printing 2 Group A group performs normal operations on the machine such as copying and printing 3 Unauthorized User 4 Authentication Using a login user name and password user authentication is performed 5 This Machine 6 Access Limit Using authentication unauthorized users are prevented from accessing the machine 7 Authorized users and groups can use only those functio...

Page 1358: ...ication Authentication that requires external devices Windows Authentication See Windows Authentication LDAP Authentication See LDAP Authentication Integration Server Authentication See Integration Server Authentication To specify Basic Authentication Windows Authentication LDAP Authentication or Integration Server Authentication you must first enable user administrator privileges in Administrator...

Page 1359: ... p 60 Windows Authentication p 70 LDAP Authentication p 78 Integration Server Authentication 3 Configuring User Authentication 40 3 ...

Page 1360: ...thod has switched fromUserCodeauthenticationtoBasicauthentication Windowsauthentication LDAPauthentication or Integration Server authentication In this case since the User Code authentication does not have a password the login password is set as blank When authentication switches to an external authentication method Windows authentication LDAP authentication or Integration Server authentication au...

Page 1361: ...t specifying the TWAIN driver user code see the TWAIN driver Help To control the use of DeskTopBinder for the delivery of files stored in the machine select Basic Authentication Windows Authentication LDAP Authentication or Integration Server Authentication Specifying User Code Authentication This can be specified by the machine administrator 1 Press the User Tools Counter key 2 Select System Sett...

Page 1362: ... key The box next to a selected item is checked To deselect the item press The selected settings will be unavailable to users For details about limiting available functions for individuals or groups see Limiting Available Functions 8 Press the OK key 9 Select Printer Job Authentication using or and then press the OK key 10 Select the Printer Job Authentication level If you select Entire or Simple ...

Page 1363: ... under an environment that does not support authentication select Simple All or Simple Limitation If you select Simple All you can print even with unauthenticated printer drivers or devices Specify this setting if you want to print with a printer driver or device that cannot be identified by the machine or if you do not require authentication for printing However note that because the machine does...

Page 1364: ...ver or device that cannot be identified by the machine or if you do not require authentication for printing However note that because the machine does not require authentication in this case it may be used by unauthorized users 1 Select Simple Limitation using or and then press Range Specify the range in which Simple Limitation is applied to Printer Job Authentication If you specify IPv4 address r...

Page 1365: ...larger than that for Start IPv4 Address 5 Select Parallel Interface Sim using or and then press the OK key 6 Select Apply using or and then press the OK key 7 Select USB Sim using or and then press the OK key 8 Select Apply using or and then press the OK key 9 Press Exit 3 Configuring User Authentication 46 3 ...

Page 1366: ...10 Press the OK key 11 Press the User Tools Counter key User Code Authentication 47 3 ...

Page 1367: ... Before beginning to configure the machine make sure that administrator authentication is properly configured under Admin Auth Management This can be specified by the machine administrator For details about logging on and logging off with administrator authentication see Logging on Using Administrator Authentication Logging off Using Administrator Authentication 1 Press the User Tools Counter key ...

Page 1368: ...cked To deselect the item press The functions you select here become the default Basic Authentication settings that will be assigned to all new users of the Address Book For details about specifying available functions for individuals or groups see Limiting Available Functions 8 Press the OK key 9 Select Printer Job Authentication using or and then press the OK key 10 Select the Printer Job Authen...

Page 1369: ...evice that does not support authentication To print under an environment that does not support authentication select Simple All or Simple Limitation If you select Simple All you can print even with unauthenticated printer drivers or devices Specify this setting if you want to print with a printer driver or device that cannot be identified by the machine or if you do not require authentication for ...

Page 1370: ...river or device that cannot be identified by the machine or if you do not require authentication for printing However note that because the machine does not require authentication in this case it may be used by unauthorized users 1 Select Simple Limitation using or and then press Range Specify the range in which Simple Limitation is applied to Printer Job Authentication If you specify IPv4 address...

Page 1371: ...larger than that for Start IPv4 Address 5 Select Parallel Interface Sim using or and then press the OK key 6 Select Apply using or and then press the OK key 7 Select USB Sim using or and then press the OK key 8 Select Apply using or and then press the OK key 9 Press Exit 3 Configuring User Authentication 52 3 ...

Page 1372: ...d For details about user registration see Registering Names Network and System Settings Guide User authentication can also be specified via SmartDeviceMonitor for Admin or Web Image Monitor p 32 Logging on Using Administrator Authentication p 33 Logging off Using Administrator Authentication Specifying Login User Names and Passwords In Address Book Management specify the login user name and login ...

Page 1373: ...Change using or and then press the OK key 6 Enter the registration number you want to program using the number keys or the Quick Dial keys and then press the OK key By pressing Search you can search by Name Display Destination List Registration No User Code and Fax Destination 7 Press the OK key 8 Press Details 3 Configuring User Authentication 54 3 ...

Page 1374: ...using or and then press the OK key 11 Select Login User Name using or and then press the OK key 12 Enter the login name and then press the OK key 13 Select Login Password using or and then press the OK key 14 Enter the login password and then press the OK key Basic Authentication 55 3 ...

Page 1375: ...k Management for SMTP Authentication Folder Authentication or LDAP Authentication see Address Book Network and System Settings Guide For details about specifying login user name and login password see Specifying Login User Names and Passwords When using Use Auth Info at Login for SMTP Authentication Folder Authentication or LDAP Authentication a user name other than other admin supervisor or HIDE ...

Page 1376: ... and then press the OK key 5 Select Program Change using or and then press the OK key 6 Enter the registration number you want to program using the number keys or the Quick Dial keys and then press the OK key By pressing Search you can search by Name Display Destination List Registration No User Code and Fax Destination 7 Press the OK key Basic Authentication 57 3 ...

Page 1377: ... press the OK key 11 Select Use Auth Info at Login using or and then press the OK key For folder authentication select Use Auth Info at Login in Folder Authentication For SMTP authentication select Use Auth Info at Login in SMTP Authentication 12 Press the Escape key 13 Press End 3 Configuring User Authentication 58 3 ...

Page 1378: ...14 Press the OK key 15 Press the User Tools Counter key p 53 Specifying Login User Names and Passwords Basic Authentication 59 3 ...

Page 1379: ...set up in a designated domain This function is supported by the operating systems listed below To obtain user information when running Active Directory use LDAP If SSL is being used a version of Windows that supports TLS v1 SSL v2 or SSL v3 is required Windows 2000 Server Windows Server 2003 Windows Server 2003 R2 Windows Server 2008 Operational Requirements for Kerberos authentication To specify ...

Page 1380: ...chine subsequently you can use all the functions available to your group and to you as an individual user Users who are registered in multiple groups can use all the functions available to those groups Under Windows Authentication you can select whether or not to use secure sockets layer SSL authentication If the Guest account on the Windows server is enabled even users not registered in the domai...

Page 1381: ...r and then press Details If you do not want to use user authentication management select Off 6 Select Kerberos Authentication using or and then press the OK key If you want to use NTLM authentication proceed to step 10 7 Select On using or and then press the OK key 8 Select Realm Name using or and then press the OK key 3 Configuring User Authentication 62 3 ...

Page 1382: ... OK key 13 Select the Printer Job Authentication level If you select Entire or Simple All proceed to Selecting Entire or Simple All If you select Simple Limitation proceed to Selecting Simple Limitation For a description of the printer job authentication levels see Printer Job Authentication p 32 Logging on Using Administrator Authentication p 33 Logging off Using Administrator Authentication p 64...

Page 1383: ...key 4 Press the User Tools Counter key To automatically register user information such as fax numbers and e mail addresses under Windows authentication it is recommended that communication between the machine and domain controller be encrypted using SSL Under Windows Authentication you do not have to create a server certificate unless you want to automatically register user information such as fax...

Page 1384: ...the range in which Simple Limitation is applied to Printer Job Authentication If you specify IPv4 address range proceed to step 2 If you specify Parallel Interface Sim proceed to step 5 If you specify USB Sim proceed to step 7 2 Select IPv4 Address 1 IPv4 Address 2 IPv4 Address 3 IPv4 Address 4 or IPv4 Address 5 using or and then press the OK key 3 Enter the Start IPv4 Address and then press the O...

Page 1385: ... key 6 Select Apply using or and then press the OK key 7 Select USB Sim using or and then press the OK key 8 Select Apply using or and then press the OK key 9 Press Exit 10 Press the OK key 11 Press the User Tools Counter key 3 Configuring User Authentication 66 3 ...

Page 1386: ...talled install them as follows 1 Select Add Remove Programs on the Control Panel 2 Select Add Remove Windows Components 3 Select the Internet Information Services IIS check box 4 Select the Certificate Services check box and then click Next 5 Installation of the selected Windows components starts and a warning message appears 6 Click Yes 7 Click Next 8 Select the Certificate Authority and then cli...

Page 1387: ... 3 On the Start menu select Run 4 Enter mmc and then click OK 5 On the Console select Add Remove Snap in 6 Click Add 7 Select Active Directory Schema and then click Add 8 Select Facsimile Telephone Number 9 Right click and then click Properties 10 Select Replicate this attribute and then click Apply Installing the Device Certificate Issued by a Certificate Authority Install the device certificate ...

Page 1388: ...ears 5 Check the radio button next to the number of the certificate you want to install 6 Click Install 7 Enter the contents of the device certificate 8 In the Certificate Request box enter the contents of the device certificate received from the certificate authority 9 Click OK Installed appears under Certificate Status to show that a device certificate for the machine has been installed 10 Click...

Page 1389: ...he LDAP server is automatically registered in the machine If user information on the server is changed information registered in the machine may be overwritten when authentication is performed Under LDAP authentication you cannot specify access limits for groups registered in the LDAP server Enter the user s login user name using up to 32 characters and login password using up to 128 characters Do...

Page 1390: ...egistered in the machine and can use the functions available under Available Functions during LDAP Authentication To limit the available functions for each user register each user and corresponding Available Functions setting in the Address Book or specify Available Functions for each registered user The Available Functions setting becomes effective when the user accesses the machine subsequently ...

Page 1391: ...key 5 Select LDAP Auth using or and then press Details If you do not want to use user authentication management select Off 6 Select Select LDAP Server using or and then press the OK key 7 Select the LDAP server to be used for LDAP authentication using or and then press the key The box next to a selected item is checked To deselect the item press 3 Configuring User Authentication 72 3 ...

Page 1392: ...or selecting the user name depends on the server environment Check the server environment and enter the user name accordingly 11 Select Unique Attribute using or and then press the OK key 12 Enter the unique attribute and then press the OK key Specify Unique Attribute on the machine to match the user information in the LDAP server with that in the machine By doing this if the Unique Attribute of a...

Page 1393: ...n will be applied to the selected functions Users can use the selected functions only 15 Press the OK key 16 Select Printer Job Authentication using or and then press the OK key 17 Select the Printer Job Authentication level If you select Entire or Simple All proceed to Selecting Entire or Simple All If you select Simple Limitation proceed to Selecting Simple Limitation For a description of the pr...

Page 1394: ... authentication for printing However note that because the machine does not require authentication in this case it may be used by unauthorized users 1 Select Entire or Simple All using or and then press the OK key 2 Press Exit 3 Press the OK key 4 Press the User Tools Counter key Selecting Simple Limitation If you select Simple Limitation you can specify clients for which printer job authenticatio...

Page 1395: ...ange in which Simple Limitation is applied to Printer Job Authentication If you specify IPv4 address range proceed to step 2 If you specify Parallel Interface Sim proceed to step 5 If you specify USB Sim proceed to step 7 2 Select IPv4 Address 1 IPv4 Address 2 IPv4 Address 3 IPv4 Address 4 or IPv4 Address 5 using or and then press the OK key 3 Enter the Start IPv4 Address and then press the OK key...

Page 1396: ... the OK key 6 Select Apply using or and then press the OK key 7 Select USB Sim using or and then press the OK key 8 Select Apply using or and then press the OK key 9 Press Exit 10 Press the OK key 11 Press the User Tools Counter key LDAP Authentication 77 3 ...

Page 1397: ...cify that the server reliability and site certificate are checked every time you access the SSL server For details about specifying SSL using Web Image Monitor see Web Image Monitor Help During Integration Server Authentication the data registered in the server is automatically registered in the machine If user information on the server is changed information registered in the machine may be overw...

Page 1398: ...the OK key 5 Select Integration Svr Auth using or and then press Details If you do not want to use User Authentication Management select Off 6 Select Server Name using or and then press the OK key Specify the name of the server for external authentication 7 Enter the server name and then press the OK key Enter the IPv4 address or host name Integration Server Authentication 79 3 ...

Page 1399: ...y You cannot specify a domain name under an authentication system that does not support domain login 12 Select Obtain URL using or and then press the OK key The machine obtains the URL of the server specified in Server Name If Server Name or the setting for enabling SSL is changed after obtaining the URL the URL will be not obtained If you set Authentication Type to Windows you can use the global ...

Page 1400: ...r and then press the OK key 16 Enter the group name and then press the OK key 17 Select which of the machine s functions you want to permit using or and then press the key The box next to a selected item is checked To deselect the item press Authentication will be applied to the selected functions Users can use the selected functions only For details about specifying available functions for indivi...

Page 1401: ...secure sockets layer SSL for authentication press Off 21 Press Exit 22 Select Integration Svr Auth using or and then press Details 23 Select Printer Job Authentication using or and then press the OK key 24 Select the Printer Job Authentication level If you select Entire or Simple All proceed to Selecting Entire or Simple All 3 Configuring User Authentication 82 3 ...

Page 1402: ... device that does not support authentication To print in an environment that does not support authentication select Simple All or Simple Limitation If you select Simple All you can print even with unauthenticated printer drivers or devices Specify this setting if you want to print with a printer driver or device that cannot be identified by the machine or if you do not require authentication for p...

Page 1403: ...or device that cannot be identified by the machine or if you do not require authentication for printing However note that because the machine does not require authentication in this case it may be used by unauthorized users 1 Select Simple Limitation using or and then press Range Specify the range in which Simple Limitation is applied to Printer Job Authentication If you specify IPv4 address range...

Page 1404: ...larger than that for Start IPv4 Address 5 Select Parallel Interface Sim using or and then press the OK key 6 Select Apply using or and then press the OK key 7 Select USB Sim using or and then press the OK key 8 Select Apply using or and then press the OK key 9 Press Exit Integration Server Authentication 85 3 ...

Page 1405: ...10 Press the OK key 11 Press the User Tools Counter key 3 Configuring User Authentication 86 3 ...

Page 1406: ...er authentication is successful If user authentication fails the print job is reset C Printing is possible if user authentication is successful and Driver Encryption Key for the printer driver and machine match X Printing is not possible regardless of user authentication and the print job is reset User Auth Management Specified Specified Specified Specified Printer Job Authentication Simple All Si...

Page 1407: ...cryption and allowing the use of simple encryption see Specifying the Extended Security Functions 3 In the PCL printer driver dialog box the User Authentication check box is not selected Personal authentication information is added to the printer job and is disabled 4 When using the PostScript 3 printer driver the printer job contains user code information Personal authentication information is no...

Page 1408: ... p 217 Specifying the Extended Security Functions Printer Job Authentication 89 3 ...

Page 1409: ...sing an external device For details about using an external device for user authentication see Authentication Using an External Device Consult the User Administrator about your login user name password and user code For user code authentication enter a number registered in the Address Book as User Code The Auto Logout Timer can only be used under Basic Authentication Windows Authentication LDAP Au...

Page 1410: ...he printer driver Help If Basic Windows LDAP or Integration Server Authentication is Specified When Basic Authentication Windows Authentication LDAP Authentication or Integration Server Authentication is set the following screen appears Enter your login user name and password Logging on Using the Control Panel Use the following procedure to log on when Basic Authentication Windows Authentication L...

Page 1411: ... Yes Logging on Using the Printer Driver When Basic Authentication Windows Authentication LDAP Authentication or Integration Server Authentication is set make encryption settings in printer properties on the printer driver and then specify a login user name and password For details see the printer driver Help When logged on using a printer driver logging off is not required Logging on Using Web Im...

Page 1412: ... or supervisor disables the lockout To use the lockout function for user authentication the authentication method must be set to Basic authentication Under other authentication methods the lockout function protects supervisor and administrator accounts only not general user accounts Lockout setting items The lockout function settings can be made using Web Image Monitor Setting Item Description Set...

Page 1413: ...hine s IP address or host name in the address bar When entering an IPv4 address do not begin segments with zeros For example If the address is 192 168 001 010 you must enter it as 192 168 1 10 to connect to the machine The top page of Web Image Monitor appears 3 Click Login The machine administrator can log on Enter the login user name and login password 4 Click Configuration and then click User L...

Page 1414: ...ick Address Book The Address Book page appears 5 Select the locked out user s account 6 Click Change 7 Select the Lockout to Inactive under Authentication Information 8 Click OK 9 Click Logout Auto Logout This can be specified by the machine administrator When using Basic Authentication Windows Authentication LDAP Authentication or Integration Server Authentication the machine automatically logs y...

Page 1415: ...Enter 60 to 999 seconds using the number keys and then press the OK key If you do not want to specify Auto Logout Timer select Off 7 Press the User Tools Counter key If a paper jam occurs or a print cartridge runs out of ink the machine might not be able to perform the Auto Logout function p 32 Logging on Using Administrator Authentication p 33 Logging off Using Administrator Authentication 3 Conf...

Page 1416: ...Authentication Using an External Device To authenticate using an external device see the device manual For details contact your sales representative Authentication Using an External Device 97 3 ...

Page 1417: ...3 Configuring User Authentication 98 3 ...

Page 1418: ...select Stored Print Shared you can also share these files Specifying Locked Print File Using the printer driver specify a Locked Print file If user authentication has been enabled you must enter the login user name and login password using the printer driver For details about logging on see the printer driver Help Locked Print is allowed even if user authentication is not yet configured For config...

Page 1419: ... is required If you do not enter the correct password you cannot print the files The file administrator can change the user password if it is forgotten For details about logging on and logging off with user authentication see If User Authentication is Specified This can also be specified via Web Image Monitor For details see Web Image Monitor Help 1 Press the Printer key 2 Press Prt Jobs 3 Select ...

Page 1420: ...s can be specified by the file creator owner To delete Locked Print files you must enter the password for the files If the password has been forgotten ask the file administrator to change the password This can also be specified via Web Image Monitor For details see Web Image Monitor Help 1 Press the Printer key 2 Press Prt Jobs 3 Select Locked Print Jobs using or and then press Job List Printing a...

Page 1421: ...ministrator Changing the Password of a Locked Print File This can be specified by the file creator owner or file administrator If the password has been forgotten the file administrator changes the password to restore access This can also be specified via Web Image Monitor For details see Web Image Monitor Help 1 Press the Printer key 2 Press Prt Jobs 4 Protecting Data from Information Leaks 102 4 ...

Page 1422: ...ress the OK key The file administrator does not need to enter the password 6 Press the OK key 7 Enter the new password for the stored file and then press the OK key 8 If a password reentry screen appears enter the login password and then press the OK key The password entry screen does not appear if the file administrator is logged on Printing a Confidential Document 103 4 ...

Page 1423: ...ions Only the file administrator can unlock files For details about logging on and logging off with administrator authentication see Logging on Using Administrator Authentication Logging off Using Administrator Authentication This can also be specified via Web Image Monitor For details see Web Image Monitor Help 1 Press the Printer key 2 Press Prt Jobs 3 Select Locked Print Jobs using or and then ...

Page 1424: ...e procedure to unlock stored print files also p 217 Specifying the Extended Security Functions p 32 Logging on Using Administrator Authentication p 33 Logging off Using Administrator Authentication Printing a Confidential Document 105 4 ...

Page 1425: ...4 Protecting Data from Information Leaks 106 4 ...

Page 1426: ... prohibit users from directly entering telephone numbers e mail addresses or Folder Path on the fax screen in order to send files If you set Rstrct Dest Use Scanner to On you can prohibit users from directly entering telephone numbers e mail addresses or Folder Path on the scanner screen in order to send files If you set Restrict Dest Use Fax to Off Rstrct Dest Add Fax appears If you set Rstrct De...

Page 1427: ...itor or SmartDeviceMonitor for Admin For details see the Help for these applications For details about logging on and logging off with administrator authentication see Logging on Using Administrator Authentication Logging off Using Administrator Authentication 1 Press the User Tools Counter key 2 Select System Settings using or and then press the OK key 3 Select Administrator Tools using or and th...

Page 1428: ...ess the User Tools Counter key p 217 Specifying the Extended Security Functions p 32 Logging on Using Administrator Authentication p 33 Logging off Using Administrator Authentication Preventing Information Leakage Due to Unauthorized Transmission 109 5 ...

Page 1429: ... Settings If an electronic signature is specified for an e mail the administrator s address appears in the From field and the address of the user specified as sender appears in the Reply To field When sending e mail to users that support S MIME and users that do not support S MIME at the same time the e mail is separated into encrypted and unencrypted groups and then sent When using S MIME the e m...

Page 1430: ...ser administrator Each user certificate must be prepared in advance 1 Open a Web browser 2 Enter http the machine s IP address or host name in the address bar When entering an IPv4 address do not begin segments with zeros For example If the address is 192 168 001 010 you must enter it as 192 168 1 10 to connect to the machine The top page of Web Image Monitor appears 3 Click Login The user adminis...

Page 1431: ...tronic Signature To attach an electronic signature to sent e mail a device certificate must be installed in advance It is possible to use either a self signed certificate created by the machine or a certificate issued by a certificate authority To install an S MIME device certificate you must first register Administrator s E mail Address in System Settings as the e mail address for the device cert...

Page 1432: ...the device certificate using Web Image Monitor 3 Make certificate settings Make settings for the certificate to be used for S MIME using Web Image Monitor 4 Make electronic signature settings Make settings for the electronic signature using Web Image Monitor Creating and Installing the Self Signed Certificate This can be specified by the network administrator Create and install the device certific...

Page 1433: ...For details about the displayed and selectable items and settings see Web Image Monitor Help Use this procedure to create a device certificate issued by a certificate authority 1 Open a Web browser 2 Enter http the machine s IP address or host name in the address bar When entering an IPv4 address do not begin segments with zeros For example If the address is 192 168 001 010 you must enter it as 19...

Page 1434: ...icate Authority This can be specified by the network administrator Install the device certificate using Web Image Monitor For details about displayed and selectable items and settings see Web Image Monitor Help Use this procedure to install a server certificate issued by a certificate authority Enter the details of the device certificate issued by the certificate authority 1 Open a Web browser 2 E...

Page 1435: ...e The top page of Web Image Monitor appears 3 Click Login The network administrator can logon Enter the login user name and login password 4 Click Configuration and then click Device Certificate under Security The Device Certificate page appears 5 Select the certificate to be used for the electronic signature from the drop down box in S MIME under Certification 6 Click OK The certificate to be use...

Page 1436: ... Security The S MIME settings page appears 5 Select the digest algorithm to be used in the electronic signature next to Digest Algorithm under Signature 6 Select the method for attaching the electronic signature when sending e mail from the scanner next to When Sending E mail by Scanner under Signature 7 Select the method for attaching the electronic signature when forwarding stored documents next...

Page 1437: ...he user administrator You can specify who is allowed to access the data in the Address Book By making this setting you can prevent the data in the Address Book being used by unregistered users For details about logging on and logging off with administrator authentication see Logging on Using Administrator Authentication Logging off Using Administrator Authentication 1 Press the User Tools Counter ...

Page 1438: ...k Dial keys and then press the OK key By pressing Search you can search by Name Display Destination List Registration No User Code and Fax Destination 7 Press the OK key 8 Press Details 9 Select Auth Protect using or and then press the OK key 10 Select Dest Protect Permissions using or and then press the OK key Protecting the Address Book 119 5 ...

Page 1439: ...lect the permission from Read only Edit Edit Delete or Full Control To register multiple users repeat steps 12 to 14 15 Press the User Tools Counter key p 32 Logging on Using Administrator Authentication p 33 Logging off Using Administrator Authentication Encrypting Data in the Address Book This can be specified by the user administrator 5 Securing Information Sent over the Network or Stored on Ha...

Page 1440: ...n see Logging on Using Administrator Authentication Logging off Using Administrator Authentication 1 Press the User Tools Counter key 2 Select System Settings using or and then press the OK key 3 Select Administrator Tools using or and then press the OK key 4 Select Extended Security using or and then press the OK key 5 Select Encrypt Address Book using or and then press the OK key 6 Select the se...

Page 1441: ...pt the data Encrypting the data in the Address Book may take a long time The time it takes to encrypt the data in the Address Book depends on the number of registered users The machine cannot be used during encryption Normally once encryption is complete Exit appears If you press Stop during encryption the data is not encrypted If you press Stop during decryption the data stays encrypted 11 Press ...

Page 1442: ...ers after encrypting the data in the Address Book those users are also encrypted p 32 Logging on Using Administrator Authentication p 33 Logging off Using Administrator Authentication p 217 Specifying the Extended Security Functions Protecting the Address Book 123 5 ...

Page 1443: ...d off and on the hard disk The following data is encrypted Address Book data User authentication information Temporary stored documents Logs Network I F setting information System settings information p 32 Logging on Using Administrator Authentication p 33 Logging off Using Administrator Authentication Enabling the Encryption Settings Use the following procedure to enable the encryption settings a...

Page 1444: ...ess will take about seven hours Rebooting will be faster if there is no data to carry over to the hard disk and if encryption is set to Format even if all the data on the hard disk is formatted Before you perform encryption we recommend you back up important data such as the Address Book 1 Press the User Tools Counter key 2 Select System Settings using or and then press the OK key 3 Select Adminis...

Page 1445: ...the User Tools Counter key 11 Turn off the power and the main power switch and then turn the main power switch back on For details about turning off the power see Turning On the Power About This Machine Printing the Encryption Key Use the following procedure to print the key again if it has been lost or misplaced The encryption key is required for data recovery if the machine malfunctions Be sure ...

Page 1446: ...ryption using or and then press the OK key 5 Select Print Encryption Key using or and then press the OK key 6 Press Print The encryption key for backup data is printed 7 Press the User Tools Counter key Updating the Encryption Key You can update the encryption key and create a new key Updates are possible when the machine is functioning normally Encrypting Data on the Hard Disk 127 5 ...

Page 1447: ...o the hard disk 1 Press the User Tools Counter key 2 Select System Settings using or and then press the OK key 3 Select Administrator Tools using or and then press the OK key 4 Select Machine Data Encryption using or and then press the OK key 5 Select Update Encryption Key using or and then press the OK key 6 Select the data to be carried over to the hard disk and not be reset To carry all of the ...

Page 1448: ...ncryption Use the following procedure to cancel the encryption settings when encryption is no longer necessary After completing this procedure on the machine s control panel turn off the power and restart the machine to enable the new settings Restarting can be slow when there is data to be carried over to the hard disk Before disposing of a hard disk note that even if Format is selected and encry...

Page 1449: ...key 5 Select Cancel Encryption using or and then press the OK key 6 Select the data to be carried over to the hard disk and not be reset To carry all of the data over to the hard disk select All Data To carry over only the machine settings data select File Sys To reset all of the data select Format 7 Press Continue 5 Securing Information Sent over the Network or Stored on Hard Disk 130 5 ...

Page 1450: ...Tools Counter key 10 Turn off the power and the main power switch and then turn the main power switch back on For details about turning off the power see Turning On the Power About This Machine Encrypting Data on the Hard Disk 131 5 ...

Page 1451: ... Auto Erase Memory erases the temporary data on the hard disk by writing over it Overwriting starts automatically once the job is completed The copier fax and printer functions take priority over the Auto Erase Memory function If a copy fax or print job is in progress overwriting will only be done after the job is completed Methods of Overwriting You can select a method of overwriting from the fol...

Page 1452: ...erwritten 1 Press the User Tools Counter key 2 Select System Settings using or and then press the OK key 3 Select Administrator Tools using or and then press the OK key 4 Select Auto Erase Memory Setting using or and then press the OK key 5 Select On using or and then press HD Erase Select the method of erasing the data from NSA DoD or Random Numbers If you select Random Numbers proceed to step 6 ...

Page 1453: ...rase Memory is completed overwriting will stop and data will be left on the hard disk Do not stop the overwrite mid process Doing so will damage the hard disk Should the main power switch be turned to Off before Auto Erase Memory is completed overwriting will continue once the main power switch is turned back to On If an error occurs before overwriting is completed turn off the main power Turn it ...

Page 1454: ...set Auto Erase Memory to On again repeat the procedure in Using Auto Erase Memory p 32 Logging on Using Administrator Authentication p 33 Logging off Using Administrator Authentication Types of Data that Can or Cannot Be Overwritten The following table shows the types of data that can or cannot be overwritten by Auto Erase Memory Data Overwritten by Auto Erase Memory Copier Copy jobs Printer Print...

Page 1455: ...e following are also deleted user codes counters under each user code user stamps data stored in the Address Book printer fonts downloaded by users applications using Embedded Software Architecture SSL server certificates and the machine s network settings If the main power switch is turned to Off before Erase All Memory is completed overwriting will be stopped and data will be left on the hard di...

Page 1456: ...t Erase All Memory using or and then press the OK key 6 Select the method of erasing the data Select the method of erasing the data from NSA DoD or Random Numbers If you select Random Numbers proceed to step 7 If you select NSA proceed to step 9 If you select DoD proceed to step 10 For details about the methods of overwriting see Methods of Overwriting 7 Select Random Numbers using or and then pre...

Page 1457: ...be turned to Off before Erase All Memory is completed overwriting will continue once the main power switch is turned back to On If you specify to both overwrite and encrypt the data the data will all be encrypted If an error occurs before overwriting is completed turn off the main power Turn it on again and then repeat from step 2 p 132 Methods of Overwriting Suspending Erase All Memory The overwr...

Page 1458: ...annot be cancelled 1 Press Suspend while Erase All Memory is in progress 2 Press Yes Erase All Memory is canceled 3 Turn off the main power To resume overwriting turn on the main power Deleting Data on the Hard Disk 139 5 ...

Page 1459: ...5 Securing Information Sent over the Network or Stored on Hard Disk 140 5 ...

Page 1460: ...s login user name and password The administrator can also specify Items in Admin Auth Management to prevent users from specifying certain settings Administrator type determines which machine settings can be modified The following administrator types are possible User Administrator For a list of settings that the user administrator can specify see User Administrator Settings Machine Administrator F...

Page 1461: ...ge Monitor Settings p 21 Administrators p 27 Registering the Administrator p 265 User Administrator Settings p 248 Machine Administrator Settings p 258 Network Administrator Settings p 263 File Administrator Settings p 270 User Settings Control Panel Settings p 287 User Settings Web Image Monitor Settings 6 Managing Access to the Machine 142 6 ...

Page 1462: ...tect This can be specified by the machine administrator You can set menu protect to Off Level 1 or Level 2 If you set it to Off no menu protect limitation is applied To limit access to the fullest extent select Level 2 For details about logging on and logging off with administrator authentication see Logging on Using Administrator Authentication Logging off Using Administrator Authentication p 32 ...

Page 1463: ...ify Menu Protect in Fax Features set Machine Management to On in Admin Auth Management in Administrator Tools in System Settings 1 Press the User Tools Counter key 2 Select Fax Features using or and then press the OK key 3 Select Administrator Tools using or and then press the OK key 4 Select Menu Protect using or and then press the OK key 6 Managing Access to the Machine 144 6 ...

Page 1464: ...n Admin Auth Management in Administrator Tools in System Settings 1 Press the User Tools Counter key 2 Select Printer Features using or and then press the OK key 3 Select Maintenance using or and then press the OK key 4 Select Menu Protect using or and then press the OK key 5 Select the menu protect level using or and then press the OK key 6 Press the User Tools Counter key Menu Protect 145 6 ...

Page 1465: ...ings 1 Press the User Tools Counter key 2 Select Scanner Features using or and then press the OK key 3 Select Administrator Tools using or and then press the OK key 4 Select Menu Protect and then press the OK key 5 Select the menu protect level using or and then press the OK key 6 Press the User Tools Counter key 6 Managing Access to the Machine 146 6 ...

Page 1466: ... Bymaking this setting you can limit the functions available to users For details about logging on and logging off with administrator authentication see Logging on Using Administrator Authentication Logging off Using Administrator Authentication 1 Press the User Tools Counter key 2 Select System Settings using or and then press the OK key 3 Select Administrator Tools using or and then press the OK...

Page 1467: ...ame Display Destination List Registration No User Code and Fax Destination 7 Press the OK key 8 Press Details 9 Select Auth Info using or and then press the OK key 10 Select Function Permissions using or and then press the OK key 11 Select which of the machine s functions you want to permit using or and then press the key 6 Managing Access to the Machine 148 6 ...

Page 1468: ...item press 12 Press the OK key 13 Press the Escape key 14 Press End 15 Press the OK key 16 Press the User Tools Counter key p 32 Logging on Using Administrator Authentication p 33 Logging off Using Administrator Authentication Limiting Available Functions 149 6 ...

Page 1469: ...e Access Log Stores details of login logout activity service engineer operations such as hard disk formatting system operations such as viewing the results of log transfers and security operations such as specifying settings for encryption unauthorized access detection user lockout and firmware authentication Using the Control Panel to Specify Log File Settings You can specify settings such as whe...

Page 1470: ... Administrator Authentication Specifying Delete All Logs This can be specified by the machine administrator For details about logging on and logging off with administrator authentication see Logging on Using Administrator Authentication Logging off Using Administrator Authentication By deleting the log stored in the machine you can free up space on the hard disk To delete all logs from the control...

Page 1471: ...istrator Tools using or and then press the OK key 4 Select Delete All Logs using or and then press the OK key 5 Press Yes 6 Press Exit 7 Press the User Tools Counter key p 32 Logging on Using Administrator Authentication p 33 Logging off Using Administrator Authentication 6 Managing Access to the Machine 152 6 ...

Page 1472: ...ogging on Using Administrator Authentication p 33 Logging off Using Administrator Authentication Specify Log Collect Settings Specify collection log settings The collection log levels are listed below Job Log Collect Level Level 1 User Settings Access Log Collect Level Level 1 Level 2 User Settings 1 Open a Web browser 2 Enter http the machine s IP address or host name in the address bar When ente...

Page 1473: ...to Web SmartDeviceMonitor UsethefollowingproceduretodisablelogtransfertoWebSmartDeviceMonitor Notethatyoucanchange the log transfer setting to Inactive only if it is already set to Active 1 Open a Web browser 2 Enter http the machine s IP address or host name in the address bar When entering an IPv4 address do not begin segments with zeros For example If the address is 192 168 001 010 you must ent...

Page 1474: ...Logs or Collect Access Logs or both must be set to Active If the data stored in the machine has been encrypted with the optional HDD Encryption Unit the log files will still be encrypted regardless of this setting Deleting All Logs Use the following procedure to delete all logs stored in the machine 1 Open a Web browser 2 Enter http the machine s IP address or host name in the address bar When ent...

Page 1475: ...hen click Download Logs under Device Settings 5 Click Download 6 Specify the folder in which you want to save the file 7 Click OK 8 Click Logout Downloaded logs contain data recorded up till the time you click the Download button Any logs recorded after the Download button is clicked will not be downloaded Downloading is slower if the number of logs is large If an error occurs while the CSV file i...

Page 1476: ...s Scanner Sending Details of sent scan files Printer Printing Details of normal print jobs Printer Locked Print Incomplete Details of Unprinted Locked Print files stored on the machine Printer Locked Print Details of Locked Print files stored on the machine and printed from Web Image Monitor or the control panel Printer Sample Print Incomplete Details of Unprinted Sample Print files stored on the ...

Page 1477: ...ork TWAIN Scanner Fax Sending Details of sent fax files Fax LAN Fax Sending Details of sent LAN Fax files Fax Storing Details of stored fax files Fax Stored File Printing Details of printing of fax files waiting be sent Fax Receiving Details of received fax files Fax Receiving and Delivering Details of forwarding of received fax files Fax Receiving and Storing Details of storage of received fax fi...

Page 1478: ...ine was switched on Machine Data Encryption Key Change Details of changes made to encryption keys using the Machine Data Encryption setting Firmware Invalid Details of checks for firmware validity made at times such as when the machine was switched on Date Time Change Details of changes made to date and time settings File Access Privilege Change Details of changes made to access privileges for sto...

Page 1479: ...ess Log Type For details about the information items contained in each type of log see Logs that can be Collected Result Result outcome of the operation Complete indicates the operation was completed successfully Failed indicates the operation was not completed successfully Details about failed jobs can be found in the access log User Entry ID ID assigned to the entry User Code User Name User code...

Page 1480: ...inations Stored File ID ID assigned to Store files Stored File Name If the Target Type is Store the file name of the stored file is recorded Access Log Information Items Item Content Access Log Type Type of access log Authentication Server The name of the authentication server accessed last Windows LDAP Authentication only No of Authentication Server Switches Thenumberofauthenticationserverswitche...

Page 1481: ...mory is recorded if all files in the memory are deleted Protocol Destination protocol TCP indicates the destination s protocol is TCP UDP indicates the destination s protocol is UDP Unknown indicates the destination s protocol could not be identified IP Address Destination IP address Port No Destination port number MAC Address Destination MAC physical address Module Name Firmware module name Parts...

Page 1482: ...FTP Bonjour SMB WSD Device WSD Printer WSD Scanner IPP DIPRINT RHPP Web Image Monitor SmartDeviceMonitor for Client or DeskTopBinder You cannot limit the monitoring of SmartDeviceMonitor for Client You cannot limit access involving telnet or SmartDeviceMonitor for Admin when using the SNMPv1 monitoring 1 Open a Web browser 2 Enter http the machine s IP address or host name in the address bar When ...

Page 1483: ...d System Settings Guide To disable SMTP on Web Image Monitor in E mail settings set the protocol to anything other than SMTP For details see Web Image Monitor Help For details about logging on and logging off with administrator authentication see Logging on Using Administrator Authentication Logging off Using Administrator Authentication Protocol Port Setting Method When Disabled IPv4 Control Pane...

Page 1484: ...onitor Functions that require sftp cannot be used You can restrict personal information frombeing displayedby making settings on the control panel using Restrict Display of User Information telnet TCP 23 Web Image Monitor Commands using telnet are disabled SMTP TCP 25 variable Control Panel Web Image Monitor SmartDeviceMonitor for Admin Web SmartDeviceMonitor Internet Fax or e mail notification fu...

Page 1485: ...itor for Admin Web SmartDeviceMonitor SMB printing functions cannot be used NBT UDP 137 UDP 138 telnet SMB printing functions via TCP IP as well as NetBIOS designated functions on the WINS server cannot be used SNMPv1 v2 UDP 161 Web Image Monitor telnet SmartDeviceMonitor for Admin Web SmartDeviceMonitor Functions that require SNMPv1 v2 cannot be used Using the control panel Web Image Monitor or t...

Page 1486: ...age Monitor telnet SmartDeviceMonitor for Admin Web SmartDeviceMonitor Functions that require RSH and network TWAIN functions cannot be used You can restrict personal information frombeing displayedby making settings on the control panel using Restrict Display of User Information LPR TCP 515 Web Image Monitor telnet SmartDeviceMonitor for Admin Web SmartDeviceMonitor LPR functions cannot be used Y...

Page 1487: ...dmin Web SmartDeviceMonitor IP Fax connecting functions using H 323 SIP and T 38 cannot be used SSDP UDP 1900 Web Image Monitor telnet Device discovery using UPnP from Windows cannot be used Bonjour UDP 5353 Web Image Monitor telnet SmartDeviceMonitor for Admin Web SmartDeviceMonitor Bonjour functions cannot be used Remote TCP 7443 TCP 7444 telnet Remote cannot be used DIPRINT TCP 9100 Web Image M...

Page 1488: ...nitor telnet Cannot print with AppleTalk WSD Device TCP 53000 variable Web Image Monitor telnet SmartDeviceMonitor for Admin Web SmartDeviceMonitor WSD Device functions cannot be used WSD Printer TCP 53001 variable Web Image Monitor telnet SmartDeviceMonitor for Admin Web SmartDeviceMonitor WSD Printer functions cannot be used WSD Scanner TCP 53002 variable Web Image Monitor telnet SmartDeviceMoni...

Page 1489: ...this setting see Specifying the Extended Security Functions p 32 Logging on Using Administrator Authentication p 33 Logging off Using Administrator Authentication p 217 Specifying the Extended Security Functions Enabling and Disabling Protocols Using the Control Panel 1 Press the User Tools Counter key 2 Select System Settings using or and then press the OK key 3 Select Interface Settings using or...

Page 1490: ...host name in the address bar When entering an IPv4 address do not begin segments with zeros For example If the address is 192 168 001 010 you must enter it as 192 168 1 10 to connect to the machine The top page of Web Image Monitor appears 3 Click Login The network administrator can log on Enter the login user name and login password 4 Click Configuration and then click Network Security under Secu...

Page 1491: ... Set the security level to Level 0 Level 1 or Level 2 Select Level 2 for maximum security to protect confidential information Make this setting when it is necessary to protect confidential information from outside threats Select Level 1 for moderate security to protect important information Use this setting if the machine is connected to the office local area network LAN Select Level 0 for easy us...

Page 1492: ...p the machine s IP address or host name in the address bar When entering an IPv4 address do not begin segments with zeros For example If the address is 192 168 001 010 you must enter it as 192 168 1 10 to connect to the machine The top page of Web Image Monitor appears 3 Click Login The network administrator can log on Enter the login user name and login password 4 Click Configuration and then cli...

Page 1493: ...ly SSL TLS Certificate Status None None None DIPRINT Active Active Inactive LPR Active Active Inactive FTP Active Active Active sftp Active Active Active ssh Active Active Active RSH RCP Active Active Inactive TELNET Active Inactive Inactive Bonjour Active Active Inactive SSDP Active Active Inactive SMB Active Active Inactive NetBIOS over TCP IPv4 Active Active Inactive WSD Device Active Active In...

Page 1494: ...k Active Active Inactive Tab Name SNMP Function Level 0 Level 1 Level 2 SNMP Active Active Active Permit Settings by SNMPv1 and v2 On Off Off SNMPv1 v2 Function Active Active Inactive SNMPv3 Function Active Active Active Permit SNMPv3 Communication Encryption Cleartext Encryption Cleartext Encryption Only Preventing Unauthorized Access 175 7 ...

Page 1495: ...stScript 3 Unit must be installed Password for IPP Authentication To encrypt the IPP Authentication password on Web Image Monitor set Authentication to DIGEST and then specify the IPP Authentication password set on the machine You canusetelnetorFTPtomanagepasswordsforIPPauthentication althoughitisnotrecommended Specifying a Driver Encryption Key This can be specified by the network administrator S...

Page 1496: ... Enter the driver encryption key using up to 32 alphanumeric characters The network administrator must give users the driver encryption key specified on the machine so they can register it on their computers Make sure to enter the same driver encryption key as that is specified on the machine 7 Re enter the encryption key and then press the OK key 8 Press the User Tools Counter key For details abo...

Page 1497: ...nhance security and so protect passwords from being analyzed For details about logging on and logging off with administrator authentication see Logging on Using Administrator Authentication Logging off Using Administrator Authentication 1 Press the User Tools Counter key 2 Select Printer Features using or and then press the OK key 3 Select PDF Menu using or and then press the OK key 4 Select PDF G...

Page 1498: ...strator Authentication Specifying an IPP Authentication Password This can be specified by the network administrator Specify the IPP authentication passwords for the machine using Web Image Monitor By making this setting you can encrypt IPP authentication passwords for transmission to prevent them from being analyzed 1 Open a Web browser 2 Enter http the machine s IP address or host name in the add...

Page 1499: ...Name box 7 Enter the password in the Password box 8 Click OK IPP authentication is specified 9 Click Logout When using the IPP port under Windows XP or Windows Server 2003 Windows Server 2003 R2 you can use the operating system s standard IPP port 7 Enhanced Network Security 180 7 ...

Page 1500: ...pecified by the network administrator To protect the communication path and establish encrypted communication create and install the device certificate There are two ways of installing a device certificate create and install a self signed certificate using the machine or request a certificate from a certificate authority and install it SSL Secure Sockets Layer BBC003S 1 To access the machine from ...

Page 1501: ...dure after creating the certificate depends on the certificate authority Follow the procedure specified by the certificate authority 2 Installing the device certificate Install the device certificate using Web Image Monitor 3 Enabling SSL Enable the SSL TLS setting using Web Image Monitor To confirm whether SSL configuration is enabled enter https the machine s IP address or host name in your Web ...

Page 1502: ...under Certificate Status to show that a device certificate for the machine has been installed 11 Click Logout Click Delete to delete the device certificate from the machine Creating the Device Certificate Issued by a Certificate Authority Create the device certificate using Web Image Monitor For details about the displayed items and selectable items see Web Image Monitor Help This section explains...

Page 1503: ...sing Web Image Monitor you can create the contents of the device certificate but you cannot send the certificate application Click Cancel Request to cancel the request for the device certificate Installing the Device Certificate Issued by a Certificate Authority Install the device certificate using Web Image Monitor For details about the displayed items and selectable items see Web Image Monitor H...

Page 1504: ...ed by a certificate authority 1 Open a Web browser 2 Enter http the machine s IP address or host name in the address bar When entering an IPv4 address do not begin segments with zeros For example If the address is 192 168 001 010 you must enter it as 192 168 1 10 to connect to the machine The top page of Web Image Monitor appears 3 Click Login The network administrator can log on Enter the login u...

Page 1505: ...certificate authority is installed in the machine confirm the certificate store location with the certificate authority Setting the SSL TLS Encryption Mode By specifying the SSL TLS encrypted communication mode you can change the security level Encrypted Communication Mode Using the encrypted communication mode you can specify encrypted communication Ciphertext Only Allows encrypted communication ...

Page 1506: ... then press the OK key 3 Select Interface Settings using or and then press the OK key 4 Select Network using or and then press the OK key 5 Select Permit SSL TLS Comm using or and then press the OK key 6 Select the encrypted communication mode using or and then press the OK key Select Ciphertext Only Ciphertext Priority or Ciphertext Cleartext as the encrypted communication mode 7 Press the User T...

Page 1507: ...cation to make various settings you can encrypt the data transmitted By making this setting you can protect data from being tampered with For details about logging on and logging off with administrator authentication see Logging on Using Administrator Authentication Logging off Using Administrator Authentication 1 Press the User Tools Counter key 2 Select System Settings using or and then press th...

Page 1508: ... Admin in addition to specifying Permit SNMPv3 Communictn on the machine For details about specifying Encryption Key in SmartDeviceMonitor for Admin see SmartDeviceMonitor for Admin Help If network administrator s Encryption Password setting is not specified the data for transmission may not be encrypted or sent For details about specifying the network administrator s Encryption Password setting s...

Page 1509: ...uration problems disable IPsec in System Settings on the control panel and then access Web Image Monitor For details about enabling and disabling IPsec using the control panel see System Settings Network and System Settings Guide IPsec is not applied to data obtained through DHCP DNS or WINS IPsec compatible operating systems are Windows XP SP2 Windows Vista Mac OSX 10 4 and later RedHat Linux Ent...

Page 1510: ...on algorithm and authentication key are specified automatically Some operating systems use the term Compliance in place of Authentication Encryption Key Auto Exchange Settings and Encryption Key Manual Settings This machine provides two key setting methods manual and auto exchange Using either of these methods agreements such as the IPsec algorithm and key must be specified for both sender and rec...

Page 1511: ...Settings IPsec settings for this machine can be made on Web Image Monitor The following table explains individual setting items Encryption Key Auto Exchange Manual Settings Shared Settings Setting Description Setting Value IPsec Specify whether to enable or disable IPsec Active Inactive Exclude HTTPS Communication Specify whether to enable IPsec for HTTPS transmission Active Inactive Specify Activ...

Page 1512: ...Authentication and High Level Encryption Select this level if you want to encrypt the data packets as well as authenticate the transmission partner and prevent unauthorized packet tampering Packet encryption helps prevent eavesdropping attacks This level provides higher security than Authentication and Low Level Encryption The following table lists the settings that are automatically configured ac...

Page 1513: ...ettings such as address type local address and remote address must still be configured manually After you specify a security level you can still make changes to the auto configured settings When you change an auto configured setting the security level switches automatically to User Setting Setting Description Setting Value Address Type Specify the address type for which IPsec transmission is used ...

Page 1514: ...If you specify Tunnel you must then specify the Tunnel End Points which are the beginning and ending IP addresses Set the same address for the beginning point as you set in Local Address IPsec Requirement Level Specify whether to only transmit using IPsec or to allow cleartext transmission when IPsec cannot be established auto setting Use When Possible Always Require Authentication Method Specify ...

Page 1515: ...p number used for IKE encryption key generation auto setting 1 2 14 Phase 1 Validity Period Specify the time period for which the SA settings in phase 1 are valid Set in seconds from 300 sec 5 min to 172800 sec 48 hrs Phase 2 Security Protocol Specify the security protocol to be used in Phase 2 To apply both encryption and authentication to sent data specify ESP or ESP AH To apply authentication d...

Page 1516: ...ich the SA settings in phase 2 are valid Specify a period in seconds from 300 5min to 172800 48 hrs Encryption Key Manual Settings Items Setting Description Setting Value Address Type Specify the address type for which IPsec transmission is used Inactive IPv4 IPv6 IPv4 IPv6 Default Settings only Local Address Specify the machine s address If you are using multiple IPv6 addresses you can also speci...

Page 1517: ... End Point the beginning and ending IP addresses In Tunnel End Point set the same address for the beginning point as you set in Local Address SPI Output Specify the same value as your transmission partner s SPI input value Any number between 256 and 4095 SPI Input Specify the same value as your transmission partner s SPI output value Any number between 256 and 4095 Security Protocol To apply both ...

Page 1518: ...ow according to the encryption algorithm Hexadecimal value 0 9 a f A F If HMAC MD5 96 set 32 digits If HMAC SHA1 96 set 40 digits ASCII IF HMAC MD5 96 set 16 characters If HMAC SHA1 96 set 20 characters Encryption Algorithm Specify the encryption algorithm Cleartext NULL encryption DES 3DES AES 128 AES 192 AES 256 Transmission Using IPsec 199 7 ...

Page 1519: ... 48 digits AES 128 set 32 digits AES 192 set 48 digits AES 256 set 64 digits ASCII DES set 8 characters 3DES set 24 characters AES 128 set 16 characters AES 192 set 24 characters AES 256 set 32 characters Encryption Key Auto Exchange Settings Configuration Flow This section explains the procedure for specifying Encryption Key Auto Exchange Settings This can be specified by the network administrato...

Page 1520: ...ansmission has been established Specifying Encryption Key Auto Exchange Settings This can be specified using Web Image Monitor 1 Open a Web browser 2 Enter http the machine s IP address or host name in the address bar When entering an IPv4 address do not begin segments with zeros For example If the address is 192 168 001 010 you must enter it as 192 168 1 10 to connect to the machine The top page ...

Page 1521: ...g the Certificate for IPsec This can be specified by the network administrator Using Web Image Monitor select the certificate to be used for IPsec You must install the certificate before it can be used 1 Open a Web browser 2 Enter http the machine s IP address or host name in the address bar When entering an IPv4 address do not begin segments with zeros For example If the address is 192 168 001 01...

Page 1522: ... default response rule check box and then click Next 8 Select Edit properties and then click Finish 9 In the General tab click Advanced 10 In Authenticate and generate a new key after every enter the same validity period in minutes that is specified on the machine in Encryption Key Auto Exchange Settings Phase 1 and then click Methods 11 Confirmthatthecombinationofhashalgorithm onWindowsXP Integri...

Page 1523: ...it 30 Click Add select the Custom check box and then click Settings 31 In Integrity algorithm select the authentication algorithm that was specified on the machine in Encryption Key Auto Exchange Settings Phase 2 32 In Encryption algorithm select the encryption algorithm that specified on the machine in Encryption Key Auto Exchange Settings Phase 2 33 In Session Key settings select Generate a new ...

Page 1524: ...sh IPsec transmission Encryption Key Manual Settings Configuration Flow This section explains the procedure for specifying encryption key manual settings This can be specified by the network administrator BBD003S Before transmission SA information is shared and specified by the sender and receiver To prevent SA information leakage we recommend that this exchange is not performed over the network A...

Page 1525: ...ultiple settings select the settings number and add settings 8 Click OK 9 Select Active for IPsec in IPsec 10 Set Exclude HTTPS Communication to Active if you do not want to use IPsec for HTTPS communication 11 Click OK 12 Click Logout telnet Setting Commands YoucanusetelnettoconfirmIPsecsettingsandmakesettingchanges Thissectionexplainstelnetcommands forIPsec Tologonasanadministratorusingtelnet th...

Page 1526: ...ipsec manual_mode Displays the current encryption key manual settings Specify encryption key manual settings msh ipsec manual_mode on off To enable encryption key manual settings set to on To disable settings set to off ipsec exclude To display or specify protocols excluded by IPsec use the ipsec exclude command Display current settings msh ipsec exclude Displays the protocols currently excluded f...

Page 1527: ...s the current setting Specify the address type in default setting msh ipsec manual default ipv4 ipv6 any Specify the address type for the default setting To specify both IPv4 and IPv6 enter any Security protocol setting msh ipsec manual 1 2 3 4 default proto ah esp dual Enter the separate setting number 1 4 or default and specify the security protocol To specify AH enter ah To specify ESP enter es...

Page 1528: ...ithm or key displays the current setting The authentication key is not displayed Encryption algorithm and encryption key setting msh ipsec manual 1 2 3 4 default encrypt null des 3des aes128 aes192 aes256 encryption key Enter the separate setting number 1 4 or default specify the encryption algorithm and then set the encryption key Ifyouaresettingahexadecimalnumber attach0xatthebeginning Ifyouhave...

Page 1529: ... an address value displays the current setting Specify the address type in default setting msh ipsec ike default ipv4 ipv6 any Specify the address type for the default setting To specify both ipv4 and ipv6 enter any Security policy setting msh ipsec ike 1 2 3 4 default proc apply bypass discard Enter the separate setting number 1 4 or default and specify the security policy for the address specifi...

Page 1530: ... IP address Enter the separate setting number 1 4 or default and specify the tunnel end point beginning and ending IP address Not specifying either the beginning or ending address displays the current setting IKE partner authentication method setting msh ipsec ike 1 2 3 4 default auth psk rsasig Enter the separate setting number 1 4 or default and specify the authentication method Specify psk tous...

Page 1531: ...ays the current setting ISAKMP SA phase 1 validity period setting msh ipsec ike 1 2 3 4 default ph1 lifetime validity period Entertheseparatesettingnumber 1 4 or default andspecifytheISAKMPSA phase1 validity period Enter the validity period in seconds from 300 to 172800 Not specifying a validity period displays the current setting IPsec SA phase 2 authentication algorithm setting msh ipsec ike 1 2...

Page 1532: ... be used Not specifying a group number displays the current setting IPsec SA phase 2 validity period setting msh ipsec ike 1 2 3 4 default ph2 lifetime validity period Enter the separate setting number 1 4 or default and specify the IPsec SA phase 2 validity period Enter the validity period in seconds from 300 to 172800 Not specifying a validity period displays the current setting Reset setting va...

Page 1533: ...n control display and setting methods are explained below View Settings msh authfree If print job authentication exclusion is not specified authentication exclusion control is not displayed IPv4 address settings msh authfree ID range_addr1 range_addr2 IPv6 address settings msh authfree ID range6_addr1 range6_addr2 IPv6 address mask settings msh authfree ID mask6_addr1 masklen Parallel USB settings...

Page 1534: ...uthentication by IEEE802 1X IEEE802 1X enables authentication in an Ethernet or wireless LAN environment For details see Using telnet Network and System Settings Guide Authentication by IEEE802 1X 215 7 ...

Page 1535: ...7 Enhanced Network Security 216 7 ...

Page 1536: ...urity functions and how to specify them For details about when to use each function see the corresponding chapters Changing the Extended Security Functions To change the extended security functions display the extended security screen as follows Administrators can change the extended security functions according to their role For details about logging on and logging off with administrator authenti...

Page 1537: ... authentication If you register the encryption key specified with the machine in the driver passwords are encrypted For details see the printer driver Help LAN Fax driver Help or TWAIN driver Help Encrypt Address Book This can be specified by the user administrator Encrypt the data in the machine s Address Book For details on protecting data in the Address Book see Protecting the Address Book On O...

Page 1538: ...he Address Book If you set Rstrct Dest Add Scanner to On users can specify destinations directly on the scanner screen but cannot use Add Dest to register data in the Address Book When this setting is made only the user administrator can change the Address Book On Off Restrict User Info Display Thiscanbespecifiedifuserauthenticationisspecified Whenthejobhistoryischeckedusinganetwork connection for...

Page 1539: ...etwork administrator When a sophisticated encryption method cannot be enabled simple encryption will be applied For example when using User Management Tool and Address Management in Smart Device Monitor for Admin to edit the Address Book or DeskTopBinder and ScanRouter delivery software and SSL TLS cannot be enabled make this setting Do not Restrict to enable simple encryption When SSL TLS can be ...

Page 1540: ...ot authorized to use the copy and printer functions You can specify Authenticate Current Job only if User Auth Management was specified Login Privilege Access Privilege Off Password Policy This can be specified by the user administrator The password policy setting is effective only if Basic Auth is specified This setting lets you specify Complexity Setting and Minimum Character No for the password...

Page 1541: ...cture change is detected and a message requesting administrator login is displayed After the machine administrator logs in the machine finishes startup with the updated firmware The administrator can confirm if the updated structure change is permissible or not by checking the firmware version displayed on the control panel screen If the firmware structure change is not permissible contact your se...

Page 1542: ...gs for users to prevent personal information in transmission history being printed set the Journal to not be printed Also if more than 200 transmissions are made transmissions shown in the Journal are overwritten each time a further transmission is made To prevent the Transmission History from being overwritten perform the following procedures In Fax Features go to Administrator Tools Parameter Se...

Page 1543: ...deliveries When this happens click Print Scanner Journal or Delete Scanner Journal To print the scanner journal automatically set On for Print Delete Scanner Journal WSD scanner function WSD scanner function is automatically disabled when user authentication is specified Even if automatically disabled it can be enabled from the initial settings available in the Web Image Monitor For instructions o...

Page 1544: ...sed by a service representative for inspection or repair If you set the service mode lock to On service mode cannot be used unless the machine administrator logs on to the machine and cancels the service mode lock to allow the servicerepresentativetooperatethemachineforinspectionandrepair Thisensuresthattheinspection and repair are done under the supervision of the machine administrator Specifying...

Page 1545: ...eling Service Mode Lock To enable a service representative to inspect or repair this machine the machine administrator must log on and cancel the service mode lock beforehand For details about logging on and logging off with administrator authentication see Logging on Using Administrator Authentication Logging off Using Administrator Authentication 1 Press the User Tools Counter key 2 Select Syste...

Page 1546: ... press the OK key 5 Select Off using or and then press the OK key 6 Press the User Tools Counter key The service representative can switch to service mode p 32 Logging on Using Administrator Authentication p 33 Logging off Using Administrator Authentication Limiting Machine Operations to Customers Only 227 8 ...

Page 1547: ...ools Admin Auth Management User Management Select On and then select Administrator Tools for Items See Enabling Administrator Authentication Administrator Tools Admin Auth Management Machine Management Select On and then select General Features Tray Paper Settings Timer Settings Interface Settings File Transfer and Administrator Tools for Items See Enabling Administrator Authentication Administrat...

Page 1548: ...ing the Extended Security Functions Administrator Tools Network Security Level Level 2 To acquire the machine status through printer driver or Web Image Monitor set SNMP to Active on Web Image Monitor See Specifying Network Security Level Administrator Tools Service Mode Lock On See Limiting Machine Operations to Customers Only Administrator Tools Machine Data Encryption Select Encrypt and then se...

Page 1549: ...nu Protect Settings you can Configure Using Web Image Monitor Use Web Image Monitor to configure the security settings shown in the following table Category Item Setting Device Settings Logs Collect Job Logs Active Device Settings Logs Collect Access Logs Active Security User Lockout Policy Lockout Active Security User Lockout Policy Number of Attempts before Lockout 5 times or less See User Locko...

Page 1550: ... Network Security Level to Level 2 on the control panel For details about the collect log setting and SNMPv3 setting see Web Image Monitor Help p 93 User Lockout Function Settings you can Configure when IPsec is Available Unavailable IPsec encrypts all the data traveling on your network If your network supports IPsec we recommend you enable it Settings you can Configure when IPsec is Available If ...

Page 1551: ...e s control panel Settings you can Configure when IPsec is Unavailable If IPsec is not available configure the settings shown in the following table to enhance the security of the data traveling on your network System Settings Control panel Tab Item Setting Interface Settings Network IPsec Inactive Interface Settings Permit SSL TLS Comm Ciphertext Only Web Image Monitor settings Category Item Sett...

Page 1552: ...s Network and System Settings Guide For details about IPP settings see Installing the Printer Driver Printer Reference For details about SSL settings see Protection Using Encryption Scanner Send the URL of scanned files to destinations by configuring Send Settings in Scanner Features instead of sending the actual scanned files Use Web Image Monitor through your network to view delete send and down...

Page 1553: ...8 Specifying the Extended Security Functions 234 8 ...

Page 1554: ...e appears deal with the problem according to the information contained in the message Messages Cause Solutions You do not have privileges to use this function The authority to use the function is not specified If this appears when trying to use a function The function is not specified in the Address Book management setting as being available The user administrator must decide whether to authorize ...

Page 1555: ... Manager Failed to obtain URL Server authentication failed Make sure server authentication is specified correctly on the machine Authentication failed The entered login user name or login password is incorrect Ask the user administrator for the correctloginusernameandlogin password Authentication failed Authentication failed because no more users can be registered The number of users registered in...

Page 1556: ...e instructions on how to deal with them Condition Cause Solution Cannot perform the following Print with the printer driver Connect with the TWAIN driver Send or print with the LAN Fax driver User authentication has been rejected Confirm the user name and login name with the administrator of the network in use if using Windows Authentication LDAP Authentication or Integration Server Authentication...

Page 1557: ...Tool in SmartDeviceMonitor for Admin and entering the correct login user name and password a message that an incorrect password has been entered appears Simple Encryption is not set correctly Alternatively SSL TLS has been enabled although the required certificate is not installed in the computer Set Simple Encryption to On Alternatively enable SSL TLS install the server certificate in the machine...

Page 1558: ... the Address Book on the fax screen Rstrct Dest Add Scanner is set to Off in Rstrct Dest Use Scanner under Extended Security so only the user administrator can register destinations in the Address Book on the scanner screen Registration must be done by the user administrator User authentication is enabled yet destinations specified using the machine do not appear User authentication may have been ...

Page 1559: ...rs Only the user who executed a copying or scanning job can interrupt it Wait until the job has completed or consult an administrator or the user who executed the job After you execute Encrypt Address Book the Exit message does not appear The hard disk may be faulty The file may be corrupt Contact your service representative p 176 Specifying a Driver Encryption Key p 186 Setting the SSL TLS Encryp...

Page 1560: ...fy up to 32 alphanumeric characters and symbols Keep in mind that user names and passwords are case sensitive Be sure not to forget the supervisor login user name and login password If you do forget them a service representative will to have to return the machine to its default state This will result in all data in the machine being lost and the service call may not be free of charge You cannot sp...

Page 1561: ...as the Supervisor If administrator authentication has been specified be sure to log off after completing settings This section describes how to log off after completing settings 1 Press Logout 2 Press Yes Changing the Supervisor This section describes how to change the supervisor s login name and password To do this you must enable the user administrator s privileges through the settings under Adm...

Page 1562: ...ct System Settings using or and then press the OK key 5 Select Administrator Tools using or and then press the OK key 6 Select Program Change Admin using or and then press the OK key 7 Select Admin Detailed Settings using or and then press the OK key 8 Select Supervisor using or and then press the OK key Supervisor Operations 243 10 ...

Page 1563: ...ress the OK key 11 Select Login Password using or and then press the OK key 12 Enter the login password and then press the OK key 13 If a password reentry screen appears enter the login password and then press the OK key 14 Press Exit three times 15 Press the User Tools Counter key 10 Appendix 244 10 ...

Page 1564: ...f as the supervisor see Supervisor Operations 1 Press the User Tools Counter key 2 Press Login 3 Log on as the supervisor You can log on in the same way as an administrator 4 Select System Settings using or and then press the OK key 5 Select Administrator Tools using or and then press the OK key 6 Select Program Change Admin using or and then press the OK key Supervisor Operations 245 10 ...

Page 1565: ...ing or and then press the OK key 9 Select Login Password using or and then press the OK key 10 Enter the login password and then press the OK key 11 If a password reentry screen appears enter the login password and then press the OK key 12 Press Exit three times 13 Press the User Tools Counter key 10 Appendix 246 10 ...

Page 1566: ... p 241 Supervisor Operations Supervisor Operations 247 10 ...

Page 1567: ... specified Timer Settings All the settings can be specified Interface Settings The following settings can be specified Parallel Interface All the settings can be specified File Transfer The following settings can be specified Delivery Option SMTP Authentication User Name E mail Address Password Encrypt POP before SMTP Wait Time after Auth User Name E mail Address Password Reception Protocol POP3 I...

Page 1568: ...can specify which authentication to use You can also edit the settings for each function Admin Auth Management Machine Management Program Change Admin Machine Administrator You can change the user name and the full control user s authority Key Counter Management Extended Security Encrypt Address Book Restrict User Info Display Transfer to Fax Receiver Authenticate Current Job Remote Service Update...

Page 1569: ...e Erase All Memory setting are available only if the optional Data Overwrite Security Unit is installed Copier Features All the settings can be specified Fax Features The following settings can be specified General Settings Adjust All the settings can be specified Reception Settings The following settings can be specified Switch Reception Mode RX Mode Auto Switch Time Authorized Reception Checkere...

Page 1570: ...etting Program Special Sender Program Memory Lock ID G3 Analog Line Memory File Transfer Menu Protect Printer Features The following settings can be specified List Test Print All the settings can be specified Maintenance The following settings can be specified Menu Protect List Test Print Lock System The following settings can be specified Print Error Report Auto Continue Memory Overflow Rotate by...

Page 1571: ...Disk Extended Auto Tray Switching Host Interface All the settings can be specified PCL Menu All the settings can be specified PS Menu All the settings can be specified PDF Menu All the settings can be specified PS or PDF menu settings are available only if the optional PostScript 3 Unit is installed Scanner Features The following settings can be specified Scan Settings All the settings can be spec...

Page 1572: ...Info Default E mail Subject Administrator Tools All the settings can be specified Settings via Web Image Monitor The following settings can be specified Status Reset Device Reset Printer Job Device Settings System Spool Printing Protect Printer Display Panel Print Priority Function Reset Timer Permit Firmware Update Permit Firmware Structure Change Display IP Address on Device Display Panel Paper ...

Page 1573: ...ication Management All the settings can be specified Administrator Authentication Management Machine Administrator Authentication Available Settings for Machine Administrator Program Change Administrator You can specify the following administrator settings for the machine administrator Login User Name Login Password Encryption Password LDAP Server All the settings can be specified Firmware Update ...

Page 1574: ...riority Edge to Edge Print Default Printer Language Tray Switching List Test Print Lock Extended Auto Tray Switching Virtual Printer Host Interface PCL Menu PS Menu PDF Menu Tray Parameters PCL All the settings can be specified Tray Parameters PS All the settings can be specified Virtual Printer Settings All the settings can be specified PDF Group Password All the settings can be specified Machine...

Page 1575: ... Address Parameter Settings All the settings can be specified Scanner Scan Settings All the settings can be specified Destination List Settings All the settings can be specified Send Settings All the settings can be specified Administrator Tools All the settings can be specified Interface Interface Settings USB Network SNMPv3 Security User Lockout Policy All the settings can be specified RC Gate S...

Page 1576: ...gs can be specified The following settings are available only if the optional PostScript 3 Unit is installed PS Menu PDF Menu Tray Parameters PS Virtual Printer Settings PDF Group Password and PDF Fixed Password Settings via SmartDeviceMonitor for Admin The following settings can be specified Device Properties Reset Current Job Reset All Jobs Reset Device Refresh User Management Tool The following...

Page 1577: ...work All the settings can be specified Wireless LAN Communication Mode SSID Setting Channel Security Method Restore Defaults Print I F Settings List File Transfer SMTP Server Server Name Port No E mail Communication Port E mail Recept Interval Max Recept E mail Size E mail Storage in Server Auto Specify Sender Name Administrator Tools Address Book Management Prgrm Change Delete Group Disp Print Us...

Page 1578: ...LAN setting is available only if the wireless LAN interface is installed Fax Features The following settings can be specified E mail Settings Maximum E mail Size IP Fax Settings All the settings can be specified Printer Features The following settings can be specified System Print Compressed Data Scanner Features The following settings can be specified Send Settings Max E mail Size Divide Send E m...

Page 1579: ...uthentication Available Settings for Network Administrator Program Change Administrator You can specify the following administrator settings for the network administrator Login User Name Login Password Encryption Password Printer Basic Settings Print Compressed Data Fax E mail Settings Maximum E mail Size IP Fax Settings All the settings can be specified IP Fax Gateway Settings All the settings ca...

Page 1580: ...k IPv4 All the settings can be specified IPv6 All the settings can be specified NetWare All the settings can be specified AppleTalk All the settings can be specified SMB All the settings can be specified SNMP All the settings can be specified SNMPv3 All the settings can be specified SSDP All the settings can be specified Bonjour All the settings can be specified Network Administrator Settings 261 ...

Page 1581: ...n be specified Device Certificate All the settings can be specified IPsec All the settings can be specified IEEE 802 1X WPA WPA2 All the settings can be specified S MIME All the settings can be specified Webpage All the settings can be specified Wireless LAN Settings are available only if the wireless LAN interface is installed Settings via SmartDeviceMonitor for Admin The following settings can b...

Page 1582: ...unter Display Admin Auth Management File Management Program Change Admin File Administrator Extended Security Enhance File Protection Fax Features The following settings can be specified Reception Settings Stored Recpt File User Set Printer Features The following settings can be specified Maintenance Delete All Temporary Jobs Delete All Stored Jobs System Auto Delete Temporary Jobs Auto Delete Sto...

Page 1583: ...ct groups to notify Administrator Authentication Management File Administrator Authentication Available Settings for File Administrator Program Change Administrator You can specify the following administrator settings for the file administrator Login User Name Login Password Encryption Password Printer Basic Settings Auto Delete Temporary Print Jobs Auto Delete Stored Print Jobs Webpage Download H...

Page 1584: ...Counter Disp Print User Counter Display Clear Admin Auth Management User Management Program Change Admin User Administrator Extended Security Encrypt Address Book Restrict Dest Use Fax Rstrct Dest Add Fax Rstrct Dest Use Scanner Rstrct Dest Add Scanner Password Policy Settings via Web Image Monitor The following settings can be specified Address Book All the settings can be specified Device Settin...

Page 1585: ...he following administrator settings for the user administrator Login User Name Login Password Encryption Password Webpage Download Help File Settings via SmartDeviceMonitor for Admin The following settings can be specified Address Management Tool All the settings can be specified User Management Tool Reset User Counters Add New User Delete User User Properties 10 Appendix 266 10 ...

Page 1586: ...assword and user name Full Control This is a user granted full control Abbreviations in the table columns R W Read and Write Both reading and modifying the setting are available R Read Reading only N A Not Applicable Neither reading nor modifying the setting is available Settings Read only User Edit User Edit Delete User Full Control Registered User User Admin Name R R W R W R W R W R W Reg No R R...

Page 1587: ...Delete User Full Control Registered User User Admin Register as R R W R W R W R W R W Dest Protect Code N A N A N A R W 2 R W 2 R W 2 Dest Protect Obj N A R W R W R W R W R W Dest Protect Permissi ons N A N A N A R W R W R W 2 The code for Protection Code can be entered or changed but not displayed Tab Name Fax Settings Settings Read only User Edit User Edit Delete User Full Control Registered Use...

Page 1588: ...nly N A R W R W R W R W R W Tab Name Folder Info Settings Read only User Edit User Edit Delete User Full Control Registered User User Admin SMB FTP NCP R R W R W R W R W R W SMB Path R R W R W R W R W R W FTP Port No R R W R W R W R W R W FTP Server Name R R W R W R W R W R W FTP Path R R W R W R W R W R W NCP Path NDS or Bindery R R W R W R W R W R W The Privilege for User Account Settings in the...

Page 1589: ...trator authentication is specified The administrator s configuration of Menu Protect and Available Settings determines which functions and system settings are available to users If user authentication is specified system settings and functions are available to authorized users only who must log on to access them 10 Appendix 270 10 ...

Page 1590: ...ing the setting is available When Menu Protect is set to Off all the following settings can be viewed and modified General Features Settings Level 1 Level 2 Auto Tray Switching R R Original Type Setting R W R Duplex Mode Priority R R Orientation R W R Max Number of Sets R R Original Count Display R R Reproduction Ratio R R Preset R E Priority R R Duplex Margin R W R Letterhead Setting R R Menu Pro...

Page 1591: ...ng is available When Menu Protect is set to Off all the following settings can be viewed and modified Normal Printer Screen Functions Level 1 Level 2 Prt Jobs R W R W List Test Print Settings Level 1 Level 2 Multiple Lists R W R W Config Page R W R W Error Log R W R W Menu List R W R W PCL Config Font Page R W R W PS Config Font Page R W R W PDF Config Font Page R W R W Hex Dump R W R W The PS Con...

Page 1592: ... Compressed Data R R Memory Usage R R Duplex R R Copies R R Blank Page Print R R Edge Smoothing R R Toner Saving R R Printer Language R R Sub Paper Size R R Page Size R W R Letterhead Setting R R Bypass Tray Priority R R Edge to Edge Print R R Default Printer Lang R R Tray Switching R R RAM Disk R R Extend Auto Tray Switching R R Printer Features 273 10 ...

Page 1593: ... Form Lines R R Font Source R R Font Number R R Point Size R R Font Pitch R R Symbol Set R R Courier Font R R Extend A4 Width R R Append CR to LF R R Resolution R R RAM Disk R R PS Menu Settings Level 1 Level 2 Job Timeout R R Wait Timeout R R Data Format R R Resolution R R Orientation Auto Detect R R 10 Appendix 274 10 ...

Page 1594: ...R R PDF Group Password R R Reverse Order Print R R Resolution R R Orientation Auto Detect R R PDF menu settings are available only if the optional PostScript 3 Unit is installed The default for Menu Protect is Level 2 Settings that are not in the list can only be viewed regardless of the menu protect level setting Printer Features 275 10 ...

Page 1595: ...ng nor modifying the setting is available When Menu Protect is set to Off all the following settings can be viewed and modified Scan Settings Settings Level 1 Level 2 Default Scan Settings R R Original Setting R R Orig Orientation Priority R R Original Type Setting R W R Color Mode Priority R R Blank Page Detect R R Destination List Settings Settings Level 1 Level 2 Dest List Priority 2 R R Send S...

Page 1596: ...ail Size R R Divide Send E mail R R Insert Addit E mail Info R W R Default E mail Subject R R Administrator Tools Settings Level 1 Level 2 Menu Protect R R The default for Menu Protect is Level 2 Settings that are not in the list can only be viewed regardless of the menu protect level setting Scanner Features 277 10 ...

Page 1597: ...ifying the setting is available When Menu Protect is set to Off all the following settings can be viewed and modified General Settings Adjust Settings Level 1 Level 2 Adjust Sound Volume R W R Program Fax Information R R On Hook Release Time R W R Set User Function Key R W R Reception Settings Settings Level 1 Level 2 Switch Reception Mode R R RX Mode Auto Switch Time R R Authorized Reception R R ...

Page 1598: ... R R H 323 Settings R R SIP Settings R R Gateway Settings R R Administrator Tools Settings Level 1 Level 2 Print Journal R N A Print TX Standby File List R R Communication Page Count R R Memory Lock R R Forwarding R R Folder TX Result Report R R Parameter Settings R R Program Special Sender R R Program Memory Lock ID R R G3 Analog line R R Memory File Transfer R R Fax Features 279 10 ...

Page 1599: ...Settings Level 1 Level 2 Menu Protect R R The default for Menu Protect is Level 2 Settings that are not in the list can only be viewed regardless of the menu protect level setting 10 Appendix 280 10 ...

Page 1600: ... the table columns R W Read and Write Both reading and modifying the setting are available R Read Reading only N A Not Applicable Neither reading nor modifying the setting is available General Features Settings Not Specified Specified Program Change Delete User Text R W R Panel Key Sound R W R Warm up Beeper R W R Copy Count Display R W R Function Priority R W R Print Priority R W R Function Reset...

Page 1601: ... Timer Settings Settings Not Specified Specified Auto Off Timer R W R Energy Saver Timer R W R System Auto Reset Timer R W R Copier Auto Reset Timer R W R Facsimile Auto Reset Timer R W R Printer Auto Reset Timer R W R Scanner Auto Reset Timer R W R Set Date R W R Set Time R W R Auto Logout Timer R W R Interface Settings Settings NotSpecified Specified Print I F Settings List R W R Network 10 Appe...

Page 1602: ...ation R W R IPsec R W R Domain Name R W R WINS Configuration R W R Effective Protocol R W R NCP Delivery Protocol R W R NW Frame Type R W R SMB Computer Name R W N A SMB Work Group R W N A Ethernet Speed R W R IEEE802 1X Auth Ethernet R W R Restr IEEE802 1X Auth Def R W R Ping Command R W R Permit SNMPv3 Communictn R W R Permit SSL TLS Comm R W R Host Name R W N A Machine Name R W N A System Setti...

Page 1603: ...ntrol R W R Parallel Interface settings are available only if the optional IEEE 1284 interface unit is installed Wireless LAN Settings NotSpecified Specified Communication Mode R W R SSID Setting R W R Ad hoc Channel R W R Security Method R W R Restore Defaults R W N A Wireless LAN settings are available only if the optional Wireless LAN interface unit is installed File Transfer Settings Not Speci...

Page 1604: ... Resend R W R The settings made for Main Delivery Server IP Address and Sub Delivery Server IP Address in Delivery Option can only be displayed not changed The passwords for SMTP Authentication and Default User Name PW Send can be entered or changed but not displayed Administrator Tools Settings NotSpecified Specified Address Book Management R W R W Prgrm Change Delete Group R W R W Address Book P...

Page 1605: ...rver R W R LDAP Search R W R Prog Change Delete Realm R W R AOF Always On R W R Service Mode Lock R W R Firmware Version R R Delete All Logs R W R Transfer log Setting R W N A Fixed USB Port R W R The password for Program Change Delete LDAP Server can be entered or changed but not displayed 10 Appendix 286 10 ...

Page 1606: ...tiondisplaystheusersettingsthatcanbespecifiedonWebImageMonitorwhenuserauthentication isspecified Settingsthatcanbespecifiedbytheuservaryaccordingtothemenuprotectlevelandavailable settings specifications User Settings Web Image Monitor Settings 287 10 ...

Page 1607: ...specified Abbreviations in the table columns R W Read and Write Both reading and modifying the setting are available R Read Reading only N A Not Applicable Neither reading nor modifying the setting is available System Settings Not Specified Specified General Settings Device Name R W R General Settings Comment R W R General Settings Location R W R Spool Printing R W N A Paper Tray Priority Copier R...

Page 1608: ... Paper Type R W R Tray3 Apply Auto Paper Select R W R Tray3 Apply Duplex R W R Bypass Tray Paper Size R W R Bypass Tray Custom Paper Size R W R Bypass Tray Paper Type R W R Date Time Settings Not Specified Specified Set Date R W R Set Time R W R SNTP Server Name R W R SNTP Polling Interval R W R Time Zone R W R Timer Settings Not Specified Specified Auto Off Timer R W R Device Settings 289 10 ...

Page 1609: ...W R Auto Logout Timer R W R Logs Settings Not Specified Specified Collect Job Logs R W R Job Log Collect Level R W R Collect Access Logs R W R Access Log Collect Level R W R Transfer Logs R R Encrypt Logs R W R Classification Code R W R Delete All Logs R W N A E mail Settings Not Specified Specified Administrator E mail Address R W R Reception Protocol R W R E mail Reception Interval R W R 10 Appe...

Page 1610: ...ryption R W R POP before SMTP R W R POP E mail Address R W R POP User Name R W N A POP Password R W N A Timeout setting after POP Auth R W R POP3 IMAP4 Server Name R W R POP3 IMAP4 Encryption R W R POP3 Reception Port No R W R IMAP4 Reception Port No R W R Fax E mail Address R W R Receive Fax E mail R W N A Fax E mail User Name R W N A Fax E mail Password R W N A E mail Notification E mail Address...

Page 1611: ...and NCP Password can be entered or changed but not displayed User Authentication Management Settings Not Specified Specified User Authentication Management R W R User Code Authentication Printer Job Authentication R W R User Code Authentication Available Function R W R Basic Authentication Printer Job Authentication R W R Basic Authentication Available Function R W R Windows Authentication Printer...

Page 1612: ...ilable Function R W R Integration Server Authentication Printer Job Authentication R W R Integration Server Authentication SSL R W R Integration Server Authentication Integration Server Name R W R Integration Server Authentication Authentication Type R W R Integration Server Authentication Domain Name R W R Integration Server Authentication Group Settings for Integration Server Authentication R W ...

Page 1613: ...either reading nor modifying the setting is available When Menu Protect is set to Off all the following settings can be viewed and modified Printer Basic Settings System Settings Level 1 Level 2 Print Error Report R R Auto Continue R R Memory Overflow R R Rotate by 180 Degrees R R Print Compressed Data R R Memory Usage R R Duplex R R Copies R R Blank Page Print R R Edge Smoothing R R Toner Saving ...

Page 1614: ...R Virtual Printer R R Host Interface Settings Level 1 Level 2 I O Buffer R R I O Timeout R R PCL Menu Settings Level 1 Level 2 Orientation R R Form Lines R R Font Source R R Font Number R R Point Size R R Font Pitch R R Symbol Set R R Courier Font R R Extend A4 Width R R Append CR to LF R R Resolution R R PS Menu Printer 295 10 ...

Page 1615: ...ttings Level 1 Level 2 Reverse Order Print R R Resolution R R Orientation Auto Detect R R PDF menu settings are available only if the optional PostScript 3 Unit is installed Virtual Printer Settings System Settings Level 1 Level 2 Print Error Report R R Job Separation R R Rotate by 180 Degrees R R Memory Usage R R Duplex R R Copies R R Blank Page Print R R Edge Smoothing R R Toner Saving R R 10 Ap...

Page 1616: ...d Setting R R Edge to Edge Print R R PCL Menu Settings Level 1 Level 2 Orientation R R Form Lines R R Font Source R R Font Number R R Point Size R R Font Pitch R R Symbol Set R R Courier Font R R Extend A4 Width R R Append CR to LF R R Resolution R R PS Menu Settings Level 1 Level 2 Job Timeout R R Wait Timeout R R Printer 297 10 ...

Page 1617: ...ional PostScript 3 Unit is installed RHPP Settings Settings Level 1 Level 2 After Errors Are Solved R W R W When Errors Occur R W R W RHPP Timeout R W R W After Misfed Paper Is Removed R W R W PDF Temporary Password Settings Level 1 Level 2 PDF Temporary Password R W R W Confirm Password R W R W PDF Temporary Password settings are available only if the optional PostScript 3 Unit is installed PDF G...

Page 1618: ...ed PDF Fixed Password Settings Level 1 Level 2 Current PDF Fixed Password N A N A New PDF Fixed Password N A N A Confirm Password N A N A PDF Fixed Password settings are available only if the optional PostScript 3 Unit is installed The default for Menu Protect is Level 2 Settings that are not in the list can only be viewed regardless of the menu protect level setting Printer 299 10 ...

Page 1619: ...llowing settings can be viewed and modified Scan Settings Settings Level 1 Level 2 Scan Settings Original Type Full Color Text R W R Scan Settings Original Type Full Color Photo R W R Scan Settings Original Type Black White Text R W R Scan Settings Original Type Black White Photo R W R Scan Settings Resolution R R Scan Settings Scan Size R R Scan Size R R Original Setting R R Original Orientation ...

Page 1620: ...r Journal R W R Max E mail Size R R Divide Send E mail R R Insert Additional E mail Info R W R Default E mail Subject R R Administrator Tools Settings Level 1 Level 2 Display WSD Destination List R R Prohibit WSD Scan Command R R The default for Menu Protect is Level 2 Settings that are not in the list can only be viewed regardless of the menu protect level setting Scanner 301 10 ...

Page 1621: ...available When Menu Protect is set to Off all the following settings can be viewed and modified Fax General Settings Settings Level 1 Level 2 Fax Header N A N A Own Name N A N A Own Fax Number N A N A Switch Reception Mode N A N A 2 Sided Print R W N A Checkered Mark R W N A Center Mark R W N A Print Reception Time R W N A Paper Tray R W N A Administrator Tools Settings Level 1 Level 2 Memory Lock...

Page 1622: ...A N A Own Fax No N A N A Enable SIP N A N A Enable Server N A N A User Name N A N A Server IP Address Proxy Server Addr Main N A N A Server IP Address Proxy Server Address Sub N A N A Server IP Address Redirect Svr Addr Main N A N A Server IP Address Redirect Svr Addr Sub N A N A Server IP Address Registrar Address Main N A N A Server IP Address Registrar Address Sub N A N A Digest Authentication ...

Page 1623: ...eport N A N A Memory Storage Report N A N A SEP Code RX Result Report N A N A SEP Code RX Reserve Report N A N A LAN Fax Result Report N A N A Inclusion of Part of Image N A N A Error E mail Notification N A N A Display Network Errors N A N A Journal Notification by E mail N A N A Response to RX Notice Request N A N A Select Destination Type Priority N A N A The default for Menu Protect is Level 2...

Page 1624: ...d user when Items have been specified Abbreviations in the table columns R W Read and Write Both reading and modifying the setting are available R Read Reading only N A Not Applicable Neither reading nor modifying the setting is available Interface Settings Settings Not Specified Specified Ethernet Ethernet Security R W R Ethernet Ethernet Speed R W R USB R W R Wireless LAN Settings Settings Not S...

Page 1625: ...ed WEP Key R W R WPA Encryption Method R W R WPA Authentication Method R W R WPA PSK WPA2 PSK R W R WPA WPA2 Settings R W R Wireless LAN Settings are available only if the Wireless LAN interface unit is installed 10 Appendix 306 10 ...

Page 1626: ...ified Specified Authorized user when Items have been specified Abbreviations in the table columns R W Read and Write Both reading and modifying the setting are available R Read Reading only N A Not Applicable Neither reading nor modifying the setting is available IPv4 Settings Not Specified Specified Host Name R W R DHCP R W R Domain Name R W R IPv4 Address R W R Subnet Mask R W R DDNS R W R WINS ...

Page 1627: ...canner R W R IPP R W R WSD Printer IPP Timeout R W R RHPP R W R IPv6 Settings Not Specified Specified IPv6 R W R Host Name R W R Domain Name R W R Stateless Address R W R Manual Configuration Address R W R DHCPv6 lite R W R DDNS R W R Default Gateway Address R W R DNS Server R W R LPR R W R RSH RCP R W R 10 Appendix 308 10 ...

Page 1628: ... IPP Timeout R W R RHPP R W R NetWare Settings Not Specified Specified NetWare R W R Print Server Name R W R Logon Mode R W R File Server Name R W R NDS Tree R W N A NDS Context Name R W R Operation Mode R W R Remote Printer No R W N A Job Timeout R W N A Frame Type R W R Print Server Protocol R W R NCP Delivery Protocol R W R Network 309 10 ...

Page 1629: ...Name R W R SMB Settings Not Specified Specified SMB R W R Workgroup Name R W R Computer Name R W R Comment R W R Notify Print Completion R W R Bonjour Settings Not Specified Specified Bonjour R W R Computer Name R W R Location R W R DIPRINT R W R LPR R W R IPP R W R 10 Appendix 310 10 ...

Page 1630: ...d Authorized user when Items have not been specified Specified Authorized user when Items have been specified Abbreviations in the table columns R W Read and Write Both reading and modifying the setting are available R Read Reading only N A Not Applicable Neither reading nor modifying the setting is available Webpage Settings Not Specified Specified Language 1 R W R Language 2 R W R URL 1 R W R UR...

Page 1631: ...ing functions require certain options and additional functions Hard Disk overwrite erase function DataOverwriteSecurity Unit PDF Direct Print function PostScript 3 Unit Hard Disk data encryption function HDD Encryption Unit 10 Appendix 312 10 ...

Page 1632: ...otype Imaging Inc Apple AppleTalk Bonjour Macintosh and Mac OS are trademarks of Apple Inc registered in the U S and other countries Solaris is a trademark or registered trademark of Sun Microsystems Inc in the United States and other countries LINUX is the registered trademark of Linus Torvalds in the U S and other countries RED HAT is a registered trademark of Red Hat Inc Other product names use...

Page 1633: ...erver 2003 Web Edition Microsoft Windows Server 2003 Datacenter Edition The product names of Windows Server 2003 R2 are as follows Microsoft Windows Server 2003 R2 Standard Edition Microsoft Windows Server 2003 R2 Enterprise Edition Microsoft Windows Server 2003 R2 Datacenter Edition The product names of Windows Server 2008 are as follows Microsoft Windows Server 2008 Standard Microsoft Windows Se...

Page 1634: ... Encrypt Address Book 218 Encrypting Data on the Hard Disk 124 Encrypting the Data in the Address Book 120 Encryption Key Auto Exchange Manual Settings Shared Settings 192 Encryption Key Auto Exchange Security Level 192 Encryption Key Auto Exchange Setting Items 194 Encryption Key Auto Exchange Settings Configuration Flow 200 Encryption Key Manual Settings Configuration Flow 205 Encryption Key Man...

Page 1635: ... 18 Self Signed Certificate 182 Service Mode Lock 225 Setting Up the Machine 14 Settings SNMPv1 and v2 220 Simple Encryption 220 SNMPv3 188 Specifying a Group Password for PDF Files 178 Specifying an IPP Authentication Password 179 Specifying Login Details 56 Specifying Menu Protect 143 SSL 185 SSL Secure Sockets Layer 181 SSL TLS Encryption 186 Supervisor 22 241 Symbols 10 System Settings 281 T t...

Page 1636: ...Copyright 2008 ...

Page 1637: ...Operating Instructions Security Reference Type for 917SPF LD117SPF MP 171SPF Aficio MP 171SPF Type for 917F LD117F MP 171F Aficio MP 171F Type for 917 LD117 MP 171 Aficio MP 171 D069 6951 EN USA ...

Page 1638: ...lement Read this manual carefully before you use this machine and keep it handy for future reference For safe and correct use be sure to read the Safety Information in About This Machine before using the machine ...

Page 1639: ...nctions and settings that may not be available for your model Functions and supported operating systems may differ from those of your model Trademarks UNIX is a registered trademark of The Open Group PostScript is registered trademark of Adobe Systems Incorporated Sun SunOS and Solaris are trademarks or registered trademarks of Sun Microsystems Inc in the U S and other countries HP UX and PCL are ...

Page 1640: ...hod 14 Printing with lpr lp 14 Printing with rsh rcp ftp 15 Printer Status 17 Viewing the Print Job Status with lpq and lpstat 17 Viewing the Printer Status with rsh and ftp 17 Copying Information to a File 18 Specifying the Device Option 19 Configuring the Device Option 19 Printer Language 22 Text Printing 22 Input Tray 23 Paper Size 24 Paper Type 25 Output Tray 26 Copies 26 Collating 27 Duplex P...

Page 1641: ...inals or loss of data Be sure to read these explanations Indicates supplementary explanations of the machine s functions and instruc tions on resolving user errors This symbol is located at the end of sections It indicates where you can find fur ther relevant information Indicates the names of keys that appear on the machine s display panel Indicates the names of keys on the machine s control pane...

Page 1642: ...Use the installation shell script to register the device option as well as the printer host name and the IP address See p 4 Using the Installation Shell Script B Start printing See p 14 Printing Method Using the rsh rcp ftp commands A Edit the host file to register the printer host name and the IP address B Start printing See p 14 Printing Method Reference See p 8 After Executing the Installation ...

Page 1643: ...p telnet may not be usable with Red Hat 7 1 or later Change the security level to allows use of rsh rcp telnet For details about how to change the setting see the operating instructions for Red Hat When you use NIS Network Information Service or DNS you should con figure the server before running the installation shell script Installation shell script does not support CUPS For details about the se...

Page 1644: ...cedure uses the sample IP address 192 168 15 16 A Enter the following ping 192 168 15 16 If the address has been configured correctly the following message appears 192 168 15 16 is alive If the address has been configured incorrectly the following message ap pears no answer from 192 168 15 16 Note When you use NIS the IP address and host name are written to etc hosts on the master server When you ...

Page 1645: ...tallation shell script B Run the installation shell script sh install Insert a period and slash before the current directory C Enter a number to select the workstation operating system that you are us ing Network printer install shell Select your workstation OS type 1 SunOS 4 x x 2 Solaris 2 x Solaris 7 9 SunOS5 x 3 HP UX 4 UnixWare 5 Linux 6 OpenServer 7 Quit Enter 1 7 2 If you select 7 the insta...

Page 1646: ... 0 256 for Solaris 8 and Red Hat Linux 7 0 and 51 for Red Hat Linux 6 2 After setup with the installation shell script is complete and if you entered the IP address in step D the following message appears hosts file is modified H Perform a test print to make sure that the settings are correct lpr Pnp file_name lp d np file_name Note SunOS UnixWare and OpenServer appear on the screen but they are n...

Page 1647: ...printcap and change its rp capability to option setting Solaris HP UX Delete the printer entry and then execute the installation shell script again Select options during the setup process To delete the printer entry follow the procedure below A Stop the scheduler usr sbin lpshut B Delete the printer usr sbin lpadmin x printer_name C Restart the scheduler usr lib lpsched After Executing the Install...

Page 1648: ...icating on the network Each entry is delimited with a space or a tab and each line is separated with a return If you do not use NIS or DNS you must manually enter the IP address and host name of each workstation using the network printer in the etc hosts file Adding an entry to the etc printcap file The following entry is added to the etc printcap file which is the configu ration for printing with...

Page 1649: ... with the character The second and following lines contain the printer s attributes Attributes are represented by two character names referred to as capabilities For de tails about capabilities see the following table Capability Explanation Value required for the network printer rm Host name of the printer The host name that was registered with the etc hosts file rp Optional specification lp will ...

Page 1650: ...r the sd capability in etc print cap Change the owner and group of the directory to root and lp The fol lowing examples show how to make a var spool lpd npd spool directory cd var spool lpd mkdir npd chown root npd chgrp lp npd Making the log file Error messages are logged to a file created in the var log directory The log file name is the printer name followed by d errs Note The log file is used ...

Page 1651: ...ter in the etc hosts file Registering the printer The installation shell script registers the printer as a remote printer following the procedure below A If your workstation is Solaris 2 5 1 register the print server and print client to the print service lpsystem t bsd R 0 y Network Printer nphost B Register the printer as a remote printer lpadmin p np s nphost option T dump I any np is the printe...

Page 1652: ...parated with a return If you do not use NIS or DNS you must manually enter the IP address and host name of each workstation using the network printer in the etc hosts file Registering the printer The installation shell script registers the printer as a remote printer following the procedure below A Stop the scheduler usr lib lpshut B Register the printer usr lib lpadmin Pnp v dev null mrmodel ormn...

Page 1653: ...2 lp d np file1 file2 Note printer_name is the name entered when executing the installation shell script You can use wild cards or for the file name The message print session full appears when the maximum number of print requests has been reached max 5 sessions Job Spool setting availa ble You should try to print again when the number of requests is less than five You can check the number of print...

Page 1654: ... is 3 rsh rsh host_name print file_name For example host name is nphost file name is file1 rsh nphost print file1 Note host_name is the name entered when executing the installation shell script If you are using HP UX use the remsh command instead of rsh rcp To specify and print the file rcp file_name file_name host_name For example host name is nphost file names are file1 and file2 rcp file1 file2...

Page 1655: ...print a file using ftp It is not possible to set options with the mput command A Start ftp using the IP address or host name of the printer ftp IP_address B Enter the user name Skip the password and then press the RETURN EN TER key Name Password C Set the file transfer mode to binary ftp bin If the file transfer mode is not set to binary the image may not be printed cor rectly D Print the file For...

Page 1656: ...Linux lpq Pprinter_name For example Printer name is np lpq Pnp System V UNIX Solaris HP UX lpstat o printer_name For example Printer name is np lpstat o np Note If you are using HP UX do not put a space between o and printer name Viewing the Printer Status with rsh and ftp Use the rsh or ftp command to display printer status or information about print jobs using specified parameters You can use th...

Page 1657: ...o a file You can use these commands for BSD and System V UNIX Important The same parameters are used as those above rcp rcp host_name parameter file_name ftp ftp host_name User user_name password ftp get parameter file_name Note Leave the user name and password blank and then press the RETURN EN TER key Parameter Information returned stat Status of the printer Information about print jobs info Inf...

Page 1658: ...1 file_name rcp rcp file_name host_name option1 value1 ftp ftp put file_name option1 value1 Host_name is the printer host name File_name is the file name you want to print The device option is specified in the form of option value For details about types of device options and values see the following explanations For example the following settings are for printing with rsh rcp and ftp switch to Po...

Page 1659: ...lt You must create another printer if you want to change printer option settings For de tails about changing the configured option see p 8 Deleting the printer When printing with the lp command use _ instead of and instead of for operating systems that cannot use and such as Solaris 2 5 or later Using the cd command with ftp For printing with ftp if the option is specified using the cd command it ...

Page 1660: ...o col late qty Number of collated sets 1 999 Specifies the number to cop ies duplex on off Specifies whether duplex printing is on or off binding longedge shortedge left right top Specifies the binding direction for duplex printing orientation portrait landscape Specifies the feed direction of the paper image direction normal reverse Specifies the print image rota tion resolution value of resoluti...

Page 1661: ...rint filetype postscript file1 rcp rcp file1 nphost filetype postscript ftp ftp put file1 filetype postscript Text Printing Set this function when printing text files directly filter text The following sample shows how to print text files directly rsh rsh nphost print filter text file1 rcp rcp file1 nphost filter text ftp ftp put file1 filter text Printer language Value PCL 5c or PCL 5e pcl PostSc...

Page 1662: ... available tray value of input tray The following sample shows how to print from tray 2 host name nphost file name file1 rsh rsh nphost print tray tray2 file1 rcp rcp file1 nphost tray tray2 ftp ftp put file1 tray tray2 Input tray Value Tray 1 tray1 Tray 2 tray2 Tray 3 tray3 Bypass tray bypass Auto Tray Select all ...

Page 1663: ... paper size The following sample shows how to print using A4 size paper host name nphost file name file1 rsh rsh nphost print paper a4 file1 rcp rcp file1 nphost paper a4 ftp ftp put file1 paper a4 Paper size Value A4 a4 A5 a5 B5JIS Japanese Industrial Standard jisb5 81 2 11 letter 51 2 81 2 halfletter 81 2 14 legal 71 4 101 2 executive 8 13 fgl 81 2 13 foolscap 81 4 13 folio 41 8 91 2 com10 6 38 ...

Page 1664: ...phost print mediatype recycled file1 rcp rcp file1 nphost mediatype recycled ftp ftp put file1 mediatype recycled Paper type Value Plain paper recycled paper plainorrecycled Plain paper plain Recycled paper recycled Special paper special Thick paper thick OHP transparency transparency Color paper color Letterhead letterhead Preprinted paper preprinted Prepunched paper prepunched Labels labels Bond...

Page 1665: ...er host name nphost file name file1 rsh rsh nphost print outbin upper file1 rcp rcp file1 nphost outbin upper ftp ftp put file1 outbin upper Copies Specify the number of copies copies number of copies 1 to 999 Important Do not specify copies and qty 1 commands at the same time 1 qty specifies the number of collated sets The following sample shows how to print 10 copies host name nphost file name f...

Page 1666: ...The duplex unit is required duplex value of duplex printing The following sample shows how to set duplex printing host name nphost file name file1 rsh rsh nphost print duplex on binding longedge file1 rcp rcp file1 nphost duplex on binding longedge ftp ftp put file1 duplex on binding longedge Note Before selecting duplex the binding option must be set to on Data and paper volume affect the complet...

Page 1667: ...binding host name nphost file name file1 rsh rsh nphost print duplex on binding longedge file1 rcp rcp file1 nphost duplex on binding longedge ftp ftp put file1 duplex on binding longedge Note Before selecting the binding option the duplex option must be set to on Data and paper volume affect completion of the print job Binding direction Value Longedge longedge Shortedge shortedge Left left Right ...

Page 1668: ...p rcp file1 nphost orientation portrait ftp ftp put file1 orientation portrait Image Direction Select the print image rotation imagedirection value of print image rotation The following sample shows how to print the 180 degrees rotation using the im agedirection function host name nphost file name file1 rsh rsh nphost print imagedirection reverse file1 rcp rcp file1 nphost imagedirection reverse f...

Page 1669: ...1 MAX 228 bytes 255byte Max number of characters allowed for each PJL command line on GW PJL source 27 bytes number of characters for PJL SET BILLING CODE CR LF rsh rsh nphost print billingcode 0x09 file1 rcp rcp file1 nphost billingcode 0x09 ftp ftp put file1 billingcode 0x09 Note Note that PJL syntax allows unlimited spaces for example more than one space can be placed between PJL and SET or bef...

Page 1670: ...ouble quotation marks Some operating systems cannot forward the user code if it is inside double quo tation marks If this is the case include escape characters such as back slashes 0x5c in place of double quotation marks rsh rsh nphost print usercode 12345 file1 rcp rcp file1 nphost usercode 12345 ftp ftp put file1 USERCODE 12345 Note If you are printing with the ftp command enter the user code in...

Page 1671: ...sktop ISO 4 iso4 ISO 6 iso6 ISO 11 iso11 ISO 15 iso15 ISO 17 iso17 ISO 21 iso21 ISO 60 iso60 ISO 69 iso69 ISO L1 isol1 ISO L2 isol2 ISO L5 isol5 Legal legal Math 8 math8 MS Publ mspubl PC 8 pc8 PC 850 pc850 PC 852 pc852 PC 8 D N pc8dn PC8 TK pc8tk Pifont pifont PS Math psmath PS Text pstext Roman 8 roman8 VN Intl vnintl VN Math vnmath VN US vnus Win 3 0 win30 Win L1 winl1 ...

Page 1672: ...The following sample shows how to print the ISO 4 character set host name nphost file name file1 rsh rsh nphost print symset iso4 file1 rcp rcp file1 nphost symset iso4 ftp ftp put file1 symset iso4 Win L2 winl2 Win L5 winl5 Font Value ...

Page 1673: ... the printer 8 Printer Status 17 Printing Method 14 I Image direction Option 29 Input Tray Option 23 Installation Shell Script 4 6 8 IP Address 5 L Linux Deleting the printer 8 Printer Status 17 Printing Method 14 lp Printing 14 lpr Printing 14 O Orientation Option 29 Output Tray Option 26 P Paper Size Option 24 Paper Type Option 25 Printer Language Option 22 Printer Status 17 ftp 17 rsh 17 Printi...

Page 1674: ...35 S Solaris Deleting the printer 8 Printer Status 17 Printing Method 14 Symbol Set Option 32 System V UNIX Printer Status 17 T Text Printing Option 22 U UNIX 3 User code Option 31 ...

Page 1675: ...36 GB GB EN USA AE AE D468 6801 ...

Page 1676: ...Copyright 2008 ...

Page 1677: ...UNIX Supplement GB GB EN USA AE AE D468 6801 ...

Page 1678: ...en Using the Printer Function Troubleshooting When Using the Scanner Function Clearing Misfeeds Appendix 1 2 3 4 5 6 Read this manual carefully before you use this machine and keep it handy for future reference For safe and correct use be sure to read the Safety Information in About This Machine before using the machine Troubleshooting Operating Instructions ...

Page 1679: ......

Page 1680: ...leshooting When Using the Copy Function Messages Displayed When Using the Copy Function 21 When You Cannot Make Clear Copies 23 When You Cannot Make Copies As Wanted 26 When Memory Is Full 29 3 Troubleshooting When Using the Facsimile Function Adjusting the Volume 31 Messages Displayed When Using the Facsimile Function 34 When You Cannot Send or Receive Fax Messages As Wanted 45 When Memory Is Ful...

Page 1681: ...ing When Using the Scanner Function When Scanning Is Not Done As Expected 77 When You Cannot Send Scanned Files 79 When You Cannot Browse the Network to Send a Scan File 79 When the TWAIN Driver Cannot Be Started 79 When the Network Delivery Function Cannot Be Used 79 When S MIME Cannot Be Used 80 When You Cannot Send Scan Files Using WSD 80 Operations Are Not Possible When Messages Are Displayed ...

Page 1682: ...7 Appendix Trademarks 97 INDEX 99 4 ...

Page 1683: ...nsumables Troubleshooting Provides a guide for resolving common usage related problems Copy Reference Explains Copier functions and operations Also refer to this manual for explanations on how to place originals Facsimile Reference Explains Facsimile functions and operations Printer Reference Explains Printer functions and operations Scanner Reference Explains Scanner functions and operations Netw...

Page 1684: ... Guide Quick Reference Fax Guide Quick Reference Printer Guide Quick Reference Scanner Guide Manuals for DeskTopBinder Lite DeskTopBinder Lite Setup Guide DeskTopBinder Introduction Guide Auto Document Link Guide Manuals provided are specific to machine types For UNIX Supplement please visit our Web site or consult an authorized dealer This manual includes descriptions of functions and settings th...

Page 1685: ...ges as a result of handling or operating the machine For good copy quality the supplier recommends that you use genuine toner from the supplier The supplier shall not be responsible for any damage or expense that might result from the use of parts other than genuine parts from the supplier with your office products 7 ...

Page 1686: ...ser errors This symbol is located at the end of sections It indicates where you can find further relevant information Indicates the names of keys that appear on the machine s display panel Indicates the names of keys on the machine s control panel Indicates instructions in book form Indicates instructions in sheet form Indicates instructions stored in a file on a provided CD ROM Indicates online i...

Page 1687: ...this machine refer to the inch version Some illustrations in this manual might be slightly different from the machine Certain options might not be available in some countries For details please contact your local dealer Depending on which country you are in certain units may be optional For details please contact your local dealer 9 ...

Page 1688: ...rohibited by local law bank notes revenue stamps bonds stock certificates bank drafts checks passports driver s licenses The preceding list is meant as a guide only and is not inclusive We assume no responsibility for its completeness or accuracy If you have any questions concerning the legality of copying or printing certain items consult with your legal advisor 10 ...

Page 1689: ...when the machine requires the user to remove misfed paper to add paper or to perform other procedures Indicator Status Error indicator Appears when there is a misfeed a cover is left open or another problem occurs See p 93 Clearing Misfeeds Load Paper indicator Appears when paper runs out See Loading Paper About This Machine Add Toner indicator Appears when toner runs out See Adding Toner About Th...

Page 1690: ...p and is ready for use Five short beeps repeated five times Strong alert The machine requires user attention because paper has jammed the toner needs replenishing or other problems have occurred Users cannot mute the machine s beep alerts When the machine beeps to alert users of a paper jam or toner request if the machine s covers are opened and closed repeatedly within a short space of time the b...

Page 1691: ...This Machine An error has occurred The function whose indicator is lit is defective Record the code number shown in the display and contact your service representative See Messages Displayed of each chapter You can use other functions normally The machine is unable to connect to the network A network error has occurred Check the displayed message and take an appropriate action See Messages Display...

Page 1692: ...the Copy Function p 34 Messages Displayed When Using the Facsimile Function p 59 Messages Displayed When Using the Printer Function p 82 Messages Displayed When Using the Scanner Function 1 When the Machine Does Not Operate As Wanted 14 1 ...

Page 1693: ...tion Functions appear in the User Tools menu when they become ready for use Wait a little longer The operation switch indicator continues blinking and does not turn off when pressed This occurs in the following cases The exposure glass cover or ADF is open The machine is communicating with external equipment The hard disk is active Close the ADF Check if the machine is communicating with external ...

Page 1694: ...artridge Wait for a while If the message does not disappear in two minutes contact your service representative The user code entry screen is displayed Users are restricted by User Code Authentication Enter the user code up to eight digits and then press the OK or key The Authentication screen appears Basic Authentication Windows Authentication LDAP Authentication or Integration Server Authenticati...

Page 1695: ...Removing Jammed Paper Original images are printed on the reverse side of the paper You may have loaded the paper incorrectly Load paper correctly Place paper in the paper tray with the print side up Bypass tray with the print side down See Loading Paper About This Machine Misfeeds occur frequently The tray s side or end fences may not be set properly Remove the misfed paper See p 93 Removing Jamme...

Page 1696: ...Settings and thenpressthe OK key Then select No Display Plain Paper or Recycled Paper for Paper Type press Duplex and then select On See Tray Paper Settings Network and System Settings Guide If you cannot make copies as you want because of paper type paper size or paper capacity problems use recommended paper See Recommended Paper Sizes and Types About This Machine 1 When the Machine Does Not Oper...

Page 1697: ...lti accessing Combination Chart Function Compatibility The chart shows Function Compatibility when Print Priority is set to Interleave For details about Print Priority see System Settings Network and System Settings Guide Simultaneous operations are possible Operation is enabled when the relevant function key is pressed and remote switching of the scanner is done Operation is performed automatical...

Page 1698: ...le of executing multiple functions simultaneously specify which function should have priority in Print Priority This setting is factory preset to Display mode For details about Print Priority see System Settings Network and System Settings Guide While printing is in progress scanning a document using another function may take longer than usual 1 When the Machine Does Not Operate As Wanted 20 1 ...

Page 1699: ...ve Problems Operating the Machine p 15 When You Have Problems Operating the Machine Message Cause Solution Authentication failed The entered login user name or login password is not correct Inquire the user administrator for the correct login user name and login password Authentication failed Cannot access the authentication server when using Basic Authentication Windows Authentication LDAP Authen...

Page 1700: ...re is placed at nn The number of copies exceeds the maximum copy quantity You can change the maximum copy quantity from Max Number of Sets under Copier Features For details about Max Copy Quantity see User Tools Menu Copy Reference Original with this length cannot be duplex scanned The specified custom length is not available for duplex printing from the ADF e g 2 Sided 2 Sided 2 Sided 1 Sided 2 S...

Page 1701: ...Copies contain blots or are patchy Image density is too light Adjust the image density See Adjusting Copy Image Density Copy Reference Copies contain blots or are patchy The paper is damp Use paper that has been stored in the recommended temperature and humidity condition See Paper Storage About This Machine Copies are too dark or too light The correct paper type settings are not made Check the pa...

Page 1702: ...Maintaining Your Machine About This Machine Copies are too light Image density is too light Adjust the image density settings See Adjusting Copy Image Density Copy Reference Copies are too light A light copy may result when you use damp or rough grain paper Use recommended paper only and be sure its storage environment meets the recommended temperature and humidity conditions For details about rec...

Page 1703: ...e originals down When using the ADF face them up See Placing Originals Copy Reference A moiré pattern is produced on copies Your original has a dot pattern image or many lines Place the original on the exposure glass at a slight angle Black spots appear on the copy of a photographic print Because of high humidity the photographic print has stuck to the exposure glass Place the print on the exposur...

Page 1704: ...n Use recommended paper See Recommended Paper Sizes and Types About This Machine Misfeeds occur frequently The copy paper is wrinkled or has been folded creased Use recommended paper only and be sure its storage environment meets the recommended temperature and humidity conditions For details about recommended paper and the proper way to store it see Recommended Paper Sizes and Types and Paper Sto...

Page 1705: ...covers are properly closed Edges of sheets are creased The paper is damp Use paper that has been stored in the recommended temperature and humidity condition See Paper Storage About This Machine Sheets are feeding in together resulting in jams Sheets are sticking together Fan the pages to loosen the paper before loading it Alternatively feed the paper one sheet at a time Edit Problem Cause Solutio...

Page 1706: ... order When placing a stack of originals in the ADF the last page should be on the bottom If you place an original on the exposure glass start with the first page to be copied Duplex Problem Cause Solution Cannot print in duplex mode You have loaded paper on the bypass tray Remove paper loaded on the bypass tray Load paper in Tray 1 3 Cannot print in duplex mode You have loaded paper exceeding 90 ...

Page 1707: ...t copied The margin is too wide Set a narrower margin with User Tools See UserToolsMenu CopyReference Partsoftheoriginalimageare not copied There is a lack of margin space on the opposite side of the binding position Set a narrower margin with User Tools See UserToolsMenu CopyReference When Memory Is Full This section describes likely causes of and possible solutions for problems related to full m...

Page 1708: ...2 Troubleshooting When Using the Copy Function 30 2 ...

Page 1709: ...ing sounds that the machine makes On Hook Mode Heard when the On Hook Dial key is pressed At Transmission Heard when Immediate Transmission is performed At Reception Heard when the machine receives a document At Dialing Heard after pressing the Start key until the line connects to the destination At Printing Heard when a received document is printed 1 Press the User Tools Counter key BQP008S 2 Sel...

Page 1710: ...elect the item you want to adjust using or and then press the OK key 6 Select the volume using or and then press the OK key Press the Escape key to cancel the setting and the display returns to that of step 5 7 Press the User Tools Counter key BQP008S The standby display appears 3 Troubleshooting When Using the Facsimile Function 32 3 ...

Page 1711: ...en you press the On Hook Dial key See On Hook Dial Facsimile Reference If the extended security function prevents you from changing this setting contact the administrator You can set the volume level to between 0 and 7 Adjusting the Volume 33 3 ...

Page 1712: ...ssage Clear Stop key was pressed Stop scanning and then press Stop Check whether there are any network problems 13 10 The alias telephone number you entered is already registered on the gatekeeper by another device In Fax Features under IP Fax Settings select H 323 Settings and then check the alias telephone number is correctly programmed You can also use the Web Image Monitor for confirmation See...

Page 1713: ...k administrator Check whether there are any network problems 13 18 Cannot access SIP server In Fax Features under IP Fax Settings select SIP Settings and then check SIP Server IP Address is correctly programmed You can also use the Web Image Monitor for confirmation See the Web Image Monitor s Help Contact the network administrator Check whether there are any network problems 13 24 The password re...

Page 1714: ...and then check the IP address is correctly programmed in Machine IPv4 Address You can also use the Web Image Monitor for confirmation See the Web Image Monitor s Help Contact the administrator Check whether there are any network problems 13 26 The Effective Protocol and SIP Server IP Address settings are different or an incorrect IP address has been registered In System Settings under Interface Se...

Page 1715: ...ctly programmed You can also use the Web Image Monitor for confirmation See the Web Image Monitor s Help In System Settings under File Transfer select SMTP Server and then check Server Name or Port No is correctly programmed You can also use the Web Image Monitor for confirmation See the Web Image Monitor s Help Check that the folder for transfer is correctly specified Check that the computer in w...

Page 1716: ...age Monitor for confirmation See the Web Image Monitor s Help Check that the user name and password of the E mail Account are correctly programmed from File Transfer under System Settings See File Transfer Network and System Settings Guide You can also use the Web Image Monitor for confirmation See the Web Image Monitor s Help Check that the user ID and password for the computer in which the folde...

Page 1717: ... address is programmed In System Settings under File Transfer select POP3 IMAP4 Settings and then check Server Name is correctly programmed You can also use the Web Image Monitor for confirmation See the Web Image Monitor s Help Contact your network administrator Check whether there are any network problems 15 02 Cannot log on to the POP3 IMAP4 server In System Settings under File Transfer select ...

Page 1718: ...File Transfer select Fax E mail Account and then check that User Name and Password are correctly programmed See File Transfer Network and System Settings Guide You can also use the Web Image Monitor for confirmation See the Web Image Monitor s Help Contact your network administrator 3 Troubleshooting When Using the Facsimile Function 40 3 ...

Page 1719: ...See the Web Image Monitor s Help In System Settings under File Transfer select POP3 IMAP4 Settings and then check Server Name is correctly programmed You can also use the Web Image Monitor for confirmation See the Web Image Monitor s Help In System Settings under File Transfer select E mail Communication Port and then check the port number of the POP3 IMAP4 server is correctly programmed You can a...

Page 1720: ... for confirmation See the Web Image Monitor s Help Contact your network administrator Connection with LDAP server has failed Check the server status A network error has occurred and connection has failed Try the operation once more If the message is still shown the network may be crowded In System Settings under Administrator Tools check the settings of LDAP server For details see Programming the ...

Page 1721: ... See Administrator Tools Network and System Settings Guide Memory is full Scanning will be stopped and only scanned page s will be stored The memory is full If you press Exit the machine returns to standby mode and starts transmitting the pages that have been stored Put original back check it and press Start key Original jammed during Memory Transmission Place originals that have not been scanned ...

Page 1722: ...rtDeviceMonitor for Admin or Web Image Monitor Wait with the main power switch on The machine will enter standby mode after it exits from RDS mode You do not have a privilege to use this function Use of this function is restricted Contact the administrator If Check whether there are any network problems appears the machine is not correctly connected to the network or the settings of the machine ar...

Page 1723: ...cing Originals Facsimile Reference Transmission failed due to a maximum email size error The size of the Internet fax document exceeds the maximum email size specified on the machine Set Maximum E mail Size under E mail Settings to Off or set the maximum e mail size to a larger value Then re send the document See E mail Settings Facsimile Reference LAN Fax Driver does not work The entered login us...

Page 1724: ...er of specified destinations exceeds the maximum number that can be specified as a group A maximum of 100 parties can be specified for a group Check if there are over the specified numbers registered in the address book If a group was registered in another group transmission is canceled but an error message does not appear See Registering Names to a Group Network and System Settings Guide Receptio...

Page 1725: ...ted The paper is fed in at a slant Load the paper correctly See Loading Paper About This Machine Print is slanted The machine s cover is open Make sure the right and lower right covers are properly closed Misfeeds occur frequently The number of sheets loaded exceeds the capacity of the machine Load paper only as high as the upper limit markings on the side fences of the paper tray or bypass tray M...

Page 1726: ... creased The paper is too thin Use recommended paper See Recommended Paper Sizes and Types About This Machine Printed images contain blots or are patchy The machine is not on a level surface The machine must be placed on a stable and level surface Check the environment of location to select an appropriate location See Where to Put Your Machine About This Machine Printed images contain blots or are...

Page 1727: ... may not be fully reproduced Only use recommended paper See Recommended Paper Sizes and Types About This Machine Received image is too light The paper is damp Use paper that has been stored in the recommended temperature and humidity condition See Recommended Paper Sizes and Types and Unusable Paper About This Machine Received image is too light The image density has been set too low The original ...

Page 1728: ...2 hours or longer If any documents have been lost for this reason a Power Failure Report is automatically printed when the machine is turned on If fax documents stored for Memory Transmission have been lost check the destinations and resend the documents If fax documents received through Memory Memory Lock or Substitute Reception have been lost ask the senders to resend the documents See p 53 Turn...

Page 1729: ...ed The memory is full If you press Exit the machine returns to standby mode and starts transmitting the stored pages Check the pages that have not been sent using the Communication Result Report and then resend those pages When You Cannot Send or Receive Fax Messages As Wanted 51 3 ...

Page 1730: ...ntly contact your service representative The Page column gives the total number of pages The Page not sent or Page not received column gives the number of pages not sent or received successfully You can display destinations by configuring the appropriate User Parameter For details about how to do this see Parameter Settings Facsimile Reference You can display sender names by configuring the approp...

Page 1731: ...harged to guard against future data loss Keep the machine plugged in and the main power switch on for about 5 days after the power loss Even if the main power switch is turned off the contents of the machine memory for example programmed numbers will not be lost However if power is lost for about 12 hours because the main power switch is turned off there is a power cut or the power cord is removed...

Page 1732: ...eter Settings Facsimile Reference If Error Mail Notification cannot be sent the Error Report E mail is printed by the machine If an error occurs when an e mail is received via SMTP the SMTP server sends an error e mail to the originator of the document Error Report E mail The Error Report E mail is printed by the machine when it is unable to send an Error Mail Notification Server Generated Error E...

Page 1733: ...This section describes the procedure under Windows 2000 1 On the Start menu point to Settings and then click Printers 2 Double click the Add Printer icon 3 Follow the instructions in Add Printer Wizard If the printer driver is on a CD ROM the location of the driver is DRIVERS PCL6 or PCL5E or PS XP_VISTA language DISK1 If the installer starts click Cancel to quit 4 Specify a port Available ports v...

Page 1734: ...ons in Add Printer Wizard If the printer driver is on a CD ROM the location of the driver is DRIVERS PCL6 or PCL5E or PS XP_VISTA language DISK1 If the installer starts click Cancel to quit 6 Specify a port Available ports vary according to your Windows operating system or the type of interface For details see Preparing the Machine Printer Reference Windows Vista This section describes the procedu...

Page 1735: ...indows Server 2008 1 On the Start menu click Control Panel 2 Click Hardware and Sound 3 Click Printers 4 Click Add a printer 5 Follow the instructions in Add Printer Wizard If the printer driver is on a CD ROM the location of the driver is DRIVERS PCL6 or PCL5E or PS XP_VISTA language DISK1 If the installer starts click Cancel to quit 6 Specify a port Messages Displayed When Installing the Printer...

Page 1736: ...chine on again When the machine has fully booted up reconnect the USB cable Windows has already configured the USB settings Check whether the computer has identified the machine as an unsupported device Open Windows Device Manager and then under Universal Serial Bus controllers remove any conflicting devices Conflicting deviceshave a or icon by them Take care not to accidentally remove required de...

Page 1737: ...b Image Monitor To resume printing via Web Image Monitor check with your system administrator first Offline The machine is offline To start printing switch the machine online by pressing the Online Key Please wait This message may appear for a few seconds It means the machine is initializing or executing maintenance operations Wait a while Printing The machine is printing Wait a while Ready This i...

Page 1738: ...et board Turn off the main power switch and back on again If the message appears again contact your sales or service representative File System Full PDF file do not print out because the capacity of file system is full Delete all unnecessary files from the hard disk or decrease the file size sent to the machine HDD functional problems An error has occurred in the hard disk drive Turn off the main ...

Page 1739: ...ontact your service representative Tray Error An error has occurred with the paper tray indicates the tray number Press JobReset to change the paper tray settings or press Form Feed to select another paper tray and print using that USB Error An error has occurred in the USB interface Turn off the main power switch and back on again If the message appears again contact your sales or service represe...

Page 1740: ...r and then press the OK key 3 Select List Test Print using or and then press the OK key 4 Select Error Log using or and then press the OK key An error log is printed If the main power switch is turned off the log is deleted 4 Troubleshooting When Using the Printer Function 62 4 ...

Page 1741: ...p 59 Messages Displayed When Using the Printer Function Printing does not start The interface cable is not connected correctly Connect the interface cable securely If it has a fastener fasten that securely as well See Connecting to the Interfaces Network and System Settings Guide Printing does not start The correct interface cable is not being used The type of interface cable you should use depend...

Page 1742: ...ide Printing does not start If the machine is using wireless LAN the receiver s MAC address may be preventing communication with the access point Check access point settings when in the infrastructure mode Depending on the access point client access may be limited by MAC address Also check there are no problems in transmission between access point and wired clients and between access point and wir...

Page 1743: ...See Turning On Off the Power About This Machine Change the settings in Network under Interface Settings of System Settings See Interface Settings Network and System Settings Guide If the printing does not start consult your service representative When the Data In Indicator Does Not Light Up or Flash When the Data In indicator does not light up or flash after starting a print job data is not being ...

Page 1744: ...ies 5 Click the Ports tab 6 In the Print to the following port s list confirm the correct port is selected For Windows Vista 1 Click the Start button and then click Control Panel 2 Click Hardware and Sound 3 Click Printers 4 Click the icon of the machine On the Organize menu click Properties 5 Click the Ports tab 6 In the Print to the following port s list confirm the correct port is selected For ...

Page 1745: ...This Machine The print on the entire page is faded If the Toner Saving is selected in the printer driver settings the entire page will be faded when printed PCL 5e On the Print Quality tab select Off in the Toner Saving area PCL 6 On the Detailed Settings tab select Off in the Toner Saving box on the Print Quality PostScript 3 On the Detailed Settings tab select Off in the Print Mode box on the Pr...

Page 1746: ...andTypes and UnusablePaper About This Machine Images smudge when rubbed Toner is not fixed The specified paper type and the paper that is actually loaded might be different For example thick paper might be loaded but not specified as the paper type PCL 5e On the Paper tab select a proper paper type in the Type box PCL 6 On the One Click Presets tab select a proper paper type in the Paper Type box ...

Page 1747: ... printer driver and check the machine is the designated printer See Setting Up the Printer Driver Printer Reference Print result differs from the display Data transmission failed or was cancelled during printing Check whether there is failed or cancelled data remaining See Checking the Error Log Printer Reference Characters differ from the display The loaded paper is unsuitable Printing on recomme...

Page 1748: ...n the Paper Source list select the desired input tray Some types of data such as graphics data or data from certain applications do not print The correct printer driver settings are not made PCL 5e On the Print Quality tab select 600 dpi in the Resolution area PCL 6 On the Detailed Settings tab select Quality in the Print Priority box on the Print Quality On the Detailed Settings tab select Raster...

Page 1749: ...hering box on the Print Quality See the printer driver Help Print speed or application relinquishing speed is slow The correct printer driver settings are not made Only when using PCL 6 On the Detailed Settings tab select Speed in the Print Priority box on the Print Quality See the printer driver Help Quit any other applications Print ends mid job An error might have occurred Check the machine s d...

Page 1750: ...ter settings Print is slanted The paper is feeding in at a slant Load the paper correctly See Loading Paper About This Machine Print is slanted The machine s cover is open Make sure the right and lower right covers are properly closed Misfeeds occur frequently The number of sheets loaded exceeds the capacity of the machine Load paper only as high as the upper limit markings on the side fences of t...

Page 1751: ... About This Machine Copy paper becomes creased The paper is too thin Use recommended paper See Recommended Paper Sizes and Types About This Machine Garbled characters are printed The correct printer language mighthavenotbeenselected Set the correct printer language Images are printed in the wrong orientation The feed orientation you selected and the feed orientation selected in the printer driver ...

Page 1752: ...y in the printing preferences dialog box PCL 6 Select Speed for the Print Priority list on the Print Quality in the printing preferences dialog box PostScript3 If your operating system is Windows select Optimize for Speed in the PostScript Output Option list in PS Options on the Detailed Settings tab Graphics print out differently to how they appear on screen If the printer driver is configured to...

Page 1753: ...size and orientation settings match those of the printer driver If a different paper size and orientation are set select the same size and orientation The print job is not canceled even when the machine is switched to offline status Even when the machine is offline printing is performed when Job Acceptance Priority is selected for Signal Control in Parallel Interface in Interface Settings under Sy...

Page 1754: ...ngs are not made Make sure the application s paper size and orientation settings match those of the printer driver If a different paper size and orientation are set select the same size and orientation A print instruction was issued from the computer but printing did not start User code management may have been set Ask the administrator about valid user codes To print the user code must be entered...

Page 1755: ...against the exposure glass The scanned image is upside down The original was placed upside down Place the original in the correct orientation See Specifying Send Options Scanner Reference No image results from scanning The original was placed with the front and back reversed When the original is placed directly on the exposure glass the side to be scanned must face down When the original is fed vi...

Page 1756: ...er than the network TWAIN scanner function certain paper size and resolution settings may produce scanned images that are larger than the specified size because of margins being added to the sides Scanning at a higher resolution may reduce the margins 5 Troubleshooting When Using the Scanner Function 78 5 ...

Page 1757: ...dSystemSettings Guide When the TWAIN Driver Cannot Be Started This section describes likely causes of and possible solutions for the TWAIN driver related problems Problem Cause Solution The Scanner Properties dialog box cannot be displayed Advanced encryption has been specified in the extended security setting For details about the extended security setting contact an administrator When the Networ...

Page 1758: ...Contact the administrator for details about destination settings When putting a signature on an e mail using S MIME an e mail address for Sender is not set for From When S MIME is applied the administrator appears in the From field and the sender appears in the Reply to field Contact the administrator Scanning cannot be completed when if S MIME has been specified Insufficient memory IfS MIMEhasbee...

Page 1759: ...ta Fordetails seeyour operating system s Help Operations Are Not Possible When Messages Are Displayed This section describes likely causes of and possible solutions for messages that appear and when the machine fails to operate Message Cause Solution Updating destination list Reselect destination s or sender s name later The destination list is being updated from the network using SmartDeviceMonit...

Page 1760: ...te Contact the administrator Cannot communicate with PC Contact the administrator WSD Device protocol or WSD Scanner protocol is disabled Use IPv4 or IPv6 located in Configuration in Web Image Monitor to enable WSD Device and WSD Scanner Cannot enter manually more than nnn destinations A figure is placed at nnn The e mail has too many nnn or more destinations Split the destinations into two or mor...

Page 1761: ...ight be incompatible with this machine Check the file name set at the time of scanning For details on the characters that can be used in file names see Values of Various Set Items for Transmission Delivery Function Scanner Reference Check with your system administrator Check the resolution and reset nnn original s A figure is placed at nnn The scanned original exceeded maximum data capacity Specif...

Page 1762: ...tered user name or password was invalid Check that the user name and password are correct Check that the ID and password for the destination folder are correct A password of 128 or more characters may not be recognized Destination list has been updated Selected destinations sender will be cleared A specified destination or sender s name was cleared when the destination list in the delivery server ...

Page 1763: ...emory capa Scanning will be cancelled Scanned data will be cleared The memory is full Try one of the following measures Wait for a while and then retry the scan operation Reduce the scan area or scanning resolution Delete unneeded stored files Exceeded max number of alphanumeric characters The correct protection code was not entered Make sure the protection code is correct and then enter it again ...

Page 1764: ...mory device error Check the memory device A non writable medium is being used Use a different medium Memory device not detected Insert the device There is no memory device inserted Insert a memory device or check to see whether the memory device is properly inserted in the media slot Memory is full Press Write to write current scanned data to memory device Or press Cancel to delete The scan could ...

Page 1765: ...s name Sending failed Check settings and check Scanned File Status While a file was being sent a network error occurred and the file could not be sent correctly Try the operation once more If the message is still shown the network may be crowded Contact the administrator Pressthe JobInformation keytodisplay the transmission results and then check which job has not been sent See Confirmation Displa...

Page 1766: ...ank Page Detect function Be sure to place your originals correctly For details about determining the cause of blank pages see Scan Settings Scanner Reference Specified group contains some invalid dest Do you want to select only valid dest The specified group contains some destinations for sending by e mail and some destinations for sending by Scan to Folder To select destinations for sending by e ...

Page 1767: ...or driver encryption key was invalid Check the login user name login password and driver encryption key Permission to use this function has not been granted Contact the administrator Cannot add any more scanning mode The maximum number of registerable scan modes has been exceeded The maximum number of modes that can be stored is 99 Delete unneeded modes Cannot connect to the scanner Check the netw...

Page 1768: ...s been exceeded The maximum number of scanning areas that can be stored is 99 Delete unneeded scanning area Clear Misfeed s in ADF A paper misfeed has occurred inside the ADF Remove jammed originals and place them again For details see p 93 Removing Jammed Paper Check whether the originals are suitable to be scanned by the machine Communication error has occurred on the network A communication err...

Page 1769: ...TWAIN driver and then reinstall it after restarting the computer Insufficient memory Reduce the scanning area Scanner memory is insufficient Reset the scan size Lower the resolution Set with no compression See TWAIN Driver help Theproblemmaybeduetothefollowing cause Scanning cannot be performed if large values are set for brightness when using halftone or high resolution See Relationship between R...

Page 1770: ...correctly Deselect the personal firewall function of the client computer For details see Windows Help Use an application such as telnet to make sure SNMPv1 or SNMPv2 is set as the machine s protocol See Connecting the Machine and Using telnet Network and System Settings Guide Scanner is not ready Check the scanner and the options The ADF cover is open Check whether the ADF cover is closed The name...

Page 1771: ... misfeeds do not turn off the operation switch If you do your copy settings will be lost To prevent misfeeds do not leave any torn scraps of paper inside the machine Contact your service representative if misfeeds occur frequently The internal parts of the machine may be hot Wait for the duplex unit to cool down before clearing a paper jam in the unit When removing jammed sheets take care to touch...

Page 1772: ...BQP004S When A is displayed BQP005S 6 Clearing Misfeeds 94 6 ...

Page 1773: ...When P is displayed BQP003S When Y1 is displayed BQP006S Removing Jammed Paper 95 6 ...

Page 1774: ...When Y2 is displayed BQP007S 6 Clearing Misfeeds 96 6 ...

Page 1775: ... follows The product names of Windows 2000 are as follows Microsoft Windows 2000 Professional Microsoft Windows 2000 Server Microsoft Windows 2000 Advanced Server The product names of Windows XP are as follows Microsoft Windows XP Professional Microsoft Windows XP Home Edition Microsoft Windows XP Media Center Edition Microsoft Windows XP Tablet PC Edition The product names of Windows Vista are as...

Page 1776: ... product names of Windows Server 2008 are as follows Microsoft Windows Server 2008 Standard Microsoft Windows Server 2008 Enterprise Microsoft Windows Server 2008 Datacenter Other product names used herein are for identification purposes only and might be trademarks of their respective companies We disclaim any and all rights to those marks 7 Appendix 98 7 ...

Page 1777: ...Legal Prohibition 10 M Manuals for this machine 5 Memory is full 29 Messages displayed 21 34 59 82 Messages displayed on the client computer 89 Messages displayed on the control panel when using the scanner function 82 Messages displayed when installing the printer driver 55 Multi accessing 19 N Names of major item 8 Network connection 65 Network delivery function cannot be used 79 Notes 9 Notice ...

Page 1778: ...n the data in indicator does not light up or flash 65 When the Function Status Indicator Lights Up in Red 13 When the machine is connected to the computer using the interface cable 65 When Y1 is displayed 95 When Y2 is displayed 96 When you cannot print clearly 67 When You Cannot Send Scan Files Using WSD 80 Windows 2000 55 Windows Server 2003 2003 R2 55 Windows Server 2008 57 Windows Vista 56 Win...

Page 1779: ...Copyright 2008 ...

Page 1780: ...Operating Instructions Troubleshooting Type for 917SPF LD117SPF MP 171SPF Aficio MP 171SPF Type for 917F LD117F MP 171F Aficio MP 171F Type for 917 LD117 MP 171 Aficio MP 171 D069 6852 EN USA ...

Reviews: