background image

1

.7

Getting Started

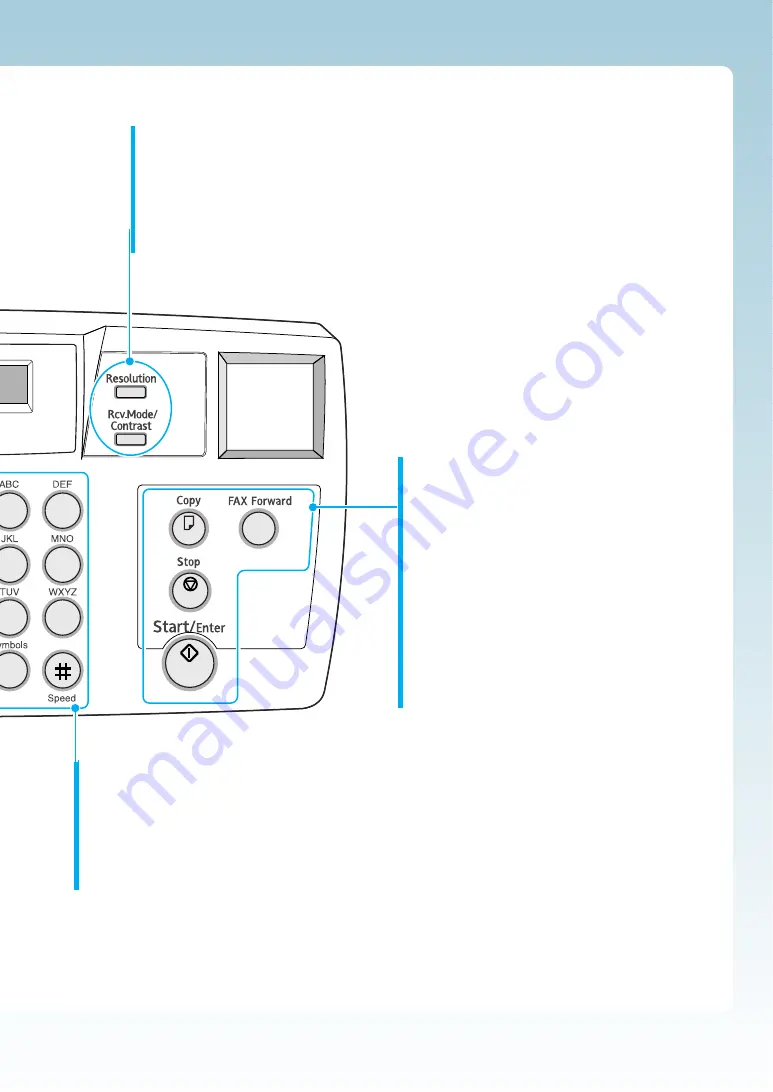
Rcv. Mode/Contrast

When a document is loaded

, choose the contrast characteristic of copied 

or transmitted documents.

When a document is not loaded

, choose the receive mode to use. 

The selected mode is displayed in Standby mode.

Resolution

Choose the resolution of documents.

Number Keypad 

Use to enter fax numbers manually or to
enter letters. 

Speed(#)

Use to send documents by entering a
registered 2-digit number. 

Fax Forward

Allows you to forward the received faxes to
the defined remote fax machine at a specified
duration.

Copy

Makes a copy of a document.

Start/Enter

Starts a job. Also use to activate the selection
shown on the display. 

Stop

Stops an operation at any time.  

JKL

MNO

TUV

WXYZ

ymbols

Speed

Rcv. Mode/

Contrast

Resolution

2

3

5

6

0

8

9

Summary of Contents for LF115m

Page 1: ......

Page 2: ...indows Windows 95 Windows 98 Windows Me Windows NT Windows 2000 and Windows XP are trademarks of Microsoft corporation Other names and trademarks mentioned in this manual are trademarks of their respective holders ...

Page 3: ... Loading Paper 1 13 Installing the Toner Cartridge 1 16 Setting the Date and Time 1 18 Setting Your Fax Number and Name 1 19 Contents Getting Started Setting Up Stand alone Fax System Setting Volume 2 1 Setting Alert Tones 2 2 Setting User Selectable System Options 2 2 Sending a Fax Preparing Documents for Faxing or Copying 2 7 Setting Document Resolution and Contrast 2 8 Loading Documents 2 9 Sen...

Page 4: ...2 16 Using Advanced Copy Features 2 17 Automatic Dialling How To Enter a Name Using the Number Keys 2 18 One Touch Dialling 2 20 Speed Dialling 2 22 Searching for a Number in the Memory 2 24 Transmission Options Broadcasting 2 25 Delayed Fax 2 26 Priority Fax 2 28 Polling 2 29 Adding Documents To a Scheduled Operation 2 31 Cancelling a Scheduled Operation 2 31 Additional Functions Monitoring a Dua...

Page 5: ...aper Guidelines 3 12 Printing Printing a Document 3 13 Cancelling a Print Job 3 16 Printing Help 3 17 Printing Several Pages Per Sheet 3 18 Scaling Your Document 3 19 Fitting Your Document to a Selected Paper Size 3 20 Printing Posters 3 21 Printing Watermarks 3 22 Using Page Overlays 3 24 Printing in a Network Environment 3 28 Scanning Scanning from a Windows Application 3 30 Type1100 TWAIN for S...

Page 6: ...pany 4 3 Cleaning the Machine 4 4 Managing the Toner Cartridge 4 7 Automatic Document Feeder Rubber Pad Replacement 4 10 4 Maintenance Clearing Paper Jams 5 1 LCD Error Messages 5 5 Fax Problems 5 7 General Printing Problems MFP model only 5 9 Print Quality Problems 5 11 Troubleshooting 5 Connecting Other Devices to the Phone line A 1 Specifications A 4 Safety Information A 6 Index A 13 Appendix ...

Page 7: ...red to be hazardous The laser system and printer are designed so there is never any human access to laser radiation above a Class I level during normal operation user maintenance or prescribed service condition CAUTION Use of controls or adjustment or performance of procedures other than those specified in this manual might result in hazardous radiation exposure WARNING Never operate or service th...

Page 8: ...nd if not installed and used in accordance with the instructions may cause harmful interference to radio communications However there is no guarantee that interference will not occur in a particular installation If this equipment does cause harmful interference to radio or television reception which can be determined by turning the equipment off and on the user is encouraged to try to correct the ...

Page 9: ...Notice to Users in EEA Countries This product complies with the essential requirements and provisions of Directive 1999 5 EC of the European Parliament and of the Council of 9 March 1999 on radio equipment and telecommunications terminal equipment and the mutual recognition of their conformity Notice to Users Accessing Analog PSTN in EEA Countries This product is designed to be able to access anal...

Page 10: ...VIII Memo ...

Page 11: ...ntifying Parts Setting Up Your Machine Choosing a Location Preparing Your Machine for Use Attaching the Supports Connecting to the Phone Line Connecting to the Computer MFP model only Plugging In the Power Loading Paper Installing Toner Cartridge Setting the Date and Time Setting Your Fax Number and Name ...

Page 12: ...uality laserjet printing from this machine You can create professional documents using the creative printing features on the various kinds of print media such as plain papers envelopes transparencies label and so on Print MFP model only Use this product as a full featured stand alone fax machine to send and receive faxes Perform advanced tasks such as delayed transmission broadcasting and unattend...

Page 13: ...ng to connect to a PC You can adjust the contrast enlarge or reduce the copies and collate A A Copy Scan important documents to create electronic files Use the scanner to add photo or graphic images to other software applications or to jazz up your projects Scan MFP model only ...

Page 14: ...nel and a panel sheet for Europe only Contents Here s what comes with this machine Toner cartridge Fax machine These may look different depending on the country Notes You should use the Telephone line cord which is supplied with the machine If you are replacing it with the other vendor s part it should be AWG 26 or lower gage Power cord must be plugged in grounded power socket ...

Page 15: ...ument input support Supports original documents Aligns documents Loads up to 20 pages at a time Supports the original document when faxing copying or scanning is complete Document guides Automatic document feeder Document output support Identifying Scanner Path Parts Items to be faxed copied or scanned use the scanner path which consists of the following parts ...

Page 16: ...follow the printer path This path consists of the following parts Use to feed paper one sheet at a time Supports the printed pages Holds paper Aligns paper Manual paper input tray For MFP model only Support the print media Paper input support Paper output tray Automatic paper input tray Paper guides ...

Page 17: ...ight through the display Also use to adjust the ringer volume Search Delete Use to search for a number in memory or to delete the last digit when typing text Report Help Use to print various reports and the help list Trans Option Use to access advanced fax operations Twenty One Touch Buttons Store frequently dialled fax numbers LCD Display Displays messages and menu settings Status Use to switch t...

Page 18: ... documents Number Keypad Use to enter fax numbers manually or to enter letters Speed Use to send documents by entering a registered 2 digit number Fax Forward Allows you to forward the received faxes to the defined remote fax machine at a specified duration Copy Makes a copy of a document Start Enter Starts a job Also use to activate the selection shown on the display Stop Stops an operation at an...

Page 19: ... Getting Started Identifying Connecting Parts and Others Power cord connector Telephone line jack Extension telephone jack Cover Cover release buttons right and left Parallel cable connector MFP model only ...

Page 20: ...opening the front cover Do not place your machine In direct sunlight Near heat sources or air conditioners In a dusty or dirty environment Preparing Your Machine for Use When you take this machine out the box note that it has been packaged to protect it during shipping Before you use the machine make certain that you check for the following items Remove all tapes Remove all packing materials Setti...

Page 21: ...abs on the document output support into the slots on the front of your machine Note This machine is shipped with the paper output tray already installed Extend the tray to use Fold out the extender if necessary Extender Fold out the extender if necessary Insert one end first then the other end by squeezing this leg inward to make the tray easy to insert Extender Fold out the extender if necessary ...

Page 22: ...g to this wall jack Go to To Connect to a Wall Jack that Has Two Phone Lines on page 1 12 LINE EXT To a standard phone wall jack To Connect to a Wall Jack that has Only One Phone Line 1 Plug the included telephone cord into the jack on the back of the unit marked the word LINE 2 If a telephone cord is plugged into the wall jack unplug the cord and set it aside 3 Plug the other end of the phone cor...

Page 23: ...other devices such as a telephone to the same phone line go to Appendix Connecting Other Devices To the Phone Line on page A 1 If you are not connecting other devices go to Plugging In the Power on page 1 13 Connecting to the Computer MFP model only Your machine has a parallel port which allows use with a Windows PC Connecting to the Computer Using the Parallel interface 1 Plug the supplied parall...

Page 24: ...ion on setting the paper size see Setting User Selectable System Options on page 2 2 1 Pull the paper input support completely out of the unit Paper input support Automatic paper input tray Manual paper input tray only for MFP model Plugging In the Power Plug one end of the cord into the back of the machine and the other end into a standard AC power outlet This machine will turn on and the display...

Page 25: ...on a flat surface to even it up 4 Adjust the paper guides to the width of the print media Slide the guides until they lightly touch the stack of print media Do not bend the print material Paper guide 3 Insert the paper with the print side facing you Place the print side facing you ...

Page 26: ...er side of the paper a different type or another package of the same kind of paper DO NOT use the following types of paper with your machine Continuous form feed paper Synthetic paper Thermal paper Multi sheet forms and documents Chemically treated paper Papers with raised embossed lettering To load paper with a preferred print side If you are using xerographic paper load the paper with the prefer...

Page 27: ...release buttons found on both sides of the machine toward you open the cover 2 Unpack the cartridge from its plastic bag and then remove the paper rolled the cartridge 3 Shake the cartridge from side to side 5 or 6 times to redistribute the toner evenly inside the cartridge ...

Page 28: ...he cartridge slots inside the machine one on each side 6 Close the cover Make sure that the cover is securely closed 5 Grasp the handle at the front of the cartridge and slide it down between the cartridge slots and push it firmly ...

Page 29: ...en press Start Enter If you select USA the date appears in format of Month Day Year The EUROPE format will be displayed in format of Day Month Year The display shows the currently set date and time using the selected date format and asks you to set the month 5 Enter the correct date and time for each item using the number keypad Each time you enter the appropriate number the display asks you to en...

Page 30: ...dy set the number appears 4 Enter the telephone number your machine is connected to You can enter up to 20 digits Press for plus sign and for a hyphen If you entered a wrong number press Search Delete to delete it 5 Press Start Enter when the number on the display is correct If there is a name already set the name appears 6 Enter your name using number keypad You can enter up to 40 characters For ...

Page 31: ...chapter also demonstrates how to use the Transmission Option features and change the settings on the fax system This chapter provides information on the following topics Setting Up Stand alone Fax System Sending a Fax Receiving a Fax Making a Copy Automatic Dialling Transmission Options Additional Functions ...

Page 32: ...display will show the level Setting 0 turns the ringer off The machine will work normally even if the ringer is set to off 3 Press Start Enter to save the setting Speaker Volume 1 Press On Hook Dial to adjust the speaker volume If you cannot hear dial tone check the phone line connection 2 Press or repeatedly until you find the desired loudness The display shows the current volume level 3 After ch...

Page 33: ...g 5 To return to Standby mode press Stop Setting User Selectable System Options Your machine has various user selectable system options These options are preset at the factory but you may need to change them To find out how the options are currently set print the System Data list For more information on printing the list see above Setting an Option 1 Press User Tools on the front panel The display...

Page 34: ...nd DUTCH SEND FROM MEMORY Enables all transmission documents to be automatically scanned into the memory before transmission Select ON to enable Select OFF to disable SENDING CONFIRM A confirmation report shows whether the last transmission was successful or not how many pages were sent etc Select ERROR to print only when an error occurs and the transmission was not successful Select ON to print a...

Page 35: ...or copying a document as long as or longer than the paper installed in your machine you can set the machine to discard any excess image at the bottom of the page to fit onto the recording paper size Enter the desired discard size from 0 through 30 mm using the number keypad If the received page is outside the margin set it will be printed on two sheets of paper at the actual size If the data is wi...

Page 36: ...sates for poor line quality and ensures accurate error free transmission with another ECM equipped facsimile machine If the line quality is poor transmission time may be increased when the ECM is enabled Select ON to enable Select OFF to disable JUNK FAX BARRIER With this feature set to ON the system will only accept a fax sent from the remote station of which the fax number is stored in memory as...

Page 37: ... must be installed on your telephone line by the telephone company To setup Distinctive Ring Pattern Detection you will need another telephone line at your location or someone available to dial your FAX number from outside Select ON to turn this feature on Select OFF to turn this feature off Select SET to setup or change the Distinctive Ring Pattern Detection The LCD displays WAITING RING Call you...

Page 38: ...to the document tray Remove all staples and paper clips before feeding the document Ensure any glue ink or correction fluid on the paper is completely dry before feeding the document Do not feed documents with pages that are different sizes or different thicknesses ACCEPTABLE DOCUMENTS for ADF1 Sending a Fax Effective Scanning Width Number of sheets which can be loaded at a time Thickness of docum...

Page 39: ... FINE 200 X 200 dpi is good for documents containing small characters thin lines or print from a dot matrix printer SUPER FINE 300 X 300 dpi works well for documents containing extremely fine details SUPER FINE works only if the remote machine also has the SUPER FINE features Contrast To compensate for the brightness or darkness of your document press the Rcv Mode Contrast button repeatedly after ...

Page 40: ...ea You can insert up to 20 sheets at a time If you insert more than one sheet ensure the bottom sheet enters first Stagger the leading edge of the document slightly and insert the document with a slight push to ensure they feed smoothly To add pages while the fax is being sent place them on top of the already loaded sheets 4 If necessary use the Resolution and Rcv Mode Contrast buttons to change t...

Page 41: ...he machine is in use Press Stop again Confirming a Transmission When the last document has been sent successfully the machine beeps and returns to the Standby mode If something went wrong during your fax transmission an error message appears on the display For a listing of error messages and their meanings see page 5 5 When you receive an error message press Stop to clear the message and resend th...

Page 42: ...ial memory in your machine retains the last 10 numbers called To search through the redial memory do as follows 1 Press and hold Pause Redial for about 2 seconds 2 Press or to search through the memory until you find the desired number 3 When the desired number appears on the display press Start Enter to dial Answering a Voice Request When the phone rings after receiving a fax pick up the external...

Page 43: ...the answering machine If the fax machine senses a fax tone on the line the call automatically switches to the fax machine Note To use the ANS FAX mode attach an answering machine to the EXT jack on the back of your machine see page A 1 In TEL mode the automatic fax reception is turned off If you pick up the extension telephone and hear fax tones you can receive a fax by pressing Start Enter on the...

Page 44: ... setting when printing reports and determining autoreduction for incoming faxes See page 2 3 to set the paper size Note As for MFP model the printing function does not use this setting If you are loading special sized media only for your current print job do not change this setting After you have finished printing reload the original paper Receiving Automatically in FAX Mode This machine is preset...

Page 45: ...chine will automatically go into FAX mode after 6 rings If your answering machine has a user selectable ring counter set the machine to answer incoming calls within 1 ring If you are in TEL mode manual reception when the answering machine is connected to your machine you must switch off the answering machine or the outgoing message from the answering machine will interrupt your phone conversation ...

Page 46: ...s complete Receiving Manually Using Remote Receive Start Code You can receive a fax from someone you are talking to on the extension telephone without having to go to the fax machine 1 When you receive a call on the extension phone and hear fax tones press the keys 9 star nine star on the extension telephone The machine receives the document Press the buttons slowly in sequence If you still hear t...

Page 47: ...ts from 50 to 130 For MFP model you can reduce or expand the image size by 1 increments from 50 to 200 Print order and sorting When the Collate Copy menu is set to YES the machine sorts the print jobs All pages of the document are printed in reverse order before the next copy is printed For example if you copy a three page job to print 2 copies the machine prints page 3 page 2 page 1 page 3 page 2...

Page 48: ...you need two or more copies enter the desired number and press Start Enter 4 If you want to reduce or expand the image size enter the number of the desired zoom rate then press Start Enter 5 The display asks you to set the Collate Copy menu Press or to choose YES or NO Setting YES will reverse the print order and sort the print job Example 2 copies of a 3 page document 6 When the desired setting i...

Page 49: ...es When the display asks you to enter a name the LCD display reads Use the procedures described below to enter alphanumeric characters special symbols or spaces Entering Alphanumeric Characters You can also include special symbols in the name by using the 0 key See Keypad Character Assignments on the next page 1 Locate the button labelled with the letter you want then press the button repeatedly u...

Page 50: ...he next letter you want If the next letter is printed on the same number button move the cursor right by pressing then press the button The blinking cursor moves right and the next letter appears on the display 3 Select additional letters in the same way When you have finished entering the letters press Start Enter KEYPAD CHARACTER ASSIGNMENTS Key 1 2 3 4 5 6 7 8 9 0 Space 1 A B C 2 D E F 3 G H I ...

Page 51: ...o insert a pause between numbers press Pause Redial a P appears on the display If you make a mistake while entering a number press Search Delete and re enter the correct number Editing Name If you make a mistake while entering a number or name move the cursor under the incorrect digit by or Then press the correct number to change or press Search Delete to delete the number Inserting a Pause While ...

Page 52: ...ress and hold the one touch button where the phone number has been stored 2 Press or to move the cursor to the desired number and edit the number Note When you press the One Touch dial number stored for group dial the display briefly shows G REGISTERED to indicate that the number is used for group dial then you can edit the number 3 When you have finished editing press Start Enter Sending a Fax Us...

Page 53: ... Start Enter 4 To assign a name to the number enter the desired name For information on how to enter names see page 2 19 If you do not want to assign a name skip this step where xx represents the speed location you have selected at step 2 LOC 01 80 Sxx 05512637522 Using Address Label A One touch label sheet is included with your machine As you store numbers in one touch dial buttons make a note of...

Page 54: ...s the number 3 Press or to move the cursor to the desired number and edit the number Note When you press the speed dial number stored for group dial the display briefly shows G REGISTERED to indicate that the number is used for group dial then you can edit the number 4 When you have finished editing press Start Enter Sending a Fax Using a Speed Number 1 Load the document face down with the top edg...

Page 55: ...ee that each entry is preceded by one of three letters T for one touch dial S for speed or G for group dial number These letters tell you how the number is stored 3 When the name and number you want appears on the display press Start Enter to dial If a document is loaded the document begins to be transmitted when the remote fax machine answers the phone Searching with a Particular First Letter 1 P...

Page 56: ...STING 3 Press Start Enter to access the Broadcasting menu 4 Enter the number of the remote machine using the number keypad You can also press a one touch button including group dial buttons If not press Speed enter a 2 digit speed dial number then press Start Enter The stored number appears on the display 5 Press Start Enter to confirm the number The display asks you to enter another fax number 6 ...

Page 57: ...pears on the display 5 Press Start Enter to confirm the number The display asks if you want to enter another fax number 7 The document will be scanned into memory The display shows the memory capacity and the number of pages being stored The machine begins sending the documents in order of the numbers you entered Notes If MEMORY FULL occurs while scanning into the memory the display will show Pres...

Page 58: ...ks you to enter the time when the fax is to be sent 9 Enter the time by using the number keypad then press Start Enter Enter the time in 24 hour format For example enter 2230 for 10 30 P M If you set a time earlier than the current time the document will be sent at that time on the following day 10 The document will be scanned into memory The display shows the memory capacity and the number of pag...

Page 59: ...irst menu BROADCASTING 3 Press or until PRIORITY FAX appears then press Start Enter to access the Priority Fax menu 4 Enter the number of the remote machine using the ten number keypad You can also press a one touch button If not press Speed enter a 2 digit speed dial number then press Start Enter The stored number appears on the display 5 Press Start Enter to confirm the number The display asks y...

Page 60: ... holding the original Polling Transmission You can program the fax machine to send documents in your absence when polled by a remote fax machine A polling code is used to prevent unauthorized polling of your machine When you secure your machine in this manner only those who know the poll code can poll your machine Note Polling Transmission only works with machines of the same model that have the P...

Page 61: ...automatically receive documents from an unattended remote fax machine This feature permits unattended polling in the evening hours when telephone rates are lower Note The remote machine must be ready for polling 1 Press On Hook Dial and when you hear a dial tone call the remote fax machine 2 When you hear the fax tone press Trans Option Then RECEIVE POLLING appears 3 Press Start Enter The display ...

Page 62: ...documents then press Start Enter The machine automatically and stores the documents in memory and the display shows the memory capacity and the number of pages 5 After storing the machine displays the total number of pages then returns to Standby mode Cancelling a Scheduled Operation 1 Press Trans Option on the front panel The display shows the first menu BROADCASTING 2 Press or until CANCEL SCHED...

Page 63: ...d all faxes which you receive during the specified period to a specified remote station This can be useful when you are out of your work station and want to receive your faxes through another station Setting Time and Destination for Forwarding Faxes To forward the received fax you must define the remote fax machine where the fax is to be sent and the start time and end time of a period when the Fa...

Page 64: ...vates Notes If an error occurs during forwarding a fax your machine will automatically redial the number every three minutes up to a maximum of two times just like normal fax operation The Sending Confirmation report showing time when faxes are forwarded the designated fax number the transmission result the contents of the fax and so on will automatically print right before the end time Printing R...

Page 65: ...layed transmission Priority transmission Broadcasting and Send polling The list shows the starting time type of operation etc System Data List Shows the status of the user selectable options After you change any setting print this list to confirm your changes Multi Communication Report Is printed automatically after sending documents to or receiving documents from more than one location Callback M...

Page 66: ... 1 Press User Tools on the front panel The display shows the first menu FAX NUMBER NAME 2 Press or until GROUP DIAL SETUP appears and press Start Enter 3 Press one of the 20 one touch buttons that you want to use for group dial 4 The display asks you to confirm that you use this button for group dialing Press Start Enter to confirm If you do not want to use the one touch number press Stop Then pre...

Page 67: ...at step 6 to 7 to enter additional numbers into the selected group 9 Press Start Enter when you have entered all the desired destinations The display asks you to enter a name 10 To assign a name to the group enter the desired name See page 2 19 for entering letters Or If you do not want to assign a name skip this procedure 11 Press Start Enter The display asks you to select a one touch number for ...

Page 68: ... number in another group dial number Select MEMBER DELETE to delete a number When the number that you want to delete is displayed press Start Enter 5 When you are finished editing press Stop Sending a Fax Using Group Dialing Multi Address Transmission You can use Group Dialling for the Delayed Transmission or Memory Transmission Follow the procedure of the desired operation Broadcasting transmissi...

Page 69: ...g the Automatic Paper Input Tray Using the Manual Paper Input Tray Specialty Paper Guidelines Scanning Scanning from a Windows Application Type1100 TWAIN for scan Window Installing Software System Requirements Installing the Software Uninstalling the Software Printing Printing a Document Cancelling a Print Job Printing Help Printing Several Pages Per Sheet Scaling Your Document Fitting Your Docume...

Page 70: ...dows 2000 Disk space 120 MB for installation Memory 32 MB CPU Pentium 133 Installing Software Installing the Software Note For Windows 95 98 users close New Hardware Found screen when the computer boots up 1 Insert the supplied CD ROM into your CD ROM drive The CD ROM is automatically running and the opening window appears If the opening window does not appear click Start and then Run Type X Setup...

Page 71: ...e on your PC Uninstalls the Software Installs the Software on your PC 4 When the installation is completed The message box recommends you restart your computer Click Finish then Windows restarts If your computer does not shut down and restart automatically you must shut it down manually and restart for the changes to saved ...

Page 72: ...oftware is un installed Un installing the MFP Driver 1 Start Windows if not already started 2 From the Start menu select Programs then select the software you want to uninstall then select Printer Driver Uninstall 3 When your computer confirms your selection click Yes The printer driver and all its components are removed from your computer 4 When un installation is done click OK 5 The message box ...

Page 73: ... the opening window appears If the opening window does not appear select Run from the Start menu then type X SETUP replacing X with the letter of your drive and click OK 2 When the opening window appears click the language you want to use 3 Click Uninstall the software on your PC 4 Follow the on screen instructions to complete un installation You must shut down and restart your computer before cha...

Page 74: ... paper adjusters of the printer Weight Use 20 24 pound or 75 90 g m2 plain paper for multipurpose everyday use Brightness Some papers are whiter than others and produce sharper more vibrant colors Use premium photo paper for documents with photographs Use white paper for documents with any other pictures Surface smoothness The smoothness of the paper affects how crisp the printing looks on the pap...

Page 75: ... designed to hold one sheet Both can be adjusted to hold media measuring from 3 87 by 6 38 inches 98 5 by 162 mm to 8 5 by 14 inches 216 by 356 mm This includes but is not limited to the following paper and envelope sizes A4 8 25 by 11 75 in 210 by 297 mm A5 5 82 by 8 25 in 148 by 210 mm B5 7 16 by 10 12 in 182 by 257 mm Letter 8 5 by 11 in 216 by 279 mm Folio 8 5 by 13 in 216 by 330 mm Legal 8 5 ...

Page 76: ...e reduced depending on the thickness For best results adjust the paper settings each time you change paper see page 3 13 Note If you experience feeding problems try printing one at a time from the manual input tray See page 3 9 1 Pull the paper input support completely out of the unit 2 Prepare the print material for loading For paper Flex or fan the paper back and forth Do not fold or crease the ...

Page 77: ...des 3 Load the print material into the paper tray Load only as much paper as will fit beneath the lip protruding from the paper length adjuster Neatly stacking the paper before loading will help prevent print problems Do not mix types See the following directions to load each type of print material Load paper with the print side facing up L E T T E R H E A D Load letterhead paper face up with the ...

Page 78: ... is usually indicated on the paper package Be sure to insert the paper into the paper tray of the printer with the print side up Using the Manual Paper Input Tray To load a single envelope card stock or specialty paper use the manual paper input tray When you use the manual input tray you must feed one piece of media at a time Manual feeding is helpful when printing on heavy paper or when experien...

Page 79: ...tray By doing so you can prevent the paper jam which might occur in the manual tray 1 Place the print media in the manual input tray with print side facing up and adjust the paper guides to the width of the print media Load a sheet of the envelope with the flap side facing away from you Make sure that the stamp area is at the top left and the end of the envelope with stamp area enters the tray Loa...

Page 80: ...he front panel displays PC PRINTING and PRESS START 3 Press Start Enter to start manual feeding If you have more than one page to print press Start Enter for each page Load a sheet of the label with the adhesive backing facing away from you Load a sheet of the card stock with print side up short edge first ...

Page 81: ...tective packaging until ready for use Store unused film at temperatures between 59o F to 86o F 15o C to 30 o C The relative humidity should be between 10 and 70 For labels follow these guidelines Verify that the labels adhesive material can tolerate fusing temperature of 200 C 392 F for 0 1 second Make sure that there is no exposed adhesive material between the labels Exposed areas can cause label...

Page 82: ... Refer to your software application s documentation for the exact printing procedure 1 Start the program to create the document and open the document you want to print 2 Select Print from the File menu You see the Print dialogue box for your application the Print dialogue box for your application may look slightly different The basic print settings you required are usually selected within the Prin...

Page 83: ...Select If you use the manual input slot on the back of the printer see page 4 5 select Manual Paper Size Select the paper size you have loaded in your printer Paper Type The Paper Type option allows you to select the paper type you want to use Select the number of copies to be printed The Paper Orientation option allows you to select the direction in which information is printed on a page Portrait...

Page 84: ...to print darker than normal document All Text to Black When the All Text to Black is checked all text in your document is allowed to print solid black regardless of the color it appears on the screen When it is not checked colored text is allowed to print in shades of gray 6 When you complete changing print settings click OK until you see the Print dialogue box again 7 Click OK to start printing T...

Page 85: ...as follows 1 Click the Windows Start button 2 Select Settings then Printers to open the Printers window 3 Select the Printer Drivers Type1100 4 Click the right mouse button and select Properties to open the properties window Cancelling a Print Job There are two ways to cancel a print job If your print job has not started to print cancel from the print spooler in Windows 95 98 Me 2000 XP or NT 4 0 ...

Page 86: ...er properties dialogue box These help screens give detailed information about the printer features provided by this printer driver From the upper right hand corner click then click on a setting for more information To restore default printer properties setting when you change the print settings click Defaults in the properties dialogue box ...

Page 87: ...es From the Paper tab select the paper orientation source and size 3 Click the Output tab and choose Multiple Pages Per Sheet in the Type drop down list under the Output Mode section 4 Select the number of pages to print per sheet 2 4 9 or 16 in the Pages per sheet drop down list When you make a selection the graphic above the option changes to show how the printed page will look 5 Click Print Pag...

Page 88: ...u change the print settings from your software application access the printer properties See page 3 13 to access the printer properties 2 Click the Output tab and select Scale Printing in the Type drop down list under the Output Mode section 3 Enter the desired scaling rate in the Scale input field You can also click the or buttons Select the scaling rate ...

Page 89: ...u want to check fine details on a small document 1 When you change the print settings from your software application access the printer properties See page 3 13 to access the printer properties 2 Click the Output tab and select Fit to Page in the Type drop down list under the Output Mode section 3 You ll see the Application page size and be prompted to select the Fit to Paper Size Select the corre...

Page 90: ...erties See page 3 13 to access the printer properties From the Paper tab select the paper orientation source and size 2 Click the Output tab and Poster Printing in the Type drop down list under the Output Mode section Select the poster style Specify the area to be overlapped Switch between mm or inch 2 x 2 3 x 3 3 To determine the scaling factor select the Style 2x2 3x3 or 4x4 For example if you s...

Page 91: ... Draft or Confidential printed across the first page or all pages of a document There are several predefined watermarks and they can be modified or you can add new ones to the list To use an existing watermark 1 When you change the print settings from your software application access the printer properties See page 3 13 to access the printer properties 2 Click the Watermark tab and select the desi...

Page 92: ...rmark will appear on the printed page 3 Select the desired watermark options You can select the font type and size color and angle There are three checkboxes at the bottom of the dialog box Transparent Text Allows the document to show through the watermark As Outline Only Prints the text outline of the watermark This setting globally effects all watermarks in the list On First Page Only Prints the...

Page 93: ...he Watermark tab select the watermark you want to delete in the Messages drop down list 3 Click Delete 4 Click OK WORLD BEST Dear ABC Regards Using Page Overlays What is an Overlay An overlay is text and or images stored in the computer HDD as a special file format that can be printed on any document you choose Overlays are often used to take the place of preprinted forms and letterhead paper Rath...

Page 94: ... items exactly as you wish them to appear when printed as an overlay If needed save the file for later use 2 Select Print from the File menu Then click Properties in the application s Print dialog box to access the printer properties For details see page 3 13 3 Click the Overlays tab and click Create Overlay 4 In the Create Overlay dialog box type a name of up to eight characters in the File name ...

Page 95: ...ith your document To print an overlay with a document 1 Create or open the document you want to print 2 When you change the print settings from your software application access the printer properties See page 3 13 to access the printer properties 3 Click the Overlays tab and select the desired overlay from the Overlay List box 4 If the desired overlay file does not appear in the Overlay List box c...

Page 96: ...that the selected overlay will be printed with your document Answering No to the message box cancels overlay printing If this box is empty and an overlay has been selected the overlay will be automatically printed with your document 6 Click OK or Yes until the printing starts The selected overlay will be downloaded with your print job and printed on your document Deleting a Page Overlay You can de...

Page 97: ... Start Windows 2 From the Start menu select Control Panel and double click on the Network icon 3 Check the File and Print Sharing box then click OK Close the window 4 Click Start and select Printers from Settings then double click your printer name 5 Select Properties in the Printers menu 6 Click the Sharing tab then check the Shared As box Fill in the Shared Name field then click OK Setting Up Cl...

Page 98: ...g 6 Double click your printer icon 7 From the Printers menu select Properties 8 Press the Details tab select the printer port then click OK Printing a Document Print your document following the procedures described in page 3 13 ...

Page 99: ...ou are using For full details on scanning refer to the manual for the application 1 Set the document to be scanned For details refer to Sending a FAX on page 2 7 2 Access the Type1100 TWAIN Options from your Scanner Software 3 Adjust the settings for this type of scan Refer to the next page for the settings that can be used The settings that can be used are Scan mode Resolution and Brightness Depe...

Page 100: ...for Scan Window Brief desciptions for the controls of Type1100 TWAIN for Scan window are provided below Setting Tabs Each tab Basic Image quality Filters and the About tab contains settings to adjust the scan image Use help for further details ...

Page 101: ...and the machine The topics included in this chapter are Guidelines for Maintenance Clearing Memory Cleaning the OPC Drum Adjusting Shading Setting the Machine to be Checked by Phone Sending Toner Low Information to the Service Company Cleaning the Machine Managing the Toner Cartridge Automatic Document Feeder Rubber Pad Replacement 4 4 ...

Page 102: ...splay shows the first menu FAX NUMBER NAME 2 Press or until MEMORY CLEAR appears then press Start Enter The display shows the items you can clear FAX NUMBER NAME your fax number and name are cleared from the machine s memory DIAL SCHEDULE clears the one touch speed dial or group dial numbers stored in the memory In addition all the Schedule Job operations you have reserved are also cancelled JOURN...

Page 103: ...ou find ADJUST SHADING then press Start Enter The white paper is scanned through the document feeder Cleaning the OPC Drum If you are getting streaks or spots on your print you may clean the OPC drum 1 Make sure that the paper is loaded in the automatic input tray 2 Press User Tools on the control panel The display shows the first setup menu FAX NUMBER NAME 3 Press or until MAINTENANCE appears the...

Page 104: ... in some areas Sending Toner Low Information to the Service Company If you have set this Notify Toner Low menu option to ON when the toner cartridge needs to be replaced your machine automatically sends a fax to your service company or the dealer to notify them that your machine requires a new toner cartridge This feature will be activated only when the phone number of the service company or the d...

Page 105: ...ean and lint free cloth You can dampen the cloth slightly with water but be careful not to let any water drip onto the machine or inside it Cleaning the Inside During the printing process paper toner and dust particles can accumulate inside the machine Over time this buildup can cause print quality problems such as toner specks or smearing Cleaning inside the printer will eliminate or reduce these...

Page 106: ...he scanner as documents stored in the memory will be lost 1 Lift the front panel by grabbing the panel along the top edge and open the cover 2 Disassemble the white roller as follows Pull the handle of the bushing on the end of the roller slightly outward A rotate it until it reaches a slot B then pull the roller upward A B bushing 3 Wipe the roller surface with a soft cloth dampened with water ...

Page 107: ...g glass with a soft dry cloth If the glass is very dirty first wipe it with a slightly dampened cloth then with a dry cloth Be very careful not to scratch the glass surface 6 Replace the roller in reverse order and then close the front panel firmly until it clicks into place ...

Page 108: ...he remaining toner in the cartridge 1 Open the cover and remove the toner cartridge 2 Gently shake the cartridge to distribute the toner evenly inside the cartridge 3 Reinstall the cartridge and close the cover This is typically successful one time only When the toner eventually runs out only blank pages will print when a print job is sent or when a fax is received At this stage the toner cartridg...

Page 109: ...printed on the cartridge box to recycle the used cartridge 3 Unpack a new toner cartridge from its plastic bag and then remove the paper rolled the cartridge Take the following steps to replace the toner cartridge 1 Pulling the cover release buttons toward you open the cover ...

Page 110: ...e on each side Grasp the handle and slide the cartridge down between the cartridge slots until it drops into place 4 Shake the cartridge from side to side 5 or 6 times to distribute the toner evenly inside the cartridge 6 Close the cover firmly until it snaps closed ...

Page 111: ... under the right and left sides of the ADF Holder 3 Apply upward pressure to release the two locking tabs on each side of the assembly 4 Remove the assembly and replace the ADF Rubber 5 Reassemble the components in the order shown in the diagram above 6 Place the assembly back onto the ADF Holder 7 Press down on the assembly until it locks into position 8 Close the Control Panel ADF Holder ADF Rub...

Page 112: ...Memo ...

Page 113: ...helpful information for what to do if you encounter a operating error It provides information on the following topics Clearing Paper Jams LCD Error Messages Fax Problems General Printing Problems MFP model only Print Quality Problems ...

Page 114: ... you are sending it DOCUMENT JAM appears on the display Do not pull the document out of the slot If you do this it could harm your machine 1 Lift the front panel by grabbing the panel along the top edge 2 Carefully remove the jammed document 3 Close the front panel firmly until it clicks into place ...

Page 115: ... jammed paper out gently and slowly IF JAMMED IN THE PAPER INPUT TRAY 1 Remove the jammed paper by carefully pulling it out of the tray 2 After you have removed the jammed paper load the paper with the print side facing you IF JAMMED IN THE PAPER OUTPUT AREA If the paper jams as it exits to the paper output tray and a long portion of the paper is visible pull the paper straight out If there is any...

Page 116: ...ng the cover release buttons toward you open the cover 2 Remove the toner cartridge 4 Check that there is no other paper inside the machine 5 Replace the toner cartridge and close the cover 3 Remove the jammed paper by carefully pulling it out of the machine ...

Page 117: ... are needed to add more sheets of paper while printing remove the remaining paper from the tray at first Then reinsert them with the new paper Note that adding new paper into the remains in the tray may cause paper jams or multiple feeding Envelopes with self stick adhesives may cause wrinkling creasing or even jams and may even damage your machine Fan stacks of labels or transparencies before loa...

Page 118: ...d in the LSU Laser Scanning Unit Unplug the power cord and plug it back in If the problem still persists please call for service FUSER ERROR There occurs a problem in the fuser unit Unplug the power code and plug it back in If the problem still persists please call for service MEMORY FULL The memory is full Either delete unnecessary documents or retransmit after more memory becomes available or sp...

Page 119: ...ne stops Replace with a new toner cartridge TONER LOW The toner is almost empty Take out the toner cartridge and gently shake it By doing this you can temporarily re establish printing operations RETRY REDIAL The machine is waiting for a specified time interval to redial a previously busy station You can press Start Enter to immediately redial or Stop to cancel the redial operation RECEIVE ERROR A...

Page 120: ...The document does not feed into the machine Make sure that the document is not wrinkled and you are putting it in correctly Check the document is the right size not too thick or thin Make sure that the cover is firmly closed You cannot receive faxes automatically The FAX mode should be selected Is there paper in the machine Check if the display shows MEMORY FULL Your machine will not send anything...

Page 121: ... documents you send Check your scan glass for marks and clean it See page 4 5 The machine dials a number but fails to make a connection with another fax machine The other fax machine may be turned off out of paper or cannot answer incoming calls Speak with the other machine operator and ask them to sort out the problem You cannot store a document in the memory There may not be enough memory to sto...

Page 122: ...ettings are correct Paper has not been inserted correctly Remove and reinsert the paper correctly See Using Automatic Paper Input Tray on page 3 7 or Using Manual Paper Input Tray on page 3 9 There is too much paper in the paper input tray Remove some of the paper from the input tray There is too much paper in the paper input tray Remove some of the paper from the tray If printing onto envelopes o...

Page 123: ... problem with the printer driver software Exit Windows and reboot the computer Turn the printer off and then back on again The printer cable specifications may be incorrect Use or replace the cable with an IEEE 1284 rated cable If using Windows 95 98 Me the Spooling Setting may be set incorrectly From the Start menu select Settings and Printers Click your printer icon with the right mouse button s...

Page 124: ...r cartridge needs cleaning See Cleaning the OPC Drum on page 4 2 The surface of scanner parts inside the machine may be dirty See Cleaning the Document Scanner on page 4 5 Light or faded print AaBbCc AaBbCc AaBbCc AaBbCc AaBbCc AaBbCc AaBbCc AaBbCc AaBbCc AaBbCc The paper may not meet paper specifications See Paper Type and Size for faxing on page 1 15 and Selecting Print Media for PC printing on ...

Page 125: ...c AaBbCc AaBbCc If the amount of background toner shading becomes unacceptable the procedures below may help to clear the condition Change the paper to a lighter basis weight See Paper Type and Size for faxing on page 1 15 and Selecting Print Media for PC printing on page 3 5 Check the printer s environment very dry low humidity or high humidity higher than 80 RH conditions can increase the amount...

Page 126: ...batch of paper Do not open packages of paper until necessary so that the paper does not absorb too much moisture from the air If background scatter occurs on an envelope change your printing layout to avoid printing over areas that have overlapping seams on the reverse side Printing on seams can cause this problem If background scatter covers the entire surface of a printed page adjust the print r...

Page 127: ... paper is loaded properly Check the paper type and quality See Paper Type and Size for faxing on page 1 15 and Selecting Print Media for PC printing on page 3 5 Turn over the stack of paper in the input tray Also try rotating the paper 180 in the tray Wrinkles or creases The transfer roller area may be dirty See Cleaning the Inside on page 4 6 Check if the toner is leaking Clean inside the machine...

Page 128: ... on page 3 5 Character Voids Clean the inside of the printer Check the paper type and quality See Paper Type and Size for faxing on page 1 15 and Selecting Print Media for PC printing on page 3 5 Try installing a new toner cartridge If the problem persists the printer may require repairs Contact a service representative Loose toner If horizontally aligned black streaks or smears appear The toner c...

Page 129: ... Connecting Other Devices to the Phone Line Specifications General Printer Copy Scanner Fax Safety Information ...

Page 130: ...ces However You can connect an external modem or a computer with an internal modem to this phone line if you want to use the fax line to access the Internet or e mail You can connect an extra telephone to this wall jack if you would like to make outgoing voice calls To connect any of these devices to the same phone line go to Connecting Other Devices Overview on page A 3 If you have another wall j...

Page 131: ...u have an answering machine or computer with voicemail make sure to connect it to the same wall jack as this machine Special Situations You have two phone lines coming into one wall jack When you connected this machine you should have plugged it into a phone unit splitter connected to the wall jack Proceed as if that side of the phone unit splitter is a phone line for fax calls only a dedicated li...

Page 132: ... always plug the LINE jack into one device and the EXT jack into another device Some computers have a second LINE jack which is used to connect the computer to a dedicated voice line If you have a second LINE jack check your computer s documentation to ensure you are connecting to the correct LINE jack This machine LINE EXT LINE EXT LINE EXT LINE EXT Computer with Internal Modem External Modem Ans...

Page 133: ... 95 98 Me Windows NT 2000 XP Speed 8 ppm mono 5 Coverage in draft mode Item Specification and Description Size W x D x H mm 313 x 356 x 195 mm Weight with accessories 7 7 Kg Printer Interface MFP Only Parallel IEEE 1284 Average Power Consumption Energy save mode 9 5W Standby mode 50W Printing mode 170W Scanning mode 25W Maximum power consumption 700W Power Supply See the rating plate on the rear c...

Page 134: ...l Darken Lighten Photo Feeding Method Sheet fed Scan Copy Speed 1160L 3710 F102 LF115m 6 sec page Fax Item Specification and Description Modem Speed 33 6 kbps Compatibility ITU T Group 3 Resolution Selectable by 1 key LCD Standard 200 x 100 dpi Default Fine 200 x 200 dpi SuperFine 300 x 300 dpi ECM Support Yes Halftone Photo 64 grayscales TAD Interface Yes Memory 2 MB Memory Backup 30 Min Receive ...

Page 135: ...may fall causing serious damage 7 Your fax machine should never be placed on near or over a radiator heater air conditioner or ventilation duct 8 Do not allow anything to rest on the power telephone Do not locate your fax machine where the cords will be abused by persons walking on them 9 Do not overload wall outlets and extension cords This can diminish performance and may result in the risk of f...

Page 136: ... or the cabinet appears damaged If the product exhibits a sudden and distinct change in performance 15 Adjust only those controls covered by the operating instructions Improper adjustment of other controls may result in damage and may require extensive work by a qualified service technician to restore the product to normal operation 16 Avoid using this fax machine during a lightning storm There ma...

Page 137: ... the operation of its business and is not inconsistent with the rules and regulations in FCC Part 68 If such changes can be reasonably expected to render any customer terminal equipment incompatible with telephone company communications facilities or require modification or alteration of such terminal equipment or otherwise materially affect its use or performance the customer shall be given adequ...

Page 138: ...stomer that service may be stopped However where prior notice is impractical the company may temporarily cease service providing that they a Promptly notify the customer b Give the customer an opportunity to correct the equipment problem c Inform the customer of the right to bring a complaint to the Federal Communication Commission pursuant to procedures set out in FCC Rules and Regulations Subpar...

Page 139: ...y discontinuance of service may be required But if advance notice is not practical the telephone company will notify the costomer as soon as possible Also you will be advised of your right to file a complaint with the FCC if you believe it is necessary 5 The telephone company may make changes to its facilities equipment operations or procedures that could affect the operation of the equipment If t...

Page 140: ...ier Any repairs or alterations made by the user to this equipment or equipment malfunctions may give the telecommunications company cause to request the user to disconnect the equipment User should ensure for their own protection that the electrical ground connections of the power utility telephone lines and internal metallic water pipe system if present are connected together This precaution may ...

Page 141: ...4 4 OPC drum 4 2 connecting other devices A 1 parallel cable 1 12 phone line 1 11 power cord 1 13 contents 1 3 copying using advanced features 2 17 overview 2 16 single copying 2 16 D date and time setting 1 18 delayed transmission 2 26 document contrast setting 2 8 document feeder loading 2 9 document resolution setting 2 8 document scanner cleaning 4 5 driver access 3 13 E entering name 2 18 err...

Page 142: ...5 3 7 setting 3 2 3 14 paper jam clear 5 1 document 5 1 inside the machine 5 3 output area 5 2 paper input tray 5 2 tips avoiding paper jams 5 4 paper size setting 3 14 paper source setting 3 14 paper type setting 3 14 parallel connection 1 12 parts identifying 1 4 pause inserting 2 20 phone line connection 1 11 polling reception 2 30 transmission 2 29 poster printing 3 21 power plugging 1 13 prin...

Page 143: ... reports printing 2 33 S scaling document 3 19 searching memory 2 24 send fax 2 7 setting alert tones 2 2 date and time 1 18 fax number and name 1 19 resolution and contrast 2 8 volume 2 1 stand alone fax system 2 2 specifications A 4 speed dialing 2 22 storing group dial 2 35 one touch 2 20 speed dial 2 22 supports attaching 1 10 system options 2 2 T tape removing 1 9 toner cartridge installing 1...

Page 144: ...H911 1000 ...

Reviews: