background image

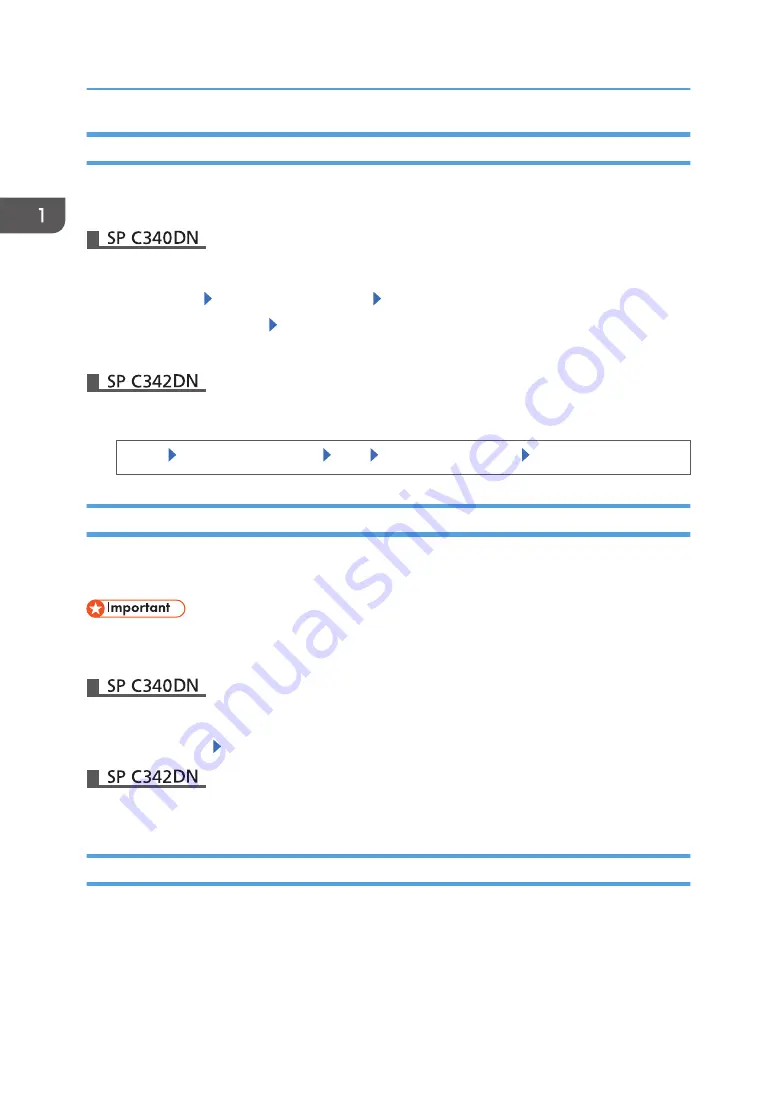
Logging In Using the Control Panel

This section explains the procedure for logging in to the printer when Basic Authentication, Windows
Authentication, LDAP Authentication, or Integration Server Authentication is set.

1.

Press the [Menu] key.

2.

Press [Login]   Enter a login user name   Press [OK]

3.

Enter a login password   Press [OK]

When the user is authenticated, the screen for the function you are using appears.

1.

Enter user information to authenticate.

[Login]   Enter a login user name   [OK]   Enter a login password   [OK]

Logging Out Using the Control Panel

This section explains the procedure for logging out the printer when Basic Authentication, Windows
Authentication, LDAP Authentication, or Integration Server Authentication is set.

• To prevent use of the printer by unauthorized persons, always log out when you have finished

using the printer.

1.

Press the [Menu] key.

2.

Press [Logout]   Press [Yes]

1.

Press the [Login/Logout] key, and then press [Yes].

Logging In Using a Printer Driver

Enter your login user name and password as registered in the printer. You need only do this the first time
you access the printer.
The PCL printer driver supports User Code Authentication.
The procedure is explained below using Windows 7 as an example:

1. Getting Started

38

midas-p3_com_operating_instructions_gb_00198452_eng.xml

Draft 2016/01/18

Summary of Contents for PRSPC342DN1

Page 1: ...zing the Home Screen 31 Logging in to the Printer 37 User Code Authentication Using the Control Panel 37 User Code Authentication Using a Printer Driver 37 Logging In Using the Control Panel 38 Logging Out Using the Control Panel 38 Logging In Using a Printer Driver 38 Logging In Using Web Image Monitor 39 Logging Out Using Web Image Monitor 40 User Lockout Function 40 Changing the Login Password ...

Page 2: ...1 Connecting to the IEEE 1284 Interface 83 Connecting to the Wireless LAN Interface 85 Connecting to the USB Device Server 88 Configuration 90 Ethernet Configuration 90 Wireless LAN Configuration 93 Specifying an IP address for the USB Device Server 97 Test Printing 100 Interpreting the Configuration Page 100 3 Loading Paper Paper Loading Procedure 105 Paper Size Specifications 106 Paper Type Spec...

Page 3: ...ions 138 Printing on Both Sides of a Page 138 Combining Multiple Pages onto a Single Page 138 Poster 140 Booklet Printing 141 Collate 142 Conserving Toner when Printing 143 Watermarks 143 Printing Documents that Are Not Authorized for Duplication 144 Cover Sheet 147 Slip Sheets 148 Registering Classification Codes 149 Banner Page 151 Using Convenient Print Functions with Windows PCL 6 PostScript 3...

Page 4: ...9 Deleting Jobs 189 Checking the Job History 189 Printing Files from a Memory Storage Device 191 Direct Printing from a Memory Storage Device 191 Direct Printing from a Digital Camera 197 Canceling a Print Job 205 Before Printing Starts 205 While Printing Is in Progress 205 If an Error Occurs with the Specified Paper Size and Type 207 Printing from a Selected Tray 207 Changing the Paper Tray Setti...

Page 5: ...e SP C340DN 229 List Test Print SP C340DN 233 System SP C340DN 234 Print Settings SP C340DN 243 Security Options SP C340DN 253 Device Setting Information SP C340 DN 255 Host Interface SP C340DN 255 Language SP C340DN 263 Extended Features SP C340DN 263 Memory Erase Status 263 Printer Configuration Items List SP C342DN 264 System Settings SP C342DN 264 Printer Features SP C342DN 276 XPS Menu SP C34...

Page 6: ...g and Configuring the Printer 332 Using Web Image Monitor 332 Printer Status Notification by E mail 343 Registering the Address Book 350 Address Book 350 Address Book Backup and Restore 351 Registering User Information 352 Authentication Information 355 Registering Users to a Group 358 Registering LDAP Authentication 362 Checking Which Functions Are Available 363 Setting Up LDAP Authentication 365...

Page 7: ...oting 410 The Printed Image is Different from the Image on the Computer 414 When Printer Is Not Functioning Properly 417 When PictBridge Printing Does Not Work 419 Removing Jammed Paper 420 Paper Misfeed Message A 420 Misfeed Bypass Tray 422 Paper Misfeed Message B 423 Paper Misfeed Message Y 425 Paper Misfeed Message Z 426 7 Maintenance and Specifications General Requirements 427 Precautions 427 ...

Page 8: ...rinter 457 Specifications for 500 sheet Paper Feed Unit 461 Specification for Hard Disk 462 Specifications for Wireless LAN Interface Board 462 Specifications for IEEE1284 Interface Board 463 Specifications for USB Device Server 463 Information for This Printer 464 User Information on Electrical Electronic Equipment 464 EMC Directive 465 Note for the Battery and or Accumulator Symbol For EU countr...

Page 9: ...ymbol is located at the end of sections It indicates where you can find further relevant information Indicates the names of keys on the machine s display or control panels Indicates the key sequence order you should perform using the control panel Example Select Host Interface Press OK Select Host Interface and then press the OK key mainly Europe and Asia mainly North America Differences in the fu...

Page 10: ...the machine About IP addresses In this manual IP address covers both IPv4 and IPv6 environments Read the instructions that are relevant to the environment you are using Model Specific Information This section explains how to identify the region to which your printer belongs There is a label on the rear of the printer located in the position shown below The label contains details that identify the ...

Page 11: ...r and the names commonly used in this manual Option name Description Paper Feed Unit TK1220 500 sheet paper feed unit Hard Disk Drive Option Type P10 Hard disk IEEE 802 11 Interface Unit Type M24 Wireless LAN interface board IEEE 1284 Interface Board Type M19 IEEE 1284 interface board USB Device Server Option Type M19 USB device server board Camera Direct Print Card Type P10 Camera direct print ca...

Page 12: ...ck Installation Guide Describes procedures from unpacking the machine to connecting it to a computer Operating Instructions Provides detailed information about the operation of the machine in HTML format The following are the main topics of the manual Getting Started Setting Up the Printer Loading Paper Printing Configuring and Managing the Printer Troubleshooting Maintenance and Specifications Ex...

Page 13: ...rinter Security Guide Be sure to read this manual when configuring the enhanced security functions or user and administrator authentication Driver Installation Guide Explains how to install and configure the drivers Manuals for This Machine midas p3_com_operating_instructions_gb_00198419_eng xml 13 Draft 2016 01 18 ...

Page 14: ...s stacked here with the print side down 2 Control panel For details see page 19 Guide to the Names and Functions of the Control Panel 3 Front cover Open this cover when replacing the waste toner bottle etc or removing jammed paper Pull the right side lever to open the front cover 4 Top cover open lever Pull this lever upward to open the top cover 1 Getting Started 14 midas p3_com_operating_instruc...

Page 15: ...es Prevent overheating 10 Top cover Open this cover to replace the print cartridge 11 Stop Fence Legal size prints Raise the rear fence to prevent Legal size prints from falling behind the printer After using the stop fence be sure to return it to its original position The fence may be damaged if it is hit with something or excessive force is applied 12 Stop Fence A4 Letter size prints Raise the f...

Page 16: ...ous cables 5 Front cover open lever Pull this lever to open the front cover 6 USB port A Connect external devices such as a digital camera a card authentication device etc 7 USB port B Use a USB cable to connect the printer to a computer 8 Ethernet port Use a network interface cable to connect the printer to a network 9 Optional interface board slot Optional interface boards can be inserted Insert...

Page 17: ...hat appear on the screen when consumables need to be replaced see page 449 Replenishing and Replacing Consumables 3 Transfer roller If the message appears on the control panel replace the transfer roller which is included with the intermediate transfer unit For details about the messages that appear on the screen when consumables need to be replaced see page 449 Replenishing and Replacing Consumab...

Page 18: ...g and Replacing Consumables Guide to functions of the printer s internal options 1 2 3 DPP004 1 Optional interface units Wireless LAN board Allows you to communicate over wireless LAN IEEE 1284 interface board Allows you to connect to an IEEE 1284 cable USB device server Allows you to add an Ethernet port to the printer and use two IP addresses at the same time To attach this option see page 63 In...

Page 19: ...4 13 12 11 10 9 8 6 7 5 1 DPP299 1 Job Reset key Press to cancel the current print job 2 Switch Functions key Press this key to switch between the operation screen of the printer function and the function screens of the extended features currently in use 3 Display Displays current printer status and error messages Entering energy saver mode turns off the back light For details about energy saver m...

Page 20: ...is not possible or is possible but print quality cannot be ensured Flashing yellow the printer will soon require maintenance or a replacement consumable such as print cartridge Follow the instructions that appear on the display 9 Menu key Press this key to configure and check the current printer settings Press to change the default settings to meet your requirements See page 211 Displaying the Pri...

Page 21: ...obs You can also display the job history and the printer s maintenance information 6 Data In indicator Flashes when the printer is receiving print jobs from a computer The indicator lights up when there is data to be printed 7 Check Status indicator Lights up or flashes when a printer error occurs Steady red Printing is not possible Flashing yellow The printer will soon require maintenance or a re...

Page 22: ...flash memory device 14 Media access lamp Lights up when a memory storage device is inserted in the media slot or is being accessed Guide to the Names and Functions of the Control Panel Screen DPP083 1 Operational Status or Messages Displays the printer status and messages 2 Option Press to display the following items Form Feed Error Log 3 Supplies Press to display the information about printer sup...

Page 23: ...een Checks the printer status such as toner paper and waste toner levels After finishing a job the printer waits a specified length of time then restores its settings to the default values specified under Function Priority This function is called System Reset For the procedure for specifying default settings under Function Priority see page 286 System Settings To change the length of time that the...

Page 24: ...splay the Supplies Info screen to check toner paper and waste toner levels 2 Printer Press to display the Printer screen 3 Shortcut icon area You can add shortcuts to embedded software applications to the Home screen For details about registering shortcuts see page 32 Adding icons to the Home screen 4 Home screen image You can display an image such as a corporate logo on the Home screen To change ...

Page 25: ...is set as the default screen when the printer is turned on 1 4 2 8 5 3 6 7 CZV303 1 Operational status or messages Displays the current printer status such as Ready Offline and Printing Information user ID and document name about the print job appears in this section 2 Print Jobs Press to display print jobs sent from a computer 3 Supply Information You can check the remaining toner Press to displa...

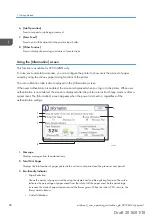
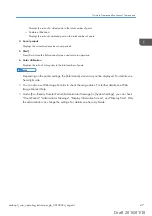
Page 26: ...ed the screen is displayed after the printer returns from Sleep mode or after a system reset The Information screen appears when the power is turned on regardless of the authentication settings CZV304 1 2 3 4 5 6 1 Message Displays messages from the administrator 2 Total Print Pages Displays the total number of pages printed in the current count period and the previous count period 3 Eco friendly ...

Page 27: ...epending on the printer settings the Information screen may not be displayed For details see Security Guide You can also use Web Image Monitor to check the usage status For further details see Web Image Monitor Help Under Eco friendly Counter Period Administrator Message in System Settings you can check Count Period Administrator Message Display Information Screen and Display Time Only the adminis...

Page 28: ...he screen changes from the initial display to the simple screen Only the main functions are shown on the simple screen Larger letters and keys are displayed making operations easier 1 Press the Simple Screen key CZV007 This illustration shows the simple display of the Printer screen To increase the screen contrast press the Simple Screen key again To return to the initial display from the high con...

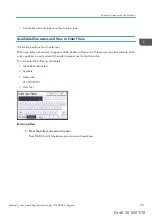
Page 29: ...haracter already at the cursor position a newly entered character appears next to the character You can enter the following characters Alphabetic characters Symbols Numerals 0123456789 User Text Entering letters 1 Press the letters you want to enter Press Shift to switch between uppercase and lowercase Using the Screen on the Control Panel midas p3_com_operating_instructions_gb_00198432_eng xml 29...

Page 30: ...ce or Delete All to delete characters Entering User Text You can select and use a user text that is registered to Program Change Delete User Text For details see page 286 General Features 1 Change the characters Entry Method User Text OK Select the User Text you want to use OK 1 Getting Started 30 midas p3_com_operating_instructions_gb_00198432_eng xml Draft 2016 01 18 ...

Page 31: ...software applications can be recalled easily by pressing the shortcut icons You can rearrange the order of the function and shortcut icons For details about the items on the Home screen see page 22 Guide to the Names and Functions of the Control Panel Screen Depending on the authentication settings there are two kinds of Home screens Default Home screen This screen is displayed when the authentica...

Page 32: ...laying the image on the Home screen Depending on the printer settings a user s Home screen cannot be used For details see Security Guide When customizing a user s Home screen the contents of the default Home screen are not changed When customizing the default Home screen after making a user s Home screen the settings for the user s Home screen that have already been registered are not changed The ...

Page 33: ...d Edit Home Add Icon Select Icon to Add Select the type of the icon to be added Select the icon to be added 2 Specify the position where the selected icon is added Select Destination Specify the position where Blank is displayed Press on the upper right corner of the Select Destination screen to check the position on the simple screen Changing the order of icons on the Home screen You can change t...

Page 34: ...n on the simple screen Deleting an icon on the Home screen Delete unused function or shortcut icons You can display only the icons of functions and shortcuts that you use Even if a function icon or shortcut icon for an embedded software application on the Home screen is deleted the application or function is not deleted For using Web Image Monitor 1 Log in to Web Image Monitor as an administrator ...

Page 35: ...For using Web Image Monitor 1 Log in to Web Image Monitor as an administrator For details see page 333 Displaying the top page 2 Point to Device Management and then click Device Home Management 3 Click Home Screen Settings 4 Select Insert Image in the Insert Image box To change the image select Select Another Image and then select a new image To delete the image select Delete Image and then click ...

Page 36: ...en the user s initial Home screen is restored the setting returns to the default Home screen When embedded software applications are installed the application icons are not deleted even if the default Home screen is restored For using Web Image Monitor 1 Log in to Web Image Monitor as an administrator For details see page 333 Displaying the top page 2 Point to Device Management and then click Devi...

Page 37: ...ide User Code to enter on User Code Authentication is the numerical value registered in the Address Book as User Code User Code Authentication Using the Control Panel This function is available for SP C342DN only This section explains the procedure for logging in to the printer when User Code Authentication is set 1 Enter a user code to authenticate Enter Enter a user code OK OK User Code Authenti...

Page 38: ...n explains the procedure for logging out the printer when Basic Authentication Windows Authentication LDAP Authentication or Integration Server Authentication is set To prevent use of the printer by unauthorized persons always log out when you have finished using the printer 1 Press the Menu key 2 Press Logout Press Yes 1 Press the Login Logout key and then press Yes Logging In Using a Printer Dri...

Page 39: ...7 Enter a login user name and login password already set on the printer or the server for user authentication Be sure to enter the same login user name and login password that is registered on the printer or the server If you do not enter a valid login user name and login password printing will not start 8 Click OK to close the Authentication dialog box 9 Click OK to close the printing preferences...

Page 40: ...ng see Security Guide Changing the Login Password You can use alphanumeric characters and symbols when registering a login user password You can register up to 128 single byte characters The password is case sensitive Keep this in mind when registering the password Do not disclose the password to anyone else Similarly do not write the password down and leave it where others can see it Change the p...

Page 41: ...Auth Info Auth Info at Login Change for Login Password Enter a new login password OK Enter the login password again OK OK Exit OK Changing the login password using Web Image Monitor 1 Start Web Image Monitor For details see page 333 Displaying the top page 2 Point to Device Management and then click Address Book 3 Select the user or group 4 Click Change 5 Select the User Authentication check box i...

Page 42: ...d Settings tab 3 Enter a login password already set on the printer or the server for user authentication Be sure to enter the same login password that is registered on the printer or the server If you do not enter a valid login password printing will not start 4 Click OK to close the Authentication dialog box 5 Click OK to close the printing preferences dialog box 1 Getting Started 42 midas p3_com...

Page 43: ...recommend that network administrators use this application Device Manager NX Lite is available as a free download For Device Manager NX Accounting contact your local dealer for information on downloading the software For details about the functionality see the manual for Device Manager NX Accounting Device Manager NX Lite Device Manager NX can use the data generated by SmartDeviceMonitor for Admin...

Page 44: ...1 Getting Started 44 midas p3_com_operating_instructions_gb_00198464_eng xml Draft 2016 01 18 ...

Page 45: ...nter as necessary For details see page 57 Installing Options 4 Load paper in the paper feed tray For details see page 105 Loading Paper 5 Plug in the power cord and then turn on the printer For details see page 70 Connecting the Power Cord and page 73 Turning On Off the Power 6 Select the language used on the display For details see page 77 Selecting the Display Language 7 Print a test page For de...

Page 46: ...lay For details see page 77 Selecting the Display Language 4 Print a test page For details see page 100 Test Printing 5 Connect the printer to your network For details see page 78 Connecting the Printer 6 Configure the printer s network settings For details see page 90 Configuration 7 Install the printer driver For details see Driver Installation Guide 2 Setting Up the Printer 46 midas p3_com_oper...

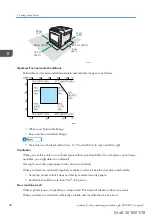
Page 47: ...able or tilted surface If it topples over an injury might occur After you move the machine use the caster fixture to fix it in place Otherwise the machine might move or come down to cause an injury Make sure the room where you are using the machine is well ventilated and spacious Good ventilation is especially important when the machine is used heavily Keep the machine away from salt bearing air a...

Page 48: ... or print large quantities you might detect an odd smell This might cause the output paper to also have an odd smell When you detect an odd smell regularly ventilate in order to keep the workplace comfortable Set up the printer so that it does not directly ventilate towards people Ventilation should be more than 30 m3 hr person New machine smell When a printer is new it might have a unique smell T...

Page 49: ...rom air conditioners Areas directly exposed to radiant heat from heaters Locations near air conditioners heaters or humidifiers Locations near other electronic equipment Locations subject to frequent strong vibration Power Source Connect the power cord to a power source of the following specification mainly Europe and Asia 220 240 V 50 60 Hz 5 A mainly North America 120 127 V 60 Hz 9 A Install Loc...

Page 50: ...tive 1 2 3 4 5 CYN095 1 Manual Read This First 2 Manual Quick Installation Guide 3 CD ROM Printer Drivers and Manuals 4 Power Cord 5 Additional Documentation This package does not include an interface cable Purchase one as necessary to connect to the printer 2 Setting Up the Printer 50 midas p3_com_operating_instructions_gb_00198472_eng xml Draft 2016 01 18 ...

Page 51: ...ght into contact with the mouth or nose The printer weighs approximately 29 kg 64 lb When moving the printer hold the handles located on both sides and then lift it slowly Lifting it carelessly or dropping it may cause an injury The removed tape is sticky Be careful not to let the sticky side touch your skin or clothes Do not grip the tray area when lifting the printer Make sure that paper clips s...

Page 52: ...owing parts Doing so may cause them to break The handle on the standard paper feed tray The underside of the bypass tray 3 Remove the tape DFP007 DFP008 2 Setting Up the Printer 52 midas p3_com_operating_instructions_gb_00198473_eng xml Draft 2016 01 18 ...

Page 53: ...4 Pull the top cover open lever upward to open the top cover DFP009 5 Remove the tape DFP010 1 2 DFP011 Unpacking midas p3_com_operating_instructions_gb_00198473_eng xml 53 Draft 2016 01 18 ...

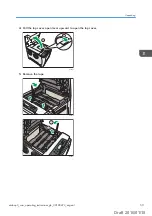
Page 54: ... be sure to place it on at a flat surface and then remove the protection sheet also DPP080 Do not touch the print cartridge s photo conductor unit DPP081 Do not touch a metal part 2 Setting Up the Printer 54 midas p3_com_operating_instructions_gb_00198473_eng xml Draft 2016 01 18 ...

Page 55: ...t cartridge and shake it from side to side five or six times DPP082 8 Return the print cartridges to its original position M C Y K DFP014 Unpacking midas p3_com_operating_instructions_gb_00198473_eng xml 55 Draft 2016 01 18 ...

Page 56: ...h optional accessories installed see page 57 Installing Options If you want to use the printer without optional accessories installed see page 105 Loading Paper For details about settings up the printer see page 45 Printer Set Up Procedure 2 Setting Up the Printer 56 midas p3_com_operating_instructions_gb_00198473_eng xml Draft 2016 01 18 ...

Page 57: ...lot supports different types of SD cards If you want to use two or more SD cards that can be inserted in the same slot contact your sales or service representative Attaching the Paper Feed Unit You can install a 500 sheet paper feed unit The printer weighs approximately 29 30 kg 63 9 66 1 lb When moving the printer hold the handles located on both sides and then lift it slowly Lifting it carelessl...

Page 58: ...unit was correctly attached print the configuration page and check Attached Equipment on the configuration page If the unit was attached correctly Tray 2 will appear For information about printing the configuration page see page 100 Test Printing If the optional paper feed unit was not installed properly repeat the procedure from the beginning If it cannot be installed correctly even after trying ...

Page 59: ...o discharge any static electricity Static electricity can damage the memory expansion units Do not subject the memory expansion unit to physical shocks Before using the new hard disk you must configure settings in the printer driver 1 Check the contents of the package 4 3 2 1 DPP016 1 Hard disk 2 Flat cable 3 Power cord 4 Screws 3 2 Remove the memory cover DFP017 Installing Options midas p3_com_op...

Page 60: ...cover to the top to remove it 1 2 DFP018 4 Install the hard disk in the indicated position DFP019 5 Connect the flat cable and power cord to the hard disk CSJ162 2 Setting Up the Printer 60 midas p3_com_operating_instructions_gb_00198474_eng xml Draft 2016 01 18 ...

Page 61: ...le and power cord to the board of the printer DFP021 8 Insert the two lower protrusions of the supplied inner cover and then the left protrusion into the notches on the printer 1 1 2 DFP022 Installing Options midas p3_com_operating_instructions_gb_00198474_eng xml 61 Draft 2016 01 18 ...

Page 62: ...ting the configuration page see page 100 Test Printing If the hard disk was not installed properly repeat the procedure from the beginning If it cannot be installed correctly even after trying the installation a second time contact your sales or service representative To use the installed hard disk configure the printer options in Accessories in the printer driver For information about opening Acc...

Page 63: ...bject the interface units to physical shocks Installing the Wireless LAN interface board 1 Check the contents of the package 2 Turn the printer off and unplug the power cord 3 Remove the cable cover DPP025 4 Loosen the two screws and remove the slot cover DPP026 The removed cover will not be reused Installing Options midas p3_com_operating_instructions_gb_00198474_eng xml 63 Draft 2016 01 18 ...

Page 64: ...hten the two screws to secure the interface board DPP028 7 Attach the cable cover DPP029 8 Plug in the power cord and then turn on the printer 9 Print the configuration page to confirm that the board was attached correctly 2 Setting Up the Printer 64 midas p3_com_operating_instructions_gb_00198474_eng xml Draft 2016 01 18 ...

Page 65: ...y even after trying the installation a second time contact your sales or service representative Before using the board you must configure settings from the printer control panel For details see page 93 Wireless LAN Configuration Installing the IEEE 1284 interface board 1 Check the contents of the package 2 Turn the printer off and unplug the power cord 3 Remove the cable cover DPP025 4 Loosen the ...

Page 66: ... the configuration page If it is correctly installed Parallel Interface will appear for Device Connection on the configuration page For details about printing the configuration page see page 100 Test Printing If the board was not installed properly repeat the procedure from the beginning If it cannot be installed correctly even after trying the installation a second time contact your sales or serv...

Page 67: ...ately Do not subject the card to physical shocks 1 Turn the printer off and unplug the power cord 2 Remove the cable cover DPP025 3 Loosen the screw and remove the SD card slot cover at an angle DPP032 Installing Options midas p3_com_operating_instructions_gb_00198474_eng xml 67 Draft 2016 01 18 ...

Page 68: ...e two or more SD cards simultaneously contact your service representative 5 Hook the SD card slot cover onto the opening attach it flat against the controller board and then fasten it using the screw DPP034 6 Attach the cable cover DPP029 7 Plug in the power cord and then turn on the printer 8 Check that the SD card was installed correctly 2 Setting Up the Printer 68 midas p3_com_operating_instruc...

Page 69: ...PS card Printing the configuration page if the XPS card is installed properly XPS will appear for Printer Language in System Reference For details about printing the configuration page see page 100 Test Printing If the card is not installed properly repeat the procedure from the beginning If it cannot be installed correctly even after trying the installation a second time contact your sales or ser...

Page 70: ...use with this machine only Do not use it with other appliances Doing so could result in fire or electric shock It is dangerous to handle the power cord plug with wet hands Doing so could result in electric shock If the power cord is damaged and its inner wires are exposed or broken contact your service representative for a replacement Use of damaged power cords could result in fire or electric sho...

Page 71: ...cting the power cord from the wall outlet always pull the plug not the cord Pulling the cord can damage the power cord Use of damaged power cords could result in fire or electric shock Be sure to disconnect the plug from the wall outlet and clean the prongs and the area around the prongs at least once a year Allowing dust to build up on the plug constitutes a fire hazard When performing maintenanc...

Page 72: ... cord into the rear of the printer DPP035 For details about turning on the power see page 73 Turning On Off the Power 2 Setting Up the Printer 72 midas p3_com_operating_instructions_gb_00198484_eng xml Draft 2016 01 18 ...

Page 73: ...tlet always pull the plug not the cord Pulling the cord can damage the power cord Use of damaged power cords could result in fire or electric shock Do not press and hold the main power switch when turning off the printer Doing so shuts down the printer forcefully and may damage the hard disk causing a malfunction of the printer Before unplugging the power cord plug turn off the power switch and ma...

Page 74: ...using unit heater is off to save energy In this mode you can change the printer settings on the control panel However the printer must exit this mode to print You can change the amount of time that the printer waits before switching to Fusing Unit Off mode under Fusing Unit Off Mode Timer For details see page 234 System SP C340DN for SP C340DN page 288 Timer Settings for SP C342DN To exit Fusing U...

Page 75: ...r is enabled and detects darkness in a room after the lights are turned off the sensor automatically turns the power off and reduces the power consumption of this product to 1W or less The default settings of ECO Night Sensor are enabled To change the settings see page 234 System SP C340DN for SP C332DN page 300 Administrator Tools for SP C333DN The ECO Night Sensor function s factory default is A...

Page 76: ...d Operations are suspended during printing The Data In indicator is on or flashing The sample print locked print hold print or stored print screen is displayed Accessing the printer using Web Image Monitor The printer consumes less energy when in Sleep mode but it takes longer to start printing If two or more energy saving functions are set the function for which the predetermined conditions to en...

Page 77: ...etting items using the or key 1 Select Language Press OK 2 Select the language you want to use Press OK 1 Press the User Tools key and then change the display language language name Press the button repeatedly until the language you want to use appears Selecting the Display Language midas p3_com_operating_instructions_gb_00198489_eng xml 77 Draft 2016 01 18 ...

Page 78: ...he main power switch is on turn it off Use the Unshielded Twisted Pair Cable UTP or Shielded Twisted Pair Cable STP and Category type 5 or more 1 Make sure the power is switched off 2 Remove the cable cover DPP025 3 Connect the Ethernet interface cable to the Gigabit Ethernet port DPP037 4 Connect the other end of the Ethernet interface cable to a network connection device such as a hub 2 Setting ...

Page 79: ... Ethernet cable is disconnected or the printer is in Sleep Mode 6 Attach the cable cover DPP029 Use an Ethernet interface cable that supports the speed that you selected for Ethernet Speed If you select Auto Select Enable 1Gbps for Ethernet Speed use an Ethernet interface cable that supports 1000BASE T Check the type of the plug before connecting Do not pull the connected cable forcefully Make sur...

Page 80: ...ain power switch is on turn it off 1 Make sure the power is switched off 2 Remove the cable cover DPP025 3 Connect a USB 2 0 Type B interface cable to the USB port B DPP038 4 Connect the other end to the USB 2 0 port on the host computer 2 Setting Up the Printer 80 midas p3_com_operating_instructions_gb_00198490_eng xml Draft 2016 01 18 ...

Page 81: ...become disconnected or somebody might trip on it Using a cable with some connectors or converters may result in an improper connection Connecting a Device to the Printer s USB Host Interface This section explains how to connect a device to the printer s USB host interface When connecting the card authentication device be sure to turn off the main power When connecting a digital camera make sure th...

Page 82: ...Interface Check the type of the plug before connecting Do not pull the connected cable forcefully Make sure the cable is properly connected Otherwise it might become disconnected or somebody might trip on it Using a cable with some connectors or converters may result in an improper connection Digital camera connection This printer supports direct printing which allows you to print images taken wit...

Page 83: ... to the printer store the USB interface cable in a location where it will not be damaged For the printing method see page 197 Direct Printing from a Digital Camera Connecting to the IEEE 1284 Interface This section explains how to connect an IEEE 1284 interface cable to the IEEE 1284 interface board If the main power switch is on turn it off For connection to the IEEE 1284 interface board use a ha...

Page 84: ... adapter contact your sales or service representative 5 Connect the other end of the cable into the interface connector on the host computer Before connecting the cable to the computer check the shape of the connector Connect the cable firmly 6 Attach the cable cover DPP029 7 Turn on the main power switch of the printer 2 Setting Up the Printer 84 midas p3_com_operating_instructions_gb_00198490_en...

Page 85: ...bnet mask from the control panel of the printer see page 93 Wireless LAN Configuration Before using this printer with a wireless LAN interface you must select Wireless LAN in LAN Type Specifying Wireless LAN Settings You can specify wireless LAN settings either by directly connecting the printer to the computer in Ad Hoc mode or by using a router or other wireless access point in Infrastructure mo...

Page 86: ...en in Infrastructure mode For details see page 94 Configuring a wireless LAN manually Setup procedure This section explains how to setup a wireless LAN interface Two methods of setting up wireless LAN are available automatic setup by using WPS Wi Fi Protected Setup and manual setup by entering required information such as SSID To configure the wireless LAN settings manually display the screen for ...

Page 87: ...tion For details about security type settings see Security Guide Checking the signal This section explains how to check the printer s radio wave status When using in infrastructure mode you can check the printer s radio wave status using the control panel Press the Menu key and then select the setting items using the or key 1 Select Host Interface Press OK 2 Select Wireless LAN Press OK 3 Select W...

Page 88: ... server must use a ferrite core to prevent RF interference Be sure to turn off the power switch of the printer before connecting or disconnecting the Ethernet interface cable 1 Make a loop at a distance of a few centimeters 1 from each end of the Ethernet interface cable and then attach to each loop the ferrite core provided with the USB device server 1 1 BZU010 2 Setting Up the Printer 88 midas p...

Page 89: ...wer plug of the printer to the wall outlet and turn the printer on It may take several seconds for the printer to recognize the USB device server If you have disconnected the USB cable connect the USB cable again LED indications If the USB device server is attached properly the LEDs on the Ethernet port light up as follows DBQ903 1 2 3 1 During 100BASE TX operation the upper LED lights up in yello...

Page 90: ...Web Image Monitor Help Specifying an IP address no DHCP If you want to use the printer on a network without using DHCP or want to use a static IP address use the following procedure to assign a specific IPv4 address to the printer Before making any changes contact your network administrator to obtain the IP address subnet mask and gateway address to be specified on the printer Press the Menu key a...

Page 91: ...mask OK OK IPv4 Gateway Address Specify the IPv4 gateway address for the printer Enter the gateway address OK Receiving an IP address automatically DHCP Follow the procedure below to set the printer to receive an IP address automatically using DHCP The DHCP feature is active by default so this procedure is only required if you have changed the default settings When Auto Obtain DHCP is selected you...

Page 92: ...ws two interfaces to determine the optimum speed when they are connected A connection cannot be established if the selected Ethernet speed does not match your network s transmission speed To reduce the power consumption of network devices the default Ethernet speed of the printer does not exceed 100BASE TX 100 Mbps To communicate using a higher speed enable 1000BASE T 1Gbps communication by select...

Page 93: ...r SP C340DN page 291 Interface Settings for SP C342DN Configuring a Wireless LAN Using Easy Setup When Using a Wireless Access Point Supporting WPS If the wireless access point in use supports WPS the wireless LAN connection settings and security settings can be automatically configured in Infrastructure mode Press the Menu key and then select the setting items using the or key 1 Select Host Inter...

Page 94: ...onnect on the screen PIN Code Enter the displayed PIN code in the Registrar on the wireless access point s webpage and then press Connect on the screen Configuring a wireless LAN manually To set up a wireless LAN manually specify the transmission mode and SSID Service Set Identifier of the wireless access point that the printer will use for network access Ask your network administrator for the SSI...

Page 95: ...Web Image Monitor For details see Web Image Monitor Help Setting the SSID Press the Menu key and then select the setting items using the or key 1 Select Host Interface Press OK 2 Select Wireless LAN Press OK 3 Select SSID Setting Press OK 4 SSID Enter Enter the SSID Press OK You can switch between lower upper case letters and numeric characters by pressing ab AB 12 The characters that can be used ...

Page 96: ...g When using IEEE 802 11 b g Channels 1 11 When using IEEE 802 11 a Channels 36 40 44 and 48 When using IEEE 802 11 n Channels 1 11 36 40 44 and 48 The transmission mode of the wireless LAN can also be set using Web Image Monitor For details see Web Image Monitor Help Setting the SSID 1 Press the User Tools key and then display the Wireless LAN screen System Settings Interface Settings Wireless LA...

Page 97: ...de Specifying an IP address for the USB Device Server Specify the IP address for the USB device server manually You can share the printer among multiple networks by specifying an IP address of a segment different from that of the printer To change the IP address for the USB device server access the setting screen for the printer using a web browser For details about the setting items see the USB d...

Page 98: ...me and then click OK 4 Specify the IP address Subnet Mask and Default Gateway When DHCP is enabled the IP address can be obtained automatically from a network device with the DHCP server function 5 Configure the other settings as necessary and then click Submit 6 Exit the web browser 7 Disconnect the Ethernet interface cable from the computer used for setup and then connect the cable to a network ...

Page 99: ...th the printer and make the following settings 1 Specify the IP address for the USB device server using the Add Standard TCP IP Printer Port Wizard 2 Select Custom for the device type 3 For Port 9100 select Raw as the protocol and then specify 9100 for the port number For LPR select LPR as the protocol and then specify lp as the queue name For IPP printing see Using the IPP Port in Driver Installa...

Page 100: ...t Press OK 2 Select Config Page Press OK 1 Press the User Tools key and then display the List Test Print screen Printer Features List Test Print 2 Print the configuration page Configuration Page Interpreting the Configuration Page This section describes the configuration page System Reference Machine ID Displays the serial number assigned to the board by its manufacturer Total Memory Displays the ...

Page 101: ...ys the settings made under the Paper Input menu Maintenance Displays the settings made under the Maintenance menu System Displays the settings made under the System menu Machine Modes Displays the settings made under the Machine Modes menu PCL Menu Displays the settings made under the PCL Menu PS Menu Displays the settings made under the PS Menu PDF Menu Displays the settings made under the PDF Me...

Page 102: ...r firmware System Displays the version number of the system firmware Engine Displays the version number of the printer engine LCDC Displays the version number of the panel display NIB Displays the version number of the Network interface Device Connection This item s appears when the device option s is installed Printer Language Displays the version number of the printer language Attached Equipment...

Page 103: ... subnet mask and gateway address appear in parentheses on the configuration page Interface Information Displays the interface information Maintenance Image Displays settings made under Maintenance Image menu Maintenance Print Displays settings made under Maintenance Print menu System Settings Displays settings made under System Settings menu Virtual Printer Displays whether the virtual printer is ...

Page 104: ...2 Setting Up the Printer 104 midas p3_com_operating_instructions_gb_00198508_eng xml Draft 2016 01 18 ...

Page 105: ...e type and weight of the paper you want to use for printing For details about available paper trays for each paper size and type see page 106 Paper Size Specifications and page 108 Paper Type Specifications 2 Change the paper size and type settings for the tray you selected Use the control panel of the printer or Web Image Monitor to change the paper size and type For details about changing paper ...

Page 106: ... can print on both sides of paper Not supported Metric sizes Paper size name Actual size Bypass tray Tray 1 Trays 2 Two sided A4 210 297 mm A A A A5 148 210 mm A A A6 105 148 mm A A B5 182 257 mm A A B6 128 182 mm A C5 Env 162 229 mm A C6 Env 114 162 mm A DL Env 110 220 mm A 16K 195 267 mm A A Imperial sizes Paper size name Actual size Bypass tray Tray 1 Trays 2 Two sided 81 2 14 8 5 14 A A 81 2 1...

Page 107: ...ided Vertical size One sided Horizontal size Two sided Vertical size Two sided Bypass tray 64 0 to 216 0 mm 125 0 to 1260 0 mm 90 to 216 0 mm 240 to 356 0 mm Tray 1 148 0 to 216 0 mm 210 0 to 356 0 mm 90 0 to 216 0 mm 240 to 356 0 mm Imperial sizes Tray Horizontal size One sided Vertical size One sided Horizontal size Two sided Vertical size Two sided Bypass tray 2 52 to 8 50 4 93 to 49 60 3 55 to...

Page 108: ... paper Not supported Paper type Paper weight No Bypass tray Tray 1 Trays 2 Two sided Thin Paper 1 A A A Plain Paper 2 A A A Middle Thick Paper 3 A A A Thick Paper 1 4 A A A Thick Paper 2 5 A A A Thick Paper 3 6 A Recycled Paper 2 A A A 3 Color Paper 2 A A A 3 Special Paper 1 1 to 2 A A 3 Special Paper 2 3 to 4 A A 3 Special Paper 3 5 to 6 A A A Letterhead Paper 2 A A A 3 Preprinted Paper 2 A A A 3...

Page 109: ... g m2 20 24 lb BOND 4 91 105 g m2 24 34 lb BOND 5 106 163 g m2 34 lb BOND 90 lb INDEX 6 1 164 220 g m2 90 lb INDEX 80 lb COVER 1 Paper weight No 6 is available for the bypass tray only 2 It is not necessary to specify the paper weight for this paper type 3 Duplex printing is available with paper of weight No 1 to 5 Paper Type Specifications midas p3_com_operating_instructions_gb_00198514_eng xml 1...

Page 110: ...ilable paper sizes and types for each paper tray see page 106 Paper Size Specifications and page 108 Paper Type Specifications Depending on the environment where the printer is being used you might at times hear a rustling noise from paper moving through the printer This noise does not indicate a malfunction Unusable Paper To prevent errors and misfeeds do not use Paper for inkjet printers thermal...

Page 111: ...will be exposed to direct sunlight Avoid storing paper in humid areas humidity 70 or less Store on a flat surface Do not store paper vertically Once opened store paper in plastic bags Print Area The following shows the recommended print area for paper printed with this printer CEC244 2 3 3 1 4 4 1 Print area 2 Feed direction 3 4 2 mm 0 2 inches 4 4 2 mm 0 2 inches The print area may vary depending...

Page 112: ...s you may be able to print outside the recommended print area However the actual output may not come out as desired or a paper feed problem may occur 3 Loading Paper 112 midas p3_com_operating_instructions_gb_00198515_eng xml Draft 2016 01 18 ...

Page 113: ...ay Do not mix different types of paper in the same paper tray After loading paper specify the paper size using the control panel or paper size dial and paper type using the control panel When printing a document specify the same paper size and type in the printer driver as specified on the printer Do not move the side paper guides and end paper guide forcefully Doing so may damage the tray Do not ...

Page 114: ...atch the paper size DPP044 4 Squeeze the end guide and slide it inward to match the standard size DPP045 5 Load the new paper stack print side up Make sure paper is not stacked higher than the upper limit upper line marked inside the tray 3 Loading Paper 114 midas p3_com_operating_instructions_gb_00198516_eng xml Draft 2016 01 18 ...

Page 115: ...end the tray For details see page 115 When Loading Paper Larger than A4 or 81 2 11 Before loading Postcard or 148 200 mm paper straighten any curls within 2 mm 0 1 inch upward and 0 mm 0 inches downward on the tray Letterhead paper must be loaded in a specific orientation For details see page 121 Loading Orientation Fixed Paper or Two Sided Paper You can load envelopes into Tray 1 Envelopes must b...

Page 116: ...t stops lift the front side of the tray and then pull it out of the printer DPP042 Place the tray on a flat surface 3 Push the metal plate down until it clicks into place to lock DPP043 3 Loading Paper 116 midas p3_com_operating_instructions_gb_00198516_eng xml Draft 2016 01 18 ...

Page 117: ...a click 2 1 1 DPP049 After extension make sure the arrows on the extender and tray are aligned DPP050 5 Squeeze the clip on the side paper guide and then slide it to match the legal paper size DPP051 Loading Paper into Paper Trays midas p3_com_operating_instructions_gb_00198516_eng xml 117 Draft 2016 01 18 ...

Page 118: ...slide it inward to match the legal paper size DPP052 When loading A4 81 2 11 or smaller paper do not extend the tray Otherwise a paper jam may occur 3 Loading Paper 118 midas p3_com_operating_instructions_gb_00198516_eng xml Draft 2016 01 18 ...

Page 119: ... the printer When loading label paper load it one by one When printing on paper that is longer than A4 load only a single sheet of paper on the bypass tray at a time and hold the paper so it is fed correctly Also make sure to check in advance the print quality of the type of paper you intend to use How paper is fed or print quality will be differs depending on the type or thickness of paper 1 Whil...

Page 120: ...you set the paper direction to Before loading Postcard or 148 200 mm paper straighten any curls within 2 mm 0 1 inch upward and 0 mm 0 inches downward on the tray Letterhead paper must be loaded in a specific orientation For details see page 121 Loading Orientation Fixed Paper or Two Sided Paper You can load envelopes into the bypass tray Envelopes must be loaded in a specific orientation For deta...

Reviews: