Email: support@ridgegatetools.com WWW.RIDGEGATETOOLS.COM
|2
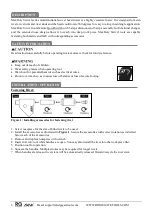
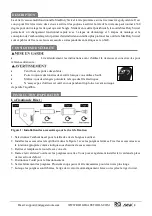
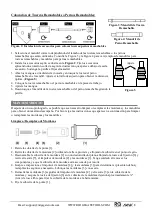
Fastening Rivet Nuts or Rivet Studs:
Figure 2: Installing accessories for fastening rivet nut or rivet stud
1.
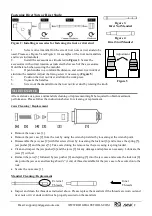
Select correct mandrel for the size of rivet nuts or rivet studs to be
used. Please see Figure 3 and Figure 4 for examples of the rivet nut mandrels
and rivet stud mandrels.
2.
Install the accessories as illustrated in
Figure 2
. Secure the
accessories with correct rotation as indicated below each of the accessories.
Hold the knob when securing the mandrel.
3.
Open handles to a comfortable distance, and screw rivet nut/rivet
stud into the mandrel. Adjust the fixing screw if necessary. (
Figure 5
)
4.
Position the rivet nut/rivet stud into the work piece.
5.
Squeeze the handles.
6.
Screw out the mandrel from the rivet nut/rivet stud by rotating the knob.
After extensive use, jaws and mandrels cleaning or replacement might be required to obtain maximum
performance. Please follow the instructions below for cleaning or replacement.
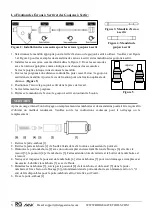
Jaws Cleaning / Replacement
•
Remove the nose case [1].
•
Remove the jaw case [2] from the tool by using the wrench provided by loosening at the wrench point.
•
Disassemble the jaw case [2] with flat screw driver by loosening the lock nut [6] and remove the spring [5],
jaw pusher [4] and the jaws [3]. Take care during the removal as the jaw casing is spring loaded.
•
Clean and inspect the jaw pusher [4] and the jaws [3] for any damage and replace as necessary. Lubricate the
jaws [3] with oil.
•
Reinsert the jaws [3] followed by jaw pusher [4] and spring [5] into the jaw case and secure the lock nut [6]
deep into the jaw case and leaving about ¾” (1cm) of thread available for the jaw case to be secured onto the
tool.
•
Secure the nose case [1].
Mandrel Cleaning / Replacement
•
Inspect and clean the threads as indicated above. Please replace the mandrels if the threads are worn out and
rivet nuts or rivet studs could not be properly secured on the mandrels.
MAINTENANCE
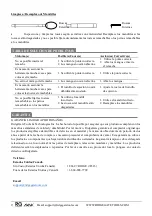
Figure 3:
Rivet Nut Mandrel
Figure 4:
Rivet Stud Mandrel
External
Threads
Inner
Threads
Adjustment
Figure 5


