background image

10

®

®

OPERATION

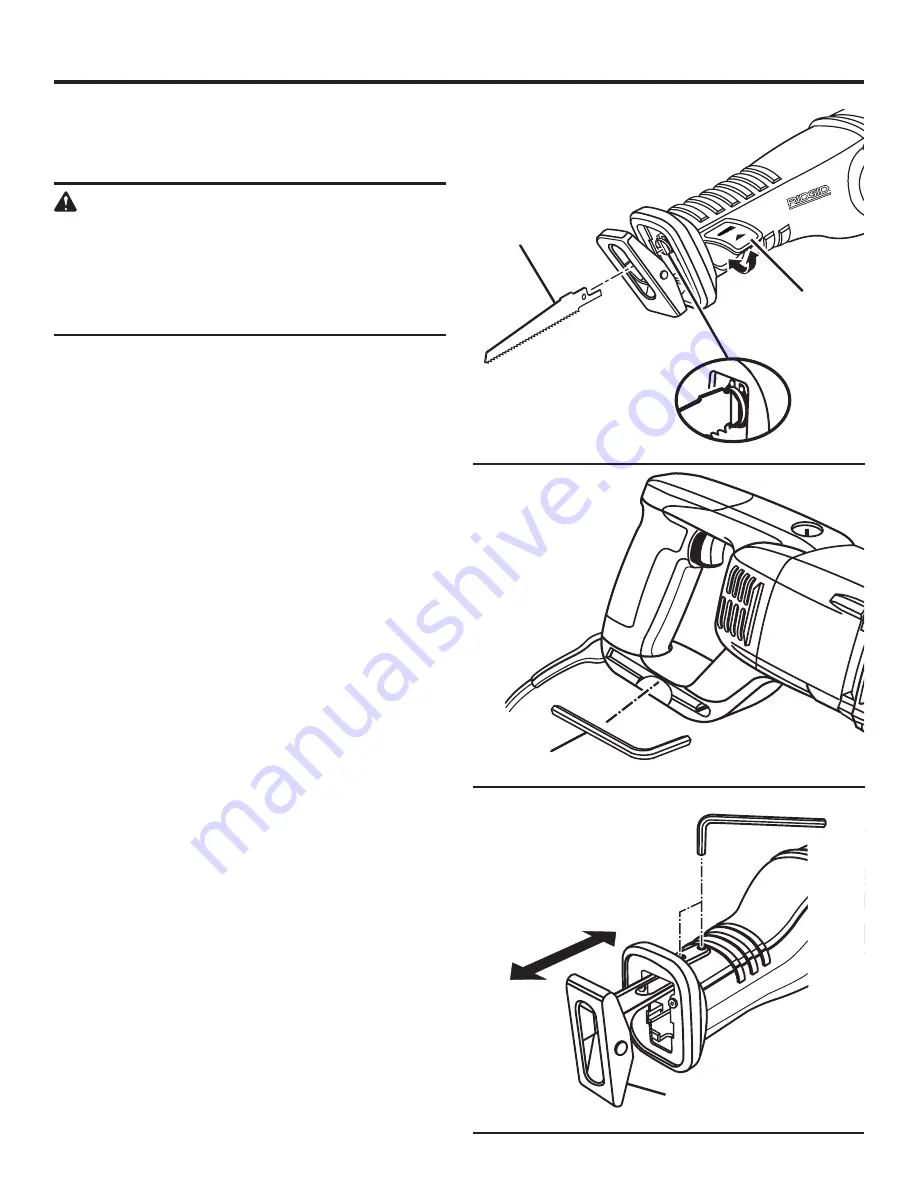
TO INSTALL BLADE

See Figure 2.

n

  Unplug the saw.

WARNING:

The tool should never be connected to a power 
supply  when  you  are  assembling  parts,  making 
adjustments, cleaning, performing maintenance, or 
when the tool is not in use. Disconnecting the tool 
will prevent accidental starting that could cause 
serious injury.

n

  Lift  blade  clamp  lock/release  lever  located  on  side  of 

saw.

n

  Insert saw blade between blade clamp and saw bar.

  NOTE:

 Blade can be installed with teeth facing either up 

or down.

n

  Lower blade clamp lever to lock position.

BASE ASSEMBLY

The base assembly of the reciprocating saw pivots up and 
down in both directions. The base is adjustable, allowing the 
use of the blade teeth at different positions on the blade.

TO  CHANGE  POSITIONS  OF  THE  BASE 
ASSEMBLY

See Figures 3 - 4.

n


Unplug the saw.

n

  Remove  hex  key  from  the  hex  key  storage  in  the 

handle.

n

  Loosen the screws in the gear frame with the hex key.

n

  Reposition base assembly.

n

  Retighten screws securely. 

Do not

 overtighten screws 

or use an aid with hex key.

n

  Remove hex key and replace in storage.

Fig. 2

Fig. 3

Fig. 4

BLADE

HEX KEY

BASE ASSEMBLY

BLADE CLAMP 

LEVER

Summary of Contents for R3001

Page 1: ...ty When properly cared for it will give you years of rugged trouble free performance WARNING To reduce the risk of injury the user must read and understand the operator s manual before using this product Thank you for buying a RIDGID product SAVE THIS MANUAL FOR FUTURE REFERENCE OPERATOR S MANUAL RECIPROCATING SAW VARIABLE SPEED R3001 ...

Page 2: ...Assembly 9 n Operation 9 12 n Maintenance 12 13 n Warranty 15 n Customer Service Information 16 INTRODUCTION This tool has many features for making its use more pleasant and enjoyable Safety performance and dependability have been given top priority in the design of this product making it easy to maintain and operate ...

Page 3: ...r finger on the switch or plugging in tools that have the switch on invites accidents n Remove adjusting keys or wrenches before turning the tool on A wrench or a key that is left attached to a rotating part of the tool may result in personal injury n Do not overreach Keep proper footing and balance at all times Proper footing and balance enables better control of the tool in unexpected situations...

Page 4: ...ice center Following this rule will reduce the risk of shock fire or serious injury n Make sure your extension cord is in good condition When using an extension cord be sure to use one heavy enough to carry the current your product will draw A wire gauge size A W G of at least 14 is recommended for an extension cord 50 feet or less in length A cord exceeding 100 feet is not recommended If in doubt...

Page 5: ...njury user must read and understand operator s manual before using this product Eye Protection Always wear safety goggles or safety glasses with side shields and a full face shield when operating this product Precautions that involve your safety Failure to keep your hands away from the blade will result in serious personal injury Failure to keep your hands away from the blade will result in seriou...

Page 6: ...the product to your nearest AUTHORIZED SERVICE CENTER for repair When servicing use only identical replacement parts WARNING To avoid serious personal injury do not attempt to use this product until you read thoroughly and understand completely the operator s manual Save this operator s manual and review frequently for continuing safe operation and instructing others who may use this product The o...

Page 7: ...eck the power supply EXTENSION CORDS When using a power tool at a considerable distance from a power source be sure to use an extension cord that has the capacity to handle the current the tool will draw An undersized cord will cause a drop in line voltage resulting in overheating and loss of power Use the chart to determine the minimum wire size required in an extension cord Only round jacketed c...

Page 8: ...e reciprocating saw pivots up and down in both directions The base is adjustable allowing the use of the blade teeth at different positions on the blade EXTERNALLY ACCESSIBLE BRUSHES Externally accessible brushes extend the life of the machine ILLUMINATED PLUG This saw is equipped with a plug that illuminates when power is supplied to the tool This allows the operator to easily identify live tools...

Page 9: ...l you have carefully inspected and satisfactorily operated the tool n If any parts are damaged or missing please call 1 866 539 1710 for assistance PACKING LIST Reciprocating Saw Saw Blades 2 Hex Key 5 mm Tool Bag Operator s Manual ASSEMBLY OPERATION WARNING Do not allow familiarity with tools to make you careless Remember that a careless fraction of a second is sufficient to inflict severe injury...

Page 10: ...ith teeth facing either up or down n Lower blade clamp lever to lock position BASE ASSEMBLY The base assembly of the reciprocating saw pivots up and down in both directions The base is adjustable allowing the use of the blade teeth at different positions on the blade TO CHANGE POSITIONS OF THE BASE ASSEMBLY See Figures 3 4 n Unplug the saw n Remove hex key from the hex key storage in the handle n ...

Page 11: ...keep the saw cutting Let the blade and saw do the work Use of excessive pressure that causes bending or twisting of the blade may result in broken blades WARNING Hold tool by insulated gripping surfaces when performing an operation where the saw blade may contact hidden wiring or its own card Contact with a live wire will make exposed metal parts of the tool live and shock the operator PLUNGE CUTT...

Page 12: ...r tool operation or when blowing dust If operation is dusty also wear a dust mask GENERAL MAINTENANCE Avoid using solvents when cleaning plastic parts Most plastics are susceptible to damage from various types of commercial solvents and may be damaged by their use Use clean cloths to remove dirt dust oil grease etc WARNING Do not at any time let brake fluids gasoline petroleum based products penet...

Page 13: ...dle n Remove brush caps 2 using a screwdriver n Remove brush assemblies 2 n Check for wear Replace both brush assemblies when either has less than 1 4 in length of carbon remaining NOTE Do not replace one side without replacing the other n Reassemble using new brush assemblies Make sure curvature of brush matches curvature of motor and that brush moves freely in brush tube n Reassemble by reversin...

Page 14: ...14 NOTES ...

Page 15: ... www ridgid com When requesting warranty service you must present the original dated sales receipt The authorized service center will re pair any faulty workmanship and either repair or replace any part covered under the warranty at our option at no charge to you One World Technologies Inc P O Box 35 Hwy 8 Pickens SC 29671 RIDGID HAND HELD AND STATIONARY POWER TOOL 3 YEAR LIMITED SERVICE WARRANTY ...

Page 16: ...d service center nearest you please call 1 866 539 1710 or visit us online at www ridgid com The model number of this tool is found on a plate attached to the motor housing Please record the serial number in the space provided below When ordering repair parts always give the following information Model No Serial No R3001 983000 603 3 24 06 REV 01 OPERATOR S MANUAL RECIPROCATING SAW R3001 VARIABLE ...

Reviews: