background image

5 - English

ASSEMBLY

FEATURES

WARNING:

Do not use this product if it is not completely 
assembled or if any parts appear to be missing or 
damaged. Use of a product that is not properly and 
completely assembled or with damaged or missing 
parts could result in serious personal injury.

PRODUCT SPECIFICATIONS

LED ........................................ 20 Watts Total (5 Watts/LED)
Light Output ................................1200 Lumens (Maximum)

WARNING:

Do not attempt to modify this product or create 
accessories or attachments not recommended 
for use with this product. Any such alteration 
or modification is misuse and could result in a 
hazardous condition leading to possible serious 
personal injury.

Maximum Runtime ........................Approximately 20 hours

If any parts are damaged or missing, please call 1-866-539-1710 for assistance.

OPERATION

WARNING:

Do not direct the light beam at persons or animals 
and do not stare into the light beam yourself (not 
even from a distance). Staring into the light beam 
may result in serious injury or vision loss.

WARNING:

Do not allow familiarity with tools to make you 
careless. Remember that a careless fraction of a 
second is sufficient to inflict serious injury.

WARNING:

Do not use any attachments or accessories 
not recommended by the manufacturer of this 
tool. The use of attachments or accessories not 
recommended can result in serious personal injury.

APPLICATIONS

You may use this tool for the purpose listed below:

 

General illumination of most work areas

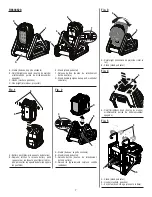
INSTALLING/REMOVING BATTERY PACK

See Figure 1, page 7.

  Align the raised rib on the battery pack with the groove 

inside the flood light, then slide the battery pack into the 
flood light.

  Make sure the latches on each side of the battery pack 

snap into place and the battery pack is secured in the 
flood light before beginning operation.

  Depress the latches to remove the battery pack.

For complete charging instructions, see the operator’s 
manuals for your battery pack and charger.

ATTACHING THE WORKLIGHT TO THE STAND

See Figure 2, page 7.

  Align the raised rib on the flood light with the groove in the 

stand’s cradle, then insert the flood light into the cradle 
until it clicks into place.


NOTE:

 The flood light is designed so that it will only install 

into the cradle one way. 

  Depress the release button to remove the flood light.

ADJUSTING THE FLOOD LIGHT POSITION

See Figure 3, page 7.

When the flood light is attached to the stand, it can be 
rotated 360 degrees. Adjust light to desired position to best 
illuminate the work area.

OPERATING THE FLOOD LIGHT

See Figure 4, page 7.

Push the on/off/brightness knob to turn the flood light on 
and off.

To increase brightness:

 turn the on/off/brightness knob 

clockwise.

To decrease brightness:

 turn the on/off/brightness knob 

counter-clockwise.

Summary of Contents for R8694620

Page 1: ...OR S MANUAL MANUEL D UTILISATION MANUAL DEL OPERADOR 18 V FLOOD LIGHT PROJECTEUR DE 18 V PROYECTOR DE 18 V R8694620 To register your RIDGID product please visit http register RIDGID com Pour enregistr...

Page 2: ...es not turn it on or off A product that cannot be controlled with the switch is dangerous and must be repaired Disconnect battery pack from product before making any adjustments changing accessories o...

Page 3: ...f a source of ignition such as a pilot light To reduce the risk of serious personal injury never use any cordless product in the presence of open flame An exploded battery can propel debris and chemic...

Page 4: ...nd learn their meaning Proper interpretation of these symbols will allow you to operate the product better and safer SYMBOL NAME DESIGNATION EXPLANATION Safety Alert Indicates a potential personal inj...

Page 5: ...sories not recommended can result in serious personal injury APPLICATIONS You may use this tool for the purpose listed below General illumination of most work areas INSTALLING REMOVING BATTERY PACK Se...

Page 6: ...and rotate them upward 180 degrees NOTE Hooks will not rotate until they are fully extended Put the wider side of the 2x wood material on the clamping surface of the stand The edge of the wood should...

Page 7: ...eur ne permet pas de le mettre en marche ou de l arr ter Un produit qui ne peut pas tre contr l par son commutateur est dangereux et doit tre r par D connecter le blocs piles avant d effectuer des r g...

Page 8: ...telle qu une veilleuse Pour r duire les risques de blessures graves ne jamais utiliser un appareil sans fil quel qu il soit en pr sence d une flamme vive En explosant une pile peut projeter des d bri...

Page 9: ...locales comp tentes pour les options de recyclage et ou l limination Intensit d clairage extr me Ce produit utilise des DEL tr s brillantes Ne pas diriger l clairage vers les yeux ou le visage pour vi...

Page 10: ...ner de la les espaces de travail INSTALLATION RETRAIT DU BLOC PILES Voir la figure 1 page 7 Aligner la nervure du bloc pile sur la rainure int rieure de la projecteur et ins rer le bloc pile dans la p...

Page 11: ...e sont pas compl tement d pli s Placer le c t le plus large du morceau de bois de 2x sur la surface de bridage des pattes du stand Le bord du bois devrait reposer contre la surface frontale de stand T...

Page 12: ...LEO Y CUIDADO DE LA PROYECTOR No utilice los producto si el interruptor no enciende o no apaga Un producto que no puede controlarse con el interruptor es peligroso y debe repararse Desconecte el paque...

Page 13: ...nte de inflamaci n como una luz gu a Para reducir el riesgo de lesiones corporales serias nunca use un producto inal mbrico en presencia de llamas expuestas La explosi n de una bater a puede lanzar fr...

Page 14: ...es reguladoras de desechos para obtener informaci n en relaci n con las alternativas de reciclado y desecho disponibles Luz sumamente brillante Este producto utiliza luces LED sumamente brillantes Par...

Page 15: ...umerados abajo La iluminaci n general de la mayor a de los espacios de trabajo INSTALACI N DESMONTAR DEL PAQUETE DE BATER AS Vea la figura 1 p gina 7 Alinee la costilla realzada del paquete de pilas c...

Page 16: ...e madera 2x usando los ganchos Hale los ganchos completamente fuera de sus franjas y g relos 180 grados hacia arriba NOTA Los ganchos no girar n hasta que est n completamente extendidos Coloque el lad...

Page 17: ...os pestillos A Cradle berceau soporte oscilante B Stand stand pedestal C Release button bouton de rel chement bot n de afloje D Raised rib paulements sur lev costilla realzadas A On off brightness kno...

Page 18: ...8 Fig 6 Fig 7 Fig 10 Fig 11 Fig 8 Fig 9 A Tripod mounting hole monture du trou du tr pied montaje para agujero para tr pode A Tension screw vis de tension tornillo de tensi n A A...

Page 19: ...15 NOTES NOTAS...

Page 20: ...n d pannage ne pas retourner ce produit au magasin Contacter le centre de r parations RIDGID agr le plus proche Veiller fournir toutes les informations pertinentes lors de tout appel t l phonique ou v...

Reviews: