15
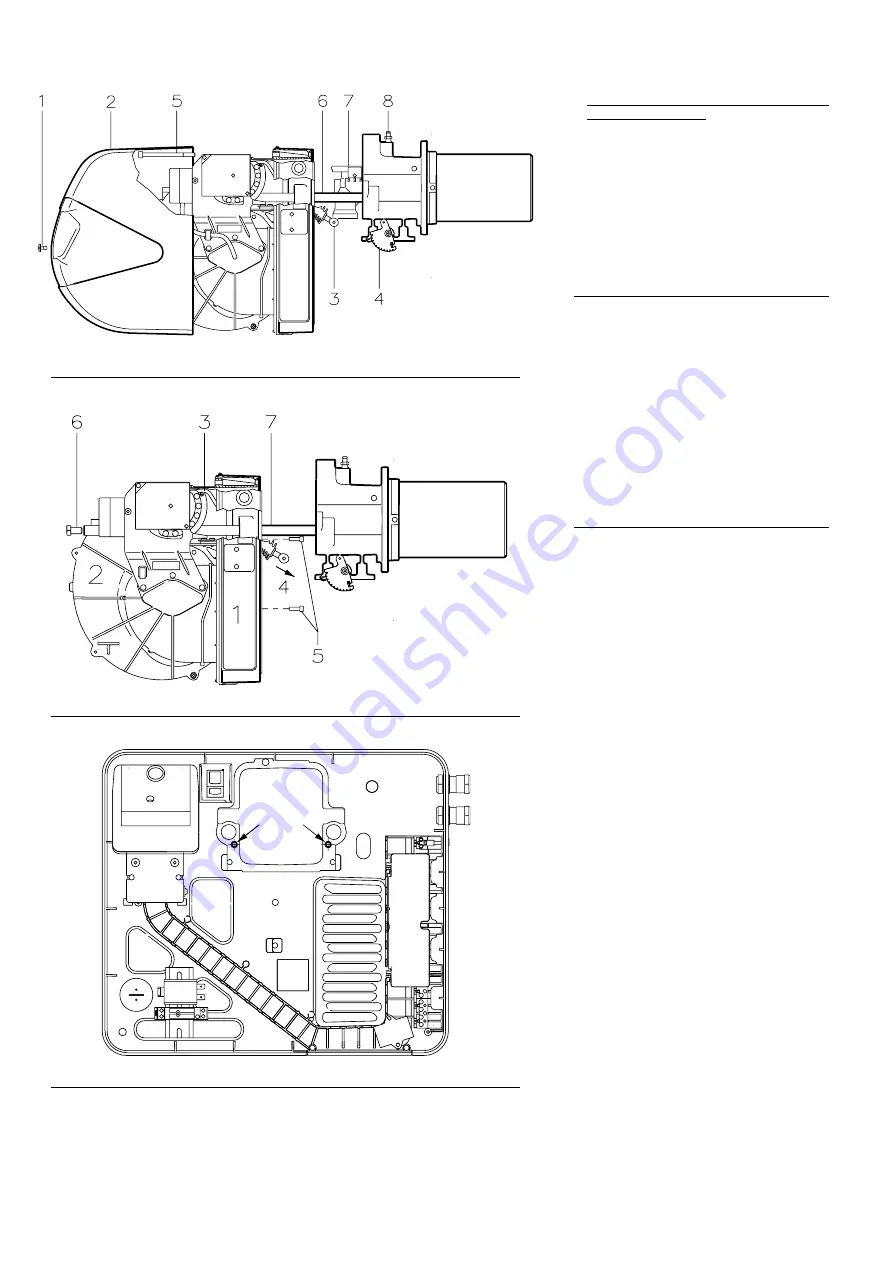
TO OPEN THE BURNER (A):
- Switch off the electrical power.
- Remove the screw 1) and pull out the hood
2).
- Disengage the articulated coupling 3) from
the graduated sector 4).
- Remove the screw 5) only with the long head
models; pull the burner back on the guides 6)
for about 100mm. Disconnect the probe and
electrode leads and then pull the burner fully
back.
Now extract the gas distributor 7) after having
removed the screw 8).
Remove the screws 2)(B)p. 6 and tighten the
two extensions 25)(A)p.3 supplied with the
burner.
Retighten the two screws 2)(B)p.6 on the termi-
nal of the extensions.
TO CLOSE THE BURNER (A):
- Push the burner up to approximately 100mm
from the pipe coupling.
- Reconnect the leads and slide in the burner
until it comes to a stop.
- Replace the screw 5) and carefully pull the
probe and electrode cables outwards until
they are slightly taut.
- Re-couple the articulated coupling 3) to the
graduated sector 4).
- In the long head models, unscrew the exten-
sions and reposition them in the appropriate
space; tighten the screws to the guides
2)(C)p.6.
- Reposition the hood 2) and fix with the
screw 1).
SWITCHBOARD MAINTENANCE
If it is necessary to carry out maintenance on the
switchboard 1)(B), it is possible to remove only
the fan unit 2)(B), to allow improved access to
the electrical components.
With the burner open as in fig.(A), unhook the
tie-rod 3)(B), removing the screw on the variable
profile cam, and extract it from the tip 4)(B).
At this point, disconnect the cables relating to
the air pressure switch, the servomotor and fan
motor.
Remove the 3 screws 5)(B) positioned on the
protective cover.
Removing the 2 screws 6)(B), it is possible to
unthread the fan unit 2)(B) from the guides
7)(B).
Finally, you can use 2 of the 3 screws 5)(B) to fix
the electrical switchboard to the pipe coupling,
in the points indicated in fig.(C), and then carry
out the maintenance operations.
(A)
OPENING THE BURNER
D3846
(B)
D3876
(C)
D3877
Summary of Contents for 3788710
Page 1: ...END VALIDITY DATE 12 06 2007 ...
Page 64: ...20 RS 34 M MZ ...
Page 65: ...21 RS 44 M MZ 1Ph ...
Page 66: ...22 RS 34 44 M MZ 1Ph ...
Page 67: ...23 RS 44 M MZ 3Ph ...
Page 68: ...24 RS 44 M MZ 3Ph ...
Page 69: ...25 RS 34 44 M MZ 1Ph 3Ph ...
Page 70: ...26 RS 34 44 M MZ 1Ph 3Ph ...


