20175134
24
GB
Installation
5.10
Combustion head adjustment
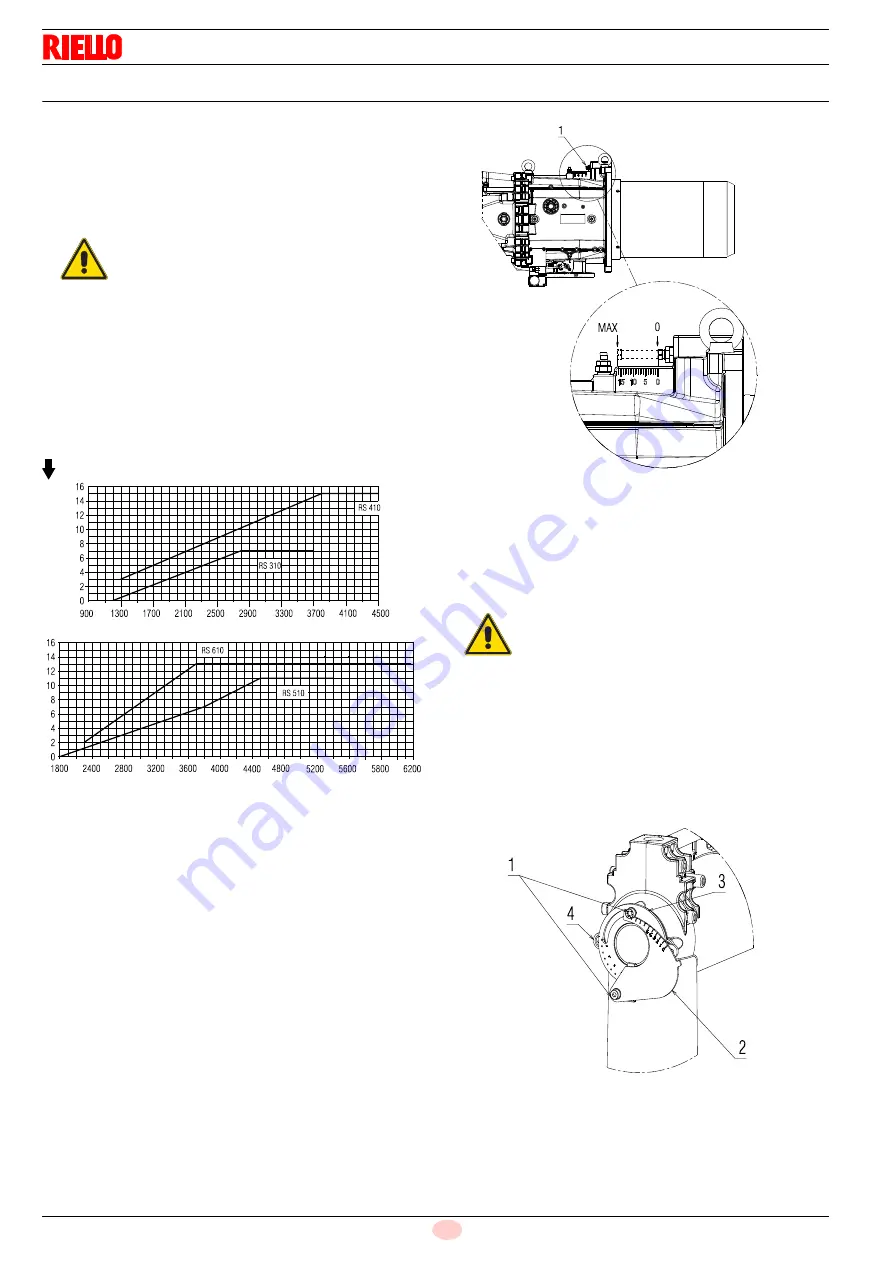
Rotate the screw 1)(Fig. 19) until the notch you have found cor-
responds with the front surface of the screw itself.
The combustion head is opened by turning the screw 1) anti-
clockwise.
The combustion head is closed by turning the screw 1) clockwise
(Fig. 19).
Before starting up the burner, carry out the settings according to
the required output and indicated in the diagram (Fig. 18).
NOTE:
Depending on the specific application, the adjustment can
be modified.
Only for the RS 310/EV O2 BLU model:
The RS 310 BLU burner is equipped with central air/gas adjust-
ment. The factory setting is the following:
AIR = notch 9
GAS = notch 0.
Only for specific cases, to change the central gas setting, do as
follows:
loosen the screws 1) and rotate the ring nut 3) until the notch
you have found corresponds with the indicator 4)(Fig. 20).
To change the central air setting, do as follows:
loosen the screws 1) and rotate the ring nut 2) until the notch
you have found corresponds with the screw 1);
Block the 2 screws 1)(Fig. 20).
WARNING
The burner leaves the factory with the combustion
head set at notch 0 (Fig. 18).
This setting allows to secure the movable compo-
nents during the transport of the burner.
20081480
No. Notches (air = gas)
Max burner output (kW)
Fig. 18
WARNING
Do not change these settings!
Fig. 19
20073539
20084828
Fig. 20
Summary of Contents for 20166004
Page 2: ...Translation of the original instructions ...
Page 46: ...20175134 44 GB Appendix Electrical panel layout ...
Page 49: ...47 20175134 GB Appendix Electrical panel layout ...
Page 50: ...20175134 48 GB Appendix Electrical panel layout ...
Page 51: ...49 20175134 GB Appendix Electrical panel layout 0 ...
Page 52: ...20175134 50 GB Appendix Electrical panel layout 0 0 0 1 0 2 0 0 0 0 0 0 0 30 3 3 0 0 1 0 ...
Page 53: ...51 20175134 GB Appendix Electrical panel layout 0 1 1 1 2 ...
Page 59: ......


