background image

20013962

26 

GB

Faults / Solutions

Here below you can find some causes and the possible solutions for some problems that could cause a failure to start or a bad working
of the burner.
A fault usually makes the lockout lamp light come on which is situated inside the reset button of the control box 6) (Fig. 3).
When lock out lamp lights the burner will attempt to light only after pushing the reset button. After this if the burner functions correctly,
the lockout can be attributed to a temporary fault.
If however the lock out continues, the cause must be determined and the remedies shown in the following table adopted.

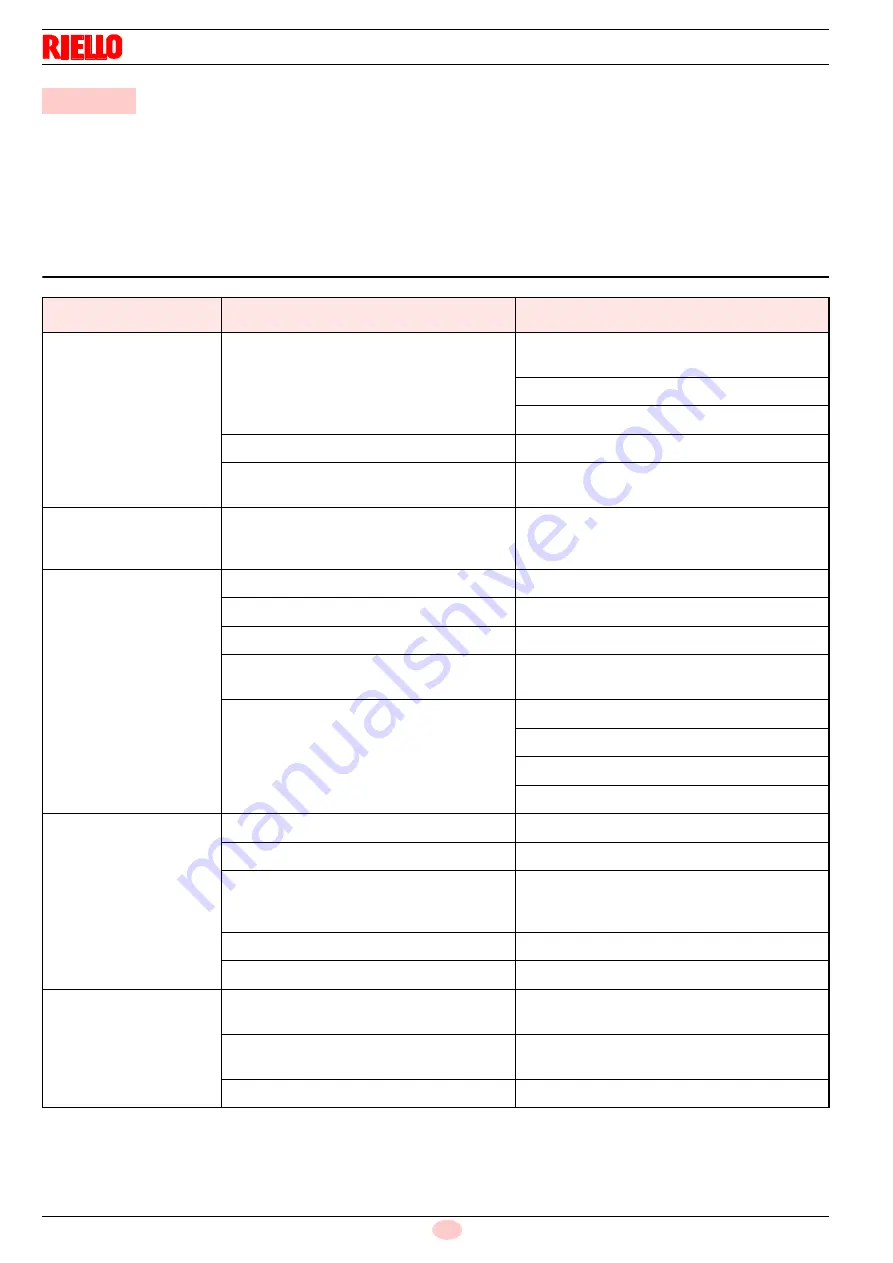
10.1 Burner start-up difficulties

 10

Faults / Solutions

FAULT

POSSIBLE CAUSES

SOLUTION

The burner doesn’t start
when the limit thermostat
closes.

Lack of electrical supply.

Check presence of voltage in the L1 - N clamps of
the 7 pin plug.

Check the conditions of the fuses.

Check that safety thermostat is not lock out.

Heating and start thermostats are faulty.

Replace them.

The connections in the control box are wrongly
inserted.

Check and connect completely all the plugs.

The burner goes in safety
lock-out before or during
the pre-purge phase.

The photoresistance sees strange light.

Eliminate the light.

Burner runs normally in
the prepurge and ignition
cycle and locks out after 5
seconds ca.

The photoresistance is dirty.

Clear it.

The photoresistance is defective.

Change it.

The fibre optic is dirty.

Clear it.

The fibre optic is not in line with the hole of the
diffuser disc-holder assembly.

Check the line-up.

Flame moves away or fails.

Check pressure and output of the fuel.

Check air output.

Change nozzle.

Check the coil of solenoid valve.

Yellow flame.

Nozzle dirty or worn.

Replace it.

Defect in the air output.

Adjust the air output.

Pump pressure is not correctly set.

Verify the pressure and the output of the fuel and
adjust them according to the instructions of this
manual.

Air suction inlet is clogged.

Clear it.

Obstruction in the exhaust circuit.

Clear it.

Burner starts with an igni-
tion delay.

The ignition electrodes are wrongly positioned.

Adjust them according to the instructions of this
manual.

Air output is too high.

Set  the  air  output according to the instructions of
this manual.

Nozzle dirty or worn.

Replace it.

Summary of Contents for BGK3

Page 1: ...and maintenance instructions Instrucciones de instalaci n montaje y funcionamiento Light oil burners Quemadores de gas leo One stage operation Funcionamiento a 1 llama CODE CODIGO MODEL MODEL0 TYPE TI...

Page 2: ......

Page 3: ...ion 10 5 2 Handling 10 5 3 Preliminary checks 10 5 4 Operation position 11 5 5 Securing the burner to the boiler 11 6 Hydraulic system 13 6 1 Pump 13 6 2 Pressurised one pipe systems 13 6 2 1 Pump pri...

Page 4: ...and intervention times if the burner fails 24 9 4 3 Resetting the control box 24 9 4 4 Recycle function 24 9 4 5 Logging of burner operating parameters 24 9 5 Supplementary programmable control box f...

Page 5: ...442630111 www rielloburners com Distributed by RIELLO NV Ninovesteenweg 198 9320 Erembodegem Tel 053 769 030 Fax 053 789 440 e mail info riello be URL www riello be It is hereby certified that the app...

Page 6: ...important that The instruction manual is supplied to the user by the system manufacturer with the recommendation to keep it in the room where the heat generator is to be installed The instruction man...

Page 7: ...y applied and or not working installation of untested supplementary components on the burner powering of the burner with unsuitable fuels faults in the fuel power supply system use of the burner even...

Page 8: ...th the burner components is not allowed apart from the parts requiring maintenance Only those parts envisaged by the manufacturer can be replaced 3 2 Personnel training The user is the person body or...

Page 9: ...G K 3 1 230 50 Designation Electrical supply Code BGK3 1 230V 50Hz 20012189 20015628 Type 375T1 Output Thermal power 3 8 6 15 Kg h 45 73 kW Fuel Light oil viscosity 4 6 mm2 s a 20 C Hi 11 86 kWh kg E...

Page 10: ...and a horizontal line from the pressure in the combustion chamber The intersection of these two lines is the work point which must lie within the firing rates Fig 1 230 11 4 5 4 5 89 222 300 189 106 1...

Page 11: ...rews and nuts for flange to be fixed to boiler No 4 Screw and nuts for flange No 1 Flexible oil pipes with nipples No 2 Remote reset connection No 1 7 pin plug No 1 Recirculating pipe No 1 Instruction...

Page 12: ...ons for the burner can be highly dangerous if not carried out with the great est attention keep any unauthorised people at a distance check the integrity and suitableness of the available means of han...

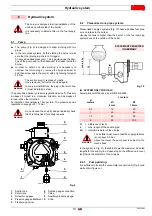
Page 13: ...only one that enables maintenance to be perfor med as described later on in this manual Operation is possible with installation option 2 though maintenance cannot be performed with the burner connect...

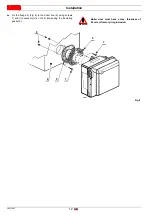
Page 14: ...Fix the flange 4 Fig 8 to the boiler door 6 using screws 7 and if necessary the nuts 8 interposing the insulating gasket 5 WARNING Boiler door must have a max thickness of 80 mm refractory linig inclu...

Page 15: ...of level L max length of the suction pipe i internal diameter of the oil pipe In the system in Fig 10 the table shows the maximum indicated lengths for the supply line depending on the difference in l...

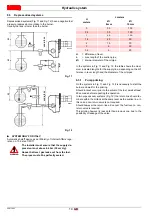
Page 16: ...is necessary to start the burner and wait for the priming Should lockout occur prior to the arrival of the fuel await at least 20 seconds before repeating the operation In two pipe vacuum systems Fig...

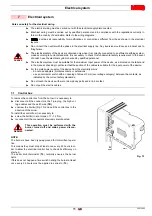
Page 17: ...country of destination Refer to the wiring diagrams declines all responsibility for modifications or connections different from those shown in the electrical layouts Do not invert the neutral with the...

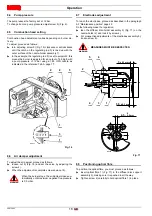
Page 18: ...TS Safety thermostat V1 Oil valve V2 Safety lockout device X7 7 pin plug XP7 7 pole socket 7 2 1 Testing Check the burner has stopped by opening the thermostats Make sure the operating burner locks ou...

Page 19: ...out by qualified personnel as indicated in this manual and in compliance with the standards and regula tions of the laws in force WARNING Check the correct working of the adjustment com mand and safe...

Page 20: ...ut 5 Fig 16 and set the valve by adjusting the screw 4 When the adjustment is complete screw down nut 5 8 7 Electrodes adjustment To reach the electrodes proceed as described in the paragraph 9 3 Main...

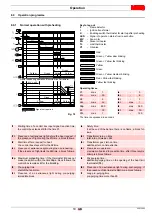
Page 21: ...the ts time there is no flame a block fol lows t1I Presence of extraneous light before the heat request if the presence of light during the t1l time a block follows t4i Transformer turn on time total...

Page 22: ...n combustion head The heater turns on when the thermostats close The enabling signal for burner start up comes through a thermostat on the noz zle holder once the optimal ignition temperature is reach...

Page 23: ...fan or on its blades as this condition will cause a reduction in the air flow rate and provoke polluting combustion Clean the fan if necessary Combustion head Check to make sure that all the parts of...

Page 24: ...er Unscrew and remove the screw fastening it to the flange to take the burner off the boiler Hook the burner onto flange 7 Fig 23 loosen screws 5 and pull off the blast tube assembly 4 Loosen screw 4...

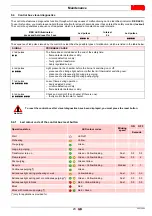
Page 25: ...n the chamber before the burner s switching on or off presence of a strange light before or after the limit thermostat switching over presence of extraneous light during pre purging presence of extran...

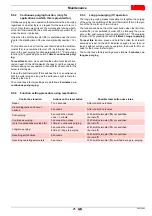
Page 26: ...f when the limit thermostat TL opens consequently cutting off the fuel supply to the valves To use this function the reset button must be pressed when the limit thermostat is not switched over burner...

Page 27: ...makes it possible too lengthen the purging of the air by the switching of the limit thermostat TL on the igni tion of the flame for up to two minutes The function can be set from the reset button when...

Page 28: ...ox are wrongly inserted Check and connect completely all the plugs The burner goes in safety lock out before or during the pre purge phase The photoresistance sees strange light Eliminate the light Bu...

Page 29: ...LUTION Burner locks out during operation Flame disappears 4 times Clean or replace photoresistance Replace dirty or deteriorated nozzle Does not shut down Check efficiency of photoresistance Check eff...

Page 30: ......

Page 31: ...5 4 Posici n de funcionamiento 11 5 5 Fijaci n del quemador a la caldera 11 6 Instalaci n hidr ulica 13 6 1 Bomba 13 6 2 Instalaciones de un tubo bajo presi n 13 6 2 1 Cebado de la bomba 13 6 3 Instal...

Page 32: ...nci n en caso de desperfecto del quemador 24 9 4 3 Desbloqueo de la caja de control 24 9 4 4 Funci n de reciclado 24 9 4 5 Memorizaci n de los par metros de funcionamiento del quemador 24 9 5 Funcione...

Page 33: ...esto en circulaci n por RIELLO NV Ninovesteenweg 198 9320 Erembodegem Tel 053 769 030 Fax 053 789 440 e mail info riello be URL www riello be Con la presente se certifica que la serie de aparatos espe...

Page 34: ...tregado por el proveedor de la instalaci n al usuario con la advertencia de que dicho manual debe ser conservado en el local de la instalaci n del generador de calor En el manual de instrucci n figura...

Page 35: ...cionen instalaci n de los componentes adicionales no probados junto con el quemador alimentaci n del quemador con combustibles no aptos defectos en la instalaci n de alimentaci n del combustible uso d...

Page 36: ...tes previstas en el manteni miento Se pueden sustituir exclusivamente las piezas previstas por el fabricante 3 2 Formaci n del personal El usuario es la persona entidad o empresa que compra la m quina...

Page 37: ...3 1 230 50 Designaci n Tensi n C digo BGK3 1 230V 50Hz 20012189 20015628 Tipo 375T1 Caudal Potencia t rmica 3 8 6 15 Kg h 45 73 kW Combustible Gas leo viscosidad 4 6 mm2 s a 20 C Hi 11 86 kWh kg Alime...

Page 38: ...al que se refiere a la pre si n en la c mara de combusti n El punto de uni n de las dos l neas es el punto de trabajo que debe permanecer dentro el campo de trabajo Fig 1 230 11 4 5 4 5 89 222 300 189...

Page 39: ...tuercas para brida fijaci n a la caldera N 4 Tornillo y tuerca para brida N 1 Tubos flexibles con nipples N 2 Cable conexi n desbloqueo a distancia N 1 Conector macho de 7 contactos N 1 Tubo de recir...

Page 40: ...r pue den ser muy peligrosas si no se realizan con la m xima atenci n mantener lejos a los que no son encargados controlar que los medios a dis posici n sean aptos y est n en buen estado Debe comproba...

Page 41: ...te escoger la instalaci n 1 puesto que es la nica que permite el mantenimiento tal como descrito a continuaci n en este manual Las instalaciones 2 permiten el funcionamiento pero no el mantenimiento c...

Page 42: ...e la caldera 6 Fig 8 la brida 4 con los tornillos 7 y si es necesario las tuercas 8 interponiendo la junta aislante 5 ATENCI N La puerta de la caldera debe tener un espesor m x de 80 mm Revestimiento...

Page 43: ...2005 H diferencia de nivel L longitud m xima del tubo de aspiraci n i di metro interior del tubo En la instalaci n de la Fig 10 la tabla muestra las longitudes m ximas indicativas para la l nea de al...

Page 44: ...funcionamiento el quemador y esperar el cebado Si la acci n de seguridad se produce antes de la llegada del com bustible esperar como m nimo 20 segundos y luego iniciar de nuevo esta operaci n En las...

Page 45: ...rmas vigentes en el pa s de destino Tomar como referencia los esquemas el ctricos declina toda responsabilidad por modificaciones o conexiones diferentes a las que figuran en los esque mas el ctricos...

Page 46: ...e TS Termostato de seguridad V1 Electrov lvula V2 Clavija de protecci n X7 Conector macho de 7 contactos XP7 Conector hembra de 7 contactos 7 2 1 Verificati n Comprobar la detenci n del quemador abrie...

Page 47: ...onamiento del quema dor debe ser realizada por personal habilitado se g n todo lo indicado en el presente manual y en conformidad con las normas y disposiciones de ley vigentes ATENCI N Comprobar el c...

Page 48: ...flojar la tuerca 5 Fig 16 y calibrar el registro de aire con el tornillo 4 Al finalizar la regulaci n volver a enroscar la tuerca 5 8 7 Regulaci n electrodos Para acceder a los electrodos realizar las...

Page 49: ...empo ts no se detecta la llama contin a el bloqueo t1I Presencia de luz extra a antes de la solicitud de calor si la presencia de luz dura un tiempo t1l sigue el bloqueo t4i Tiempo de encendido del tr...

Page 50: ...bezal de combusti n El calentador se activa cuan do se cierran los termostatos Un termostato ubicado en el portaboquilla permite la activaci n del quemador una vez que se ha alcanzado la temperatura p...

Page 51: ...ya acumulado polvo en el interior del ven tilador ni en las palas de la turbina reduce el caudal de aire pro vocando una combusti n defectuosa Si es necesario limpiar la turbina Cabezal de combusti n...

Page 52: ...te indicado Desenroscar y quitar la tuerca de fijaci n a la brida para extraer el quemador de la caldera Enganchar el quemador a la brida 7 Fig 23 aflojar los tornillos 5 luego extraer el conjunto tub...

Page 53: ...el quemador presencia de luz extra a antes o despu s de conmutar el termostato l mite presencia de luz extra a durante la pre ventilaci n presencia de luz extra a durante la post ventilaci n 7 destel...

Page 54: ...te de combustible de las v lvulas Para activar esta funci n es necesario utilizar el pulsador de des bloqueo cuando el termostato l mite TL no est conmutado quemador apagado El tiempo de post ventilac...

Page 55: ...e TL al encender la llama hasta los 2 minutos La funci n se puede programar con el pulsador de desbloqueo cuando el termostato l mite TL no est conmutado quemador apagado siguiendo el procedimiento de...

Page 56: ...stituirlos No hacen buen contacto las conexiones de la caja de control Controlar y conectar hasta el fondo todos los conectores El quemador se bloquea antes o durante la pre ventilaci n El revelador d...

Page 57: ...l funciona miento Desaparici n de la llama durante 4 veces Limpiar o sustituir el revelador de llama Sustituir la boquilla sucia o deteriorada No se apaga Comprobar la eficiencia del revelador de llam...

Page 58: ...20013962 Notes Notas...

Page 59: ...20013962 Notes Notas...

Page 60: ...Subject to modifications Con la posibilidad de modificaci n RIELLO S p A I 37045 Legnago VR Tel 39 0442 630111 http www riello it http www rielloburners com...

Reviews: