20102152
22
GB
Installation
4.12 Gas feeding
4.12.1 Gas feeding line
It must be type-approved according to required standards and is
supplied separately from the burner.
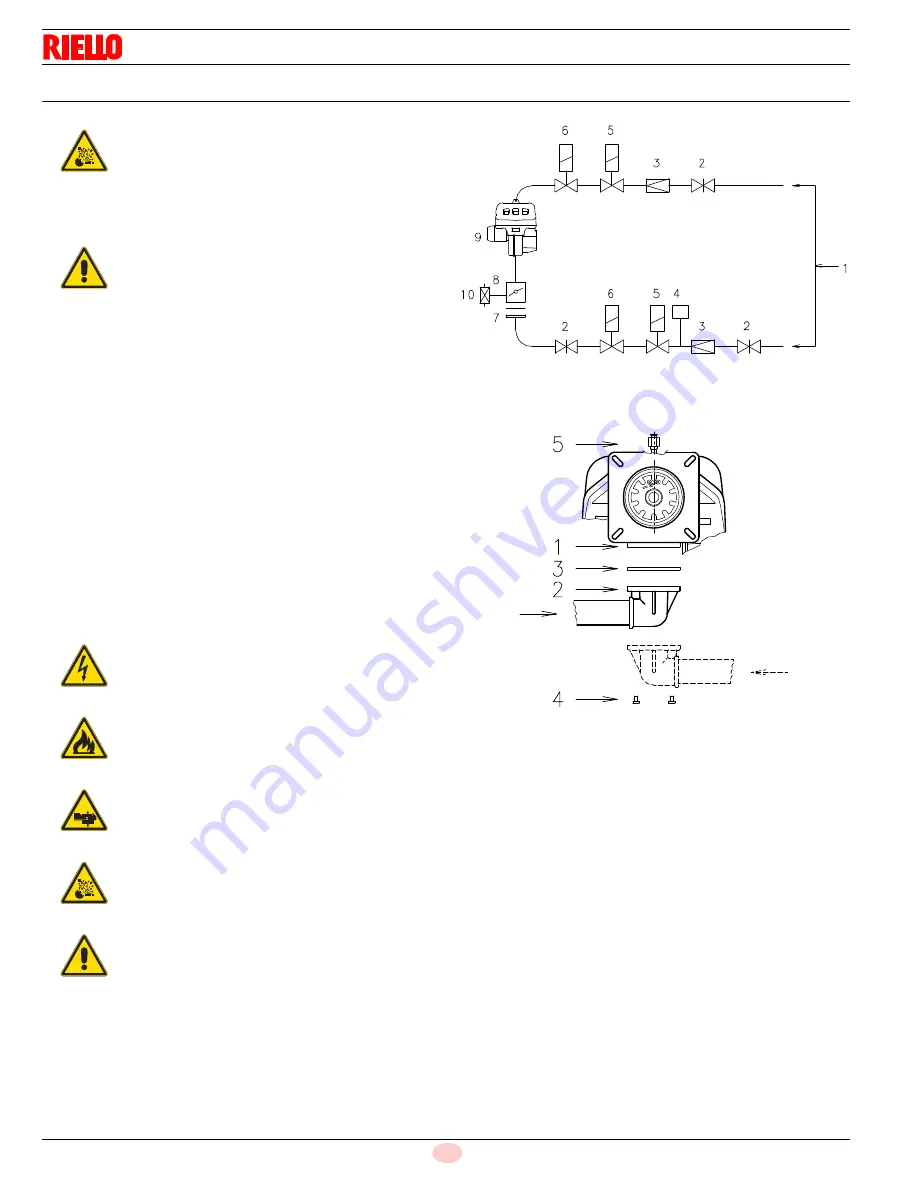
Key (Fig. 20)
1
Gas input pipe
2
Manual valve
3
Pressure regulator
4
Minimum gas pressure switch
5
1st safety shut off valve
6
2nd safety shut off valve
7
Standard issue burner with flange gasket
8
Gas adjustment butterfly valve (*)
9
Burner
10 Maximum gas pressure switch (*)
(*) On the burner
4.12.2 Gas train
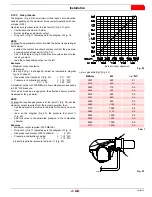
The gas train can enter the burner from the right or left side, de-
pending on which is the most convenient, see Fig. 21.
The gas train must be connected to the gas attachment 1)(Fig. 21)
with the flange 2), the gasket 3) and the screws 4) supplied with the
burner.
The gas solenoids must be as close as possible to the burner, to
ensure that the gas reaches the combustion head within the safety
time of 3s.
Ensure that the maximum pressure necessary for the burner is in-
cluded in the calibration field of the pressure regulator (colour of the
spring).
The pilot gas train must be connected to the gas attachment
5)(Fig. 21) and can enter the burner from the right or left side.
Explosion danger due to fuel leaks in the presence
of a flammable source.
Precautions: avoid knocking, attrition, sparks and
heat.
Make sure that the fuel interception tap is closed
before performing any operation on the burner.
WARNING
The fuel supply line must be installed by qualified
personnel, in compliance with current standards
and laws.
DANGER
Disconnect the electrical power using the main sys-
tem switch.
Check that there are no gas leaks.
Beware of train movements: danger of crushing of
limbs.
Make sure that the gas train is properly installed by
checking for any fuel leaks.
WARNING
See the accompanying instructions for the adjust-
ment of the gas train.
Fig. 20
D2438
GAS PILOT LINE
MAIN GAS LINE
Fig. 21
D2393


