background image

2916050

16 

GB

Installation

4.7

Nozzle 

The burner complies with the emission requirements of the UL 296
Standard.
In order to guarantee that emissions do not vary, recommended
and/or alternative nozzles specified by the manufacturer in the In-
struction and warning booklet should be used.

4.7.1

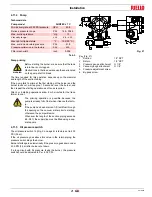
Recommended nozzles

Type A4 return flow nozzles - 45° angle

4.7.2

Nozzle assembly

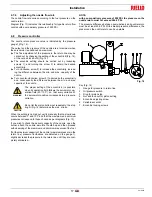
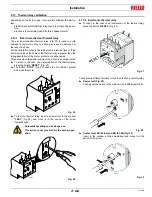
At this stage of installation the burner is still disassembled from the
blast tube; it is therefore possible to fit the nozzle with the box
wrench 1)(Fig. 10), inserting the wrench through the central hole in
the flame stability disk. 

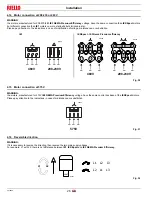
Finally remount the burner 3)(Fig. 11) on the slide bars 2) and slide
it up to the flange 5), keeping it slightly raised to prevent the flame
stability disk from pressing against the blast tube.
Tighten the screws 1) on the slide bars 2) and screws 4) fixing the
burner to the flange.
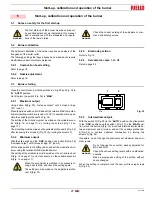
If it proves necessary to change a nozzle with the burner already
fitted to the boiler, proceed as outlined below:

pull back the burner on its slide bars as shown in Fig. 8;

remove the nuts 1)(Fig. 12) and the disk 2);

use wrench 3)(Fig. 12) to change the nozzles.

4.7.3

Choice of nozzle

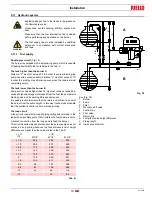
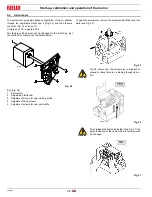
In case an intermediate delivery between the two values indicated
in the diagram (Fig. 13) is required, a nozzle with higher delivery
must be chosen. 

NOTE:
the values indicated in the right side of the diagram (Fig. 13)
,
refer to the data printed on the nozzle.

Delivery reduction will be obtained by means of the pressure regu-
lator.

WARNING

It is advisable to replace nozzles every year during
regular maintenance operations.

CAUTION

The use of nozzles other than those specified by the
manufacturer and inadequate regular maintenance
may result into emission limits non-conforming to
the values set forth by the regulations in force, and
in extremely serious cases, into potential hazards to
people and objects.
The manufacturing company shall not be liable for
any such damage arising from nonobservance of
the requirements contained in this manual.

WARNING

Do not use any sealing products such as gas-
kets, sealing compound, or tape. 

Be careful to avoid damaging the nozzle seal-
ing seat.

Fig. 10

D1220

D1221

Fig. 11

D1222

Fig. 12

D2355

Fig. 13

N

ozzl

e fl

ow

 rat

GPH

Return pressure - 

PSI

Summary of Contents for C9514300

Page 1: ...50 12 10 2021 Installation use and maintenance instructions Light oil burners Low High or modulating operation CODE MODEL C9514300 C9514301 RL 70 M C9515300 C9515301 RL 100 M C9516300 C9516301 RL 130...

Page 2: ...Original instructions...

Page 3: ...dimensions 11 3 10 Control box for the air fuel ratio LAL2 12 4 Installation 13 4 1 Notes on safety for the installation 13 4 2 Handling 13 4 3 Preliminary checks 13 4 4 Operating position 14 4 5 Prep...

Page 4: ...functions 29 5 5 Final calibration of the pressure switch 29 5 5 1 Air pressure switch 29 5 6 Burner operation 30 5 6 1 Burner starting 30 5 6 2 Steady state operation 30 5 6 3 Firing failure 30 5 6 4...

Page 5: ...ar ried out correctly may cause damage to the ma chine and or injury to people DANGER DANGER LIVE COMPONENTS This symbol indicates operations which if not car ried out correctly lead to electric shock...

Page 6: ...of damage to things or injury to peo ple if such damage injury was due to any of the following causes incorrect installation start up use and maintenance of the burner improper incorrect or unreasonab...

Page 7: ...nce Only those parts envisaged by the manufacturer can be replaced 2 2 Personnel training The user is the person body or company that has acquired the ma chine and intends to use it for the specific p...

Page 8: ...1260 2688 9 19 2 1568 3584 11 2 25 6 Fuel 2 fuel oil Operation Low high or modulating Nozzle number 1 return flow nozzle Standard applications Boilers water steam thermal oil Ambient temperature F 32...

Page 9: ...0 M RL 130 M Main electrical supply Control circuit power supply V Ph Hz 575 3 60 120 1 60 Fan and pump motor rpm W HP V A 3490 1100 1 5 575 1 6 3480 2200 3 575 3 3480 2200 3 575 3 Ignition transforme...

Page 10: ...tube short long obtainable with kit 3 6 Standard equipment The burner is supplied complete with Screws to secure the burner flange to the boiler 1 2 W No 4 Flexible hoses No 2 Gaskets for flexible hos...

Page 11: ...cting the combus tion head 14 Photocell cad cell 15 High oil pressure switch 16 Extensions for slide bars 14 with kit 17 Ignition transformer 18 Motor contactor and thermal overload with reset button...

Page 12: ...MAX output In order to utilize also area C RL 130 M it is necessary to perform the calibration of the combustion head as explained on page 18 NOTE The firing rate areas given in Fig 4 have been reduce...

Page 13: ...ig 5 indicates the diameter and length of the test combus tion chamber Example Output 2579 MBtu hr diameter 24 inch length 6 6 ft AIR TEMPERATURE Altitude Altitude bar press bar press 0 5 10 15 20 25...

Page 14: ...e load requested by the system maintaining the pressure or temper ature of the boiler at the working values set the safety diagnostic of the air and fuel circuits via which it is possible to easily id...

Page 15: ...lable means of handling Check also that the area in which you are working is empty and that there is an adequate escape area i e a free safe area to which you can quickly move if the burner should fal...

Page 16: ...his protective insulation must not compromise the extraction of the blast tube For boilers having a water cooled front the insulation 10 11 B is not required unless it is required by the boiler manufa...

Page 17: ...very of the burner is contained in area B or in area C of the firing rate See Fig 4 on page 10 If it is in area B then no operation is required If on the other hand it is in area C unscrew the screws...

Page 18: ...on its slide bars as shown in Fig 8 remove the nuts 1 Fig 12 and the disk 2 use wrench 3 Fig 12 to change the nozzles 4 7 3 Choice of nozzle In case an intermediate delivery between the two values ind...

Page 19: ...the min and max capacity of the nozzle Turn counter clockwise screw 5 to decrease the eccentricity and consequently the difference between the min and max capacity of the nozzle When the setting is c...

Page 20: ...tch shown in diagram Fig 17 is level with the front surface of flange 5 Fig 16 Example RL 70 M maximum light oil delivery 16 GPH Diagram Fig 17 indicates that for a delivery of 16 GPH the RL 70 M Mode...

Page 21: ...a loop of piping exiting and returning to the tank with an auxiliary pump that circulates the fuel under pressure A branch connection from the loop goes to feed the burner This circuit is extremely u...

Page 22: ...e stepped on or come into contact with hot surfaces of the boiler Now connect the other end of the hoses to the suction and return lines 4 11 3 Hydraulic system layout Key Fig 20 1 Pump suction 2 Sole...

Page 23: ...justed to Px 43 5 PSI Key Fig 21 1 Suction 1 2 NPT 2 Return 1 2 NPT 3 Pressure gauge attachment G 1 8 4 Vacuum gauge attachment G 1 8 5 Pressure adjustment screw 6 By pass screw Pump model SUNTEC J7 C...

Page 24: ...device is obtained only when it is correctly connected to an efficient earthing system made according to current standards It is necessary to check this fundamental safety requirement In the event of...

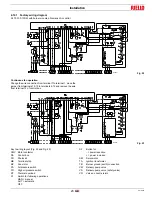
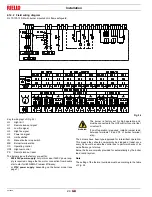
Page 25: ...ontrol box Key to wiring layout Fig 22 and Fig 23 CMV Motor contactor DA Control box FR Photocell MB Terminal strip MV Fan motor PA Air pressure switch PO High oil pressure switch RT Thermal overload...

Page 26: ...star to star for IE3 NEMA Premium Efficiency or 575V power supply depending on the burner model see page 7 The burners have been type approved for intermittent operation This means they should compuls...

Page 27: ...s a nominal value To reset in the case of an intervention of the thermal relay press the button RESET Fig 25 The button STOP Fig 25 opens the NC 95 96 contact and stops the motor To test the thermal r...

Page 28: ...ING the motors manufactured for 575V IE3 NEMA Premium Efficiency voltage have the same control box base of the IE2 Epact motors Please pay attention to the indications in case of maintenance or substi...

Page 29: ...il it stops at app 20 cam 3 Put the slide switch in the MIN position and set the modulation min imum using the relative MIN trim potentiometer The setting of the oil delivery must be made on the nut a...

Page 30: ...ly with the details below Key Fig 34 1 Servomotor 2 Adjustable profile cam 3 Adjustment screws for cam starting profile 4 Adjustment fixing screws 5 Adjustment screws for cam and profile To open the s...

Page 31: ...rnal command This function cuts out any external signals NOTE using the slide switch Fig 38 to select MAX or MIN the ser vomotor goes into the position for the respective settings of the MAX and MIN T...

Page 32: ...t of the fuel passes through piping 12 at the pressure adjusted by the regulator 13 then through piping 7 it goes back into the tank The spark goes out The starting cycle ends 5 6 2 Steady state opera...

Page 33: ...he OPEN command for the air damper 5 8 Final checks with the burner working Tab N Switching times Seconds t1 18 t2 4 t3 2 t4 12 t5 optional t6 optional t7 12 t8 4 D2871 Fig 41 FULL MODULATION D2883 Fi...

Page 34: ...n be due to worn flame sensor low current bad set up of the burner In order to measure the current use a microammeter of 100 A c c connected to the scanner as in the diagram Tab O 6 Maintenance DANGER...

Page 35: ...r the burner This measure permits the cause of the anomaly to be traced to either the suction line or the pump If the pump is found to be responsible check to make sure that the filter is not dirty Th...

Page 36: ...on blast tube 7 6 4 Closing the burner Refit following the steps described but in reverse order refit all burner components as they were originally assembled Model A inch RL 70 M 1 2 RL 100 M 5 16 RL...

Page 37: ...of fail ures that may occur and result in irregular burner operation or no functioning at all If a burner malfunction is detected first of all check that the electrical wiring is adequately connected...

Page 38: ...uit Replace flame safeguard The burner remains in pre purging phase Contact III of servomotor does not operate flame safeguard terminals 10 8 Adjust cam III or replace servomotor After pre purge and t...

Page 39: ...with loop circuit Piping diameter too small Increase Suction filters clogged Clean Suction valves closed Open Paraffin solidified due to low temperature Add additive to light oil Pump loses prime afte...

Page 40: ...38 52 45 29 36 55 18 44 83 82 79 80 81 74 75 76 30 77 30 73 66 71 68 69 66 65 67 60 59 57 56 49 48 47 54 4 51 50 41 40 10 43 78 33 34 24 27 28 21 31 32 17 15 14 12 13 6 5 4 3 2 1 70 4 61 53 20 18 4 7...

Page 41: ...SWITCH A 19 3012957 ANCHOR PLATE 20 3000805 PUMP SEAL A 21 3013127 BASE PLATE 22 3012933 C5830009 CONTROL BOX B 23 3012343 SUPPORT A 24 3012080 SWITCH 25 3007627 MEMBRAN 26 3012934 COVER 27 20115409...

Page 42: ...74 CONTROL DEVICE 57 3003975 FRONT PIECE 57 3003976 FRONT PIECE 58 3012464 SQUARE 58 3012465 SQUARE 58 3012466 SQUARE 59 3003983 SHUTTER C 59 3003984 SHUTTER C 60 3012467 END CONE B 60 3012468 END CON...

Page 43: ...basic safety fittings A B C Spare parts for extended safety fittings 78 3012945 SHAFT 79 3003287 COIL B 80 3007150 O RING B 81 3003204 SEAL B 82 3003200 NUT 83 3012474 MODULATOR B 84 3013065 CONNECTOR...

Page 44: ...ner Standard length Length obtainable with the kit Code RL 70 M 10 23 32 15 5 32 3010280 RL 100 M 10 23 32 15 5 32 3010281 RL 100 M 10 23 32 15 5 32 3010282 Burner Code RL 70 100 M 3010180 RL 130 M 30...

Page 45: ...h Fire Control Power Supply CO Low Fire High Fire Burner Firing Rate NOX Low Fire High Fire Low Fire Flame Signal Net Stack Temp Low Fire High Fire High Fire Flame Signal Comb Efficiency Low Fire High...

Page 46: ......

Page 47: ......

Page 48: ...URNERS NORTH AMERICA 35 Pond Park Road http www riello ca 2165 Meadowpine Blvd Hingham Massachusetts Mississauga Ontario U S A 02043 1 800 4 RIELLO Canada L5N 6H6 RIELLO S p A I 37045 Legnago VR Tel 3...

Reviews: