2694
7
GB
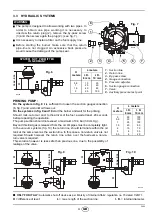
PUMP
PRESSURE
The pump leaves the factory set at 12 bar.
To change it act on pump pressure adjust screw (5, fig.
7, page 4).
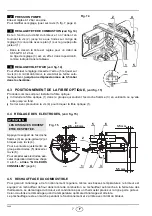
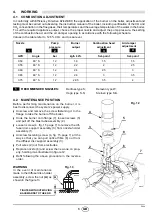
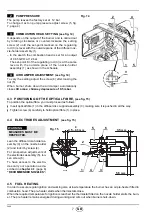
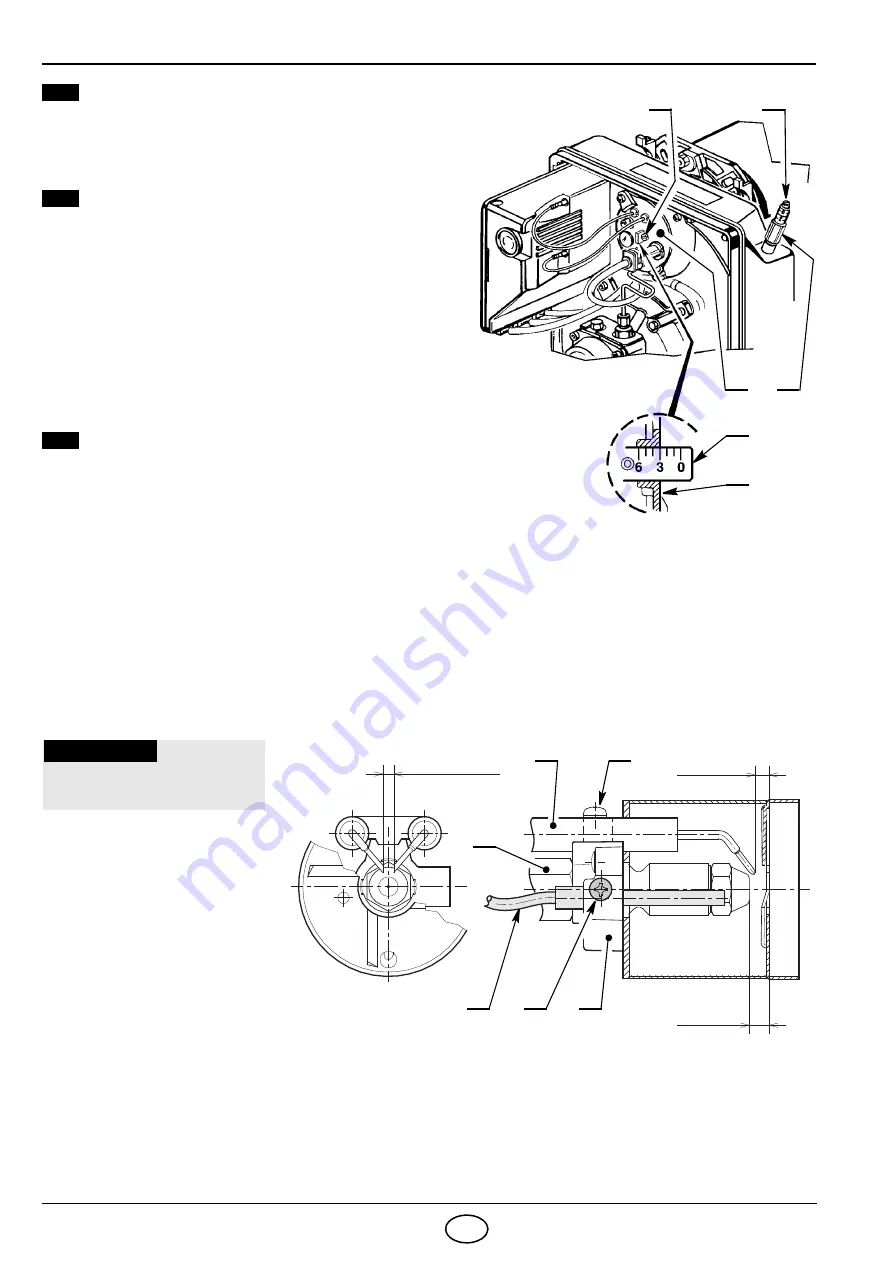
COMBUSTION HEAD SETTING
(see fig. 14)
It depends on the output of the burner and is carried out
by rotating clockwise or counterclockwise the setting
screw (2) until the set-point marked on the regulating
rod (3) is level with the outside plane of the diffuser noz-
zle-holder assembly (1).
– In the sketch the combustion head is set for an output
of 0.65 GPH at 12 bar.
The set-point
3
of the regulating rod (3) is at the same
level with the outside plane of the nozzle-holder
assembly (1) as shown in the schedule.
AIR DAMPER ADJUSTMENT
(see fig. 14)
To vary the setting adjust the screw (4) after loosing the
nut (5).
When burner shuts down the air damper automatically
closes
till a max. chimney depressure of 0.5 mbar
.
4.3
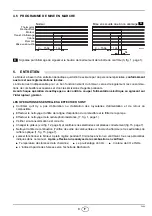
POSITIONING OF THE OPTICAL FIBRE,
(see fig. 15)
To position the optical fibre, you must proceed as follows:
. Insert optical fibre (1) in the diffuser disc support assembly (3), making sure it is pushed in all the way.
. Tighten screw (4) carefully to hold optical fibre (1) in place.
4.4
ELECTRODES ADJUSTMENT
(see fig. 15)
4.5
FUEL HEATING
In order to assure regular ignition and working also at low temperature the burner has an oil pre-heater fitted in
combustion head. The pre-heater starts when thermostats close.
When the required temperature for ignition is reached the thermostat fitted on the nozzle holder starts the burn-
er. The pre heater remains energised during working and cuts out when burner shuts-down.
S7717
Fig. 14
2
1
3
1
5
4
2
3
4
MEASURES MUST BE
RESPECTED.
WARNING
Lean the diffuser disc-holder as-
sembly (3) on the nozzle-holder
(2) and lock it by screw (4).
For prospective adjustments of
the electrodes assembly (5), loo-
sen screw (6).
To have access to the electro-
des carry out operation as de-
scribed in
chapter 4.1
(page 6)
“RECOMMENDED NOZZLES”.
D4222
Fig. 15
4.5
– 0.5 mm
0
3.5
mm
5.5
mm
4
1
2
5
6
3

