background image

Electrical wiring

20153653

20 


GB

7.3

Electrical wiring diagram

TESTING:

Check the shut-down of the burner by opening the thermostats
and the lock-out by darkening the flame sensor.

7.4

Burner start-up cycle

Lock out is indicated by a lamp on the control box 3)(Fig. 1 on
page 9).

 Fig. 21

Capacitor

N

L

~

50Hz - 230V

Limit

Oil valve

D4238

CONTROL BOX

Flame sensor

535SE/LD

thermostat

Safety 

Motor

Main switch

T6A

Black

White

Blue

PE

Ignition

electrodes

Remote lock-out signal
(230V - 0.5A max.)

6 pin plug

6 pole socket

Burner-earth 

thermostat

WARNING

Do  not  swap  neutral  and  phase  over,  follow
the diagram shown carefully and carry out a
good earth connection.

The  electrical  wiring  carried  out  by  the
installer must be in compliance with the rules
in force in the country.

The  section  of  the  conductors  must  be  at
least 1mm

2

. (Unless requested otherwise by

local standards and legislation).

 Fig. 22

Thermostat

Motor

Ignition transformer

Valve

Flame

Lock-out lamp

12s

D5229

12s

5s

Lock-out due to failure to light

Normal

Summary of Contents for RDB2.2 BX 15-20

Page 1: ...3 1 10 2018 Installation use and maintenance instructions Kerosene burners One stage operation CODE MODEL 20153493 RDB2 2 BX 15 20 20153619 RDB2 2 BX 20 26 20153643 RDB2 2 BX 26 35 20153654 RDB2 2 BX 35 41 GB ...

Page 2: ...Original instructions ...

Page 3: ...stallation 10 5 1 Notes on safety for the installation 10 5 2 Handling 10 5 3 Preliminary checks 10 5 4 Installer Servicer notes for the use of light oil with bio blends up to 30 11 5 5 Operating position 11 5 6 Burner assembly 11 5 7 Securing the burner to the boiler 12 5 8 Fuel supply 13 5 8 1 Pump 13 5 9 Two pipe system 14 5 9 1 Priming pump 14 5 10 One pipe system 15 5 10 1 Priming pump 15 6 S...

Page 4: ...Contents 20153653 2 GB 8 2 Maintenance programme 21 8 2 1 Maintenance frequency 21 8 2 2 Checking and cleaning 21 8 2 3 Safety components 22 9 Faults Solutions 23 ...

Page 5: ... compliance with the following Technical Standards EN 267 EN 12100 and according to the European Directives MD 2006 42 EC Machine Directive LVD 2014 35 UE Low Voltage Directive EMC 2014 30 UE Electromagnetic Compatibility The quality is guaranteed by a quality and management system certified in accordance with ISO 9001 2015 Legnago 01 12 2015 Executive General Manager RIELLO S p A Burner Departmen...

Page 6: ...ied out correctly may cause damage to the ma chine and or injury to people DANGER DANGER LIVE COMPONENTS This symbol indicates operations which if not car ried out correctly lead to electric shocks with le thal consequences DANGER FLAMMABLE MATERIAL This symbol indicates the presence of flammable materials DANGER BURNING This symbol indicates the risks of burns due to high temperatures DANGER CRUS...

Page 7: ...ponents most likely to be subject to wear and tear use of non original components including spare parts kits accessories and optional force majeure The manufacturer furthermore declines any and every re sponsibility for the failure to observe the contents of this manual The manufacturer s warranty is subject to correct burner appli ance and application matching and set up in line with Manufac ture...

Page 8: ...filter of 60 Microns protecting the burner from con tamination If an existing oil storage tank is to be used then in addition to the materials checks as detailed above it will be essential that the tank is first inspected for condition and checked for water or other contamination The manufacturer strongly recommends that the tank is cleaned and oil filters replaced prior to biofuel delivery If thi...

Page 9: ...aintenance Only those parts envisaged by the manufacturer can be replaced 3 2 Personnel training The user is the person body or company that has acquired the machine and intends to use it for the specific purpose He is re sponsible for the machine and for the training of the people work ing around it The user undertakes to entrust the machine exclusively to suitably trained and qualified personnel...

Page 10: ...o 1 Spare part list No 1 4 Technical description of the burner Designation Voltage Code RDB2 2 BX 15 20 1 230V 50Hz 20153493 RDB2 2 BX 20 26 1 230V 50Hz 20153619 RDB2 2 BX 26 35 1 230V 50Hz 20153643 RDB2 2 BX 35 41 1 230V 50Hz 20153654 Model RDB2 2 BX 15 20 RDB2 2 BX 20 26 RDB2 2 BX 26 35 RDB2 2 BX 35 41 Delivery 1 1 3 1 7 kg h 1 7 2 2 kg h 2 2 2 9 kg h 2 9 3 4 kg h Heat output range 1 15 20 kW 20...

Page 11: ...tion line 14 Return line 15 Combustion head adjustment handle knob 16 Coil 17 Air pressure test point 18 Recirculating pipe 2 2 8 153 2 3 5 135 1 7 2 75 8 4 8 7 360 300 213 1 180 4 5 4 5 130 150 7 2 7 2 1 1 Fig 1 20140396 17 2 11 12 4 3 10 15 6 7 14 13 9 18 16 1 8 5 Fig 2 20140595 WARNING The hoses supplied with this burner are not suita ble for use with light oil containing a bio blend In case of...

Page 12: ...alo gen if present it is highly recommended to carry out cleaning and maintenance more frequently WARNING The handling operations for the burner can be highly dangerous if not carried out with the great est attention keep any unauthorised people at a distance check the integrity and suitableness of the available means of handling Check also that the area in which you are working is empty and that ...

Page 13: ...good quality bio compatible oil filter at the tank and a secondary 60 micron filter be used to protect the burner pump and noz zle from contamination The burner hydraulic components and flexible oil lines must be suitable for biofuel use check with the manufacturer if in doubt The burner must be commissioned and combustion parame ters set to appliance manufacturer s recommendations Regularly check...

Page 14: ...1 and tighten the nut 3 Fig 7 Fix the flange 5 to the boiler door 4 using the screws 6 placing in between the insulating gasket 7 Fig 8 Insert the burner and fix it in place with the nut 8 Fig 9 Prepare a suitable lifting system WARNING The seal between burner and boiler must be airtight 3 1 2 M8 Fig 7 20138111 6 M8x20 4 7 5 20083626 Fig 8 8 M8 Fig 9 20138114 ...

Page 15: ...ould cause the sealing organ located on the pump shaft to break WARNING The suction plug 1 is made of plastic Once removed it must not be used again In single pipe installations the plug in the re turn line 2 must be totally in steel WARNING Where light oil containing bio diesel is in use it is recommended to avoid over oxygenation of the blended fuels Where at all possible avoid the use of two pi...

Page 16: ...the oil pipes NOTE Tab C shows the maximum approximate lengths for the supply line depending on the difference in level length and the diame ter of the fuel conduit CAUTION You are advised to use additional filters on the fuel supply line The Manufacturer recommends the use of a good quality fuel filter on the tank Fig 6 and a sec ondary filter 60 for light oil and 15 for kero sene to protect the ...

Page 17: ...f the suction line I D internal diameter of the oil pipes NOTE Tab D and Tab E the approximate maximum lengths for the supply pipes according to the difference of level length and di ameter of the fuel line CAUTION You are advised to use additional filters on the fuel supply line The Manufacturer recommends the use of a good quality fuel filter on the tank Fig 13 and a sec ondary filter 60 for lig...

Page 18: ...ut by qualified personnel as indicated in this manual and in compliance with the standards and regula tions of the laws in force WARNING Check the correct working of the adjustment com mand and safety devices WARNING The combustion air is sucked from outside there fore there can be sensitive temperature varia tions that can influence the percentage value of the CO2 It is advisable to adjust the CO...

Page 19: ...ozzle 8 loosen the nozzle with the aid of a size 16 wrench and replace it screw in the nozzle again then reassemble the electrode stabiliser unit respecting the position of the electrodes See Fig 23 on page 22 6 3 Positioning the electrodes Tab G DANGER Turn off the burner s power supply using the main system switch WARNING Make sure the screw 3 Fig 17 is positioned in its seat 7 1 Fig 15 20138115...

Page 20: ...is factory set to the values indicated in Tab F on page 16 These adjustments are indicative Each installation however has its own unpredictable working conditions actual nozzle output positive or negative pressure in the combustion chamber the need of excess air etc All these conditions may require a different air damper setting The damper 1 Fig 19 is used to precisely adjust the input air flow ra...

Page 21: ...anteed by the boiler s thermostat pressure switch The electrical safety of the device is obtained only when it is correctly connected to an efficient earthing system made according to current standards It is necessary to check this fundamental safety requirement In the event of doubt have the electrical system checked by qualified personnel The electrical system must be suitable for the maximum in...

Page 22: ...T6A Black White Blue PE Ignition electrodes Remote lock out signal 230V 0 5A max 6 pin plug 6 pole socket Burner earth thermostat WARNING Do not swap neutral and phase over follow the diagram shown carefully and carry out a good earth connection The electrical wiring carried out by the installer must be in compliance with the rules in force in the country The section of the conductors must be at l...

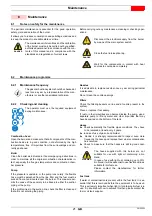
Page 23: ...side the pump use a separate pump to lift any water and other impurities that may have deposited on the bottom of the tank Hoses Check periodically the flexible pipes conditions They have to be replaced at least every 2 years In case of use of gas oil and biofuel blends it is strongly recommended to inspect even more frequently the hoses and replace them where contamination has occurred Check to m...

Page 24: ...ty for about ten minutes setting all the elements correctly as explained in this manual Then carry out the analysis of the combustion by checking Smoke temperature at the flue CO2 content CO content ppm Smoke value according to opacity smokes index according to Bacharach scale Tab H 8 2 3 Safety components The safety components must be replaced at the end of their life cycle indicated in Tab I The...

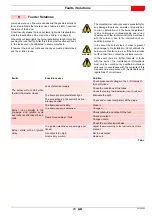
Page 25: ...f the burner locks out for a third time contact the customer service DANGER In the event there are further lockouts or faults with the burner the maintenance interventions must only be carried out by qualified authorised personnel in accordance with the contents of this manual and in compliance with the standards and regulations of current laws Faults Possible causes Solution The burner will not s...

Page 26: ......

Page 27: ......

Page 28: ...Subject to modifications RIELLO S p A I 37045 Legnago VR Tel 39 0442 630111 http www riello it http www riello com ...

Reviews: