background image

20035606

GB

Technical description of the burner

3.6

Firing rate

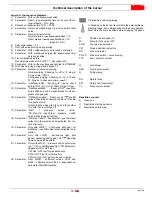
MAXIMUM OUTPUT 

must be selected in the hatched area of the

diagram (Fig. 3).

MINIMUM OUTPUT

 must not be lower than the minimum limit

shown in the diagram:

RL 300/E = 2272 MBtu/h

3.6.1

Modulation ratio

The modulation ratio, determined using test boilers, is 4 : 1.

3.7

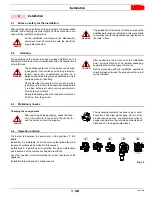
Test boiler

The firing rates were set in relation to special test boilers. 
Fig. 4 indicates the diameter and length of the test combustion
chamber.

Example: 

Output 18.500 MBtu/hr - diameter 39.4 inch - length 16.5 ft.

WARNING

The firing rate area values have been obtained con-
sidering a surrounding temperature of 68 °F, and an
atmospheric pressure of 394 “WC (approx. 329 ft
above sea level) and with the combustion head ad-
justed as shown on page 20.

Burner power output

Comb

ustio

n

 cha

mber 

pre

s

sur

e

D11235

Fig. 3

0

2

4

6

8

10

12

14

16

18

20

mb

ar

8

7

6

5

4

3

2

0

1

w.

c.

0              2000          4000           6000            8000         10000         12000         14000        16000   

GPH

0              14.3            28,6            42,9            57,2           71,4             85,7             100          114,3 

MBtu/hr

1 5 . 7

1 9 . 7

2 3 . 6

3 1 . 5

3 9 . 4

4 7 . 2

f t

i n c h es


ft= 0,12

MBtu/hr

18.9

11.3

7.5

1000

1.5

760

16.5

13.2

9.9
6.6

3.3

1.6

MBtu

hr

37870

23.0

29.6

22.7

D9396

Fig. 4

Summary of Contents for RL 300

Page 1: ...20035606 1 07 2011 Installation use and maintenance instructions Light oil burner Progressive two stage or modulating operation CODE MODEL TYPE 20034452 RL 300 E 34452X ...

Page 2: ......

Page 3: ...10 3 9 Control box for the air fuel ratio LMV51 11 3 10 Actuators 16 4 Installation 17 4 1 Notes on safety for the installation 17 4 2 Handling 17 4 3 Preliminary checks 17 4 4 Operation position 17 4 5 Preparing the boiler 18 4 5 1 Boring the boiler plate 18 4 5 2 Blast tube length 18 4 6 Securing the burner to the boiler 18 4 7 Accessibility to the interior of the combustion head 18 4 8 Nozzles ...

Page 4: ...dulation system 27 5 4 1 Combustion air adjustment 27 5 4 2 Air gate adjustment for maximum output 27 5 5 Rotation of fan motor 27 5 6 Pressure switches calibration 28 5 6 1 Air pressure switch 28 5 6 2 Low oil pressure switch 28 5 7 Final checks with the burner working 28 6 Maintenance 29 6 1 Notes on safety for the maintenance 29 6 2 Maintenance programme 29 6 2 1 Maintenance frequency 29 6 2 2 ...

Page 5: ... generator is to be installed The instruction manual shows the serial number of the burner the address and telephone number of the nearest Assis tance Centre The system supplier carefully informs the user about the use of the system any further tests that may be necessary before the system is started up maintenance and the need to have the system checked at least once a year by the manufacturer or...

Page 6: ...is manual 1 2 1 Owner s responsibility Please pay attention to the Safety Warnings contained within this instruction manual Keep this manual for your records and provide it to your quali fi ed service agency for use in profession ally setting up and maintaining your burner Your burner will provide years of ef fi cient operation if it is pro fessionally installed and maintained by a qualifi ed serv...

Page 7: ...th the burner components is not allowed apart from the parts requiring maintenance Only those parts envisaged by the manufacturer can be replaced 2 2 Personnel training The user is the person body or company that has acquired the machine and intends to use it for the specific purpose He is re sponsible for the machine and for the training of the people working around it The user Undertakes to entr...

Page 8: ...9 Fuel Oil no 2 Operation Progressive two stage or modulating Nozzles number 1 Standard applications Boilers water steam diathermic oil Ambient temperatur F 32 104 0 40 C Combustion air temperature F max 140 60 C Electrical supply Ph V Hz 3 575 60 Fan motor rpm V HP A 3500 333 575 7 6 15 8 8 7 Pump motor rpm V HP A 3470 575 2 2 2 Ignition transformer V1 V2 I1 I2 120V 1 x 7 kV 1 6 A 23 mA Pump deli...

Page 9: ... burners stands on a wooden base which can be lifted by fork lifts Outer dimensions of packaging are indicated in Fig 2 The weight of the burner complete with packaging is indicated in Tab C Tab C 3 5 Standard equipment 1 Thermal insulation screen 4 Screws to secure the burner flange to the boiler M 18 x 70 2 Spacers see Fig 18 page 20 1 Instruction booklet and spare parts list D A E B R L S S H G...

Page 10: ...er Example Output 18 500 MBtu hr diameter 39 4 inch length 16 5 ft WARNING The firing rate area values have been obtained con sidering a surrounding temperature of 68 F and an atmospheric pressure of 394 WC approx 329 ft above sea level and with the combustion head ad justed as shown on page 20 Burner power output Combustion chamber pressure D11235 Fig 3 0 2 4 6 8 10 12 14 16 18 20 mba r 8 7 6 5 4...

Page 11: ... 17 Gears for movement of air damper 18 Air pressure switch differential operating type 19 Air pressure test point 20 Air pressure test point 21 QRI cell 22 Air pressure test point 23 Oil modulator valve servomotor 24 Pump 25 Pump motor 26 Minimum oil pressure switch 27 Oil shutoff valve 28 Nozzle delivery pressure gauge 29 Nozzle return pressure gauge 30 Oil modulator 31 Strainer 32 Check valve 2...

Page 12: ...uel 12 Button for alarm silence 13 Signal light for burner failure and lock out reset button 14 AZL display 15 Relay 16 Fuse 17 Auxiliary terminal strip 18 Pump motor contactor and thermal cut out 19 Fan motor contactor and thermal cut out 20 Air pressure switch Two types of burner failure may occur Control box lock out if on the AZL display 14 Fig 6 shows lock out and the reset button 13 lights u...

Page 13: ...lso be observed Condensation and ingress of humidity must be avoided Should such conditions occur make sure that the unit will be completely dry before switching on again Static charges must be avoided since they can damage the unit s electronic components when touched Mechanical design The LMV5 is a microprocessor based burner management sys tem with matching system components for the control and...

Page 14: ...y fuse externally Max 16 AT Undervoltage Safety shutdown from operating position at mains voltage Restart on rise in mains voltage AC 96 V AC 100 V Oil pump magnetic clutch nominal voltage Nominal current Power factor 1 6A cos 0 4 Air pressure switch test valve nominal voltage Nominal current Power factor 0 5A cos 0 4 Terminal loading Outputs Total contact loading Mains voltage Input current of un...

Page 15: ... tn3 Direct start Oil Timer 3 phase max time Fuel 1 oil Fuel 2 gas Controller ON internal external Fuel selection ARF LP alternative to GSK Heavy oil direct start Oil Fuel valve SV Fuel valve PV Fuel valve V1 Fuel valve V2 Fuel valve V1 Fuel valve V2 Fuel valve V3 Fuel valve SV Fuel Actuator 2 3 OR Air Aux VSD Actuator 1 4 5 0 0 Fig 8 S8319 ...

Page 16: ...il tn1 t78 Postpurge time 3 gas oil tn3 t80 Valve proving evacuate time t81 Leakage test time atmospheric pressure t82 Leakage test filling test t83 Leakage test time gas pressure tmn1 Min time extraneous light test 5 s after skip over of pre purge tmx1 Max damper running time tmx2 Max time startup release tmx3 Max time circulation heavy oil tn Postpurge time TSA1 Safety time 1 TSA2 Safety time 2 ...

Page 17: ...ch Output is active when fan is on and for another 15 s after fan is switched off 17 Parameter Start pressure switch valve PS_Reli_Inv Output pressure switch valve will be logically inverted 18 Parameter Alarm act deact deactivated The alarm output can temporarily be deactivated for cur rent error only 19 Parameter Only with LMV51 Continuous pilot gas oil Activated Pilot valve is also activated in...

Page 18: ...V section of the actuator is strictly segregat ed from the functional low voltage section The holding torque is reduced when the actuator s power supply is switched off Technical data Tab F WARNING To avoid injury to persons damage to prop erty or the environment the following warn ing notes should be observed Do not open interfere with or modify the ac tuators WARNING The housing cover may only b...

Page 19: ... be carried out by qualified personnel as indicated in this manual and in compliance with the standards and regulations of the laws in force WARNING The handling operations for the burner can be high ly dangerous if not carried out with the greatest at tention keep any unauthorised people at a distance check the integrity and suitableness of the available means of handling Check also that the area...

Page 20: ... cooled front the refractory fettling 2 5 Fig 12 is not required unless it is expressly requested by the boiler manufacturer 4 6 Securing the burner to the boiler Prepare an adequate system of hoisting by hooking onto the rings 3 Fig 12 Slip the thermal protection standard equipment onto the blast tube 4 Place entire burner on the boiler hole arranged previously see Fig 11 and fasten with the scre...

Page 21: ...de and ignition pilot positioning WARNING It is advisable to replace nozzles every year during regular maintenance operations CAUTION The use of nozzles other than those specified by the manufacturer and inadequate regular mainte nance may result into emission limits non conform ing to the values set forth by the regulations in force and in extremely serious cases into potential hazards to people ...

Page 22: ...anged in the plant for the maximum run hole 3 When dealing with boilers featuring a strong back pressure if air delivery is insufficient even with the damper fully open you can use a different setting to that illustrated in diagram Fig 16 do this by moving the tie rod onto the next highest hole numerically speaking thus increasing the combustion head s opening and hence air de livery If combustion...

Page 23: ...rence are higher than the values listed in the Tab I 4 12 3 Hydraulic connections The pumps are equipped with a by pass that connects return line and suction line The pumps are installed on the burner with the by pass closed by screw 3 Fig 20 It is therefore necessary to connect both hoses to the pump Remove the plugs from the suction and return connections of the pump Insert the hose connections ...

Page 24: ...f the oil circuit makes it possible to vary the pressure on return of the nozzle depending on the flow rate required Governing of the pressure on return is obtained with the varia tion of a section by rotating the servomotor 23 Fig 5 page 9 Pressure governor at 0 maximum opening minimum pres sure on nozzle return Pressure governor at 90 minimum opening maximum pres sure on nozzle return The servom...

Page 25: ...at the starting operation as often as required After 5 or 6 starting operations allow 2 or 3 minutes for the trans former to cool Do not illuminate the QRI cell or the burner will lock out the burner should lock out anyway about 10 seconds after it starts Suntec TA3 Min delivery rate at 290 PSI pressure GPH 218 Delivery pressure range PSI 100 580 Max suction depression PSI 7 Viscosity range cSt 4 ...

Page 26: ...l The burners have been set for intermittent operation This means they should compulsorily be stopped at least once every 24 hours to enable the control box to perform checks of its own start up efficiency Normally the boiler s thermo stat pressure switch ensures the stopping of the burner If this is not the case it is necessary to apply in series with IN a timer switch that turns off the burner a...

Page 27: ...e motor is 400V To reset in the case of an intervention of the thermal relay press the button RESET Fig 24 The button STOP Fig 24 opens the NC 95 96 contact and stops the motor To test the thermal relay insert a screwdriver in the window TEST Fig 25 and move it in the sense of the arrow towards right 4 15 2 Electronic thermal relay To reset in the case of an intervention of the thermal relay press...

Page 28: ...n this case increase gas fir ing delivery Happened this operation the oil burner active devices and retires gas operation if firing is still not achieved it may be that oil is not reaching the combustion head within the safety time period In this case increase oil firing delivery During the first firing there is a momentary lowering of the fuel pressure caused by the filling of the nozzle tubing T...

Page 29: ... application obtained with this burner The first start up and curve synchronization manual is supplied with the burner The complete manual for checking and setting all parameters will be provided on application 5 4 1 Combustion air adjustment Fuel combustion air must be synchronized with the relevant ser vomotors air and oil by storing a setting curve by means of the electronic cam To reduce press...

Page 30: ...er starts again automatically if the pressure goes above 261 PSI 18 bar after burner start up 5 7 Final checks with the burner working WARNING As a rule the air pressure switch must prevent the air pressure from lowering below 80 of the adjust ment value as well as preventing the CO in the fumes from exceeding 1 10 000 ppm To check this insert a combustion analyser into the chimney slowly close th...

Page 31: ...e and at nozzle present in the sys tem Clean or replace if necessary If rust or other impurities are observed inside the pump use a sep arate pump to lift any water and other impurities that may have de posited on the bottom of the tank Nozzles It is advisable to replace nozzles every year during regular main tenance operations Do not clean the nozzle openings do not even open them Flexible hoses ...

Page 32: ...e screws 5 At this point it is possible to open the burner at the hinge 6 2 4 Closing the burner Close the burner at the hinge Apply screw 5 Connect the oil servomotor test point 3 Apply the tire rod 1 of the head movement lever loosening nut 2 Connect the electrical supply from the burner DANGER Disconnect the electrical supply from the burner 5 5 1 2 5 5 3 Fig 34 D8381 ...

Page 33: ...Appendix Spare parts 31 20035606 GB A Appendix Spare parts ...

Page 34: ...ANGE GASKET A 28 3013462 CONNECTOR C 29 20041685 U BOLT C 30 3008663 VIEWING PORT C 31 3013509 TIE ROD C 33 3014152 FAN MOTOR C 34 3012948 AIR PRESSURE SWITCH 35 3012795 BEARING C 36 3005447 PRESSURE TEST POINT C 37 3013284 AZL TRANSFORMER B 38 3013106 ELECTRODE A 39 3013128 HIGH VOLTAGE LEAD A 40 20013160 INSULATOR A 41 20041690 SUPPORT 42 20041673 AIR DIFFUSER A 43 3013549 NOZZLE HOLDER C 44 200...

Page 35: ...safety fittings 62 3013282 CONTROL BOX B 63 3003006 BAR C 64 3006723 CONNECTOR C 65 3012841 SOCKET C 67 20041698 SUPPORT 68 3013516 TUBE 69 3013517 TUBE 70 20041716 TUBE 71 20041723 TUBE 72 3006140 PRESSURE GAUGE 73 20029212 VALVE B 74 3006158 PUMP C 75 20029257 VALVE 76 20041730 TUBE 77 3007079 SEAL B 78 20029248 VALVE 79 20041732 MOTOR C N CODE DESCRIPTION ...

Page 36: ...ut 4 Operational layout 5 LMV51 operational layout 6 LMV51 operational layout 7 LMV51 operational layout 8 LMV51 operational layout 9 LMV51 operational layout 10 LMV51 operational layout 11 LMV51 operational layout 12 Electrical connections set by installer 13 Electrical connections set by installer 1 2 Sheet no 1 A1 Coordinates Reference layout ...

Page 37: ...Appendix Electrical panel layout 35 20035606 GB 0 1 0 2 2 1 1 3 3 3 4 3 5 3 3 3 3 3 3 3 63 6 6 3 3 4 3 7 8 7 8 ...

Page 38: ...20035606 36 GB Appendix Electrical panel layout ...

Page 39: ...Appendix Electrical panel layout 37 20035606 GB ...

Page 40: ...20035606 38 GB Appendix Electrical panel layout 0 0 0 0 1 2 1 2 0 1 0 3 1 4 1 0 1 0 0 1 1 1 21 2 1 51 5 5 2 1 1 0 3 1 0 ...

Page 41: ...Appendix Electrical panel layout 39 20035606 GB ...

Page 42: ...20035606 40 GB Appendix Electrical panel layout ...

Page 43: ...Appendix Electrical panel layout 41 20035606 GB 0 1 0 ...

Page 44: ...20035606 42 GB Appendix Electrical panel layout 0 0 0 1 0 2 0 0 0 0 0 0 0 30 3 3 0 0 1 0 ...

Page 45: ...Appendix Electrical panel layout 43 20035606 GB 0 0 0 1 0 2 0 0 0 0 0 0 0 30 3 3 0 0 1 0 4 56 76 ...

Page 46: ...20035606 44 GB Appendix Electrical panel layout 0 1 2 3 2 4 5 4 0 6 6 1 1 7 8 8 8 8 9 1 9 1 3 9 9 2 9 9 9 9 9 19 1 9 59 5 5 1 9 9 9 ...

Page 47: ...Appendix Electrical panel layout 45 20035606 GB 0 0 1 1 1 2 1 1 1 1 1 1 1 1 1 1 1 2 1 3 0 45 65 ...

Page 48: ...essure switch PE Burner ground PGmin Min gas pressure switch POmin Min oil pressure switch POC VR Light oil POC return valve POC VS Light oil POC safety valve QRI Infrared sensor RS Remote lock out reset button S1 Switch for burner ON OFF S2 Switch for following operations LOCAL REMOTE SH3 Burner reset button and lockout warning SM1 Air servomotor SM2 Servomotor T1 Electronic cam transformer TA Ig...

Reviews: