background image

20145860

20 

GB

Installation

5.11.2 Gas train

Type-approved in accordance with EN 676 and supplied sepa-
rately from the burner.
To select the correct model of the gas train, refer to the "burner-
gas train combination" manual supplied.

5.11.3 Gas train installation

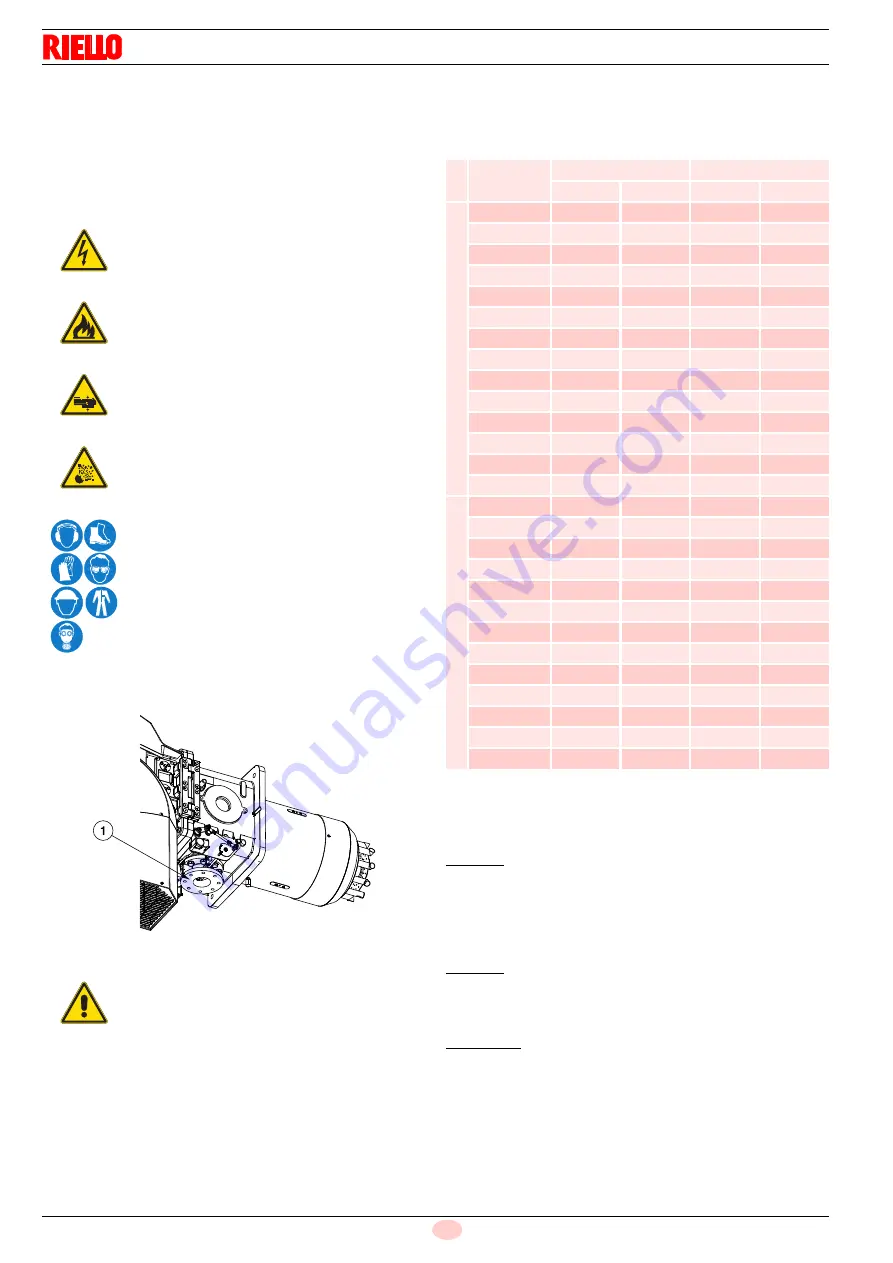
The gas train is prearranged to be connected to the burner with
the flange 1)(Fig. 21).

5.11.4 Gas pressure 

Tab. J indicates the pressure drop of the combustion head and
the gas butterfly valve depending on the operating output of the
burner. 

Tab. J

The values shown in Tab. J refer to: 

Natural gas G 20 NCV 9.45 kWh/Sm

(8.2 Mcal/Sm

3

)

Natural gas G 25 NCV 8.13 kWh/Sm

(7.0 Mcal/Sm

3

Column 1
Pressure drop on combustion head.
Gas pressure measured at the test point 1) (Fig. 22), with:

combustion chamber at 0 mbar;

burner working at maximum modulating output;

combustion head adjusted as in page 18.

Column 2
Pressure loss at gas butterfly valve 2) (Fig. 22) with maximum
opening: 90°.

To calculate the approximate output at which the burner oper-
ates:

Subtract the combustion chamber pressure from the gas
pressure measured at test point 1) (Fig. 22).

Find, in the table Tab. J related to the burner concerned, the
pressure value closest to the result of the subtraction.

Read off the corresponding output on the left.

DANGER

Disconnect the electrical supply by means of the
system's main switch.

Make sure that there are no gas leaks.

Pay attention when handling the train: danger of
crushing of limbs.

Make sure that the gas train is properly installed
by checking for any fuel leaks. 

The operator must use the required equipment
during installation.

WARNING

The heat output and gas pressure data in the
head refer to operation with gas butterfly valve
fully open (90°).

Fig. 21

20058943

kW

p (mbar)

p (mbar)

G 20

G 25

G 20

G 25

RS 1

000

/M 

BLU

4000

9.9

14.4

1.2

1.7

4500

13.0

18.8

1.5

2.2

5000

16.0

23.2

1.8

2.7

5500

19.1

27.6

2.2

3.3

6000

22.1

32.0

2.6

3.9

6500

25.2

36.3

3.1

4.6

7000

28.9

41.6

3.6

5.3

7500

32.9

47.2

4.1

6.1

8000

36.9

52.7

4.7

7.0

8500

41.5

59.4

5.3

7.9

9000

46.4

66.3

5.9

8.8

9500

51.2

73.3

6.6

9.8

10000

56.0

80.2

7.3

10.9

10100

57.0

81.6

7.5

11.1

RS 1

200

/M 

BLU

5500

18.2

26.6

2.2

3.3

6000

22.1

32.1

2.6

3.9

6500

26.0

37.6

3.1

4.6

7000

29.9

43.2

3.6

5.3

7500

33.8

48.7

4.1

6.1

8000

38.6

55.4

4.7

7.0

8500

43.4

62.1

5.3

7.9

9000

48.2

68.8

6.0

8.8

9500

53.1

75.5

6.6

9.8

10000

58.6

83.1

7.4

10.9

10500

64.4

91.0

8.1

12.0

11000

70.2

99.0

8.9

13.2

11100

71.4

100.6

9.1

13.4

Summary of Contents for RS 1000/M BLU

Page 1: ...ation use and maintenance instructions 20145860 2 10 2020 Forced draught gas burners Progressive two stage or modulating operation CODE MODEL TYPE 20145840 RS 1000 M BLU 1133 T 20145867 RS 1200 M BLU 1134 T GB ...

Page 2: ...Translation of the original instructions ...

Page 3: ...RFGO A22 control box 13 4 13 Servomotor SQM10 1 14 5 Installation 15 5 1 Notes on safety for the installation 15 5 2 Handling 15 5 3 Preliminary checks 15 5 4 Operating position 16 5 5 Removal of the locking screws from the shutter 16 5 6 Preparing the boiler 16 5 6 1 Boring the boiler plate 16 5 6 2 Blast tube length 16 5 7 Securing the burner to the boiler 17 5 8 Access to head internal part 17 ...

Page 4: ...ration 28 6 10 3 Burner flame goes out during operation 28 6 10 4 Ignition failure 28 6 11 Final checks with burner operating 29 7 Maintenance 30 7 1 Notes on safety for the maintenance 30 7 2 Maintenance programme 30 7 2 1 Maintenance frequency 30 7 2 2 Safety test with gas feeding closed 30 7 2 3 Checking and cleaning 30 7 2 4 Safety components 31 7 3 Opening the burner 32 7 4 Closing the burner...

Page 5: ...014 68 EU only FS2 Pressure Equipment Directive Such products are marked as follows The quality is guaranteed by a quality and management system certified in accordance with ISO 9001 2015 Manufacturer s Declaration RIELLO S p A declares that the following products comply with the NOx emission limits specified by German standard 1 BImSchV revision 26 01 2010 Product Type Model Output Forced draught...

Page 6: ...ried out correctly may cause damage to the ma chine and or injury to people DANGER DANGER LIVE COMPONENTS This symbol indicates operations which if not car ried out correctly lead to electric shocks with le thal consequences DANGER FLAMMABLE MATERIAL This symbol indicates the presence of flammable materials DANGER BURNING This symbol indicates the risks of burns due to high temperatures DANGER CRU...

Page 7: ...of damage to things or injury to people if such damage injury was due to any of the following causes incorrect installation start up use and maintenance of the burner improper incorrect or unreasonable use of the burner intervention of unqualified personnel carrying out of unauthorised modifications on the equipment use of the burner with safety devices that are faulty incor rectly applied and or ...

Page 8: ...ance Only those parts envisaged by the manufacturer can be replaced 3 2 Personnel training The user is the person body or company that has acquired the machine and intends to use it for the specific purpose He is re sponsible for the machine and for the training of the people work ing around it The user undertakes to entrust the machine exclusively to suitably trained and qualified personnel under...

Page 9: ...oltage of auxiliaries 230 50 60 110 50 60 R S 1000 M TC Emission C01 or Class 1 EN676 BLU or BLU Class 3 EN676 FS1 3 400 50 230 50 BASIC DESIGNATION EXTENDED DESIGNATION BLU 3N 400V 50Hz 3N 230V 50Hz 230V 50 60Hz 110V 50 60Hz Heavy oil E Electronic cam EV Electronic cam with variable speed with Inverter P Proportional air gas valve BP Two stage light oil Proportional valve gas M Mechanical cam S L...

Page 10: ...1134 T Output 1 Output 1 min max kW 1100 4000 10100 1500 5500 11100 Fuels Natural gas G20 methane gas G21 G22 G23 G25 Gas pressure at max output 2 Gas G20 G25 mbar 67 1 101 2 97 2 145 Operation Intermittent min 1 stop in 24 hours Progressive two stage or modulating by kit see accessories Standard applications Boilers water steam diathermic oil Ambient temperature C 0 50 Combustion air temperature ...

Page 11: ...the burner to be opened and the rear part turned on the hinge The maximum dimensions of the open burner are indicated by the L and R positions The l position is reference for the refractory thickness of the boiler door Tab E Fig 1 20058937 mm A B C D E F G H I L R RS 1000 M BLU 1637 669 200 413 885 DN80 1206 1338 485 1493 1350 RS 1200 M BLU 1637 670 200 456 885 DN80 1250 1338 485 1493 1350 ...

Page 12: ...d in the diagram consult the manufac turer The firing rates were obtained in special test boilers according to EN 676 regulations In Fig 3 you can see the diameter and length of the test combus tion chamber Example Output 7000 kW diameter 120 cm length 6 m MODULATING RATIO The modulating ratio obtained in test boilers in accordance with standard EN 676 is 2 5 1 WARNING The firing rate value Fig 2 ...

Page 13: ...boiler fixing 13 Gas train flange 14 Shutter 15 Combustion head movement lever 16 Air damper movement leverage 17 Air pressure switch differential operating type 18 Combustion head air pressure test point 19 Maximum gas pressure switch with pressure test point 20 UV cell 21 Pressure test point for air pressure switch 22 Locking screws of the shutter during the transport replace them with the screw...

Page 14: ...ignalling of main fuel valve open 18 Heat request light signalling 19 Light signalling of mains live state 20 Flame sensor plug sensor socket NOTE Two types of burner lockout may occur Control box lockout if the pushbutton red led of the con trol box 9 Fig 5 and the pushbutton with light 8 light up this indicates that the burner is in lockout Release by pressing the pushbutton 8 Motors lockout rel...

Page 15: ...f the control box comply with the following instructions avoid conditions that can favour the development of conden sate and humidity Otherwise before switching on again make sure that the entire control box is perfectly dry Static charges must be avoided since they can damage the control box s electronic components when touched Technical data Tab F Mechanical structure The control box is made of ...

Page 16: ...ional safety standards are respected During the assembly of the servomotor and the connection of the damper the gears can be disengaged by means of a le ver allowing the drive shaft to be easily adjusted in both ro tation directions Technical data Tab G WARNING To avoid accidents material or environmental damage observe the following instructions Avoid opening modifying or forcing the actua tors O...

Page 17: ...must be free from hazardous mixes e g chloride fluoride halo gen if present it is highly recommended to carry out cleaning and maintenance more frequently WARNING The handling operations for the burner can be highly dangerous if not carried out with the great est attention keep any unauthorised people at a distance check the integrity and suitableness of the available means of handling Check also ...

Page 18: ...ast tube 4 This protection must not compromise the extraction of the blast tube For boilers with a water cooled frontpiece a refractory lining 2 5 Fig 12 is not necessary unless expressly requested by the boiler manufacturer Tab H WARNING The burner is designed to operate only in positions 1 2 3 and 4 Fig 9 Installation 1 is preferable as it is the only one that allows the maintenance operations a...

Page 19: ...mbustion head Fig 13 proceed as follows disconnect the electrical wiring from the servomotor disconnect the leverage 3 of the cam and movement of the head 12 unscrew the 4 fixing screws 1 and open the burner on the hinge disconnect the cables 14 from the electrodes 2 remove the screw gas pressure socket 6 of the head pull out the inner part of the head 5 Prepare a suitable lifting system using rin...

Page 20: ...mined based on the maximum output requested as illustrated in Tab I In the factory the adjustment is adjusted for the maximum stroke hole 10 Fig 15 Tab I WARNING Position the electrodes according to the dimen sions shown in Fig 14 Fig 14 Diffuser Electrodes D11587 5 6 7 8 10 Fig 15 20058942 Leverage hole Output kW From A RS 1000 5 1100 4000 5 4000 6600 6 6600 8100 8 8100 10100 RS 1200 5 1500 5500 ...

Page 21: ... supplied separately P2 Upstream pressure of valves adjuster P3 Upstream pressure of the filter L Gas train supplied separately L1 The responsibility of the installer Explosion danger due to fuel leaks in the pres ence of a flammable source Precautions avoid knocking attrition sparks and heat Make sure that the fuel interception tap is closed before performing any operation on the burner WARNING T...

Page 22: ... J related to the burner concerned the pressure value closest to the result of the subtraction Read off the corresponding output on the left DANGER Disconnect the electrical supply by means of the system s main switch Make sure that there are no gas leaks Pay attention when handling the train danger of crushing of limbs Make sure that the gas train is properly installed by checking for any fuel le...

Page 23: ...ter To calculate the required gas pressure at test point 1 Fig 22 set the maximum modulating output required from the burner op eration find the nearest output value in the table Tab J for the burner in question Read on the right column 1 the pressure at the test point 1 Fig 22 Add this value to the estimated pressure in the combustion chamber Example RS 1000 M BLU with natural gas G20 Maximum mod...

Page 24: ...s requiring a burner operating cycle longer than 24 hours When it is used as a UV control the system is considered as non permanent requiring one burner recycle every 24 hours Normally burner stopping is guaranteed by the boiler s thermostat pressure switch If this is not the case you must apply a time switch to L N in series to stop the burner at least once every 24 hours Refer to the wiring diag...

Page 25: ...ewdriver in the window TEST TRIP 4 and move it in the arrow direction to the right to carry out the thermal relay test 5 14 Motor rotation As soon as the burner starts up go in front of the cooling fan of the fan motor and check it is rotating anticlockwise Fig 25 If this is not the case set the burner switch to 0 off and wait for the control box to carry out the switch off phase Invert the phases...

Page 26: ... valves is equipped with a pilot light that signals voltage pass ing through 6 3 Burner start up Close the remote controls and position the selector 1 Fig 27 to AUTO Make sure that the lights or testers connected to the solenoids or the pilot lights on the solenoids themselves indicate that no volt age is present If voltage is present stop the burner immediately and check the electrical connection...

Page 27: ...not used Cam II limits the limit switch of the servomotor on po sition 0 With the burner off the air damper is completely closed Cam III not used Cam IV limits the limit switch of the servomotor on po sition max approx 130 Cam V regulates the minimum modulation output fac tory set at 45 Remaining cam not used Lever 7 servomotor reset 6 6 Burner adjustment and output modulation 6 6 1 Maximum output...

Page 28: ...s and for a wide calibration field to adjust the servomotor to the maximum of the output used the nearest possible to the maximum opening 130 On the gas butterfly valve fuel step according to the burner out put required with servomotor completely open is carried out by the pressure stabilizer placed on the train The values in the Tab K can be useful as reference for a good fuel calibration Tab K 6...

Page 29: ...s pressure test point The maximum gas pressure switch must be regulated to a value no higher than 30 of the measurement read on the gauge when the burner is working at maximum output After making the adjustment remove the pressure gauge and close the tap 6 9 3 Minimum gas pressure switch Adjust the minimum gas pressure switch after performing all the other burner adjustments with the pressure swit...

Page 30: ...correct position of the air and gas maximum pres sure switches If the temperature or the pressure is low so the thermostat pressure switch TR is closed the burner progressively in creases the output up to the MAX value section C D If subsequently the temperature or pressure increases until TR opens the burner progressively decreases its output to the MIN value section E F The sequence repeats endl...

Page 31: ...m end of scale position Turn the air pressure switch to the maximum end of scale position The burner must stop in lockout Turn off the burner and cut off the power Disconnect the minimum gas pressure switch connector The burner must not start Disconnect electrically the sensor for the flame detection The burner must stop in lockout due to ignition failure WARNING Make sure that the mechanical lock...

Page 32: ... signals or closure opening position indicators that are activated when the electrical supply arrives 7 2 3 Checking and cleaning Combustion Carry out an analysis of the combustion discharge gases Significant differences with respect to the previous check indicate the points where more care should be exercised during mainte nance Combustion head Open the burner and make sure that all components of...

Page 33: ... it is dirty Combustion If the combustion values found at the start of the intervention do not satisfy current standards or anyway indicate a poor state of combustion consult the table below contact the Technical As sistance Service for the necessary adjustments Tab M 7 2 4 Safety components The safety components should be replaced at the end of their life cycle indicated in the following table Ta...

Page 34: ...pen the burner on the hinge 7 4 Closing the burner Refit following the steps described but in reverse order refit all burner components as they were originally assembled DANGER Disconnect the electrical supply from the burner by means of the main system switch DANGER Close the fuel interception tap Wait for the components in contact with heat sources to cool down completely 20058947 Fig 36 Carry o...

Page 35: ... 20 of the signal power To exit the check mode function press the reset button the flame control will go back to the normal operating mode 8 3 Flame control lock out or emergency stop condition The RFGO control device can be locked emergency stop at any time during the operating cycle and unlocked when already locked lock out by simply pressing the key on the front panel or by means of the termina...

Page 36: ...n damper Closed damper Modulation Ignition Flame Status Icon Power OFF ON OFF Not ready Diagnostics Green Standby Green Servomotor movement Note 3 OFF Flashing Flashing OFF Green Waiting for closing Green blinking Green OPEN before ignition Green Minimum before ignition Green Ignition Green PTFI Green blinking Green MTFI Green Active modulation Green Minimum output position Green With flame presen...

Page 37: ...se material problems severe injuries or death It is the owner or user s responsibility to make sure that the equipment described is installed used and commissioned in compliance with the requirements provided both by national and local law The lock out condition indicates the presence of a fault which occurred during the operating cycle or during stand by mode Before performing an unlock attempt i...

Page 38: ...relay fault Red 19 Combustion airflow switch fault in the rest position Red 20 UV no flame at the end of the 2nd safety time MTFI Red 21 Safety relay fault Red 22 Supervisor processor fault Red 23 Supervisor memory test fault Red 24 Flame loss during the operation AUTO Red 25 Supervisor processor data memory fault Red 26 Supervisor processor internal fault Red 27 Not used 28 Not used 29 Operating ...

Page 39: ... Red 52 Piloted valve feedback fault Red 53 Actuator feedback waiting time expired Red 54 Direct ignition valve feedback fault Red 55 Internal processor fault Red 56 UV false flame during operation Red 57 FR false flame during operation Red 58 T8 inlet fault Red 59 Internal hardware fault Red 60 Local reset fault Red 61 Open POC fault Red 62 UV strong UV flame fault Red 63 Internal hardware fault ...

Page 40: ...or fault Internal fault Replace the control device o 16 No flame 1st safety time PTFI No flame at the end of the first safety time Inspect the system check the gas pressure check the UV scanner check the wiring etc 17 Wiring fault The system detected the presence of voltage on critical terminals T16 T17 T18 or T19 at the wrong moment or there is no voltage when necessary Inspect the wiring and mak...

Page 41: ... system detected the presence of voltage on T17 at the wrong moment or there is no voltage when necessary Check the wiring and make sure that the earthing is appropriate If the problem persists contact the distributor factory 52 Piloted valve feedback fault The system detected the presence of voltage on T19 at the wrong moment or there is no voltage when necessary Check the wiring and make sure th...

Page 42: ...10V Two components should be ordered the analogue signal converter the Potentiometer Continuous purging kit Soundproofing box kit Gas trains in compliance with EN 676 Please refer to manual A Appendix Accessories Parameter to be checked Probe Output regulator Adjustment field Type Code Type Code Temperature 100 500 C PT 100 3010110 RWF50 RWF55 20101190 20101191 Pressure 0 2 5 bar 0 16 bar Output p...

Page 43: ...riangle starter 5 Operational layout RFGO A22 6 Operational layout RFGO A22 7 Operational layout RFGO A22 8 Operational layout RFGO A22 9 Electrical wiring kit RWF50 internal 10 Electrical connections set by installer 11 Electrical connections set by installer 12 Operational layout RWF50 13 Electrical wiring kit RWF50 external 1 2 Sheet no 1 A1 Co ordinates Indication of references ...

Page 44: ...20145860 42 GB Appendix Electrical panel layout 0 0 0 0 12342 5 56 7 7 7 8 7 9 7 7 7 7 7 7 7 7 7 7 8 7 ...

Page 45: ...43 20145860 GB Appendix Electrical panel layout ...

Page 46: ...20145860 44 GB Appendix Electrical panel layout 0 0 1 0 0 0 0 0 2 2 2 0 0 0 ...

Page 47: ...45 20145860 GB Appendix Electrical panel layout 0 1 2 2 2 0 ...

Page 48: ...20145860 46 GB Appendix Electrical panel layout 0 0 1 0 1 2 0 3 0 1 0 1 1 0 0 0 0 0 40 4 4 0 0 1 2 0 1 ...

Page 49: ...47 20145860 GB Appendix Electrical panel layout 0 1 1 1 2 3 2 3 2 3 2 3 2 3 2 3 2 3 2 3 4 5 6789 77 ...

Page 50: ...10 302 6 7 1 0 2 2 310 24 5 2 2 0 8 0219 310 24 5 1 0821 2 5 5 1 0 2 24 5 9 9 9 1 1 1 3 2 3 12 64 2 1 4 A B 2 2 B 20 27 2 2 2 2 2 0 46 1 4610 4 1 2 1 2 2 2 B0 B1 00 B1 0 B1 0 B1 00 21 1 2 21 2 3 2 1 3 2 2 2 2 09 0 2 6 0 29 1 0 29 1 0 231 2 2 0 1 B 2 2 0 1 2 1 B 2 4 2 A B 20 2 22 2 4 22 2 39 3 3 ...

Page 51: ...49 20145860 GB Appendix Electrical panel layout 0 1 2 3 4 32 5 5 2 2 2 2 0 5 2 2 0 2 2 2 0 62 7 28 2 0 2 0 7 7 9 1 9 1 2 4 0 9 0 9 3 9 2 9 2 9 9 09 0 19 1 9 9 2 1 9 0 9 0 9 ...

Page 52: ...20145860 50 GB Appendix Electrical panel layout 0 12 3 4 5 4 5 6 7 8 9 8 9 0 0 0 0 ...

Page 53: ... 4 0 4 5 1 5 6 4 4 9 4 7 A 91 5 9 09 A 7 001B 5 4 1 C 4 7 8 4 D970 4 64 7 47 1 4 E 001 9 F4 94 1 4 1 0 7 94 G 6 1 9 4 4 A H H A A H A H 7 7 7 A 7 A A I 3 I 3 I J I K I I I I I 3I 3 I I 3 I I J I 3 3 3 L L L L A L L A L L A 47 901 9 70 4 94 47 7 4 8 4 4 9 47 7 4 8 4 4 9 7 4 4 8 944 9 09 8 944 9 09 4 8 1 5 9 09 8 1 5 9 09 ...

Page 54: ...4 5 4 5 46 7 4 8 09 6 4 4 46 4 6 6 8 09 6 4 8 09 446 5 4 8 09 8 09 1 3 2 6 4 6 4 8 A 7 6 68 B 7 7 C 5 7 C 7 5 6 6 5 6 7 6 8 46 8 4 8 67 4 6 6 7 6 7 6 7 C C 6 6 C 6 C 6 C 6 7 7 7 6 7 7 7 6 6 6 75 6 6 76 5 6 76 5 4 6 6 7 6 C 7 7 7 6 C 5 68 7 B C 7 7 6 68 6 7D 7 5 57 D ...

Page 55: ...KT1 Star triangle starter triangle contactor KS1 Start triangle starter star contactor KST1 Star triangle starter timer K1 Clean contacts output relay operating fan K2 Motor clean contacts overload relay K3 Clean contacts output relay burner lockout K6 Clean contacts output relay burner switched on MV Fan motor PA Air pressure switch PE Burner earth PGMax Maximum gas pressure switch PGMin Minimum ...

Page 56: ...Subject to modifications RIELLO S p A I 37045 Legnago VR Tel 39 0442 630111 http www riello it http www rielloburners com ...

Reviews: