background image

20098208

40 

GB

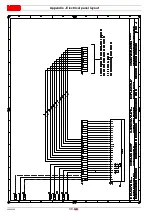
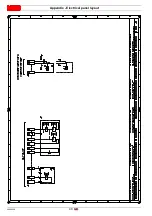
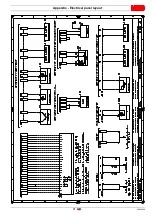
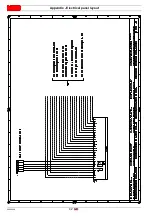
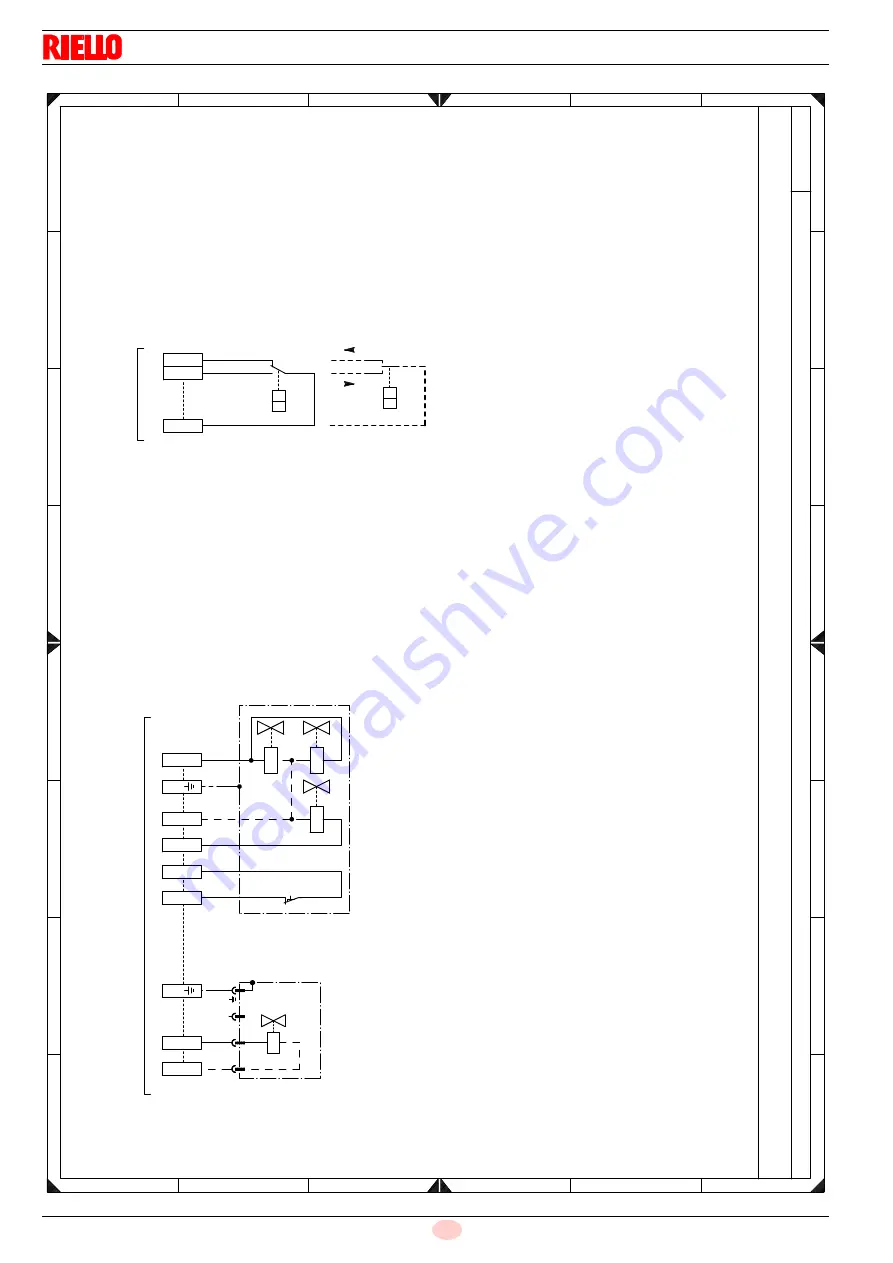
Appendix - Electrical panel layout

 !

"#$$%&&'

() 

(*+

,-"&.-/.0

(*

() 

(12


+

+3402&20,5/-1637&4618

9(+3"61637&:371-:1

(12


+


;

9

<

=

>

?

@


;

9

<

=

>

?

@

-

A

:

B

0

C

-

A

:

B

0

C

:3//0,-D0716&0/01126:6&-&:52-&B0//E&67"1-//-1320

0/0:126:-/&:3770:1637"&"01&A*&67"1-//02

0/0F123-7":8/G""0&.3D&67"1-//-1052&-5"H5CG8207

2-::32B0D071"&I/0:126J50&0CC0:15I&+-2&/E&67"1-//-1

052

7

KA:

.+

+0

:+6

:+6

.;

7

+0

. 9

1>

6L&"%MN$

1?

:

7:

73

KA:

1@

66L&"%MN$

A5&O&A/5&P&A/50&P&A/05&P&A/-5

AF&O&7023&P&A/-:F&P&7362&P&":84-2H

*0&O&,6-//3&P&*0//34&P&Q-570&P&,0/A

,7&O&.02B0&P&,2007&P&.021&P&,2G7

2B&O&23""3&P&20B&P&235,0&P&231

48&O&A6-7:3&P&48610&P&A/-7:&P&406""

3,O&-2-7:63&P&32-7,0&P&32-7,0&P&32-7,0

.1O&.63/0113&P&.63/01&P&.63/01&P&.63/011

,*O&,26,63&P&,20*&P&,26"&P&,2-5

+FO&23"-&P&+67F&P&23"0&P&23"-

,BO&323&P&,3/B&P&32&P&,3/B

1JO&152:80"0&P&152J536"0&P&152J536"0&P&1

52F6"A

/-5

"2O&-2,0713&P&"6/.02&P&-2,071&P&"6/A02

,7*0O&,6-//3P.02B0&P&*0//34P,2007&P&Q

-570P.021&

P&,0/AP,257

A7&O&D-22370&P&A2347&P&D-2237&P&A2-57

.+

;

9

+0


.9

.;

:+6

"MR$%S

"%MT%

DMUV
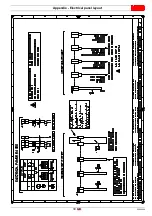
Summary of Contents for RS 300/M BLU FS1

Page 1: ...Installation use and maintenance instructions 20098208 1 01 2015 Forced draught gas burner Modulating operation CODE MODEL TYPE 20098189 RS 300 M BLU FS1 98189X GB ...

Page 2: ...Original instructions ...

Page 3: ...rvomotor SQM10 1 13 5 Installation 14 5 1 Notes on safety for the installation 14 5 2 Handling 14 5 3 Preliminary checks 14 5 4 Operating position 15 5 5 Removal of the locking screws from the shutter 15 5 6 Preparing the boiler 15 5 6 1 Boring the boiler plate 15 5 6 2 Blast tube length 15 5 7 Securing the burner to the boiler 16 5 8 Access to head internal part 16 5 9 Electrode pilot position 17...

Page 4: ...Burner start up 24 6 8 2 Operation 25 6 8 3 Burner flame goes out during operation 25 6 8 4 Ignition failure 25 7 Maintenance 26 7 1 Notes on safety for the maintenance 26 7 2 Maintenance programme 26 7 2 1 Maintenance frequency 26 7 2 2 Checking and cleaning 26 7 3 Opening the burner 27 7 4 Closing the burner 27 8 Faults Probable causes Solutions 28 A Appendix Accessories 31 B Appendix Electrical...

Page 5: ... following Technical Standards EN 676 EN 12100 and according to the European Directives MD 2006 42 EC Machine Directive LVD 2006 95 EC Low Voltage Directive EMC 2004 108 EC Electromagnetic Compatibility The quality is guaranteed by a quality and management system certified in accordance with UNI EN ISO 9001 Legnago 03 09 2014 Executive General Manager RIELLO S p A Burner Department Research Develo...

Page 6: ...ried out correctly may cause damage to the ma chine and or injury to people DANGER DANGER LIVE COMPONENTS This symbol indicates operations which if not car ried out correctly lead to electric shocks with le thal consequences DANGER FLAMMABLE MATERIAL This symbol indicates the presence of flammable materials DANGER BURNING This symbol indicates the risks of burns due to high temperatures DANGER CRU...

Page 7: ...of damage to things or injury to people if such damage injury was due to any of the following causes incorrect installation start up use and maintenance of the burner improper incorrect or unreasonable use of the burner intervention of unqualified personnel carrying out of unauthorised modifications on the equipment use of the burner with safety devices that are faulty incor rectly applied and or ...

Page 8: ...ance Only those parts envisaged by the manufacturer can be replaced 3 2 Personnel training The user is the person body or company that has acquired the machine and intends to use it for the specific purpose He is re sponsible for the machine and for the training of the people work ing around it The user undertakes to entrust the machine exclusively to suitably trained and qualified personnel under...

Page 9: ...y of the system 3 400 50 3 230 50 Voltage of auxiliaries 230 50 60 110 50 60 R S 300 M TC Emission C11 or Class 1 EN267 EN676 C11 or MZ Class 2 EN267 EN676 C33 or BLU Class 3 EN267 EN676 FS1 3 400 50 230 50 60 BASIC DESIGNATION EXTENDED DESIGNATION BLU 3N 400V 50Hz 3 230V 50Hz 230V 50 60Hz 110V 50 60Hz Heavy oil E Electronic cam EV Electronic cam with variable speed with Inverter P Proportional ai...

Page 10: ...odel RS 300 M BLU FS1 Power 1 Output 1 min max kW 500 1350 3800 Fuel Natural gas G20 methane gas G21 G22 G23 G25 Gas pressure at max output 2 Gas G20 G25 mbar 23 3 32 7 Operation Intermittent Standard applications Boilers water steam diathermic oil Ambient temperature C 0 40 Combustion air temperature C max 60 Protection level IP 54 Noise levels 3 dB A 82 Weight kg 225 Model RS 300 M BLU FS1 Main ...

Page 11: ...ufac turer The firing rates were obtained in special test boilers according to EN 676 regulations In Fig 2 you can see the diameter and length of the test combus tion chamber Example Output 3000 kW diameter 100 cm length 4 m 4 8 Maximum dimensions The maximum dimensions of the burner are shown in Fig 3 Bear in mind that inspection of the combustion head requires the burner to be opened and the rea...

Page 12: ...n head air pressure test point 20 Maximum gas pressure switch with pressure test point 21 pilot igniter 22 Pressure test point for air pressure switch 23 Pressure test point for air pressure switch 24 Gas butterfly valve control lever 25 Adjustable profile cam 26 Air damper control lever 27 UV sensor 28 Locking screws of the shutter during the transport replace them with the screws M12x16 supplied...

Page 13: ...n of UV sensor kit 18 Auxiliary circuits fuse 19 Plug socket servomotor 20 Main valve ON OFF Two types of burner lockout may occur Control box lockout if the control box button red led 11 Fig 5 and the backlit button 10 light up it indicates that the burner is in lockout Release by pressing the pushbutton 10 Motor lockout release by pressing the button on thermal relay 4 10 1 Fan motor rotation Pl...

Page 14: ...the neutral ones Ensure that spliced wires cannot get into contact with neigh bouring terminals Use adequate ferrules Arrange the H V ignition cables separately as far as possi ble from the control box and the other cables When wiring the unit make sure that AC 230 V mains voltage cables are run strictly separate from extra low voltage cables to avoid risks of electrical shock hazard Technical dat...

Page 15: ...ional safety standards are respected During the assembly of the servomotor and the connection of the damper the gears can be disengaged by means of a le ver allowing the drive shaft to be easily adjusted in both ro tation directions Technical data Tab F WARNING To avoid accidents material or environmental damage observe the following instructions Avoid opening modifying or forcing the actua tors O...

Page 16: ...must be free from hazardous mixes e g chloride fluoride halo gen if present it is highly recommended to carry out cleaning and maintenance more frequently WARNING The handling operations for the burner can be highly dangerous if not carried out with the great est attention keep any unauthorised people at a distance check the integrity and suitableness of the available means of handling Check also ...

Page 17: ...nd the flame funnel 4 This protection must not compromise the extraction of the blast tube For boilers with a water cooled frontpiece a refractory lining 2 5 Fig 12 is not necessary unless expressly requested by the boiler manufacturer Tab G WARNING The burner is designed to operate only in positions 1 2 3 and 4 Fig 9 Installation 1 is preferable as it is the only one that allows the maintenance o...

Page 18: ...Fig 13 and unhook the tie rod 7 Disconnect the socket 8 of the servomotor Disconnect the socket 9 of the gas pressure switch Remove the 4 fixing screws 1 Open the burner on the hinge as in Fig 13 Unhook the probe cables and electrode 2 Turn the underneath part of the elbow 3 anticlockwise up to release it from its housing Undo the screw 4 with pressure test point Remove the internal part of the he...

Page 19: ...2 3 to be used is determined by the diagram Fig 15 according to the maximum output requested In the factory the hole is adjusted for the maximum stroke hole 3 In case in which with boilers with high back pressure also with damper completely open the air output is not enough it is possi ble to carry out a calibration different to the one indicated by the diagram Fig 15 moving the tie rod on the fol...

Page 20: ...d separately P2 Upline pressure of valves adjuster P3 Upstream pressure of the filter L Gas train supplied separately L1 The responsibility of the installer 5 11 2 Gas train Approved according to standard EN 676 and provided separately from the burner To select the correct gas train model refer to the supplied Burn er gas train combination manual Explosion danger due to fuel leaks in the pres ence...

Page 21: ...ple with G20 Maximum output operation Gas pressure at test point P1 19 mbar Pressure in combustion chamber 4 mbar 19 4 15 mbar A pressure of 15 mbar column 1 corresponds in the table Tab H to an output of 3000 kW This value serves as a rough guide the effective output must be measured at the gas meter To calculate the required gas pressure at test point P1 set the MAX output required from the burn...

Page 22: ... the control box to per form checks of its own start up efficiency Normally burner stopping is guaranteed by the boiler s thermostat pres sure switch If this is not the case a time switch should be fitted in series to TL to stop the burner at least once every 72 hours Refer to the wiring diagrams The electrical safety of the device is obtained only when it is correctly connected to an efficient ea...

Page 23: ...page 11 comes on Put the selector 1 Fig 25 in position MAN 6 4 Burner firing Having completed the checks indicated in the previous heading the burner should fire If the motor starts but the flame does not appear and the control box goes into lock out reset and wait for a new firing attempt If firing is still not achieved it may be that gas is not reaching the combustion head within the safety time...

Page 24: ... com bustion head and gas butterfly valve To reduce pressure loss and to have a wider adjustment range it is best to set the servomotor to the maximum output used as near to maximum opening 130 as possible On the gas butterfly valve the fuel s partial setting adjustment based on required output with the servomotor fully open is made by using the pressure stabilizer on the train 6 6 1 Max output Ad...

Page 25: ...am assembly when the upper bearing running on the profile 4 Fig 29 is aligned with one of the adjusting screws 2 Tighten or loosen the preselected screw 2 to increase or de crease airflow so as to adapt it to the corresponding gas flow Once output adjustments maximum medium and intermediate have been carried out it is important you secure all the air regu lation screws 2 with the locking screws 3 ...

Page 26: ...urner locks out Then turn the knob anticlockwise by 2 mbar and repeat burner start up to ensure it is uniform If the burner locks out again turn the knob anticlockwise again by 1 mbar 6 8 Operation sequence of the burner 6 8 1 Burner start up 0s TL thermostat pressure switch closes 6s Fan motor starts up Servomotor starts 130 rotation to the right until contact is made on cam I 48s The air damper ...

Page 27: ... value section E F The sequence repeats endless ly The burner locks out when the heat request is less than the heat supplied by the burner at MIN output section G H The TL thermostat pressure switch opens and the servomo tor returns to angle 0 limited by the contact of the cam 2 The air damper closes completely to reduce heat losses to a minimum For every change of output the servomotor will autom...

Page 28: ...m to check that a flame is present The minimum current for control box operation is 6 µA Fig 35 The burner provides a much higher current so controls are not normally required However if it is necessary to measure the ion isation current disconnect the plug socket on the ionisation probe cable and insert a direct current microammeter with a base scale of 100 µA Carefully check the polarities Elect...

Page 29: ...he socket 3 of the servomotor Disconnect the socket 4 of the gas pressure switch Remove the self locking nut 5 Remove the screws 6 At this point it is possible to open the burner on the hinge 7 4 Closing the burner Refit following the steps described but in reverse order refit all burner components as they were originally assembled EN 676 Air excess Max output λ 1 2 Min output λ 1 3 GAS CO2 theore...

Page 30: ...of fail ures that may occur and result in irregular burner operation or no functioning at all If a burner malfunction is detected first of all check that the electrical wiring is adequately connected check whether fuel is delivered check that every adjustment parameter is adequately set 8 Faults Probable causes Solutions Fig 38 S8889 Lockout indicator a b Start up sequence b b Idle stages without ...

Page 31: ...ir pressure Air pressure switch incorrectly adjusted Adjust or replace Pressure switch pressure test point pipe blocked Clean Poorly adjusted head Adjust Dirty fan Clean High depression in the furnace Contact our Technical Department The burner turns on and then remains in lockout mode Failure to the flame detection circuit Replace the control box The burner remains in the pre purge phase Do not i...

Page 32: ... minimum gas pressure switch intervention pressure Replace the gas filter cartridge Lockout without symbol indication Flame simulation Replace the control box Burner goes into lockout during operation Faulty flame sensor Replace worn parts Air pressure switch faulty Replace Maximum gas pressure switch intervention Adjust or replace Lockout when the burner stops Permanent flame in the combustion he...

Page 33: ...e Code RS 300 M BLU FS1 0 2 10V 0 4 20mA 3010390 Burner Output regulator Code RS 300 M BLU FS1 RWF 40 BASIC 3010356 RWF 40 HIGH 3010357 Burner Probe Adjustment field Code RS 300 M BLU FS1 PT 100 temperature 100 500 C 3010110 4 20 mA pressure 0 2 5 bar 3010213 4 20 mA pressure 0 16 bar 3010214 Burner Code RS 300 M BLU FS1 3010402 Burner Code RS 300 M BLU FS1 3010094 Burner Code RS 300 M BLU FS1 300...

Page 34: ...operational layout 5 LFL 1 operational layout 6 LFL 1 operational layout 7 LFL 1 operational layout 8 Electrical connections for internal RWF40 kit 9 Electrical connections set by installer 10 Electrical connections set by installer 11 RWF40 operational layout 12 Electrical connections for external RWF40 kit 1 2 Sheet no 1 A1 Co ordinates Indication of references ...

Page 35: ...4 7 5 L 8 4 8 B6BDHB7 G E 4 N 7 7 B 7 LB B 0L L8 6 9 Q 49 49B 4B9 489 3 Q 7BDE 48 3 7ECD 1P8DF GB Q HC844E GB44EP R897B HB4 H7 Q BDAB HDBB7 BD HDS7 DA Q DE E DBA DE9HB DE P1 Q C87 E P1C B 487 PBC EHQ 8D87 CE ED87HB ED87HB ED87HB Q CE4B E CE4B CE4B CE4B HGQ HDCHCE HDBG HDC HD89 3Q DE 8 C73 DE B DE 8 HAQ EDE HE4A ED HE4A TQ 9D 1B B 9DT9EC B 9DT9EC B 9D3C 489 DQ 8DHB7 E C4 BD 8DHB7 C4 BD H7GBQ HC844E...

Page 36: ... F 4 9 C 4 97 C 4 79 C 4 39 4 F 7 C 4 35 C C 5 G3 B7 F H 3 C B7 G C I39 7 C H7 4 H F J7 67 C H 77 C J7 A C H K 6 F C 76 C 9H7 C A G F 4 3 5 C G A7 C 4 3 5 C G7 HF 3 3 5 C 3 H7 C 3 H7 C 3 H7 JAF J 7AA C J 7A C J 7A C J 7AA HBF H H C H 7B C H C H 39 F 3 C C 7 C 3 H6F C H 6 C C H 6 ALF A9 5 7 7 C A9 L9 7 C A9 L9 7 C A9 4 39 F 3 H7 A C J7 C 3 H7 A C 47 H B7F H 3 CJ7 67 C B7 GCH 77 C I39 7CJ7 A C H7 4C...

Page 37: ... 7 8 F 9 8 A F 1 F F 9 F K F F F K A ED F F ADCE F 5L EB 6 K 2C D F 6 DL F M A F 2 2A K 7 E F 2E A F 7 E4 F 2ENA E K ED D F E F ED 2 F ED4 L5 K C A D F L5C4 F A F L C D2K E A CD F DE A2 F DE A2 F DE A2 74K 7CD 44D F 7CD 4 F 7CD 4 F 7CD 44 26K 2EC2CD F 2E 6 F 2EC F 2E 1 K ED F 1CA F ED F ED 2 K DED F 2D F DE F 2D 4OK 4 E 5 F 4 EO DC F 4 EO DC F 4 E C EK E2 A4D F C 7 E F E2 A4 F C E 2A6 K 2C DF7 E F...

Page 38: ...8 E 9 6 7 AJ32 I9 8 E8 E9 C E8 I9 9 H 0 K 0 E 0 E 0 E 0 4 K 5B E 4 E BA5 E 3L 5 D K JA B E D BL E M 0 E J J K 1 5 E J5 E 1 52 E J5N 5 K 5B B E 5 E 5B0J E 5B2 L3 K A B E L3A2 E E L A BJK 5 AB E B5 J E B5 J E B5 J 12K 1AB 22B E 1AB 2 E 1AB 2 E 1AB 22 JDK J5AJAB E J5 D E J5A E J5 0 C4K 5B E CA 4 E 5B E 5B J K B5B E JB E B5 E JB 2OK 205 3 E 205O0BA E 205O0BA E 2054A 0 5K 5J 2B E A 1 5 E 5J 2 E A 5 J D...

Page 39: ...9 F D9 E D9 D9 8 D9 H I D D D J I 7B D J D B57 D K 7A C I L5 B D C BK D M D L L I N 7 D L7 D N 76 D L7O 7 I 7B B D 7 D 7B L D 7B6 K I 5 B D K 56 D D K 5 BLI 7 5B D B7 L D B7 L D B7 L N6I N5B 66B D N5B 6 D N5B 6 D N5B 66 LCI L75L5B D L7 C D L75 D L7 8JI 7B D 85 J D 7B D 7B L I B7B D LB D B7 D LB 6GI 6 7 D 6 7G B5 D 6 7G B5 D 6 7J5 7I 7L 6B D 5 N 7 D 7L 6 D 5 7 L C I L5 BDN 7 D C BKDL7 D M DN 76 D L...

Page 40: ...XE L L HG H HL I I LNI M P M L X G ME E XE L L P M L X ME E XE L L X KX Y KX Y K X Y KGX R N QJ Y KGHR Y NJPQ Y HTSGQ_ LPGKKJ Y KKJS Y GXN Y L K LN a QI Y LQ N Y a QO Y LQUN QI QJ J Y Q I Y QJXL Y QJO ST PGNHJ Y STPO Y KGNH Y S P JL GQGNHPJ Y JQGNL Y JQGNL Y JQGNL aO aPJK OOJ Y aPJK O Y aPJK O Y aPJK OO L LQPLPJ Y LQ Y LQP Y LQGX R QJ G Y PNR Y QJ Y QJ G LI JQJ Y LJKI Y JQ Y LJKI OW OXQHT Y OXQWXJ...

Page 41: ...d ePI fFcI FbG e_ 8 EFG Gf g f bG e_ 6 G I fhFGV 8 EFG Ebg E aIff FG IG Ge_GV e d 8 EFG eF e I _ i i _cj_GV gbE 9 9 K 034 9 A H 7 O77H 7H7 AH A 9 9 7 8H A 6 7C 7H 7C 9 6 7AC ACHH 7 8 A 7 0 N9k O A 7 AH 7 77 8O9 7 1H97 AH 7 A7 HO79 7 1 7 9 7 O 99O S H 1 7 9 7H AA H 0 7l N AC 97O H7H A P 7 O87 O S7H7C TO ACH 9 7 8 A 99 7H7C AC AC 97 7 8 A 6kC9 N9HA H7 O H7H 9HA5 HO7 N9HAAH H7H 2 H 7 AH 7 A7 8 H8 O Q...

Page 42: ...O A 5 P A 50 P A 05 P A 5 AF O 7023 P A F P 7362 P 84 2H 0 O 6 3 P 0 34 P Q 570 P 0 A 7 O 02B0 P 2007 P 021 P 2G7 2B O 23 3 P 20B P 235 0 P 231 48 O A6 7 3 P 48610 P A 7 P 406 3 O 2 7 63 P 32 7 0 P 32 7 0 P 32 7 0 1O 63 0113 P 63 01 P 63 01 P 63 011 O 26 63 P 20 P 26 P 2 5 FO 23 P 67F P 23 0 P 23 BO 323 P 3 B P 32 P 3 B 1JO 152 80 0 P 152J536 0 P 152J536 0 P 152F6 A 5 2O 2 0713 P 6 02 P 2 071 P 6 ...

Page 43: ... SNJP 1H SUJI BFD 9 8f f2 f5 f 83 8 8f f5 f2 g O SJ NHT LP JT ULS SJHKMXI S 8 B7 h A V3 9g f 1 9g 9 g 9 f 2 6 f2 h 7 f5 f 5 9 9 1 f 5 9 f 5 6 6 B V3 5 8 5 8 V3 B V3 8 1 V3 B V3 8 1 9 9 9 9 f 7 7 8 7 7 8 f5 1 9 9 5 5 5 5 5 i 4 h 4 6 h 46 h 43 R i 26 h 438R h 2 1 h 8 3 G C6 i f1344 h C644 h j3 26 h f64 f2 i 76 6 h f 662 h 76 0 h f k2 i h 6 h f6 h 0 i 1328 h 106 h 4328 h 61 fi 3 3281 h 32f6 h 32f6 h ...

Page 44: ...Y L 3 414L35U SZ1 4 4 345 45 L 3 5WENXYYY 5 SSU5T4 4 3 14S35 4 L 3 5WENXYYY 4 3 5 4 5 S 31 31 3P 3R 3Q _ 1 1 4 14 1 L _ 45U 1 SL U 5 SZW 5a 24 _ V 11U 2411UW b 4 V41 V _ c45T4 V544 c453 V5 5T _ 5U U 54T 5U V4 5U3 WZ _ SU WZ 34 1 S W4 UV_ 5 S U U5 V4 U5 V4 U5 V4 c3_ c U1433U c U143 c U143 c U1433 V2_ V5 V U V542 V5 V5 0L_ 5U 0 L 5U 4 5U VT_ U5U VU1T U5 VU1T 3 _ 3 5SZ4 4 3 5 U 4 3 5 U 4 3 5L 1 5_ 5V...

Page 45: ...lay fan on K2 Clean contacts output relay motor overload K3 Clean contacts output relay burner lockout K6 Clean contacts output relay burner switched on MV Fan motor PA Air pressure switch PE Burner earth PGMin Minimum gas pressure switch PGM Maximum gas pressure switch RS Remote reset switch S1 Emergency stop button S2 Off automatic manual selector S4 Power increase power reduction selector SH3 B...

Page 46: ......

Page 47: ......

Page 48: ...Subject to modifications RIELLO S p A I 37045 Legnago VR Tel 39 0442 630111 http www riello it http www riello com ...

Reviews: