background image

29 

20151717

GB

Calibration and operation

6.3

Visualisation and programming modes

The operator panel, and especially the display visualisation, has
4 working modes:



Normal Mode



Info Mode (

InFo

)



Service Mode (

Ser

)



Parameter Mode (

PArA

)

The information for accessing and operating at the various levels
is given below.

Visualises the operation conditions and allows you to modify the
operation point of the burner manually.
It does not require any use of the keys of the operator panel.
It  allows  access  to  the  other  visualisation  and  programming
modes.
Some examples in the standard conditions are given below.

6.3.1

Operation

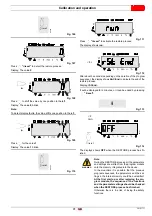
Normal display

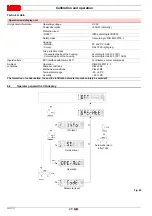
Normal display is the standard display during normal operation,
which is the higher menu level. From normal display it is possible
to pass to the Info, Service or Parameters level.
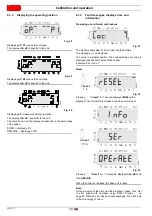
Display in standby mode.

The unit is in standby mode.

Note:
OFF flashes when the manual switching off function or the
manual control 

are active, and when the regulator is off.


Display during starting/stopping.

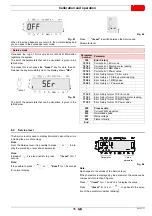
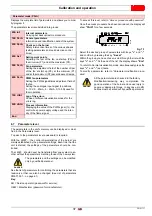
Displaying the program phases

.

The unit is in phase 30. The regulator requires heat. 
The bar is displayed under the symbols 

 and 

The individual phases of the program and the components con-
trolled are displayed according to the sequence of the program.

   Normal 

Mode

WARNING

Eventual modifications to the parameters and the
settings should be set and saved only in the unit's
internal memory.
To save the modified settings in the PME7... pro-
gram  module,  the  backup  should  be  activated
manually. Otherwise there is the risk of losing the
safety functions.

WARNING

At the first start-up or after replacing the program
module, the sequence of the functions and the pa-
rameter settings should be checked when the re-
store process ha finished. Otherwise there is the
risk of losing the safety functions.

WARNING

If the parameters need to be changed, a backup
copy must be made! Otherwise there is the risk of
losing the safety functions.

D9002

P

h

V

min s

%

Fig. 26

S9028

Fig. 27

o
o

o
o

o
o

o
o

Summary of Contents for RX 360 S/PV

Page 1: ...20151717 3 03 2019 Installation use and maintenance instructions Premix gas burner Modulating operation with pilot flame ignition CODE MODEL TYPE 20144871 RX 360 S PV 851T4 GB...

Page 2: ...Translation of the original instructions...

Page 3: ...nstallation 19 5 1 Notes on safety for the installation 19 5 2 Handling 19 5 3 Preliminary checks 19 5 4 Operating position 20 5 5 Preparing the boiler 20 5 5 1 Boring the boiler plate 20 5 5 2 Head l...

Page 4: ...ic operation 49 7 6 Combustion head 50 7 7 Burner adjustment 50 7 7 1 Indicative calibration values 50 7 7 2 Emissions 50 7 8 Switching off the burner 51 7 9 Load controller inputs 51 7 10 Final check...

Page 5: ...ording to the European Directives GAR 2016 426 EU Gas Appliances Regulation MD 2006 42 EC Machine Directive LVD 2014 35 UE Low Voltage Directive EMC 2014 30 UE Electromagnetic Compatibility The produc...

Page 6: ...ed out correctly may cause damage to the ma chine and or injury to people DANGER DANGER LIVE COMPONENTS This symbol indicates operations which if not car ried out correctly lead to electric shocks wit...

Page 7: ...vent of damage to things or injury to people if such damage injury was due to any of the following causes incorrect installation start up use and maintenance of the burner improper incorrect or unreas...

Page 8: ...intenance Only those parts envisaged by the manufacturer can be replaced 3 2 Personnel training The user is the person body or company that has acquired the machine and intends to use it for the speci...

Page 9: ...1 Instructions No 1 Spare parts list No 1 Hardware for burner assembly 8 x 50 zinc plated nuts with or without tip No 4 Zinc plated washers 8 No 4 Zinc plated toothed washers 8 No 4 M8 Zinc plated nu...

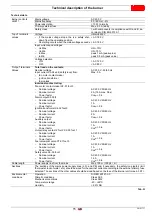
Page 10: ...s described in EN ISO 3746 4 5 Electrical data Tab C Model RX 360 S PV Output 1 Max kW Mcal h 360 310 Min kW Mcal h 60 52 Fuel Natural gas G20 G25 methane gas LPG G31 Power Supply Pressure 2 mbar 17 1...

Page 11: ...burner 4 6 Maximum dimensions The maximum dimensions of the burner and flange are shown in Fig 1 Tab D Tab E L H T TX D E P Fig 1 20151695 mm H L P T TX D E RX 360 S PV 390 675 502 635 442 144 306 mm...

Page 12: ...r boiler combination does not pose any problems if the boiler is EC type approved If however the burner is to be used with a commercial boiler that has not been EC approved and or its combustion chamb...

Page 13: ...See dotted line The burnt output corresponds to 300 kW Going vertically up the diagram to intersect the not dotted line you can estimate the value of the number of revs on the left hand y axis in thi...

Page 14: ...12 Control box 13 Programming card 14 Plug socket on ionisation probe cable 15 Gas train pilot 16 Transformer 17 Plate with four hole knock outs for electrical cable routing 18 Reset button 19 7 pin p...

Page 15: ...make sure that the en tire control box is perfectly dry Failure to do this will lead to the risk of electrocution Static charges must be avoided since they can damage the control box s electronic com...

Page 16: ...e capacitive reactance of the line reduces the magnitude of the flame signal use a separate cable Respect the permitted lengths for the cables of the detectors see Technical Data The ionisation probe...

Page 17: ...Cos 0 4 Alarm output X2 03 3 Nominal voltage Nominal current Power factor AC 230 V 50 60 Hz 1A Cos 0 6 Ignition transformer X4 02 foot 3 Nominal voltage Nominal current Power factor AC 230 V 50 60 Hz...

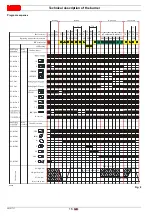
Page 18: ...3 t3n t4 Standby Startup t1 TSA 4 3 2 7 5 2 6 2 2 0 6 2 5 2 2 9 5 2 Relay contact Function outputs SK X3 04 Pin 1 X5 03 Pin 1 X5 03 Pin 3 X65 Pin 1 X5 03 Pin 2 X65 Pin 1 X3 02 Pin 1 X5 01 Pin 2 X2 02...

Page 19: ...ctuator SA NL High flame actuator SA R Feedback actuator SA Z Actuator CLOSED SA ZL Ignition load actuator SL Safety loop STB Safety limit thermostat SV Safety valve V1 Fuel valve V2 Fuel valve V2a Fu...

Page 20: ...ling time fan motor pre purging speed 30 Part 1 pre purging time without flame simulation test Part 2 pre purging time with flame simulation test 2 1 seconds 36 Stabilisation time at ignition speed 38...

Page 21: ...must be free from hazardous mixes e g chloride fluoride halo gen if present it is highly recommended to carry out cleaning and maintenance more frequently WARNING The handling operations for the burn...

Page 22: ...he burner is designed to operate only in positions 1 2 4 and 5 Fig 10 Installation 1 is preferable as it is the only one that allows the maintenance operations as described in this manual Installation...

Page 23: ...e sure the probe and electrodes are positioned cor rectly as in Fig 13 If necessary use nuts 1 Fig 14 in order to obtain the correct positions WARNING Respect the dimensions shown in Fig 13 WARNING Th...

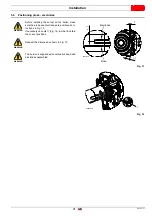
Page 24: ...tighten the nut fully home Install the gas train following the instructions on pag 24 Screw the studs 2 Fig 16 onto the boiler plate 1 Position the refractory gasket 3 Position the silicone rubber gas...

Page 25: ...s compensa tion to occur for accidental occlusion of the suction line due to a reduction in gas delivered Explosion danger due to fuel leaks in the pres ence of a flammable source Precautions avoid kn...

Page 26: ...filter P2 Downstream pressure of valve P3 Downstream pressure of pilot Tab N DANGER Disconnect the electrical power using the main switch Check that there are no gas leaks Pay attention when handling...

Page 27: ...to TL to stop the burner at least once every 24 hours Refer to the wiring diagrams The electrical safety of the device is obtained only when it is correctly connected to an efficient earthing system...

Page 28: ...side Fig 23 DANGER Turn off the burner s power supply using the main system switch S8688 Fig 20 S8689 Fig 21 WARNING After installing check all the safety conditions line leaks tightening adequateness...

Page 29: ...Access to a lower point of the modulation curve Scrolling of the parameter list Increase of value Access to a higher point of the modulation curve Scrolling of the parameter list Exit function ESC pr...

Page 30: ...y Fire protection class Transparent parts of the housing Coloured parts of the housing According to UL94 V2 PC According to UL94 V0 PC ABS Inputs outlets BCI interface with female RJ11 For Siemens bur...

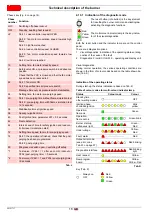
Page 31: ...e manual switching off function or the manual control are active and when the regulator is off Display during starting stopping Displaying the program phases The unit is in phase 30 The regulator requ...

Page 32: ...lt status The message is displayed The unit is in a lockout position The corresponding error code is displayed see chapter Table of blink codes Example Error code 7 Reset Pressing i reset for 1 second...

Page 33: ...vel value If the display shows _ _ together with the parameter the value can be composed of more than 5 figures When pressing i reset for 1 second and 3 seconds the value will be displayed By pressing...

Page 34: ...03 11 05 Press i reset or to return to the display of the pa rameters 6 5 2 Identification number On the left the parameter 103 is displayed blinking On the right the identification number 0 is displa...

Page 35: ...he left the parameter 164 is displayed blinking On the right the characters _ _ are displayed Example Parameter 164 _ _ Press i reset for 1 3 seconds to display the number of starts resettable Example...

Page 36: ...level When this page appears you have reached the end of the Info level The display shows End blinking Press or info to return to standby mode The display shows OPErAtE S9054 reset or ESC P V h min s...

Page 37: ...t for 8 seconds for normal display Note No changes to the values of the Service level If the characters re displayed by the parameter the value can be composed of more than 5 figures Press i reset for...

Page 38: ...0 to 100 Example 954 0 End of the Service level When this page appears you have reached the end of the Service level The display shows End blinking Press to return to standby mode The display shows O...

Page 39: ...See List of parameters PME71 901 on page 61 Key SO Service operator password for service OEM Manufacturer password for manufacturer Parameter mode PArA 000 InF Internal parameters Carrying out backup...

Page 40: ...ast character the password needs to be con firmed by pressing the i reset key Press i reset again to finish entering the password Example The password is composed of 4 characters To confirm it has bee...

Page 41: ...reset for the parameter rEStorE Display The pa rameter rEStorE blinks Press for the parameter bAC_UP Display The parameter bAC_UP blinks Press i reset for the backup process Display The value 0 Press...

Page 42: ...reset for the group of parameters 041 Display Parameter 041 blinks the display _ _ does not blink Press for the parameter 060 Display Parameter 060 blinks the index 00 and the value 0 do not blink Pr...

Page 43: ...can be ended by pressing i reset The displays shows OFF when the RESTORE process has fin ished Fig 106 S9063 reset Fig 107 S9133 Fig 108 S9134 Fig 109 S9149 Fig 110 S9063 reset WARNING Note During th...

Page 44: ...3 675 does not blink Press i reset for the modification mode Display 3 675 Press or to move the previous pre purging time by the mode one place to the left Display the pre purging time 3 675 blinks No...

Page 45: ...he air pressure signal Display Parameter 224 blinks characters _ _ do not Press i reset for the modification mode Display 48 510 Press or to change the time previously set by one posi tion to the left...

Page 46: ...s the value appears again but shifted by one position to the right Display Value 53 361 Press to return to the Parameter level Display Parameter 224 blinks characters _ _ do not P V h min s Fig 131 S9...

Page 47: ...the error 4 does not blink Press to select the index 00 error code 01 start meter reading 02 MMI phase at time of fault 03 current value at the time of the fault Example Parameter 701 index 01 start...

Page 48: ...r 701 blinks the index 01 and the diag nostic code 4 do not blink The parameters cover the period up to the first error recorded starting from the deletion of the history max to parameter 711 Example...

Page 49: ...sed on the maximum output of the boiler the minimum output desired and that of the ignition To set the points based on the desired outputs see the charts pag 11 To modify the points P0 P1 and P2 with...

Page 50: ...load and passes to the display of P0 number of rpm ignition load On the left is dis played P0 blinking on the right the current rpm keeping button A pressed the display passes to 0A and the rpm is ind...

Page 51: ...is confirmed in the internal memory From here the speeds of the low flame P1 or the high flame P2 can be changed as described above or else it is possible to end the setting process and pit the burne...

Page 52: ...uence MAX output MIN output The MAX output should be equal to the value requested by the boiler used To increase or decrease its value use the external modulation control Measure the gas delivery on t...

Page 53: ...60 NOTE For the connections see the wiring diagrams 7 10 Final checks with burner operating Tab Q WARNING Press the switch ON OFF switch to OFF posi tion during the burner post ventilation phase the...

Page 54: ...ening position indicators that are activated when the electrical supply arrives 8 2 3 Checking and cleaning Combustion The optimum calibration of the burner requires an analysis of the flue gases Sign...

Page 55: ...s do not refer to the warranty terms indicated in the delivery or payment condi tions Tab S 8 3 Opening and closing the burner WARNING This display is possible only in operating mode or in stand by LM...

Page 56: ...ation of all the adjustment components SIX MONTHLY Check of system components for detecting flame fault SIX MONTHLY Check of firing rate command SIX MONTHLY Check of piping and cabling of all the lock...

Page 57: ...nterrupted 9 Operation indications diagnostic Causes Answer Mains voltage interruption Restart Voltage below the undervoltage threshold Safety switch off Voltage above the undervoltage threshold Resta...

Page 58: ...nternal error outlet contacts other faults Loc 12 Valve test Fuel valve 1 leak Loc 13 Valve test Fuel valve 2 leak Loc 14 POC error POC error valve closure control Loc 20 Min gas pressure switch open...

Page 59: ...w light Tab W During the diagnosis of the cause of the fault the outputs of the controls are disabled The burner stays off Indication of external fault alarm on the clamp X2 03 foot 3 on fixed At the...

Page 60: ...o restart the reset process you need to reset the LME7 switching the mains ON OFF The display shows run during the download reset process of the program sequence The display shows rSt and End alternat...

Page 61: ...ownload restore process of the program sequence At the end of the reset process the unit is automatically in a lockout position LOC 138 and need to be released in order to work After 2 minutes the uni...

Page 62: ...ameters and the settings in the internal memory could be overwritten 9 4 2 Reset Tab AA NOTE For the meaning of the diagnostic codes and errors see the chapter List of error codes with operation using...

Page 63: ...ecial time Modification 0s 13 818 s 0 294 s 13 818 s SO OEM 225 Pre purging time 2 1 seconds Modification 0s 1237 s 4 851 s 29 106 s SO OEM 226 Spark pre ignition time Modification 1 029 s 37 485 s 0...

Page 64: ...put passage 3 positions 1 0 10 V 2 0 135 3 0 20 mA 4 4 20 mA with lockout at I 4 mA 5 4 20 mA Modification 0 5 1 1 SO SO 658 00 PWM fan values PWM starting Modification 1 100 1 25 SO OEM 658 01 PWM fa...

Page 65: ...up meter reading Reading only 0 999999 1 Service 702 02 Error history o1 MMI phase Reading only Service 702 03 Error history o1 Power value Reading only 0 100 1 Service 711 00 Error history former 10...

Page 66: ...to a PC shows the burner life together with operating hours type and number of lockouts no of motor rpm s and safety parameters To view diagnostics proceed as follows connect the kit supplied separat...

Page 67: ...out Index of layouts 2 Indication of references 3 Operational layout 4 Operational layout 5 Operational layout 6 Operational layout 7 Electrical wiring set by installer 8 RWF50 operational layout 1 2...

Page 68: ...20151717 63 Appendix 0 0 0 1 0 2 0 0 0 0 0 0 0 0 0 0 1 0...

Page 69: ...64 20151717 Appendix...

Page 70: ...20151717 65 Appendix 0 1 1 1 1 1 1...

Page 71: ...66 20151717 Appendix 0 0 0 1 1 2 3 435678...

Page 72: ...58 596 5 58 59 B 8 7 8 8C 9 75C 5 5 A 568 596 5 56 59 8 C 7 8 D 8 C E8 68 C 5 9 F 75 C A G8 596 5 59 8 H 9 8 9 7 8 8 6 9 6 I 6 86 4 A AAA AAA J K 2 2 2 K 2 2 2 K 2 2 L 2 K 2 2 2 K 2 2 2 K 2 2 2 K 2 2...

Page 73: ...96 9 08 2231 1 09 1 5 0 3 1 2 7 381 7792 97 3 7 3 1 2 7 3 7 7 1 7 0 3 5 5 0 3 0 1 7 7 A 1 7 09 6 0 1 7 1 0 3 7 9 0 0 7 31 B 7 1 0 7 31 B 1 3 9 0 9 0 5 5 1 0C7 70 2 7 1 6 3 6 7 7 09 7 D D E D D D E D D...

Page 74: ...or contactor relay KP Timer for pilot valve KV Timer for main valve IN ON OFF external burner switch ION Ionisation probe MV Fan motor Q2 Auxiliary switches RS Reset button external burner S1 Burner s...

Page 75: ......

Page 76: ...Subject to modifications RIELLO S p A I 37045 Legnago VR Tel 39 0442 630111 http www riello it http www riello com...

Reviews: