background image

|

13

IT

12

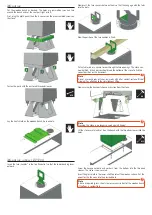
Montaggio

Appoggiare la panchina in legno. I fori sono simmetrici, potete girare la panchina 

e installarla con la parte del sedile a destra o sinistra.

Fissare per prima cosa il frontalino e poi i 4 distanziatori sulle viti premontati 

sulla stufa. 

Fissare i pezzi con le bussole filettate.

Posizionare la lamiera anticalore sulla panchina appoggiandola sui fori.

Kit montaggio E15768

Inserire i due ganci nel raccordo tubi superiore, con le lamiere inferiori verso 

la parte esterna. 

Inserire adesso in mezzo tra i due ganci i distanziatori, badendo al corretto 

inserimento nella sede prevista.

Grazie alla connessione tra di loro, la posizione dei due ganci rimane ben 

fissata.

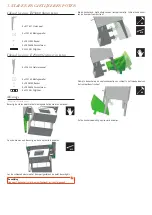
Far passare una barra di metallo oppure un travetto in legno dalle due 

aperture. Ora è possibile alzare la stufa. Si consiglia che una altra persona 

controlli bene i movimenti del lato inferiore della stufa, per poterla appoggiare 

sulla posizione corretta sui basamenti.

Attenzione

Non utilizzare barre rotonde oppure tubi, utilizzare esclusivamente barre con 

appoggio piano. Rischio di scivolamento! Fare attenzione ad alzare la barra su 

entrambi i lati nello stesso momento!

Togliere le viti di fissaggio tra struttura di trasporto e stufa. 

Attenzione

Attenzione, la stufa non è più fissata, pericolo di caduta!

Alzare la stufa con cautela sulla panchina, inserendo bene le bussole filettate 

nei fori.

Inserire le viti esagonali con la rondella dalla parte inferiore nelle bussole 

filettate. La stufa è quindi messa in sicurezza.

Appoggiare la piastra in vetro per proteggere la superficie del legno, 

inserendola nella parte inferiore della panchina a legno. Inserire il contenitore 

del set pulizia camino nel foro predisposto.

Attenzione

In caso di pavimentazioni infiammabili è necessario predisporre una base di 

appoggio (vetro, lamiera di acciaio o ceramica) davanti alla panchina.

#10

#8

#13

Summary of Contents for LOOK E15668

Page 1: ...LOOK Montageanleitung ...

Page 2: ...gkeiten sollen unbedingt in dieser gesicherten Position durchgeführt werden Hinweis Fragen Sie Ihren RIKA Fachhändler nach der RIKA Montagehilfe E15768 Es wird dringend empfohlen die Montagehilfe zu benutzen um den Ofen auf die Holzbank zu stellen Tipp Verwenden Sie die beigelegten Filzgleiter um Ihren Fußboden zu schützen 2 HOLZBANK Lieferumfang E15673 1x Z36330 Sockelblende 1x LB00688 Hitzeschut...

Page 3: ...r Ofen kann nun angehoben werden Eine weitere Person sollte die Führung am unteren Ende des Ofens übernehmen um den Ofen in der korrekten Position auf die Holzbank aufzusetzen Hinweis Verwenden Sie keine Rundstäbe oder Rohre sondern Stangen mit flacher Auflage Rutschgefahr Achten Sie auf gleichzeitiges Anheben Jetzt lösen Sie nur die Befestigungsschrauben mit denen die Transportkonstruktion am Ofe...

Page 4: ...rn und Scheiben Ziehen Sie die Muttern fest an Befestigen Sie auf diese Art alle 4 Füße mit den Einlageblechen Positionen wie unten gezeigt Unterlegscheiben und Muttern Lösen Sie die Schrauben mit denen das Transportgestell auf der Palette befestigt ist Hinweis Achtung der Ofen ist nicht mehr gesichert es besteht Kippgefahr Kippen Sie den Ofen z B mit Hilfe einer Transportkarre Sackrodel Jetzt sch...

Page 5: ...nd Druckfehler vorbehalten 2017 RIKA Innovative Ofentechnik GmbH RIKA Innovative Ofentechnik GmbH 4563 Micheldorf Austria Müllerviertel 20 Telefon 43 7582 686 41 Fax DW 43 E Mail verkauf rika at RIKA AT Z36322_Look_Montage_DE_FR_IT_EN_NL 8 05 2017 4 ...

Page 6: ...LOOK Notice de montage ...

Page 7: ...es les opérations de montage doivent impérativement être réalisées dans cette position assurée Attention Demandez le dispositif d aide au montage E15768 auprès de votre revendeur RIKA Il est vivement recommandé d utiliser le dispositif d aide au montage pour l installation du poêle sur le banc en bois Conseil Utilisez les patins en feutre pour protéger votre sol 2 BANC EN BOIS Eléments fournis E15...

Page 8: ...lors être soulevé Une autre personne doit tenir le bas du poêle afin de guider la manœuvre et assurer son installation correcte sur le banc en bois Attention N utilisez pas de barres rondes ou de tubes mais uniquement des barres à surface plane Risque de glissement Veillez à lever le poêle simultanément Desserrez ensuite les vis fixant le châssis de transport au poêle Attention Prudence le poêle n...

Page 9: ... acier Fixez un premier pied en acier avec une cale au moyen d un écrou et d une rondelle Serrez l écrou à fond Montez de cette manière les 4 pieds avec une cale positions indiquées ci dessous Desserrez les vis fixant le châssis de transport à la palette Attention Prudence le poêle n est plus fixé risque de basculement Basculez le poêle par exemple à l aide d un chariot de transport diable Dévisse...

Page 10: ... erreurs de composition et d impression 2017 RIKA Innovative Ofentechnik GmbH RIKA Innovative Ofentechnik GmbH 4563 Micheldorf Austria Müllerviertel 20 Telefon 43 7582 686 41 Fax DW 43 E Mail verkauf rika at RIKA AT Z36322_Look_Montage_DE_FR_IT_EN_NL 8 05 2017 ...

Page 11: ...LOOK Istruzioni di montaggio ...

Page 12: ...à di montaggio vanno effettuate in questa posizione di sicurezza Attenzione Chiedete al vostro rivenditore RIKA il kit montaggio E15768 Si raccomanda vivamente l utilizzo del kit montaggio per installare la stufa sulla panchina Consiglio Utilizzare i feltrini per proteggere il vostro pavimento da eventuali danni 2 PANCHINA IN LEGNO Articoli consegnati E15673 1x Z36330 Frontalino basamento 1x LB006...

Page 13: ...controlli bene i movimenti del lato inferiore della stufa per poterla appoggiare sulla posizione corretta sui basamenti Attenzione Non utilizzare barre rotonde oppure tubi utilizzare esclusivamente barre con appoggio piano Rischio di scivolamento Fare attenzione ad alzare la barra su entrambi i lati nello stesso momento Togliere le viti di fissaggio tra struttura di trasporto e stufa Attenzione At...

Page 14: ...amiera di fissaggio con i dadi e le rondelle Fissare bene i dadi Procedere nella stessa maniera tutti i 4 piedini con la lamiera di fissaggio posizione come da immagine sottostante le rondelle ed i dadi Togliere le viti di fissaggio tra struttura di trasporto e bancale Attenzione Attenzione la stufa non è più fissata pericolo di caduta Inclinare la stufa ad esempio con l aiuto di un carrello per i...

Page 15: ...i errori di stampa e composizione 2017 RIKA Innovative Ofentechnik GmbH RIKA Innovative Ofentechnik GmbH 4563 Micheldorf Austria Müllerviertel 20 Telefon 43 7582 686 41 Fax DW 43 E Mail verkauf rika at RIKA AT Z36322_Look_Montage_DE_FR_IT_EN_NL 8 05 2017 14 ...

Page 16: ...LOOK Assembly Manual ...

Page 17: ...st falling All assembly operations have to be carried out in this secured position Note It is strongly recommended to use the RIKA installation kit E15768 for installation Ask your local RIKA dealer for it Tip Use the enclosed felt gliders to protect your floor 2 WOODEN BENCH Delivered Parts E15673 1x Z36330 Plinth panel 1x LB00688 Heat shield 1x B17640 Wooden bench 1x Z36327 Glass plate 1x Z36328...

Page 18: ...penings The stove can now be lifted A third person should lead the bottom of the stove to find the correct position on the basement Note Do not use round rods or tubes only rods with a flat contact surface Risk of slipping Pay attention to the simultaneous lifting Now unscrew the transportation construction from the stove Note Warning the stove is no longer secured against tipping Lift the stove c...

Page 19: ...l casse leg Attach the steel case leg and the insert plate with the nut and washer Tighten the nut firmly Attach all 4 legs in this way with the insert plates positions as shown below washers and nuts Loosen the screws which are holding the transport frame to the pallet Note Warning the stove is no longer secured against tipping Tilt the stove for example with a transport trolley Now unscrew one s...

Page 20: ...g and printing errors reserved 2017 RIKA Innovative Ofentechnik GmbH RIKA Innovative Ofentechnik GmbH 4563 Micheldorf Austria Müllerviertel 20 Telefon 43 7582 686 41 Fax DW 43 E Mail verkauf rika at RIKA AT Z36322_Look_Montage_DE_FR_IT_EN_NL 8 05 2017 ...

Page 21: ...LOOK Montagehandleiding ...

Page 22: ... worden terwijl de kachel op de transportbevestiging staat Aanwijzing Vraag uw RIKA vakhandelaar naar de montagehulp E15768 Om de kachel op de houten zitbank te plaatsen heeft u deze montagehulp nodig Tipp Maak gebruik van de viltglijders om uw vloer te beschermen tegen beschadiging 2 HOUTEN ZITBANK Inhoud levering E15673 1x Z36330 Sokkelplaat 1x LB00688 Hittebeschermingsplaat 1x B17640 Houten zit...

Page 23: ... balk of houten balk door de openingen van de handvaten De kachel kan nu omhoog getakeld worden Een derde persoon begeleidt de kachel zodat die meteen op de juiste positie geplaatst wordt Aanwijzing Gebruik geen ronde buizen maar vlakke vormen Gevaar van schuiven Verdeel de hefpunten zodat u de kachel gelijkmatig omhoog heft Los nu de bevestigingsschroeven waarmee de transportconstructie aan de ka...

Page 24: ...stalen poten Bevestig de stalen poot met het montageprofiel de moer en de rondel Span de moeren aan Bevestig op deze wijze alle 4 de poten Los de schroeven waarmee het transportgestel aan de palet bevestigd is Aanwijzing Opgepast de kachel is niet meer vastgemaakt er is kantelgevaar Kip de kachel bvb met behulp van een transportkarretje Schroef nu één kant van de transportconstructie af Nu kipt u ...

Page 25: ... 25 NL 24 ...

Page 26: ...Ihre Notizen Pour vos notes personelles Foglio d appunti Your notes Uw aantekeningen ...

Page 27: ... 27 NL 26 Ihre Notizen Pour vos notes personelles Foglio d appunti Your notes Uw aantekeningen ...

Page 28: ...g of drukfouten voorbehouden 2017 RIKA Innovative Ofentechnik GmbH RIKA Innovative Ofentechnik GmbH 4563 Micheldorf Austria Müllerviertel 20 Telefon 43 7582 686 41 Fax DW 43 E Mail verkauf rika at RIKA AT Z36322_Look_Montage_DE_FR_IT_EN_NL 8 05 2017 ...

Reviews: