background image

7 Maintenance


7-2. Regular maintenance mode 


- 34 - 

SD-2600 

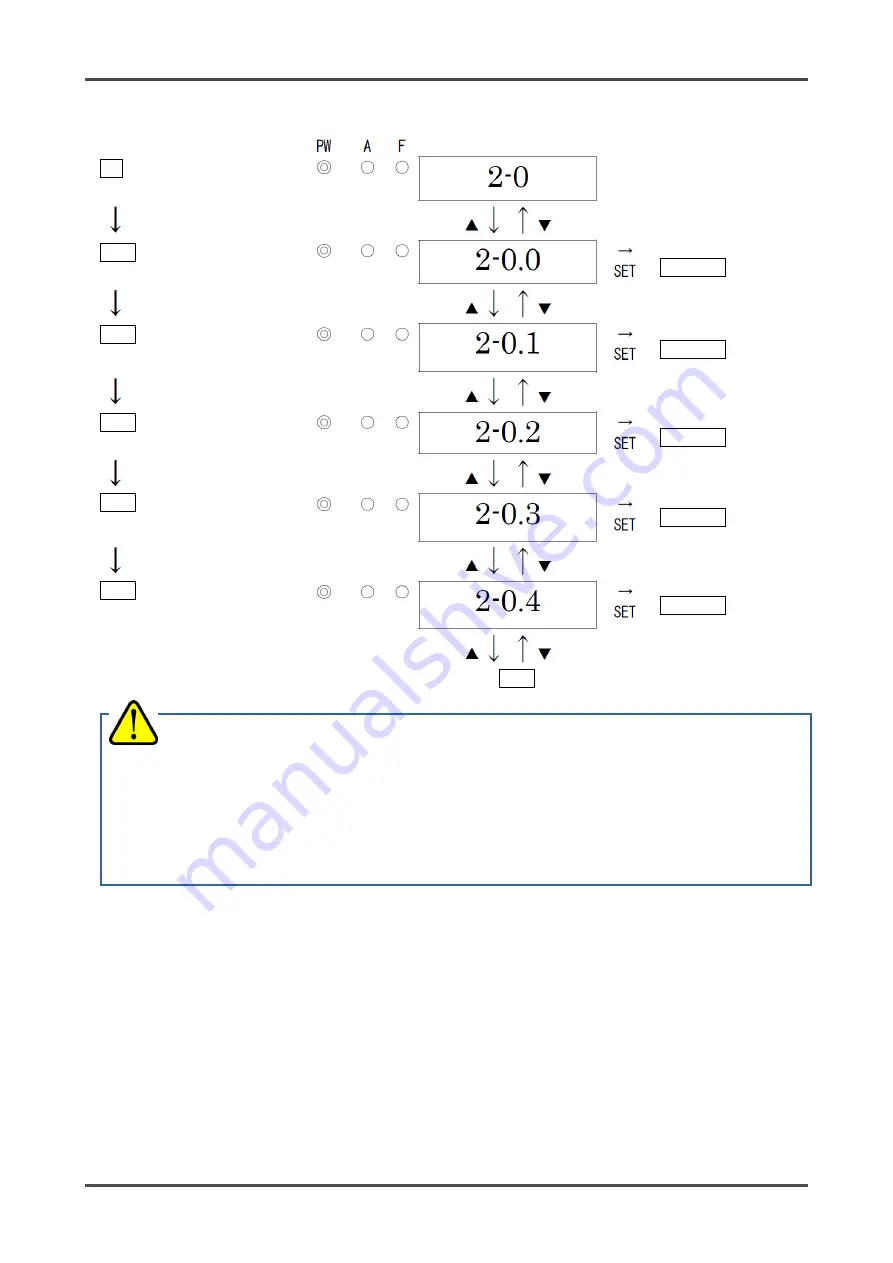
<Alarm Test Mode "2-0"> 


2-0   

Press the SET key. 

Gas Test 

  => P35   

2-0.0 Gas Test 

Alarm Test 

  => P35   

2-0.1 Alarm Test 

Fault Test 

  => P36   

2-0.2 Fault Test 

LED Test 

  => P36   

2-0.3 LED Test 

Memory Test 

  => P37   

2-0.4 Memory Test 

To 2-0.0 


 WARNING 

  Before starting the alarm test (transmission test), provide a notification to the related sections so that 

they can prepare for false abnormalities (external output signals and alarm contact). After the test is 
completed, never fail to press MENU/ESC key to return to the detection mode. (If the gas monitor 
remains in the alarm test mode, it automatically returns to the detection mode in ten hours.) 

  In the alarm test mode, the gas concentration equal to the reading is output even in the maintenance 

mode depending on the setting. Take actions, if necessary, so that the signal receiver side can 
prepare to avoid false alarms. 

LED 

Summary of Contents for SD-2600

Page 1: ...0 PT2E 1639 Furnace Gas Monitor SD 2600 Operating Manual PT2E 163 PT2 163...

Page 2: ...ct output of the gas monitor must be used for an external alarm lamp buzzer while the analog signal output must be used for an indicator or external recorder If these outputs are used to control other...

Page 3: ...15 5 How to Operate 20 5 1 Preparation for start up 20 5 2 Basic operating procedures 20 5 3 How to start the gas monitor 21 5 4 Modes 22 5 5 User mode 23 5 6 How to exit 25 6 Operations and Functions...

Page 4: ...itor is a safety unit not an analyzer or densitometer which performs quantitative qualitative analysis measurement for gases Please fully understand the features of the gas monitor before using it so...

Page 5: ...has some specification depends on standard and explosion proof certificate Please confirm the detector specification before using Please refer Declaration of Conformity that is at the end of this man...

Page 6: ...2J possibility of mechanical damage Do not repair the explosion proof joint surface 2 Important Notices on Safety 2 1 Danger cases 2 2 Warning cases WARNING Power supply Before turning on the gas moni...

Page 7: ...with the operating manual Avoid applying organic solvents and others to the window plate for a long time The window plate material is a polycarbonate resin When organic solvents liquid or highly conc...

Page 8: ...the gas alarm or the fail alarm Technical Data Protection Method Flameproof enclosure d Certificate Numbers IECEx DEK 11 0040X DEKRA 11ATEX0095 X Group II Category 2G Type of Protection and Marking c...

Page 9: ...ncluding a cable gland Standard Accessories Operating manual Dedicated handling lever used for the wiring Dedicated control key Flange gasket Exhaust air direction nameplate CAUTION Use the supplied d...

Page 10: ...alue UP 4 key Used to switch menus or change a value DOWN 5 Power lamp Power lamp Detection mode It lights up in green Maintenance mode It blinks in green 6 Alarm lamp Alarm lamp It lights up in red w...

Page 11: ...NPUT 24 VDC Power supply part Gas alarm contact ALARM Contact activation De energized De energized at a normal environment ON ALARM Closed contact at an alarm time Alarm contact controller Display POW...

Page 12: ...tures that meet the following requirements ATEX IECEx Specifications Main unit case part The detector head must be installed in a stable place where the operating temperature is 0 to 50 C and do not c...

Page 13: ...the gas monitor may be activated when the power is turned on when momentary blackout occurs or when the system is being stabilized In such cases use a UPS or take appropriate actions on the receiving...

Page 14: ...opriate measures must be taken to stabilize the operation of the gas monitor and protect the alarm contact referring to the following information Relay it with an external relay at a lower voltage of...

Page 15: ...4 How to Use 4 3 Precautions for system designing 13 SD 2600 SD 2600...

Page 16: ...hits the windscreen where it is installed Securely fix the windscreen with bolts for fixing it After the gas detector head is installed affix the supplied exhaust air direction nameplate on the surfac...

Page 17: ...3 0 13 5 14 13 8 TIIS Specifications Cable overall outer diameter mm Rubber seal inner diameter mm Washer inner diameter mm From 9 6 to less than 11 0 11 12 From 11 0 to less than 11 5 12 12 From 11 5...

Page 18: ...tact 4 Contact 5 Specifications of Terminal Plate Specifications of terminal plate Rated voltage 250 VAC Rated current 12 A However it depends on cables to be used Connection conditions Cables 0 08 2...

Page 19: ...WAGO How to Connect to Terminal Plate When cables are connected to the connectors use the dedicated lever or a flathead screwdriver to do it as shown below NOTE How to Use the Dedicated Handling Leve...

Page 20: ...able The way to attach the external cable is different from specifications Attach the external cable appropriately referring to the following information ATEX IECEx Specifications Attach the parts in...

Page 21: ...turning on the gas monitor do not forget to connect it to a grounding terminal For stable operation of the gas monitor and safety it must be connected to a grounding terminal Do not connect the ground...

Page 22: ...gas monitor to a grounding circuit Check that the wiring is connected to external device properly Check that the power supply voltage is compliant with the specifications Because the external contact...

Page 23: ...ection mode swiftly NOTE Start up Operation Procedures approximately 25 seconds for system check of the gas monitor and alarm deactivation Power on Initial clear approximately 25 seconds Detection mod...

Page 24: ...2 3 Initialize zero span values Environmental Setting 2 4 Used for various environmental settings 2 4 0 Sensor Power Supply ON OFF 2 4 1 INHIBIT Setting 2 4 2 Alarm Setpoint Setting 2 4 3 Alarm Delay...

Page 25: ...the detection mode in ten hours Detection Mode Press the MENU ESC key for three seconds Zero Adjustment P24 User Mode 1 0 ROM SUM Display Display the program version and others This is not typically...

Page 26: ...is is used to perform the zero adjustment NOTE If the zero calibration failed since the zero point was significantly fluctuated from around zero it returns to 1 1 after FAIL rather than PASS is displa...

Page 27: ...he fault alarm A or F The contact is activated due to the gas alarm or the fault alarm WARNING When the gas monitor is turned off an alarm may be activated on the upper central system Before turning o...

Page 28: ...ncentration Display In case of over the detection range Over Scale is displayed on the LED Power Indicator Lamp POWER Green During operation this lights up continuously Alarm Indicator Lamp ALM Red It...

Page 29: ...then check that the gas concentration reading dropped Access the gas leak point equipped with a protective gear to avoid dangers caused by possibly remaining gases and check whether gases remain or no...

Page 30: ...4 20 mA concentration output Output OFF setting 4 mA 6 Fault Alarm 0 5 mA Fixed 7 INHIBIT Depending on the setting of the section 4 2 5 mA setting 2 5 mA 4 mA HOLD 4 20 mA setting 4 mA 8 Power Off 0...

Page 31: ...ro that have no meaning for your management rules of gas alarm This function is used to hide suppress the fluctuation of the reading under the setting value indicating zero NOTE In the maintenance mod...

Page 32: ...value is zero When the reading is incorrect perform the zero adjustment AIR adjustment after ensuring that no other gases exist around it Alarm Test Check the alarm circuit by using the alarm test fun...

Page 33: ...m Test Inspects the alarm circuit by using the alarm test function Checks the alarm lamps Checks each activation of ALM1 and ALM2 Checks the external alarm Checks the activation of the external alarm...

Page 34: ...4 Alarm Pattern Setting 2 4 5 Zero Suppression Pattern Setting 2 4 6 Zero Suppression Value Setting 2 4 7 Alarm Contact Specification Setting 2 4 8 Energized De energized Contact Setting 2 4 9 Mainte...

Page 35: ...0 2 3 Zero Span Initialization Initialize the zero span adjustment after the sensor is replaced 2 4 Environmental Setting Set various operations and functions Environmental Setting P38 2 4 0 and 2 4 3...

Page 36: ...the related sections so that they can prepare for false abnormalities external output signals and alarm contact After the test is completed never fail to press MENU ESC key to return to the detection...

Page 37: ...as test even in the maintenance mode depending on setting be careful to perform the test WARNING Because the contact and gas concentration output can be activated by an alarm test even in the maintena...

Page 38: ...to go back to the original state WARNING Because the contact and gas concentration output can be activated by a fault alarm test even in the maintenance mode depending on setting be careful to perfor...

Page 39: ...he RAM fault and F RO is displayed for the ROM fault For both the RAM fault and ROM fault F RA and F RO are displayed alternately 2 0 4 Press the SET key When StA is displayed press the SET key again...

Page 40: ...SET key to confirm the selection When ON is selected in the detection mode InHI and 0 0 gas concentration value are displayed on the LED alternately As a result an alarm is not triggered to external d...

Page 41: ...returns to 2 1 after FAIL rather than PASS is displayed In this case the zero adjustment has not been completed Flow meter Gas calibration adapter SD 2600 gas monitor IN OUT Gas sampling bag Needle v...

Page 42: ...r turning off the power supply please contact our overseas sales department or local representatives After the span adjustment is completed perform the zero adjustment at the operating temperature of...

Page 43: ...artment or local representatives Replacement of Regular Replacement Parts List of recommended regular replacement parts No Item Maintenance intervals Replacement intervals year Quantity pieces unit 1...

Page 44: ...monitor or use it again When the gas monitor is relocated select a new place in accordance with 4 2 Precautions for installation points and 4 4 How to install For information on wiring see 4 5 How to...

Page 45: ...ly system Provide the rated voltage Check the UPS power supply line filter and insulation transformer and then take additional measures Cable abnormalities open circuit not connected short circuit Che...

Page 46: ...espite of no gas leak and no other abnormalities at the detection point Disturbance by noise Turn off and restart the gas monitor If such a symptom is observed frequently take appropriate measures to...

Page 47: ...han alarm preset point Gas alarm type Single alarm H Gas alarm indication ALM lamp lighting red Gas alarm action Auto recover Trouble alarm Self diagnosis System failure Sensor failure Trouble alarm i...

Page 48: ...rapidly vary Case 20 60 non rapidly vary Structure Direct insert type Explosion proof structure Flame proof structure Explosion proof grade 2G Ex db C T2 Gb ATEX IECEx DEKRA Outer dimension Approx 148...

Page 49: ...ighting yellow content display Trouble alarm action Auto recover Alarm contact No voltage contact 1a or 1b Non exciting at normal exciting at alarm or exciting at normal non exciting at alarm Contact...

Page 50: ...ist of accessories Operating manual 1sheet Dedicated handling lever 1pce Dedicated control key Depends on ordered quantity of the unit 1 10 units 1 pce 11 20 units 2 pcs 21 50 units 3 pcs 51 units and...

Page 51: ...n a combustible gas comes into contact with the surface of the detecting element with oxidation catalyst sintered on it the gas burns causing the temperature to rise In accordance with this temperatur...

Page 52: ...a function to prevent triggering alarm during that time Full scale Maximum value of the detection range LEL A unit which the lower explosive limit LEL of the combustible gas to be detected is set to...

Page 53: ...51 SD 2500...

Reviews: