background image

In the event of a malfunction or breakdown, grounding provides a path of least resistance for electric 

current to reduce the risk of electric shock. This tool is equipped with an electric cord having an 

equipment-grounding conductor and a grounding plug. The plug must be plugged into a matching 

outlet that is properly installed and grounded in accordance with all local codes and ordinances.

Do not modify the plug provided. If it will not fit the outlet, have the proper outlet installed by a 

qualified electrician.

Improper connection of the equipment-grounding conductor can result in a risk of electric shock. The 

conductor, with insulation having an outer surface that is green with or without yellow stripes, is the 

equipment-grounding conductor. If repair or replacement of the electric cord or plug is necessary, do 

not connect the equipment-grounding conductor to a live terminal.

Check with a qualified electrician or service personnel if the grounding instructions are not completely 

understood, or if in doubt as to whether the tool is properly grounded.

Use only three wire extension cords that have three-prong grounding plugs and three-pole 

receptacles that accept the tool’s plug.*

Repair or replace a damaged or worn cord immediately.

This tool is intended for use on a circuit that has an outlet that looks the one illustrated in Figure 

A below. The tool has a grounding plug that looks like the grounding plug as illustrated in Figure A 

below. A temporary adapter, which locks like the adapter as illustrated in Figure B below, may be 

used to connect this plug to a two-pole receptacle, as shown in Figure B if a properly grounded outlet 

is not available.** The temporary adapter should only be used until a properly grounded outlet can 

be installed by a qualified electrician. The green colored rigid ear or tab, extending from the adapter, 

must be connected to a permanent ground such as a properly grounded outlet box.

* Canadian electrical codes require extension cords to be certified SJT type or better.

** Use of an adapter in Canada is not acceptable.

Electrical Requirements

9

Summary of Contents for 50-110

Page 1: ...or more information www rikontools com or info rikontools com For Parts or Questions techsupport rikontools com or 877 884 5167 Record the serial number and date of purchase in your manual for future...

Page 2: ...PAREL Never wear loose clothing or jewelry that might get caught in moving parts Rubber soled footwear is recommended for the best footing ALWAYS USE SAFETY GLASSES AND WEAR HEARING PROTECTION Also us...

Page 3: ...eyewear prior to operating this machine 7 Do not operate this machine if you are under the influence of drugs and or alcohol 8 Remove all jewelry prior to operating this machine 9 Do not wear any glov...

Page 4: ...cking check to make sure the following parts are included If any parts are missing or broken please call RIKON Power Tools at the number on the cover of this manual as soon as possible Item Descriptio...

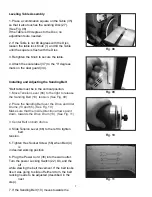
Page 5: ...ugh the workbench 4 Align sander base over holes and secure using two 5 16 inch screws or larger and hex nuts See Fig 01 Mounting Sanding Disc and Guard 1 Locate sanding disc 27 and peel backing off d...

Page 6: ...upport to Table Do not over tighten screws 4 Position Table Support 36 in corresponding holes on side of base See Fig 04 5 Place Washer 8 on Knob 1 shaft and insert through slot into threaded holes in...

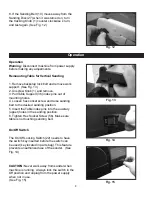
Page 7: ...Tension Lever 66 to the right to release the Sanding Belt 10 tension See Fig 09 2 Place the Sanding Belt over the Drive and Idler Drums 13 and 65 See Fig 10 Make sure that the inside direction arrows...

Page 8: ...of mounting holes 4 Loosen hex socket screw and raise sanding bed to the desired sanding position 5 Insert the Table index pins into the auxiliary upper holes in the sanding position 6 Tighten Hex So...

Page 9: ...if the grounding instructions are not completely understood or if in doubt as to whether the tool is properly grounded Use only three wire extension cords that have three prong grounding plugs and thr...

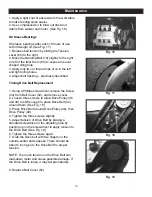
Page 10: ...a Phillips screwdriver remove the Screw 44 from Belt Cover 52 and remove cover 2 Loosen three screws to allow Drive Pulley 46 and 49 to shift enough to place Drive Belt 42 around them See Fig 18 3 Pl...

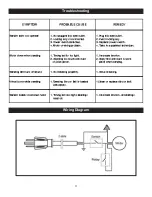
Page 11: ...11 Troubleshooting Wiring Diagram...

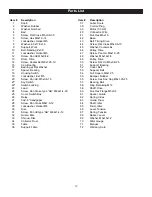
Page 12: ...M6x1 0 12 Lockwasher Helical M6 Disc Screw Pan Hd type AB M4 2x1 4 12 Guard Disc Shroud Disc Collector Dust Table Support Table Item 37 38 39 40 41 42 43 44 45 46 47 48 49 50 51 52 53 54 55 56 57 58 5...

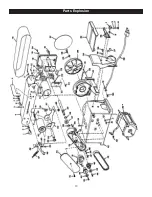
Page 13: ...13 Parts Explosion...

Page 14: ...14 Notes...

Page 15: ...cial industrial or educational purposes This limited warranty does not apply to accessory items such as blades drill bits sanding discs or belts and other related items Seller shall in no event be lia...

Page 16: ...For more information 16 Progress Rd Billerica MA 01821 877 884 5167 978 528 5380...

Reviews: