10
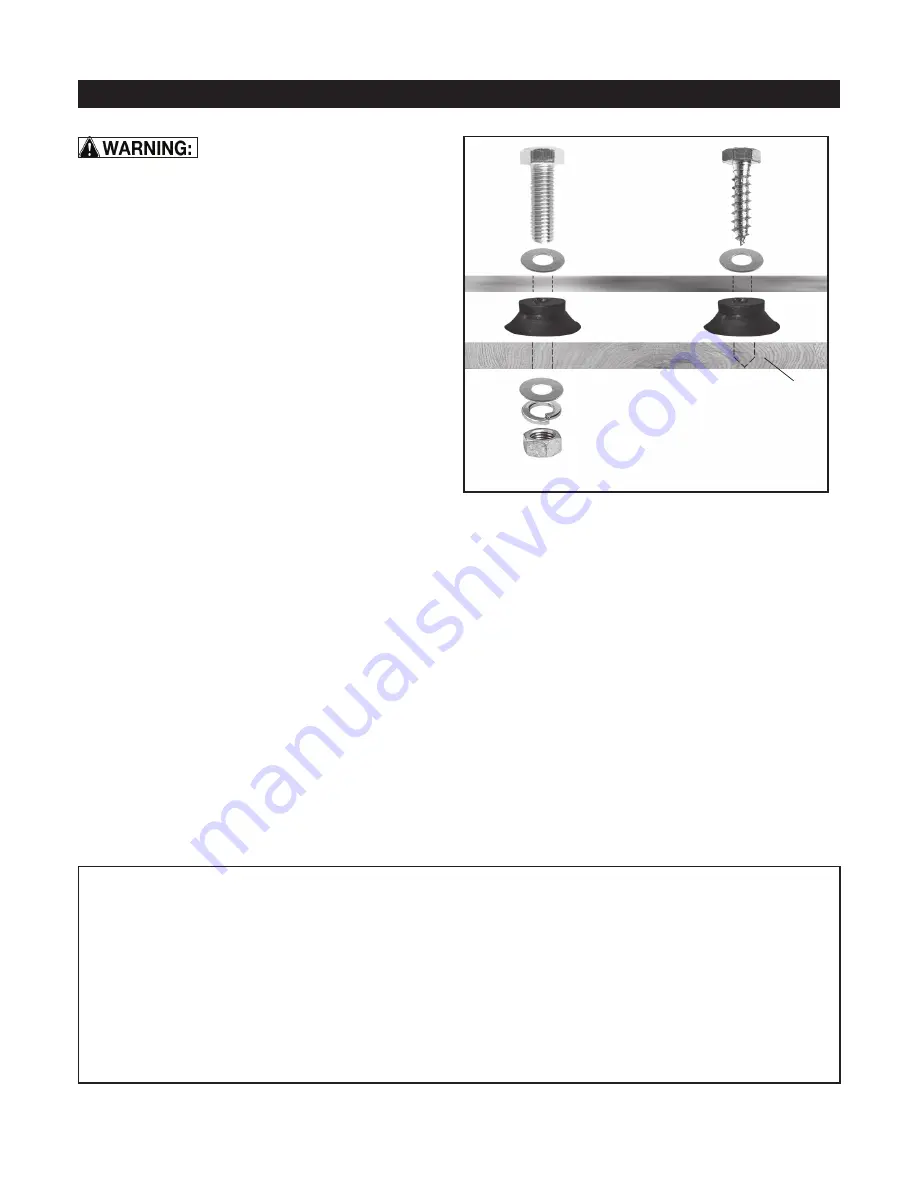
FIG. 15
ASSEMBLY
California Proposition 65 Warning
WARNING:
Some dust created by power sanding, sawing, grinding, drilling, and other
construction activities contains chemicals known to the State of California to cause cancer
and birth defects or other reproductive harm.Your risk from exposure to these chemicals
varies, depending on how often you do this type of work. To reduce your exposure, work in a
well-ventilated area and with approved safety equipment, such as dust masks that are
specially designed to filter out microscopic particles.
For more detailed information about California Propostion 65 log onto rikontools.com.
Lag Bolt
Machine Bolt
Washer
Rubber Foot
Washer
Lock Washer
Nut
Pilot Hole for
Lag Bolt
Workbench
MOUNTING THE SANDER
TO A WORKBENCH OR STAND
CAUTION:
If during operation there is any
tendency for the sander to tip over, slide or walk
on the supporting surface, the sander should be
properly mounted to a workbench or stand.
1. Rubber feet are fastened to this sander prior
to shipping. They may, or may not, be used when
attaching the sander to a bench or stand.
2. Position the sander on the workbench.
3. There are two options for mounting the sander
to the workbench:
- Use the two extra holes in the base (located by
the front right foot, and rear left foot when looking
at the sanding belt table);
- Use the four holes that are securing the
rubber feet. The bolts will have to be removed
and replaced with other fasteners to go through
the sander’s base and feet. See Figure 15 for
illustrations of each method.
4. Mark the workbench through the selected
mounting holes located in the sander’s base, per
above.
5. Drill holes in the workbench at the marks.
6. Using long bolts, washers, lock-washers and
nuts; or lag bolts; (fasteners not supplied), secure
the sander to the workbench. FIG. 15.
Always ensure the sander is
unplugged prior to attempting any assembly,
installation or changing of parts and accessories.
TEST RUNNING THE SANDER
With the sander fully assembled and checked
to make sure that all parts and fasteners are
secure, test run the sander to confirm that it
runs smoothly. If any adjustments are needed,
these must be done with the machine turned off
and unplugged for safety.
If you have any questions regarding assembly
before operating the sander, contact RIKON
Tech Support at 877-884-5167 for assistance.


